INSTALLATIEVOORSCHRIFT
inbouwframe
met magnetron-oven
Algemeen
Plaatselijk geldende voorschriften dienen altijd in acht genomen te
worden.
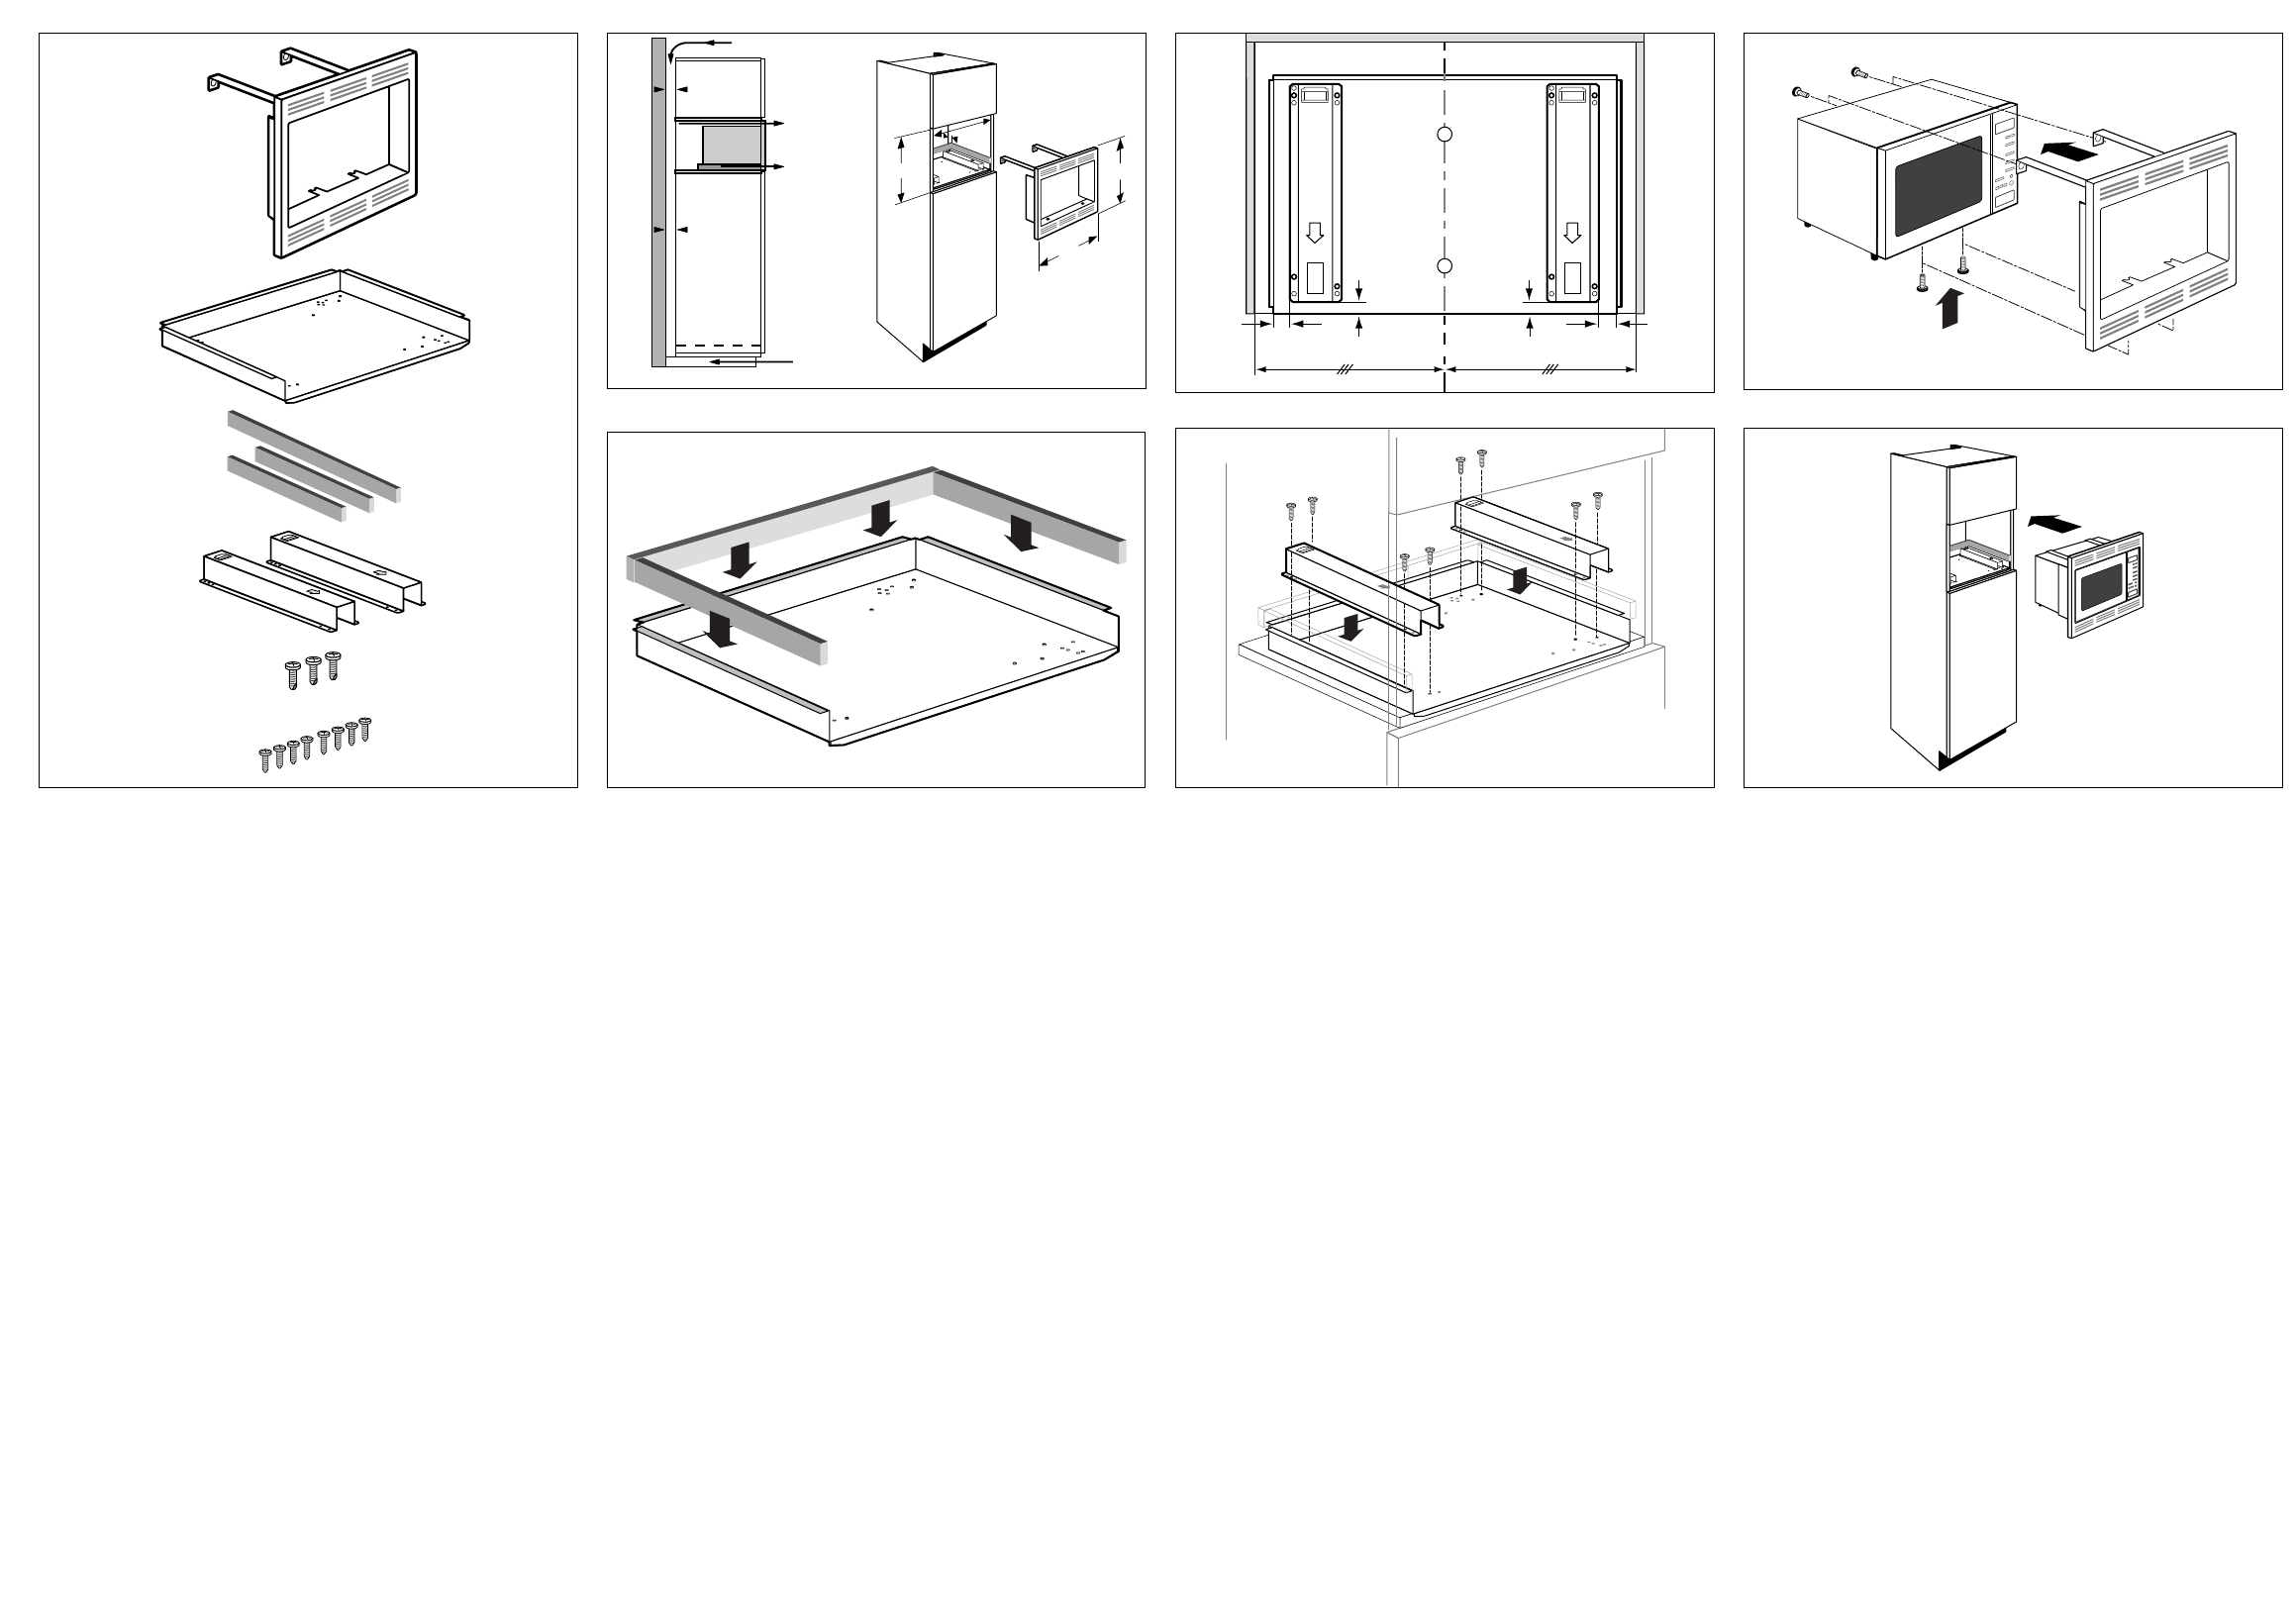
Inbouwmaten
Voldoende luchttoevoer is absoluut noodzakelijk. De keukenkast dient
daarom voorzien te zijn van een ventilatiekanaal (X), zoals te zien is op
de afbeelding. De lucht wordt afgevoerd via de openingen die zich in
het inbouwframe bevinden.
Om het correct inbouwen van de oven mogelijk te maken, moet de
keukenkast waterpas staan en recht zijn.
Installatie
1. Teken het midden van de kast af.
2. Plak de schuimstrips (C) aan de bovenzijde op de
bodemplaat (B, fig. 3).
3. Positioneer de bodemplaat in het midden van de kast. Hulpmiddel
zijn de twee gaten (fig. 4).
4. Positioneer de steunen parallel aan de bodemplaat, zoals
aangegeven in fig. 4. Let daarbij op de centreringsnokken.
5. Bevestig de bodemplaat samen met de steunen (D). Gebruik hierbij
alle acht schroeven (F). De pijlen op de steunen wijzen naar de
voorzijde (fig. 5).
6. Verwijder schroef (G) aan de achterzijde van de magnetron (fig. 6).
7. Schuif het frame (A) voorzichtig – om schade te voorkomen – over
de voorzijde van de magnetron (fig. 6).
8. Bevestig het frame met behulp van de beugels aan de achterzijde
en zet het aan de onderzijde met twee schroeven (E) vast (fig. 6).
9. Schuif de oven gedeeltelijk in de kast (fig. 7). Leid de aansluitkabel
van de oven naar de plaats waar het aansluitpunt zit.
10. Schuif de oven helemaal in de kast en maak de elektrische
aansluiting.
INSTALLATION INSTRUCTIONS
fascia frame
with microwave oven
General
National regulations must always be observed.
Installation dimensions
An adequate air supply is absolutely necessary. The kitchen cabinet
must therefore have a ventilation channel (X), as shown in the
diagram. The air is vented through the openings in the fascia frame.
To ensure the oven is built in correctly, the kitchen unit must be level
and straight.
Installation
1. Mark the middle of the cupboard.
2. Attach the foam strips (C) to the top of the bottom plate (B, fig. 3).
3. Position the bottom plate in the middle of the cupboard. The two
holes (fig. 4) act as an aid.
4. Position the supports parallel to the bottom plate, as shown in
fig. 4. Pay attention to the centring bosses.
5. Fasten the bottom plate and the supports (D). Use all eight screws
for this (F). The arrows on the supports point to the front (fig. 5).
6. Remove the screw (G) at the rear of the microwave oven (fig. 6).
7. Slide the frame (A) carefully – in order to prevent damage – over
the front of the microwave oven (fig. 6).
8. Fasten the frame using the brackets at the rear and fix it on the
underside with two screws (E) (fig. 6).
9. Slide the oven partly into the cupboard (fig. 7). Lead the connection
cable from the oven to where the power point is.
10. Slide the oven fully into the cupboard and make the electrical
connection.
INSTRUCTIONS D’INSTALLATION
cadre encastre
avec four à micro-ondes
Generalites
Il convient toujours d’observer les prescriptions locales.
Dimensions de l’encastrement
Une alimentation suffisante en air est absolutement nécessaire. Aussi
l’armoire de cuisine doit-elle présenter un canal d’aération (X), comme
illustré sur le croquis. La décharge d’air s’effectue par les ouvertures
dans l’encastrement.
Pour un montage correct du four dans l’armoire, celle-ci doit être de
niveau et à angles droits.
Mise en place
1. Marquez le milieu du placard.
2. Collez les bandes de mousse (C) sur la partie supérieure de la
plaque de fond (B, fig. 3).
3. Positionnez la plaque du fond au milieu du placard. Les deux trous
sont des repères (fig. 4).
4. Positionnez les supports parallèlement à la plaque du fond comme
l’indique la fig. 4. Respectez les entailles de centrage.
5. Fixez la plaque du fond avec les supports (D). Utilisez les 8 vis (F).
Les flèches qui figurent sur les supports indiquent le devant (fig.5).
6. Retirez la vis (G) à l’arrière du micro-ondes (fig.6).
7. Introduisez avec précaution – pour éviter tout dommage - le cadre
(A) par l’avant du micro-ondes (fig.6).
8. Fixez le cadre avec les colliers à l’arrière et avec deux vis au fond
(E) (fig.6).
9. Placez le four partiellement dans le placard (fig.7). Guidez le câble
de raccordement du four au point de branchement.
10. Placez le four entièrement dans le placard et effectuez le
branchement électrique.
EINBAUVORSCHRIFTEN
Einbaurahmen
mit Mikrowellenherd
Allgemeines
Die nationalen Vorschriften müssen immer beachtet werden.
Einbaumasse
Eine ausreichende Luftzufuhr ist absolut notwendig. Der Küchenschrank
muß daher einen Belüftungsschacht (X), wie in der Abbildung gezeigt,
haben. Der Luftabzug erfolgt über die Öffnungen im Einbaurahmen.
Damit der Küchenschrank korrekt eingebaut werden kan, muß der
Küchenschrank eben und rechteckig sein.
Einbau
1. Markieren Sie die Mitte des Schrankes.
2. Kleben Sie die Schaumstreifen (C) auf die Oberseite der Bodenplatte
(B, Abb. 3).
3. Bringen Sie die Bodenplatte in der Schrankmitte an. Hilfsmittel sind
die beiden Löcher (Abb. 4).
4. Bringen Sie die Träger parallel zur Bodenplatte an, wie in Abb. 4
angegeben. Achten Sie dabei auf die Zentriernocken.
5. Befestigen Sie die Bodenplatte zusammen mit den Trägern (D).
Benutzen Sie hierzu alle acht Schrauben (F). Die Pfeile auf den
Trägern weisen zur Vorderseite (Abb,. 5) hin.
6. Entfernen Sie Schraube (G) an der Rückseite des Mikrowellengerätes
(Abb. 6).
7. Zur Vermeidung von Beschädigungen den Rahmen (A) vorsichtig
über die Vorderseite des Mikrowellengerätes schieben (Abb. 6).
8. Befestigen Sie den Rahmen mit Hilfe der Bügel an der Rückseite und
mit zwei Schrauben (E) an der Unterseite (Abb. 6).
9. Schieben Sie das Gerät teilweise in den Schrank (Abb. 7). Führen Sie
das Anschlusskabel des Backofens zur Anschlussstelle.
10. Schieben Sie den Backofen ganz in den Schrank und sorgen Sie für
den elektrischen Anschluss.