Discs
Basic play
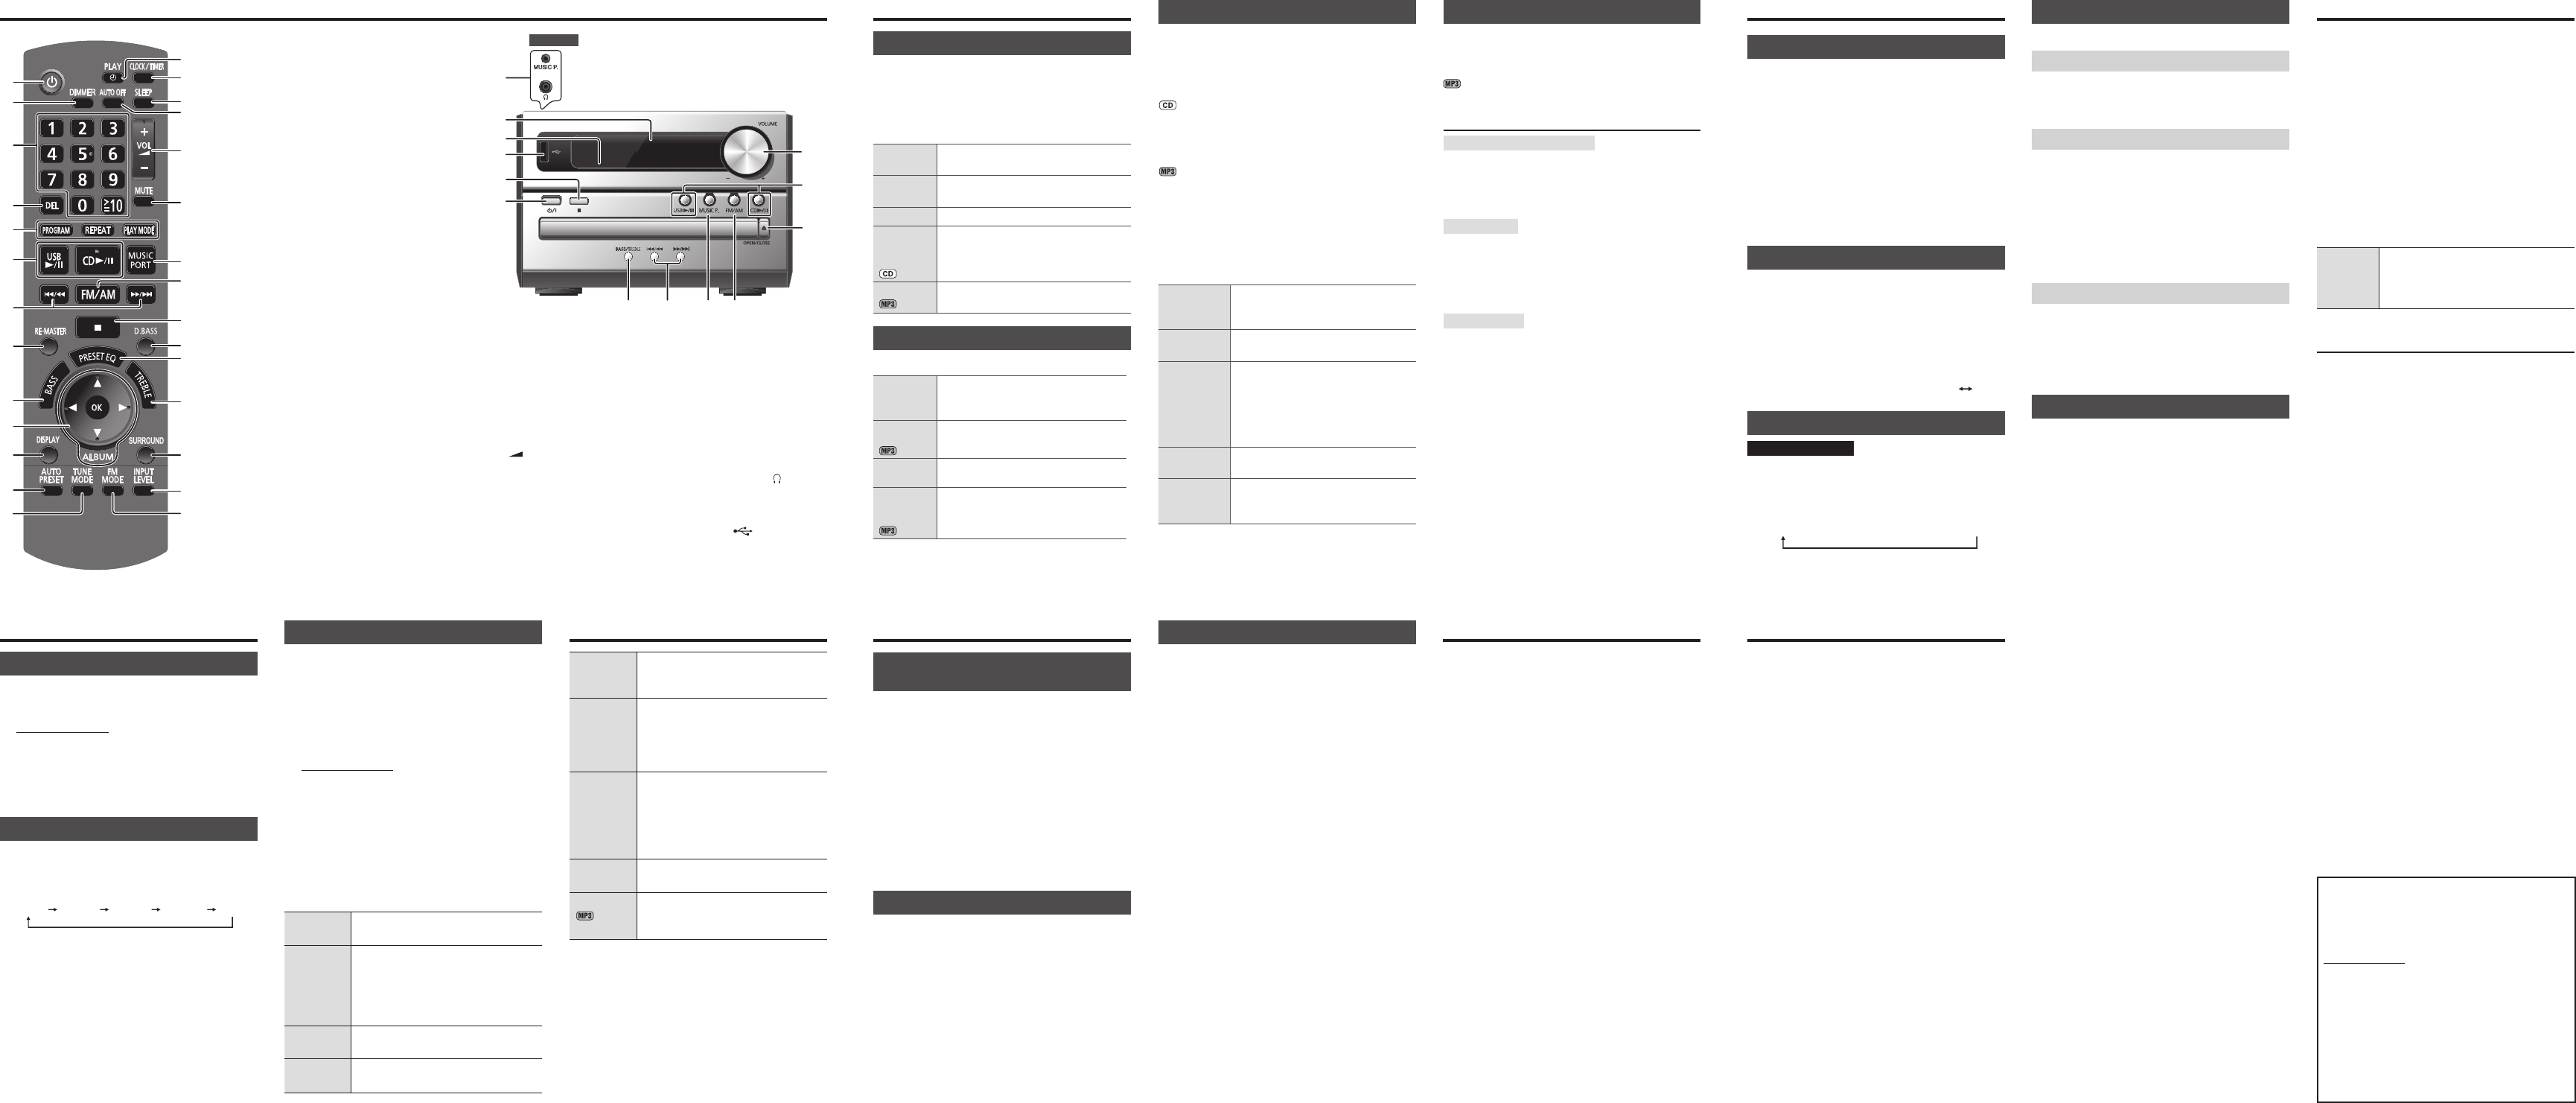
1 Press [x, OPEN/CLOSE] on the main unit to
open the tray.
The unit turns on, load a disc with the label facing up.
Press [x, OPEN/CLOSE] again to close the tray.
2 Press [4/9, CD] to start play.
Stop
playback
Press [8 ].
Pause play
Press [4/9, CD]. Press again to resume
play.
Skip tracks
Press [2/3] or [5/6].
Search
through
tracks
Press and hold [2/3] or [5/6]
during play or pause.
Skip album
Press [R/T].
Play Mode function
Press [PLAY MODE] to select the desired mode.
1-TRACK
1TR
Play one selected track on the disc.
Press the numeric buttons to select
the track.
1-ALBUM
1ALBUM
Play one selected album on the disc.
Press [R/T] to select the album.
RANDOM
RND
Play a disc randomly.
1-ALBUM
RANDOM
1ALBUM RND
Play all tracks in one selected album
randomly.
Press [R/T] to select the album.
This function does not work with “Program play”.
Program play
This function allows you to program up to 24 tracks.
1 Press [4/9, CD] and then [8].
2 Press [PROGRAM].
“PGM” is shown.
3 Press the numeric buttons to select the track.
Repeat this step to program other tracks.
4 Press [4/9, CD] to start play.
3 Press [R/T] to select the album.
4 Press [5/6] once and then the numeric
buttons to select the track.
5 Press [OK].
6 Repeat steps 3 to 5 to program other tracks.
7 Press [4/9, CD] to start play.
Cancel
program
mode
Press [PROGRAM] in the stop mode.
Replay the
program
Press [PROGRAM] then [4/9, CD] in
the stop mode.
Check
program
contents
Press [2/3] or [5/6] when
“PGM” is displayed in the stop mode.
To check while programming, press
[PROGRAM] twice after “PGM”
appears, then press [2/3] or
[5/6].
Clear the last
track
Press [DEL] in the stop mode.
Clear all
programmed
tracks
Press [8 ] in the stop mode. “CLR ALL”
is displayed. Within 5 seconds, press
the button again to clear all tracks.
• The program memory is cleared when you open the
disc tray.
• To repeat program play or selected play mode, press
[REPEAT]. Press again to cancel.
Checking the track information
You can view the information of the current track from the
display panel.
Press [DISPLAY] during play or pause.
• This unit supports ver. 1.0 and 1.1 ID3 tags.
• Text data that is not supported will not be displayed.
NOTE about using a DualDisc
The digital audio content side of a DualDisc does not
meet the technical specifi cations of the Compact Disc
Digital Audio (CD-DA) format so playback may not be
possible.
NOTE on CDs
• This unit can access up to 99 tracks.
• This unit can play MP3 fi les and CD-DA format audio
CD-R/RW that have been fi nalised.
• It may not be able to play some CD-R/RW due to the
condition of the recording.
NOTE on MP3s
• Files are treated as tracks and folders are treated as
albums.
• This unit can access up to 999 tracks, 255 albums and
20 sessions.
• Disc must conform to ISO9660 level 1 or 2 (except for
extended formats).
• To play in a certain order, prefi x the folder and fi le
names with 3-digit numbers in the order you want them
to play.
Limitations on MP3 play
• If you have recorded MP3s on the same disc as
CD-DA, only the format recorded in the fi rst session
can be played.
• Some MP3s may not be played due to the condition of
the disc or recording.
• Recordings will not necessarily be played in the order
you recorded them.
FM/AM radio
Manual tuning
1 Press [FM/AM] to select “FM” or “AM”.
2 Press [TUNE MODE] to select “MANUAL”.
3 Press [2/3] or [5/6] to select the
frequency of the required station.
To tune automatically
Press and hold [2/3] or [5/6] until the
frequency starts changing rapidly.
• Auto tuning may be interrupted when there is excessive
interference.
• To cancel auto tuning, press [2/3] or [5/6]
once again.
To improve the sound quality
When “FM” is selected
Press [FM MODE] to display “MONO”.
Press again to cancel.
• “MONO” is also cancelled if the frequency is changed.
• Turn off “MONO” for normal listening.
When “AM” is selected
Press and hold [TUNE MODE].
Each time you press and hold the button: BP 2
BP 1
RDS broadcasting
For the United Kingdom
This unit can display the text data transmitted by the
radio data system (RDS) available in some areas.
Press [DISPLAY] to display:
Station name
(PS)
Program type
(PTY)
Frequency
(FREQ)
]]
RDS displays may not be available if reception is poor.
USB
The USB connectivity enables you to connect and play
MP3 tracks from USB mass storage device.
Preparation
Before connecting any USB mass storage device to the
unit, ensure that the data stored therein has been backed
up.
Do not use a USB extension cable. The USB mass
storage device connected via the cable will not be
recognised by this unit.
1 Reduce the volume and connect the USB mass
storage device to the USB port.
Hold the main unit when connecting or disconnecting
the USB mass storage device.
2 Press [4/9, USB] to start play.
Stop
playback
Press [8 ]. “RESUME” is displayed.
The position is memorised.
Press [4/9, USB] to resume play.
Press [8 ] again to clear the position.
For other operations, they are similar as those
described in “Discs”.
Compatible devices
Devices which are defi ned as USB mass storage class:
• USB devices that support bulk only transfer.
• USB devices that support USB 2.0 full speed.
Supported formats
• Track must have the extension “.mp3” or “.MP3”.
• CBI (Control/Bulk/Interrupt) is not supported.
• A device using NTFS fi le system is not supported.
[Only FAT 12/16/32 (File Allocation Table 12/16/32) fi le
system is supported.]
• Depending on the sector size, some fi les may not work.
• Maximum album: 255 albums
• Maximum track: 2500 tracks
• Maximum track in one album: 999 tracks
Clock and timers
Setting the clock
This is a 24-hour clock.
1 Press [CLOCK/TIMER] to select “CLOCK”.
2 Within 10 seconds, press [R/T] to set the time.
3 Press [OK].
• Press [CLOCK/TIMER] to display the clock for few
seconds.
• Reset the clock regularly to maintain accuracy.
Using the sleep timer
This function enables you to turn off the unit
automatically after the set time.
Press [SLEEP] to select your desired time (in minutes).
Press [SLEEP] to show the remaining time and press
[SLEEP] again to select your desired time.
• The play and sleep timer can be used together.
• The sleep timer always has priority. Make sure not to
overlap timer settings.
Using the play timer
You can set the timer to come on at a certain time to
wake you up
.
Turn the unit on and set the clock.
Prepare the music source you want to listen to; disc,
radio, USB or music port source and set the volume.
1 Press [CLOCK/TIMER] to select “# PLAY 1”,
“# PLAY 2” or “# PLAY 3”.
2 Within 10 seconds, press [R/T] to set the
starting time.
3 Press [OK].
4 Repeat steps 2 and 3 to set the fi nishing time.
To activate the timer
5 Press [#, PLAY] to turn on “# PLAY 1”,
“# PLAY 2” or “# PLAY 3”.
“#” is shown.
6 Press [`] to turn off the unit.
Change the
settings
Repeat steps 1 to 4 and 6
(Z see above).
Change the
source or
volume
1) Press [#, PLAY] twice to clear timer
indicator from the display.
2) Make changes to the source or
volume.
3) Perform steps 5 and 6
(Z see above).
Check the
settings
Press [CLOCK/TIMER] to select
“# PLAY 1”, “# PLAY 2” or “# PLAY 3”.
Cancel
Press [#, PLAY] twice to clear the timer
indicator from the display.
• The timer will start at the preset time, with the volume
increasing gradually to the preset level.
• The unit must be in standby mode for the timer to
function.
Sound adjustment
Preset EQ Press [PRESET EQ] to select
“HEAVY”, “SOFT”, “CLEAR”, “VOCAL”
or “FLAT”.
Bass or
Tre b le
1) Press [BASS] or [TREBLE] (main
unit: [BASS/TREBLE]) to select
“BASS” or “TREBLE”.
2) Press [2/3] or [5/6] to
adjust the level (–4 to +4).
Surround
sound
Press [SURROUND] to select
“ON SURROUND” or
“OFF SURROUND”.
If interference in FM stereo reception
increases, cancel the surround sound
effect.
D.Bass Press [D.BASS] to select “ON D.BASS”
or “OFF D.BASS”.
Re-master
Press [RE-MASTER] to select
“ON RE-MASTER” or
“OFF RE-MASTER”.
Optional equipments
Avoid interfering with other Panasonic
equipment
Other Panasonic audio or video equipment may start
functioning when you operate the unit using the supplied
remote control.
To solely operate this system, synchronise the main
unit with its corresponding remote control to operate in
“REMOTE 2” mode.
1 Press and hold [MUSIC P.] on the main unit and
[2] until “REMOTE 2” is displayed.
2
Press and hold [OK] and [2] for at least 2 seconds.
To change the mode back to “REMOTE 1”, repeat steps 1
and 2 by replacing [2] with [1].
Portable audio equipment
Turn off the equalizer function (if there is any) of the
portable audio equipment before you plug into the
MUSIC P. jack. Otherwise, sound from the speaker may
be distorted.
1 Plug the audio cord into the MUSIC P. jack.
2 Press [MUSIC PORT] (main unit: [MUSIC P.]) and
play the portable audio equipment.
To adjust the sound input level
Press [INPUT LEVEL] to select “HIGH” or “NORMAL”.
• Select “NORMAL” if the sound is distorted during
“HIGH” input level.
• Cords and the equipment are not included.
• For details, refer to the portable audio equipment’s
instruction manual.
Troubleshooting guide
Before requesting service, make the following checks.
If you are in doubt about some of the check points, or if
the solutions indicated do not solve the problem, consult
your dealer for instructions.
■ Common problems
No response when remote control buttons are
pressed.
• Check that the batteries are installed correctly.
Distorted sound or no sound.
• Turn the volume up.
• Turn off the unit, determine and correct the cause.
Turn the unit on again. It may be caused by straining of
the speakers through excessive volume or power, and
using the unit in a hot environment.
A “humming” sound can be heard during play.
• An AC mains lead or fl uorescent light is near the unit.
Keep other appliances and cords away from the unit.
■ Discs
Incorrect display or play will not start.
• You have not inserted the disc correctly; insert it
correctly.
• Disc may be dirty. Wipe it clean.
• Replace the disc if it is scratched, warped, or non-
standard.
• Condensation has formed: wait 1 to 2 hours for it to
evaporate.
■ Radio
A beat sound is heard.
• Turn off any television nearby or move the unit away
from any television.
• Switch to either BP 1 or BP 2 when in AM tuner mode.
A low hum is heard during AM broadcast.
• Separate the antenna from other cables and cords.
■ USB
No response when [
4/9
, USB] is pressed.
• Disconnect the USB device and then reconnect it.
Alternatively, turn the unit off and on again.
The USB drive or its contents cannot be read.
• The USB drive format or its contents is/are not
compatible with the system.
• The USB host function of this product may not work
with some USB devices.
• USB devices with storage capacity of more than
8 gigabytes may not work in some instances.
Slow operation of the USB device.
• Large fi le size or high memory USB fl ash drive takes
longer time to read.
■ Unit displays
“NO PLAY”
• Examine the content. You can only play supported
format.
• If there are more than 255 albums or folders (audio and
non-audio), some of the MP3 fi les in these albums may
not be read and played. Transfer these music albums
to another USB. Alternatively, reformat the USB device
and save these music albums prior to saving the other
non-audio folders.
Connecting to headphones
Connect headphones (not included) to the headphones
jack.
Plug type: Ø 3.5 mm stereo
• Avoid listening for prolonged periods of time to prevent
hearing damage.
• Excessive sound pressure from earphones and
headphones can cause hearing loss.
• Listening at full volume for long periods may damage
the user’s ears.
“F61” or “F76”
• Check and correct the speaker cords connection. If this
does not fi x the problem, consult the dealer.
• Disconnect the USB device. Turn the unit off and on
again.
“ERROR”
• Incorrect operation performed. Read the instructions
and try again.
“ADJUST CLOCK”
• Clock is not set. Adjust the clock accordingly.
“ADJUST TIMER”
• Play timer is not set. Adjust the play timer accordingly.
“AUTO OFF”
• The unit has been left unused for about 29 minutes and
will turn off in a minute. Press any button to cancel.
Memory reset (Initialisation)
When the following situations occur, refer to the
instructions below to reset the memory:
• There is no response when buttons are pressed.
• You want to clear and reset the memory contents.
To reset memory
1) Disconnect the AC mains lead. (Wait at least
3 minutes before proceeding to step 2.)
2) While pressing and holding down [1] on the
main unit, reconnect the AC mains lead.
Continue to press and hold the button
(approximately 10 seconds) until “– – – – – – – –”
is shown.
3) Release [1].
All the settings are returned to the factory preset.
You will need to reset the memory items.
Memory preset
30 FM and 15 AM stations can be preset.
Automatic presetting
1 Press [PLAY MODE] to select “CURRENT” or
“LOWEST” frequency.
2 Press [AUTO PRESET] to start presetting.
Manual presetting
1 Press [TUNE MODE] to select “MANUAL”.
2
Press
[2/3] or [5/6]
to tune to the
required station.
3 Press [PROGRAM].
4 Press the numeric buttons to select a channel.
The station occupying a channel is erased if another
station is preset to that channel.
5 Repeat steps 2 to 4 to preset more stations.
Selecting a preset station
1 Press [TUNE MODE] to select “PRESET”.
2 Press
[2/3] or [5/6 ] to select the
channel.
Alternatively, press the numeric buttons to select the
channel.
AM allocation setting
(by main unit only)
This system can also receive AM broadcasts allocated in
10 kHz steps.
Press and hold [FM/AM].
After a few seconds the display changes to a fl ashing
display of the current minimum frequency. Release the
button when the minimum frequency changes.
• To return to the original step, repeat the above steps.
• After changing the setting, previously preset frequency
will be cleared.