INTRODUCTION
Thank you for purchasing the Projection Clock . Please read carefully through the following
information and keep these instructions, in case you need to refer to them in the future. If you
pass the product on to someone else, please also include these instructions.
The Radio-Controlled Projection Clock (Projection Clock) displays:
- indoor temperature
- date / time / weekday
- alarm
The Projection Clock is unsuitable for commercial use in weather forecasting or in temperature data
measurement.
P
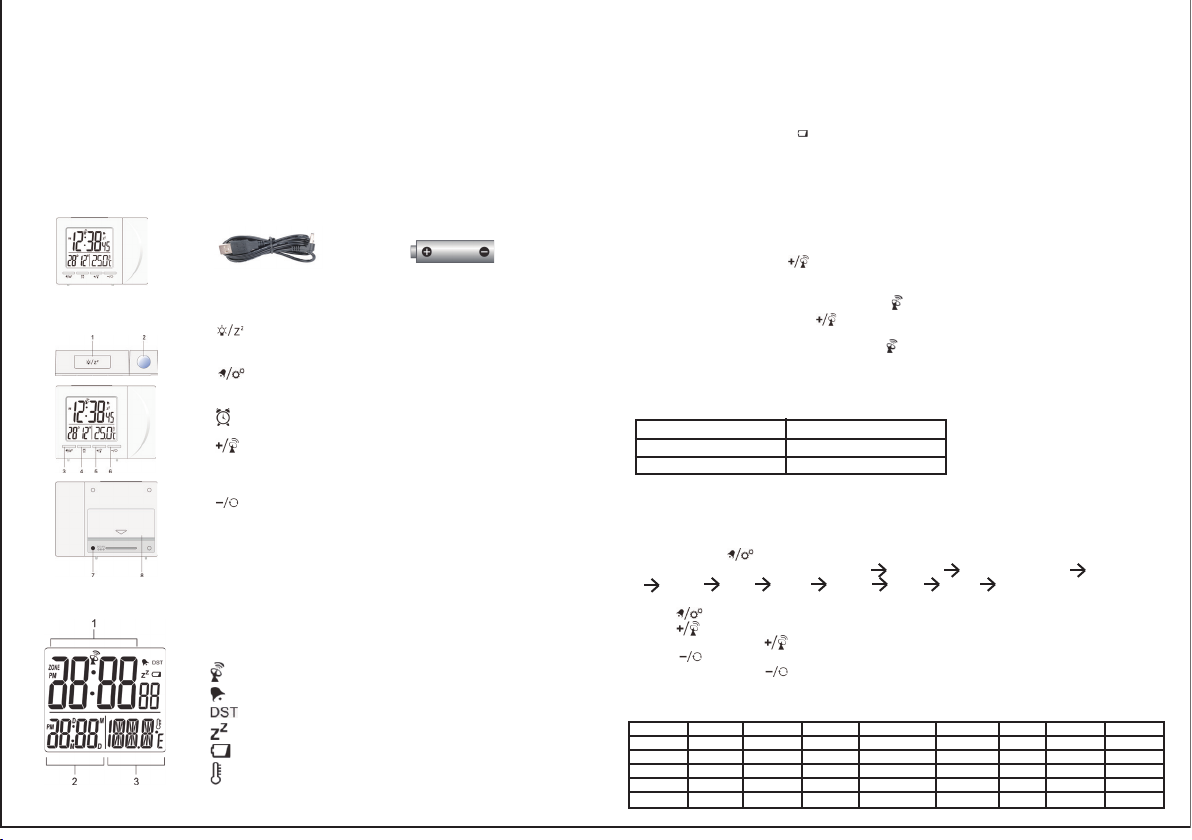
Main unit Po
AAA batteries
for main unit x 2
O 1: Press to activate the snooze functon,backlight and projection,
Press and hold to toggle projection on/off.
2: Projection lens
3: In Date mode, press to turn on/off zone. In
mode, press to turn on/off alarm. Press and hold to enter time
and date setting.
4: Press to show alarm time of
Press and hold to enter alarm setting.
5: Press to switch between T
display
setting mode, press to increase one unit, press and hold
to increase rapidly
6: Press to switch between Date and the nearest coming
display in 180 . In setting mode, press to decrease one unit,
press and hold to decrease rapidly
7: Power jack.
8: Battery compartment. Slide down to open.
LCD DISPLA
1: Time Display
2: Date display or
3: T
RCC signal received
Alarm ON
DST ON
Snooze Activated
Low battery indicator
T
GETTING ST
INSERT BA
1: Remove the battery door from the back
2: Insert 2 R03 (AAA)/ 1.5V batteries. Please ensure the polarities (+/-) of the
batteries match upon installation.
3: Reattach the battery door
NOTE: Replace batteries when displays, or when the display is dim.
DC POWER
Plug the power cable to the power jack and plug the USB plug to a
5V USB power adapter (Not included).
NOTE: It is suggested to insert batteries as backup power source.
CLOCK
CLOCK RECEPTION
1: Replace batteries or press button will initiate RCC receiving.
2: RCC receiving can be worked in both Date Mode and
3: The receiving process duration is 7 minutes.
4: During receiving process, the RCC signal logo flashes.
5: During receiving process, press button to quit receiving, press other buttons
can work normally
6: If process is successful, completed RCC logo will be shown in display
7 minutes, RCC setting will be quit automatically
7: RCC receiving will automatically start at 2:03, 3:03, 4:03, 5:03 every night.
receiving function will cease if it is successful.
Front
back
ALARM
SETTING/ADJUSTING ALARM TIME
1. Press and hold button, enter alarm setting
2. Sequence of setting: weekday hour weekday minute weekend hour weekend
minute exit
3. During setting, the setting parameter will flash.
4. Press button to confirm setting and enter to next parameter
5. Press button once, the figure will increase 1 unit. Press and hold the button, the figures
will increase rapidly
6. Press button once, the figure will decrease 1 unit. Press and hold the button, the
figures will decrease rapidly
7. Press button to turn on/off alarm
8.
9. If there is no action in 20 seconds, the setting will be saved and will exit the setting mode.
TURN
1. When it is displaying the nearest coming
alarm. (1-5) or (6-7) will flash to indicate which alarm displaying.
2. Press button once to switch to alarm mode. Monday to Friday alarm time will be shown and
(1-5) will flash.
3. Press button once to turn on/off Monday to Friday alarm
4. Press button again to show Saturday to Sunday alarm time. (6-7) will flash.
5. Press button once to turn on/off Saturday to Sunday alarm.
OPERA
1.
2. During alarm rings, press any keys to end the alarm. Or press button to delay the alarm for
8 minutes.
3. If do not press any button to end the alarm, it will turn off automatically after 5 minutes.
4.
PROJECTION
The projector displays the time on your ceiling or wall and it can rotate 180 . It is easier to view in a
darkened room. For the optimal projection results, place the unit within 5-6.5 ft (1.5 - 2 m) from the
ceiling or wall.
1. Press button to activate the backlight and projection for 5 seconds.
2. Press and hold button, flip the projection display 180 .
3. Press and hold button, toggle continues projection on in case of using adapter power
source and toggle projection on for 5 minutes in case of using batteries power only
hold button again, turn off projection and toggle continues projection off
PRECAUTIONS
Hazards for children
Batteries can be life-endangering if swallowed. Please keep the Projection Clock and batteries
out of reach of children. If a battery has been swallowed, please seek medical assistance
immediately
Keep children away from packaging material and the small parts in the scope of delivery
Suffocation hazard if swallowed.
Injury hazard
Caution: Explosion hazard with improper handling of batteries. Batteries must not be charged,
reactivated with other means, dismantled, thrown into fire or short-circuited.
Avoid contact with skin, eyes and mucous membranes. When coming into contact with battery
acid, immediately rinse the affected areas with plenty of clear water and immediately contact a
physician.
Caution – property damage
Protect the Projection Clock from dust, impact, extreme temperatures and direct sunshine.
protect the Projection Clock from moisture. Exclusively position Projection Clock in a dry
enclosed space.
Remove the batteries from the Projection Clock, if they become depleted or if you are not using
the Projection Clock for a longer period of time.
Do not expose the batteries to any extreme conditions by e.g. placing them on a radiator or
under direct sunlight.
Clean the battery and appliance contacts prior to insertion, if required.
Using same type of batteries. Do not use different types or used and new batteries together
Do not carry out any changes to the device. Only allow repairs to be carried out by a
professional workshop.
Never use hard, scratching or abrasive detergents or similar
This could scratch the surfaces.
SPECIFICA
L x W x H 100 x 25 x 75 mm
Weight (Main unit) 97g (Exclude batteries)
T℃ to +50℃ (14℉ to 122℉ )
Accuracy 0℃ to +40℃ : +/- 1.5℃ (+/-3℉ )
<0℃ and >+40℃ : +/- 2℃ (+/-4℉ )
Resolution 0.1℃ (0.2℉ )
Power 2 x R03 (AAA) 1.5V batteries
5V USB adapter (Not included)
NOTE:
When the temperature is lower than -10 ℃(14 ℉), the temperature displays LL.L. When the
temperature is higher than 50℃ (122℉ ), the temperature displays HH.H.
During alarm rings or RCC receiving process, temperature detection will be stopped.
NOTE: The technical specifications for this product and the contents of the user manual are subject
to change without notice.
EU-DECLARA
Disposal:
Guideline 2012/19/EC concerning the handling, collection, recycling and disposal of
electrical and electronic equipment and their components (‘waste electrical and electronic
equipment’, known as WEEE).
The crossed symbol on a rubbish container indicates that the machine or device is not allowed to be
disposed of but it must be handed over to a suitably equipped collection centre for proper recycling
or disposal.
Directives:
We declare that this device has been manufactured in accordance with the applicable rules
and regulations.
Different model receives different RCC signal:
Region Signal
EU DCF
UK MSF
NOTE: Please increase the separation of the main unit and the power adapter to avoid interference
of RCC signal receiving.
SET THE CLOCK MANUALL
1. Press and hold button, enter time and date setting
2. Sequence of setting: Week Day Language 12/24 Hr Y Date format
Month Date Hour Minute Zone ℃/ ℉ exit
3. During setting, the setting parameter will flash.
4. Press button to confirm setting and enter to next parameter
5. Press button once, the figure will increase 1 unit (when setting minute, second will reset to
0). Press and hold the button, the figures will increase rapidly
6. Press button once, the figure will decrease 1 unit (when setting minute, second will reset to
0). Press and hold the button, the figures will decrease rapidly
7.If there is no action in 20 seconds, the setting will be saved and will exit the setting mode.
Five languages Week Day display: GER, ENG, FRE, IT
Symbol Monday T
German GER MON DIE MIT DON FRE SAM SON
English ENG MON TUE WED THU FRI SA
France FRE LUN MAR MER JEU VEN SAM DIM
Italian IT GIO VEN SAB DOM
Dutch DUT MAA DON VRI ZAI ZON
o