Thank you for selecting the Oregon Scientifi
Pedometer with Real-Time Clock (PE320). This unique
product is ideal in assisting an exercise routine. The
pedometer
to
c
In this box, you will fi
Digital Pedometer with Real-Time Clock
1 x LR43 size 1.5 V battery
his manual handy as you use your new product. It
contains practical step-by-step instructions as well as
technical
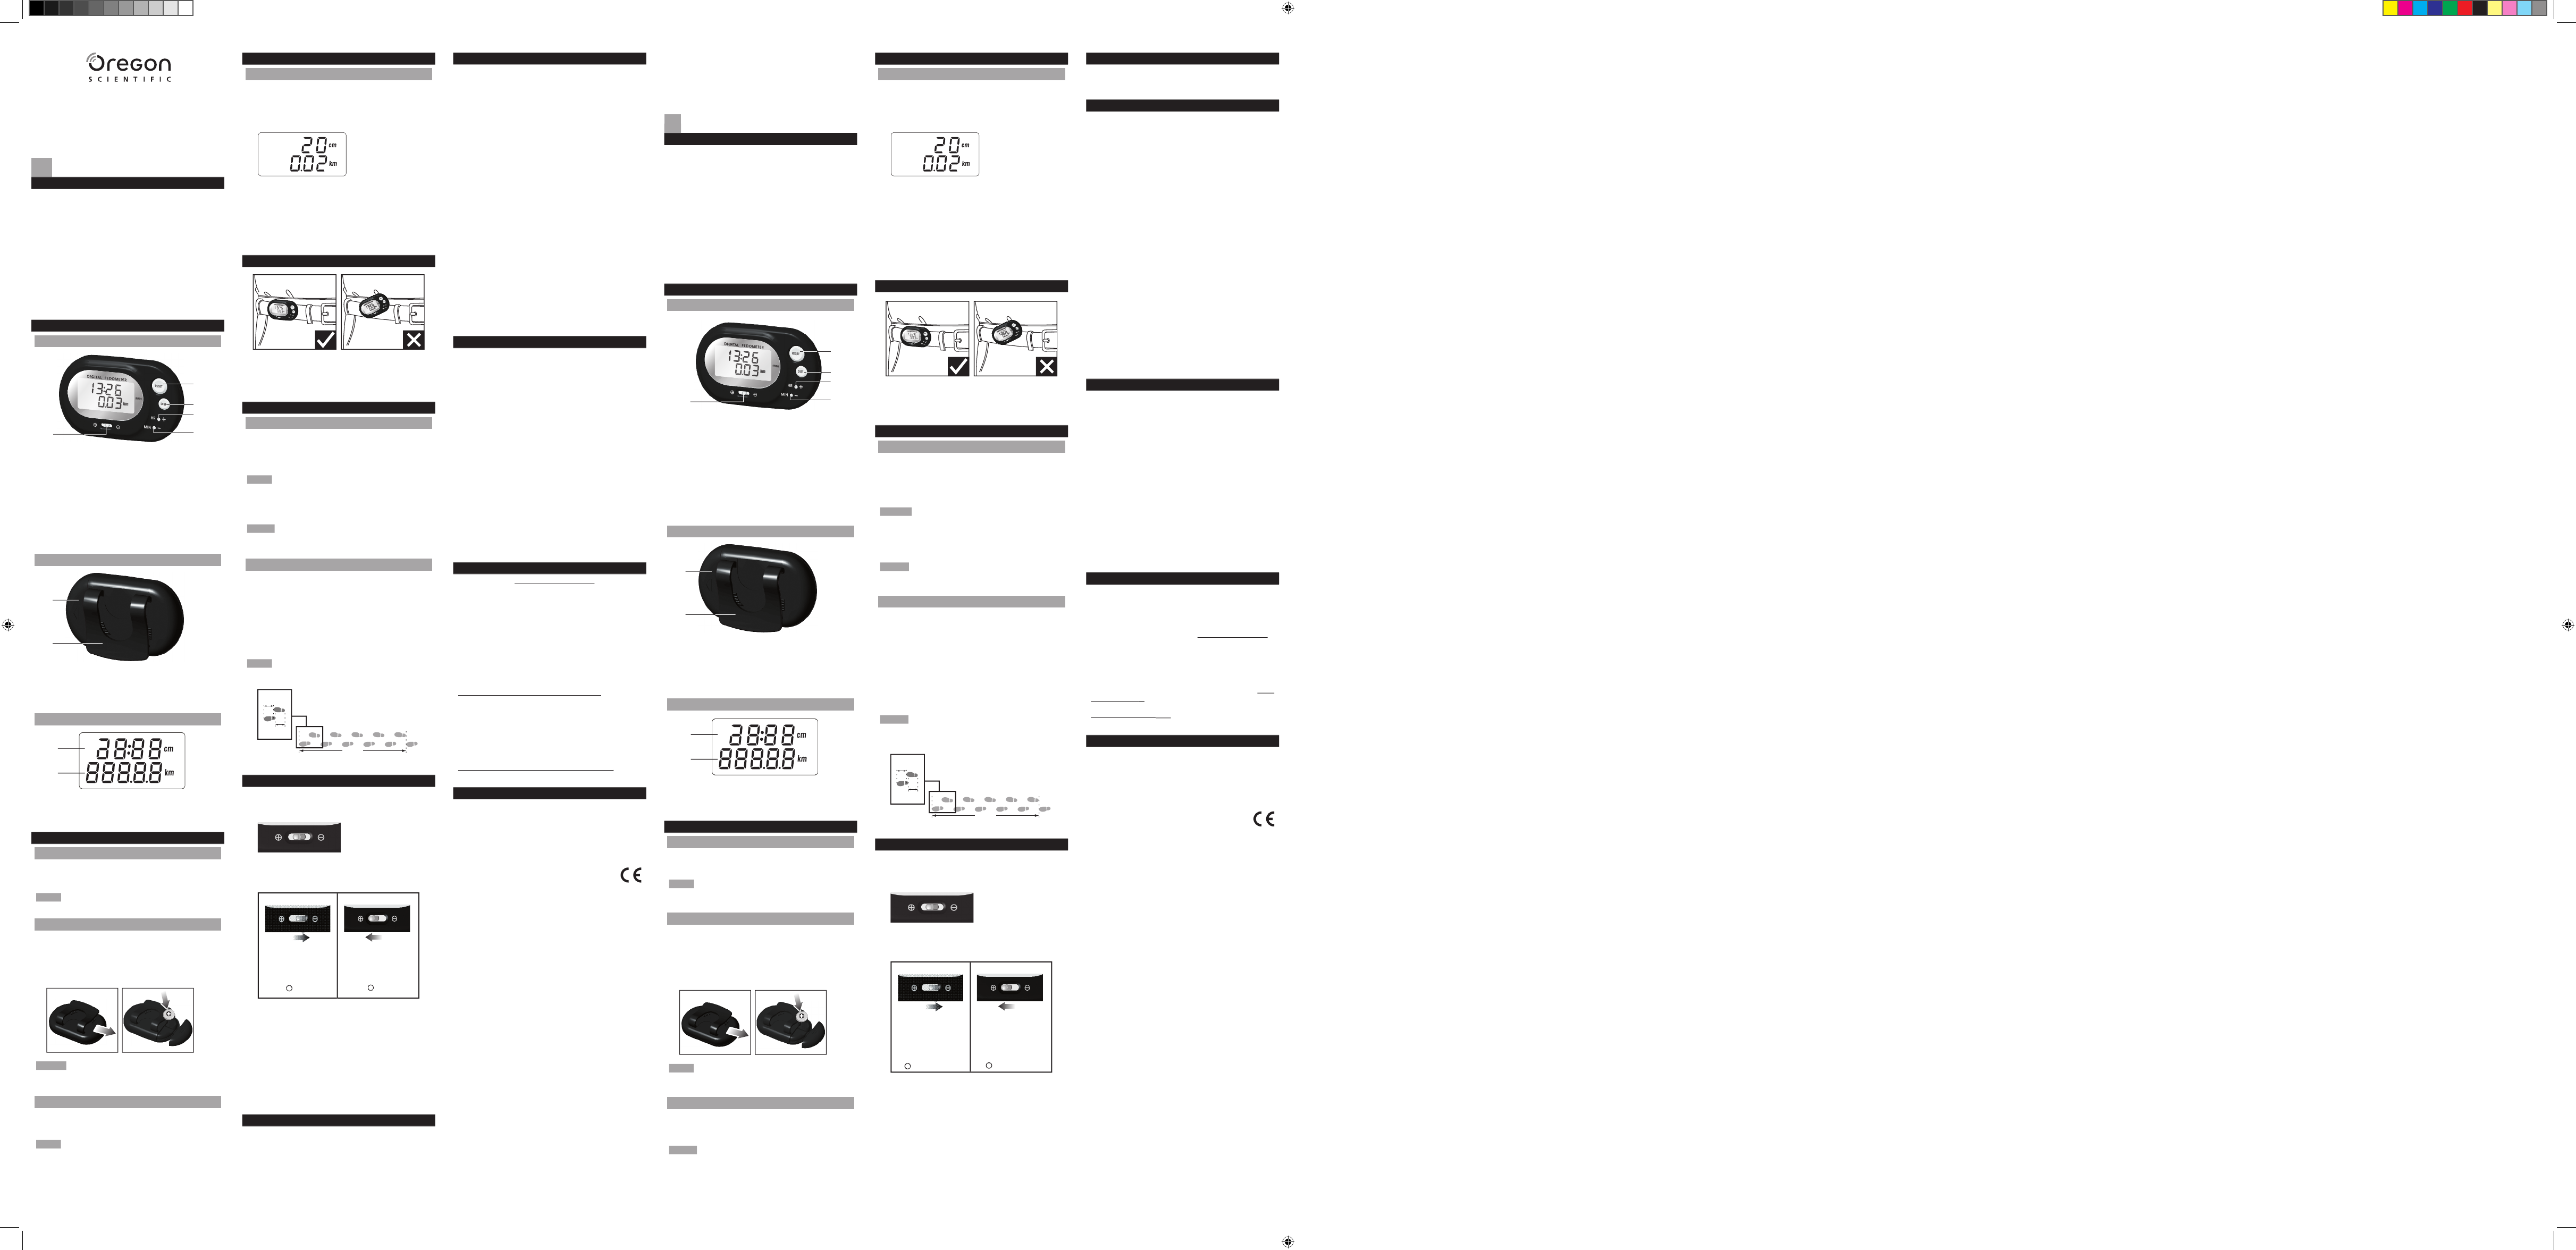
1.
button - Resets display mode values to zero
button - Total distance and stride length display
button - Changes clock hour digits; changes
button - Changes clock minute digits; changes
1. Battery compartment - Requires 1 x LR43 size 1.5V
2. Belt clip - Use to clip unit securely to belt or waistline
GETTING STARTED
INSULATION TAPE
Before using the device, pull out the insulation tape
underneath battery x
The unit will not work until the tape is pulled out.
This 1 LR43 Should
need to change the batteries,
1. Gently press and pull the battery compartment door.
2. Insert 1 x LR43 size 1.5V battery or equivalent.
3. Replace the battery compartment door.
Protect the environment by taking exhausted
batteries to authorized disposal stations.
Insert a
the clock
The unit automatically returns to
5 seconds if no buttons are pressed.
This product is designed to give you years of service
if handled properly. Observe the following guidelines:
• While the product can be considered splash proof, never
immerse the unit in water. This can cause electrical
shock and damage the unit.
• Do not subject the main unit to extreme force, shock, or
fl
• The product can withstand a drop of approx. 4 feet, but
it is strongly recommended that you avoid dropping the
• Do not tamper with the internal components. Doing so
will terminate the units warranty and may cause
damage. The unit contains no user-serviceable parts.
• Do not mix new and old batteries or batteries of different
• Do not use rechargeable batteries with this product.
• Remove the batteries if storing this product for a long
• Do not scratch the LCD display.
• Read this instruction manual thoroughly before
ontents
are subject to change without further notice. Images not
drawn
to this product.
Step counter 0 to 99,999 steps
0 to 999.99 km
(0 to 999.99 miles)
30 to 150 cm
(
11 to 60 inches)
65 x 40 x 14 mm
(L x W x H)
2.6 x 1.6 x 0.6 inches
(L x W x H)
-5.0 to 40.0 °C
(23 to 104.0 °F)
about Oregon such as
MP3 players; children’s electronic learning products and
games; and
stations; and digital and conference phones. The website
also includes contact information for our customer care
department in case you need to reach us, as well as
frequently asked questions and customer downloads.
We you the you on
website,
the Oregon Scientifi Customer Care department directly,
www2.oregonscientifi
For international enquiries, please visit:
www2.oregonscientifi
www2.oregonscientifi
EU-DECLARATION OF CONFORMITY
, declares that the Digital
Pedometer with Real-Time Clock model PE320 is in
compliance with
73/23/EC. A copy of the signed and dated Declaration of
Conformity is
6 m
(20 ft)
60cm
(24inch)
60cm
(24inch)
ADJUSTING THE SETTINGS
DISTANCE
The distance traveled is shown on the bottom line of the
LCD display. For
personal stride-length is set.
until the stride length is viewed on the top
(30 to 150cm or 11 to 60 inches)
The
If no changes are made to the Stride function, the top
line of the display will automatically return to the clock
urely at waist level
attire maintain
USING THE PEDOMETER
COUNTING STEPS TAKEN
The pedometer counts the number of steps taken.
once to view number of steps.
To pedometer to
To
reposition slide determine
the proper amount of motion sensitivity, experiment with
different settings. See section
SENSITIVITY for more information.
Improper positioning
in incorrect data collection.
Correctly measuring distance depends on accurately setting
the average
properly setting an internal motion-sensitivity device.
until the distance traveled is viewed on the
rn the distance counter to zero, press
Distance = steps taken x average step length
Individual stride-length varies. Input an
appropriate
of stride walk 10 paces and divide distance traveled by 10.
ADJUSTING MOTION SENSITIVITY
Follow
-/+ Motion Sensitivity Switch and ensure accurate readings:
3.
to provide more accurate motion sensitivity.
ust sensitivity switch if walking speed changes.
Repeat steps 2-5 until accurate readings is obtained.
conditions may cause incorrect reading of
1. Uneven walking pace, such as walking in crowded areas
2. Frequent up and down movements, such as standing up
and/or sitting down; running, jumping, or ascending/
descending stairs or steep slopes.
Clean the unit with a slightly damp cloth and mild detergent.
Grazie
(PE320).
è
conteggia ad altro.
Inserendo la
distanza totale percorsa.
Contenuto della confezione:
1 batteria di tipo LR43 da 1,5 V
Si consiglia di tenere questo manuale a portata di mano
durante
istruzioni dettagliate ed istruzioni per la manutenzione che è
FUNZIONI PRINCIPALI
VISTA ANTERIORE
1. Interruttore della sensibilità di movimento – aumenta o
diminuisce la sensibilità dell’unità
– Azzera i valori della modalità di
– Modalità di visualizzazione distanza
totale e lunghezza della falcata
Modifi
Modifi
o batterie – contiene 1 batteria di tipo LR43 da
2.
ogio / Lunghezza della falcata
OPERAZIONI PRELIMINARI
NASTRO ISOLANTE
Prima di utilizzare il dispositivo, togliere il nastro isolante
protettivo
L’unità non
otto funziona
V. Quando è necessario sostituire le batterie:
1. Premere delicatamente ed estrarre la copertura del vano
2. Inserire 1 batteria di tipo LR43 da 1,5 V o equivalente.
3. Riposizionare la copertura del vano batterie.
in centri di raccolta autorizzati.
per modifi rispettivamente i valori di ora e minuto.
L’orologio è impostato in modo predefi
Se non viene premuto nessun pulsante entro 5
secondi, alla
ulire il prodotto con
sto
soddisfacente
alle seguenti istruzioni:
• Il prodotto si può considerare a prova di spruzzi, non
immergerlo in acqua. Ciò potrebbe causare scariche
elettriche e danni all’unità.
• Non sottoporre l’unità a forza eccessiva, urti o
oscillazioni di temperatura o di umidità.
• Il prodotto è in grado di sopportare una caduta da circa
1,20 metri, ma si consiglia di non farlo cadere.
• Non manomettere i componenti interni. In questo
modo si invalida la garanzia del prodotto e si possono
provocare danni. L’unità non contiene componenti che
possono essere riparati dall’utente.
• Non mischiare batterie nuove con batterie vecchie o con
batterie di tipo diverso.
• Non utilizzare batterie ricaricabili con questo prodotto.
• Rimuovere le batterie se si prevede di non utilizzare il
prodotto per un lungo periodo di tempo.
• Non graffi
• Prima dell’utilizzo dell’unità, leggere attentamente il
presente manuale di istruzioni.
Il contenuto di
soggetti a modifi
Le immagini utilizzate non sono in scala. Non apportare
modifi
nza percorsa da 0 a 999,99 km
ni 65 x 40 x 14 mm (L x l x h)
p. funzionamento da -5.0 a 40.0 °C
INFORMAZIONI SU OREGON SCIENTIFIC
ere sui Oregon
Scientifi
didattici per ragazzi, gli orologi con proiezione dell’ora, le
stazioni barometriche, gli orologi da polso multifunzione,
gli
ancora, visita il nostro sito internet
Puoi trovare
il
frequenti (FAQ) o i software da scaricare gratuitamente.
Sul nostro sito internet potrai trovare tutte le informazioni
di cui ma se desideri
il nostro Servizio Consumatori puoi visitare il sito
oppure numero 199112277.
Per ricerche
DICHIARAZIONE DI CONFORMITA’ UE
Con la presente Oregon Scientifi dichiara che questo
Contapassi
alla direttiva
Una copia
è disponibile, su richiesta, tramite il servizio clienti della
6 m
(20 ft)
60cm
(24inch)
60cm
(24inch)
REGOLAZIONE DELLE IMPOSTAZIONI
DISTANZA
tanza visualizzata inferiore
del display
impostare la lunghezza della propria falcata.
fi
viene visualizzata sulla riga superiore del display LCD.
2. Premere con una punta smussata
per diminuire la lunghezza della falcata
(da 30 a 150cm o da 11 a 60 pollici). La lunghezza della
falcata è impostata in modo predefi
Se non vengono apportate modifi
Falcata, dopo 5 secondi la riga superiore del display
tornerà automaticamente alla visualizzazione
Fissare alla cintura, ai pantaloni o agli indumenti all’altezza
della vita e mantenerlo in posizione orizzontale per ottenere
UTILIZZO DEL CONTAPASSI
CONTEGGIO DEI PASSI EFFETTUATI
ntapassi conteggia il numero dei passi effettuati.
una volta per visualizzare il numero dei
Per azzerare la visualizzazione del contapassi, premere
Per aumentare o diminuire la sensibilità di
movimento
di
di movimento, provare impostazioni diverse. Per ulteriori
informazioni, si veda il paragrafo REGOLAZIONE DELLA
SENSIBILITÀ DI MOVIMENTO.
Il posizionamento scorretto del contapassi può
causare un rilevamento errato.
MISURAZIONE DELLA DISTANZA
etta misurazione della distanza dipende dalla
impostazione
individuale (lunghezza della falcata) e dalla corretta
impostazione del dispositivo interno di sensibilità di
fi
percorsa sul display LCD.
Per azzerare
in modalità di visualizzazione
Distanza totale = passi effettuati x lunghezza media della
La lunghezza della falcata varia da individuo a
individuo. falcata
media. Per determinare la lunghezza media della falcata,
fare 10 passi e dividere la distanza percorsa per 10.
ADJUSTING MOTION SENSITIVITY
ire le importanti istruzioni indicate di seguito per la
regolazione -/+ dell’interruttore di sensibilità di movimento
del contapassi e per ottenere delle rilevazioni precise:
1. Spostare l’interruttore al centro
are il contatore dei passi.
3. Camminare a passo normale; fare almeno 100 passi per
rendere più precisa la sensibilità di movimento.
re l’interruttore della sensibilità al variare della
Ripetere le fasi da 2 a 5 fi
non si ottengono delle rilevazioni precise.
seguenti condizioni
1. Passo irregolare, come ad esempio se si cammina in
aree affollate o su una superfi
2. Movimenti frequenti in su e in giù, ad es. alzarsi e/o
sedersi, correre, saltare, salire/scendere scale o pendii
PE320 086L00XXXX-02_8 LANG_R1.indd 1 2/8/06 4:20:47 PM