Congratulaons! You have successfully installed the security system!
C
Need customer support? Please call us at 1-888-212-2254
or email at Support@OplinkSecurity.com
A
STEP
2
• Set up an account with your smartphone
Launch the “Oplink mi Security” applicaon. Follow the instrucons on the applicaon page to
acvate your account using your phone number.
STEP
9
• Acvaon completed
When you see the “System is ready!” message, your system is ready for use.
Note: Your IP Camera status will be updated aer 10 minutes.
STEP
6
For complete user manuals and installaon videos, please visit
www.OplinkSecurity.com
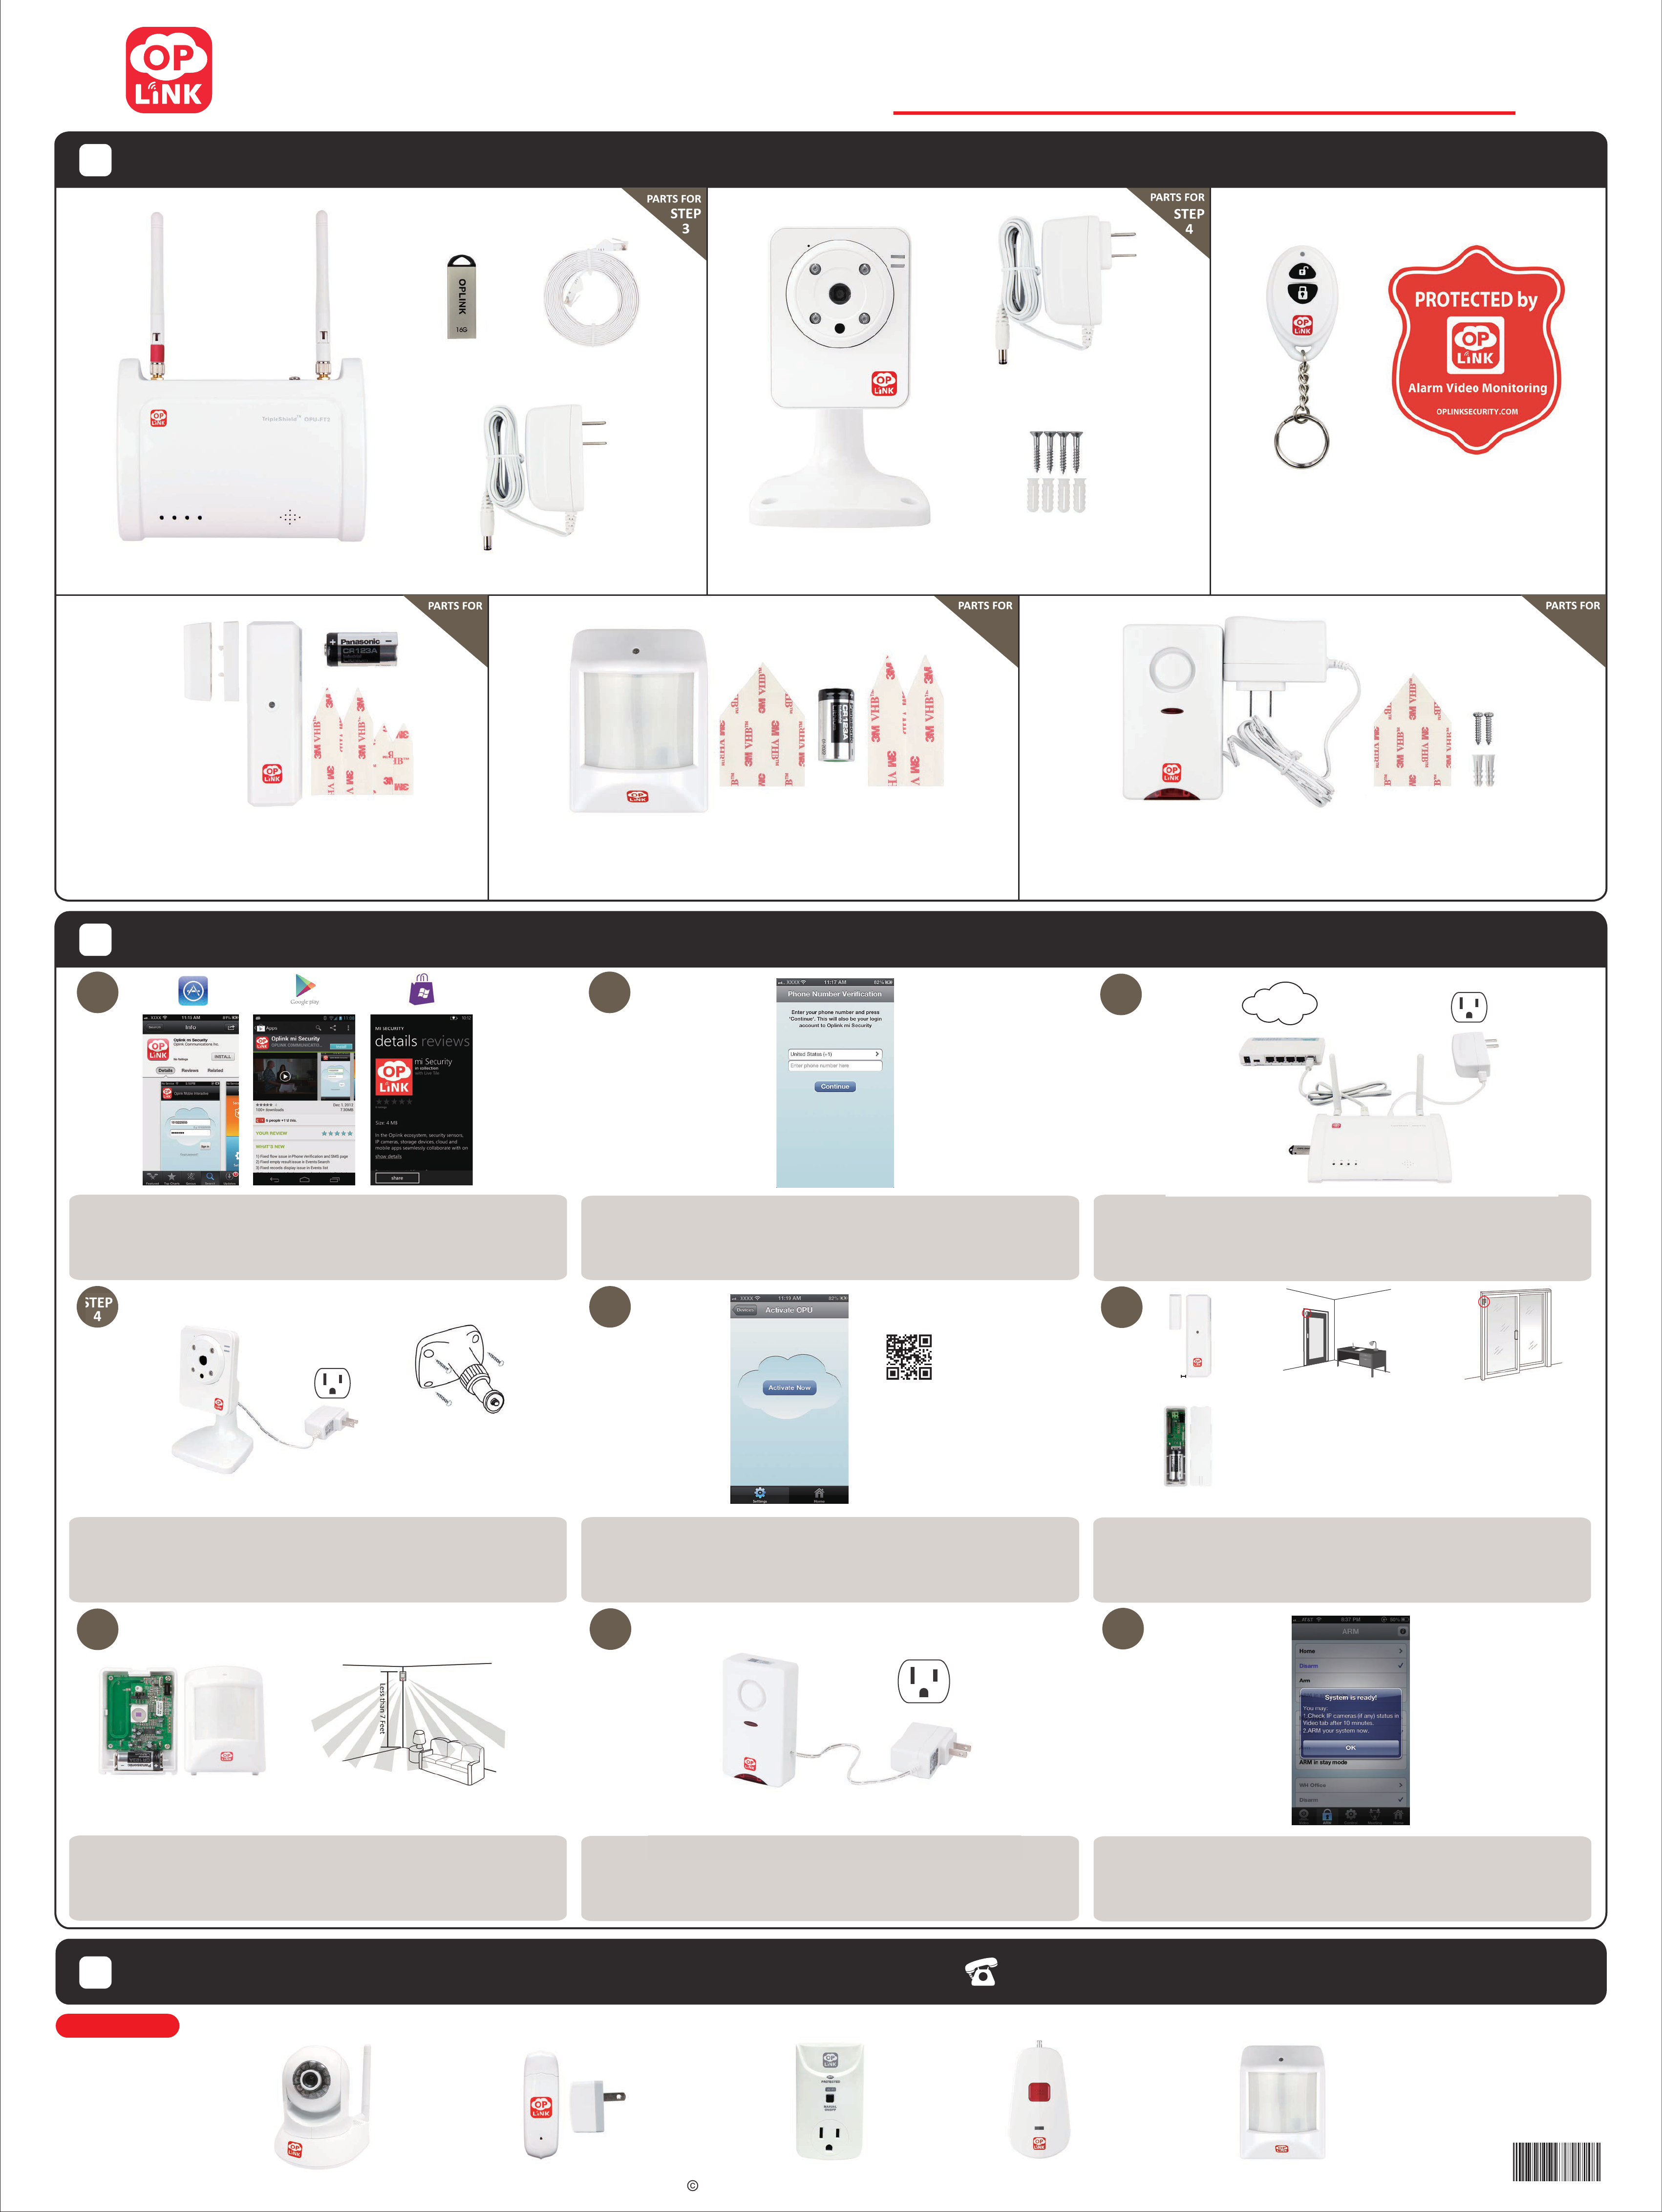
Package Contents (for indoor use only)
PT IP Camera
Add on Devices
View more on our webstore
RF RepeaterWiFi Smart Plug
Panic Button
Remote Control (2)
Window Decal (3)
* Trigger the Panic Alarm feature
by pressing the Arm buon for
3 seconds
STEP
1
• Download the Oplink App
Android: Open Google Play Store. Search for “Oplink mi Security” and install the applicaon.
iPhone: Open App Store. Search for “Oplink mi Security” and install the applicaon.
Windows: Open Marketplace. Search for “Oplink” and install the applicaon.
2013 Oplink Communicaons, Inc. All rights reserved.
For the latest version of
Oplink Terms and Condions,
please visit our website.
99200090MIG001
STEP
4
• Power up the IP Camera
Plug the IP Camera into an outlet within 5 feet of the OPU to establish connecon. Once
connecon is established and working, the IP camera can be moved to its desired locaon.
STEP
4
(E)
(F)
The camera can be moved
and mounted aer the
inial acvaon.
Note: Should the placement of the camera cause the image to be upside-down, use the Flip
feature in the App to correct this maer. Video > Single Video Mode > Image Seng
(I) Siren with Power Adapter (1)
Double-sided Tape (1)
Mounng Screws (2)
Screw Anchors (2)
STEP
8
(I)
STEP
3
internet
(B)
(C)
(A)
(D)
• Assemble the OPU staon and connect to a router
Assemble the system according to the provided picture. It is recommended that the OPU be
placed on a 3-5 (0.91-1.52m) high plaorm.
Note: Once the OPU is up and running, to establish proper connecon to it, power up the remaining devices within 5 feet of
the OPU. When connecon is established and working, the devices can be moved to their desired locaons.
TripleShield™
STEP
7
Setup GuideB
STEP
5
(Sample QR Code)
Note: When the acvaon
process cannot be completed
normally, the App will ask you
to scan the OPU’s QR code,
located on the back of the
OPU, to connue.
• Start device acvaon on the App
Tap the “Acvate Now” buon.
(Acvaon process takes approximately 2 minutes)
• Power up the Siren
Plug the Siren into an outlet within 5 feet of the OPU to establish connecon. Once connecon
is established and working, the Siren can be moved to its desired locaon. Your Siren comes with
a backup baery pre-installed. To make use of the backup baery, pull and remove the clear
plasc strip to iniate baery contact.
Magnet
Spacer
Sensor
STEP
8
Router
(not included)
• Install Door/Window Sensor baeries
Each Door/Window Sensor set consists of two pieces. Take the larger piece and with slight force,
push the small tab on the back plate outward and slide the back plate upward. Remove the back
plate and insert a baery into each Door/Window Sensor set. Apply the double-sided tape to each
piece. It is recommended that the Door/Window Sensor be mounted in a vercal/upright posion.
1/4 inch Max
Mount Door Sensor
Note: For the Door/Window Sensor, it does not maer which piece you
place on the frame and which piece you place onthe moving part.
To create proper contact, ensure the tops of the two pieces line up.
The Spacer is used in situaons where the smaller piece needs to be
elevated to the larger piece to ensure proper contact.
Mount Window Sensor
(G) Door/Window Sensor
Baery Installaon
(H) Moon Sensor
Baery Installaon
• Place the Moon Sensor
Li the top tab to remove the cover and install the baery into the Moon Sensor. For maximum
coverage, the sensor should be placed in the corner of the room to be monitored and no more
than 7 feet above the ground. The Moon Sensor is most effecve in areas such as hallways and
entry points where possible intruders will have to pass through.
Mount Moon Sensor
(D) OPU Power Adapter (1)
STEP
6
Inactivity Sensor
Need help? Post your question in this forum.
Report abuse
Libble takes abuse of its services very seriously. We're committed to dealing with such abuse according to the laws in your country of residence. When you submit a report, we'll investigate it and take the appropriate action. We'll get back to you only if we require additional details or have more information to share.
Product:
Forumrules
To achieve meaningful questions, we apply the following rules:
First, read the manual;
Check if your question has been asked previously;
Try to ask your question as clearly as possible;
Did you already try to solve the problem? Please mention this;
Is your problem solved by a visitor then let him/her know in this forum;
To give a response to a question or answer, do not use this form but click on the button 'reply to this question';
Your question will be posted here and emailed to our subscribers. Therefore, avoid filling in personal details.
Register
Register getting emails for Oplink TripleShield at:
new questions and answers
new manuals
You will receive an email to register for one or both of the options.
Get your user manual by e-mail
Enter your email address to receive the manual of Oplink TripleShield in the language / languages: English as an attachment in your email.
The manual is 1,37 mb in size.
You will receive the manual in your email within minutes. If you have not received an email, then probably have entered the wrong email address or your mailbox is too full. In addition, it may be that your ISP may have a maximum size for emails to receive.
If you have not received an email with the manual within fifteen minutes, it may be that you have a entered a wrong email address or that your ISP has set a maximum size to receive email that is smaller than the size of the manual.
The email address you have provided is not correct.
Please check the email address and correct it.
Your question is posted on this page
Would you like to receive an email when new answers and questions are posted? Please enter your email address.