3332
USING THE VIDEO CONFIGURATION MODE
The One For All 4-Device Video Expert remote control
includes a powerful Video Configuration feature that
allows you to combine the most used functions of your
Audio/Video equipment into one V.CONFIG mode. The
features you can combine are organized into five groups
and can be defined by specific modes as follows:
Function Groups
• Function Group 1 – Transport Keys (Play,Stop,Fast
Forward, Rewind, Pause, Record, Forward Scan,and
Rewind Scan)
• Function Group 2 – Volume Keys (Volume Up,Volume
Down,and Mute)
• Function Group 3 – Channel Keys (Channel Up,
Channel Down,Digits 0-9,Enter,Previous Channel,
Sleep,and Display)
• Function Group 4 – Menu Keys (Menu,Up,Down,Left,
Right,and Select)
• Function Group 5 – PIP Keys (Picture-In-Picture,Swap,
and Move)
Component (Mode) Groups
• Component Group 1 – VCR and DVD
• Component Group 2 – TV,VCR,and Cable/Sat
• Component Group 3 – TV,VCR,and Cable/Sat
• Component Group 4 – TV,VCR,Cable/Sat,and DVD
• Component Group 5 – TV,VCR,and Cable/Sat
To enable the Video Configuration feature,you’ll need to
perform the following programming sequence:
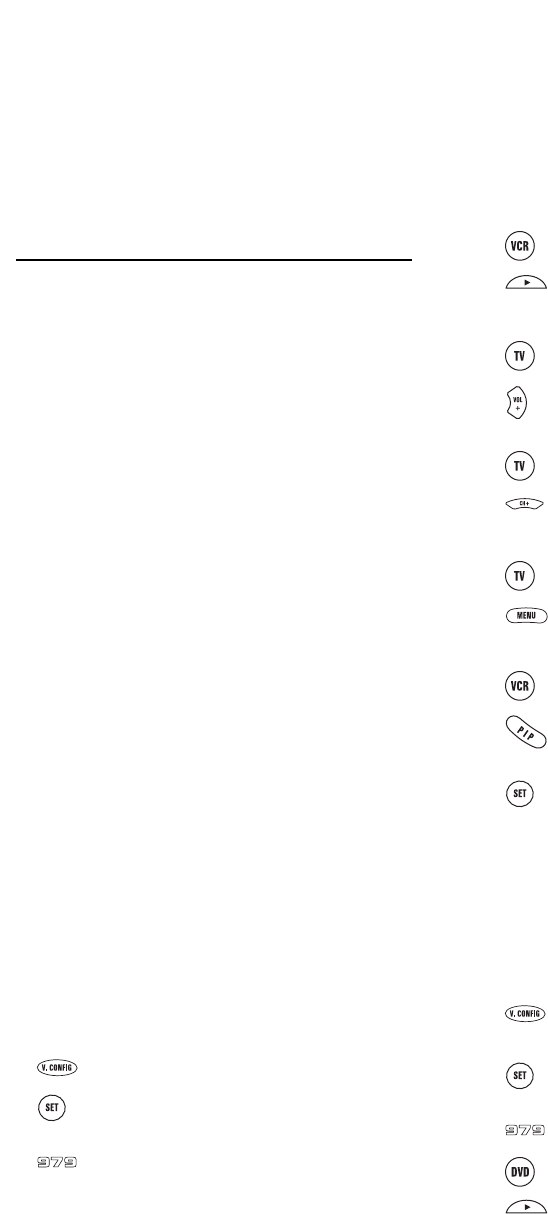
1. On the remote control,press V.CONFIG once.
2. Press and hold SET until the LED blinks twice,
then release SET.
3. Enter 9 - 7 - 9.The LED will blink twice.
At this point, you’ll assign Component Groups to Function
Groups up to five times,depending on how many combi-
nations you need.You can perform any of the following
steps in any order,as long as you finish the sequence with
step 9.
4. Select a key from Component Group 1 (i.e.,VCR
or DVD) and press it once.Press PLAY to assign
Function Group 1 (i.e.,the transport keys).The
LED will blink twice.
5. Select a key from Component Group 2 (i.e.,TV,
VCR,or CBL/SAT) and press it once.Press VOL+
to assign Function Group 2 (i.e.,the volume
keys).The LED will blink twice.
6. Select a key from Component Group 3 (i.e.,TV,
VCR,or CBL/SAT) and press it once.Press CH+
to assign Function Group 3 (i.e.,the channel
keys).The LED will blink twice.
7. Select a key from Component Group 4 (i.e.,TV,
DVD,VCR,or CBL/SAT) and press it once.Press
MENU to assign Function Group 4 (i.e.,the
menu keys).The LED will blink twice.
8. Select a key from Component Mode Group 5
(i.e.,TV,VCR,or CBL/SAT) and press it once.
Press PIP to assign Function Group 5 (i.e.,the
PIP keys).The LED will blink twice.
9. To lock in the Video Configuration,press SET
until the LED blinks twice,then release SET.
An Example Video Configuration
From one mode,you would like to play your DVD,use the
Volume control on the TV,change channels on your Cable
Box,control the Menu on the Cable Box,and use the PIP
feature of your TV. To program this Video Configuration
you would perform the following steps:
1. On the remote control,press V.CONFIG once.
2. Press and hold SET until the LED blinks twice,
then release SET.
3. Enter 9 - 7 - 9.The LED will blink twice.
4. Press DVD once and then press PLAY.The LED
will blink twice.
...continued on next page