Pull the strap tight so that it does not come loose.
a.Charge the battery
Battery comes partially charged.
b.Insert the battery in the camera
a.Press the o button
To turn off the camera, press the o button once again.
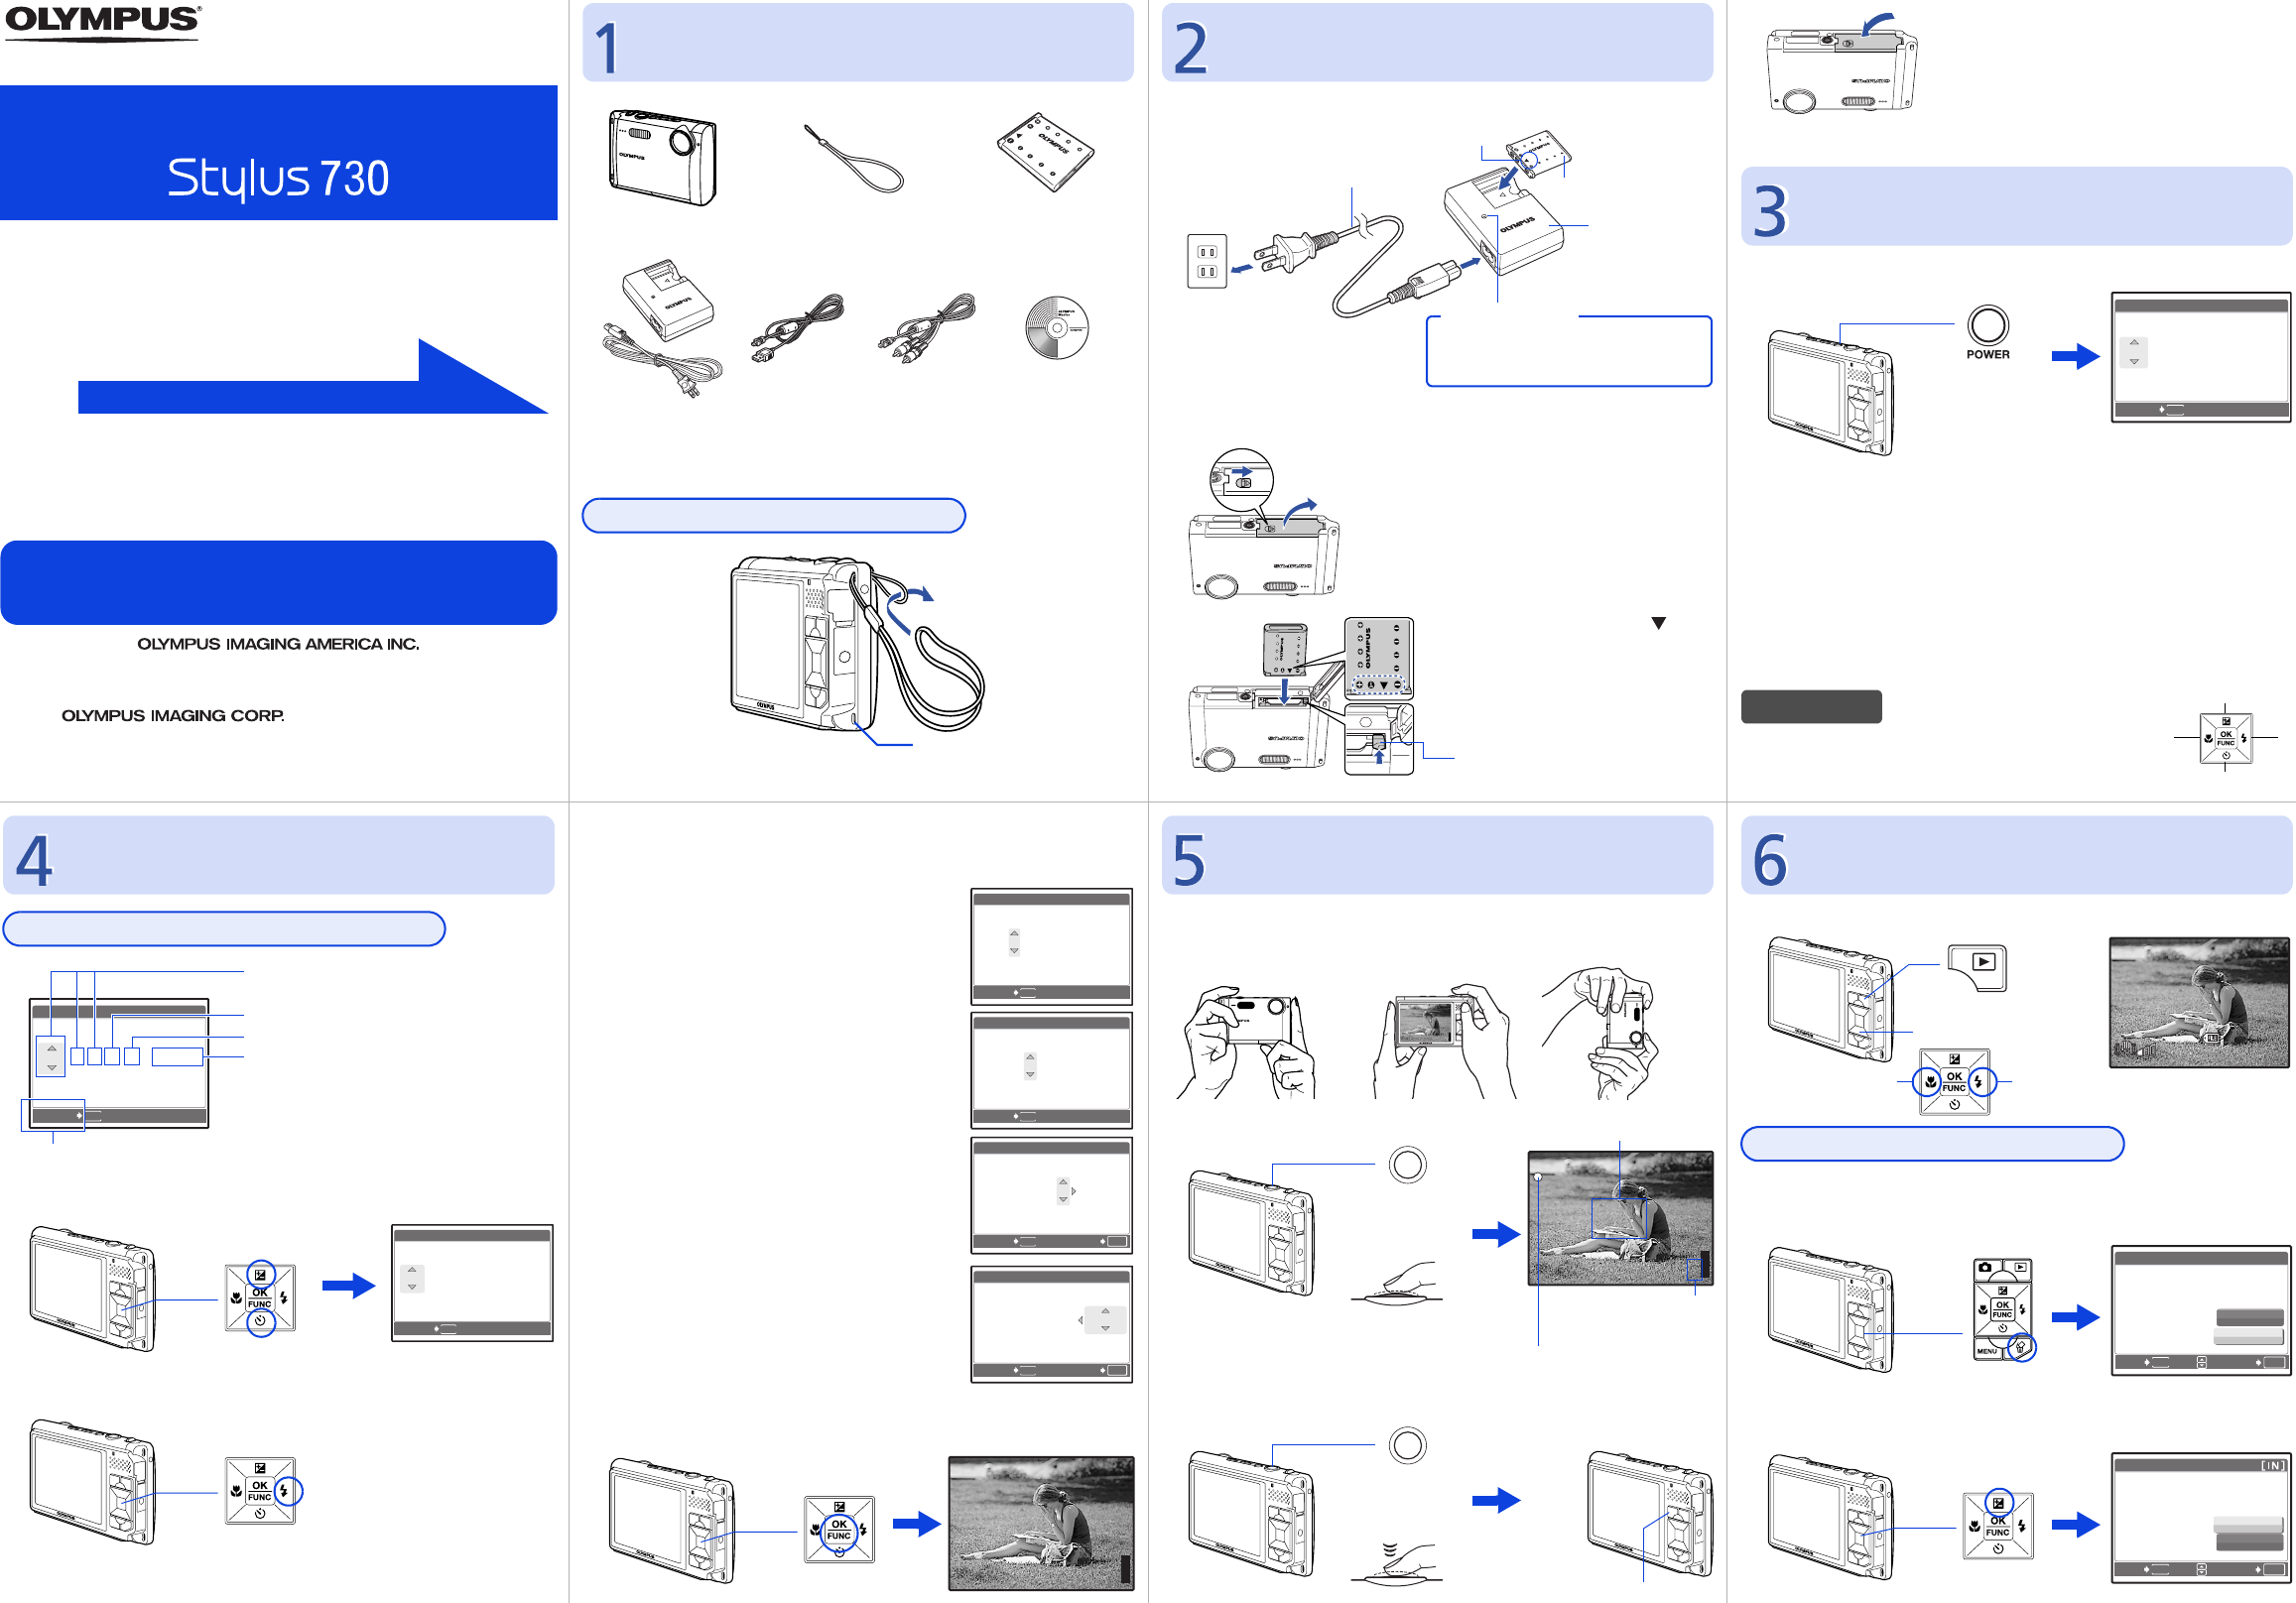
Quick Start Guide
S
tart
Here
For more information, please refer to the Basic & Advanced Manuals
or visit: www.olympusamerica.com/support
Gather these items (box contents)
Digital CameraStrapLI-42B Lithium Ion
Battery
LI-40C Battery
Charger
USB CableAV CableOLYMPUS Master
Software CD-ROM
Items not shown: Advanced Manual (CD-ROM), Basic Manual, and warranty
card. Contents may vary depending on purchase location.
Attach the strap
The strap can also be fed through strap
eyelet on the lower side.
Prepare the battery
1
Light On (Red): Charging
Light Off: Charging complete
(Charging time: Approx. 5 hours)
AC Wall
Outlet
Power Cable
Battery Charger
Lithium Ion Battery
3
W
2
Charging Indicator
1
3Insert the battery with the side
down.
To remove the battery, slide the
battery lock knob in the direction of
the arrow.
Battery lock knob
2
•When the date and time
have not yet been set, this
screen will appear.
4For details on inserting an optional xD-
Picture Card™, please refer to the
advanced manual.
Turn the camera on
o Button
MENU
CANCEL
X
Y/M/D
Y/M/D
Y
Y
M D
D
TIME
TIME
----.--.-- --:--
----.--.-- --:--
1
2
34
Hint
The directions of the arrow pad (1243) is indicated
with 1243 in the supplied instruction manual.
a.Press the
1F
button and the
2Y
button to select [Y].
•The first two digits of the year are fixed.
b.Press the 3# button.
c.Press the 1F button and the
2Y button to select [M].
d.Press the 3# button.
e.Press the 1F button and the
2Y button to select [D].
f.Press the 3# button.
g.Press the 1F button and the
2Y button to select “hour”,
“minute”.
•The time is displayed in the 24-hour format.
h.Press the 3# button.
i.Press the 1F button and the
2Y button to select [Y/M/D].
j.After all items have been set, press the button.
•
For precise time setting, press the
button as the time signal strikes 00 seconds.
a.Hold the camera
c. Shoot
a.Press the q button.
a.As described in a. above, display the picture you
want to erase.
b.Press the
S
button.
c.Press the 1F button to select [YES] and press the
button to erase the image.
Set date and time
About the date and time setting screen
MENU
CANCEL
X
Y/M/D
Y/M/D
Y
Y
M D
D
TIME
TIME
----.--.-- --:--
----.--.-- --:--
Y-M-D (Year-Month-Day)
Exits a setting.
Minute
Date formats (Y-M-D, M-D-Y, D-M-Y)
Hour
2Y Button
1F Button
CANCEL
MENU
2006
2006
.--.-- --:--
.--.-- --:--
X
Y
Y
M
D
D
TIME
TIME
Y/M/D
Y/M/D
3# Button
2006
2006
.
11
11
.-- --:--
.-- --:--
CANCEL
MENU
X
Y
Y
M
D
D
TIME
TIME
Y/M/D
Y/M/D
2006
2006
.
11
11
.
26
26
--:--
--:--
CANCEL
MENU
X
Y
Y
M
D
D
TIME
TIME
Y/M/D
Y/M/D
CANCEL
MENU
OK
SET
2006
2006
.
11
11
.
26
26
12
12
:
30
30
X
Y
Y
M
D
D
TIME
TIME
Y/M/D
Y/M/D
CANCEL
MENU
OK
SET
2006
2006
.
11
11
.
26
26
12
12
:
30
30
X
Y/M/D
Y/M/D
Y
Y
M
D
D
TIME
TIME
Button
P
HQ
HQ
3072
3072
×
2304
2304
[
IN
IN
]
44
[]
Horizontal gripVertical grip
b.Focus
The K button blinks.
Take a picture
(Pressed
halfway)
Shutter
Button
P
HQ
HQ
3072
3072
×
2304
2304
[
IN
IN
]
44
[]
The green lamp indicates the
focus and exposure are locked.
The number of remaining
still pictures is displayed.
Place this mark over your subject.
(Pressed
completely)
Shutter
Button
Review your pictures
12:30
12:30
'06.11.26
'06.11.26
100-0001
100-0001
1
HQ
HQ
[
IN
IN
]
q Button
Arrow Pad
Next Picture
Prev. Picture
Erase pictures
S Button
OK
SET
MENU
BACK
YES
NO
ERASE[IN]
1F Button
OK
SET
MENU
BACK
YES
NO
ERASE
d4316_e_qsg_7.fm Page 1 Monday, July 31, 2006 11:14 PM
Need help? Post your question in this forum.
Report abuse
Libble takes abuse of its services very seriously. We're committed to dealing with such abuse according to the laws in your country of residence. When you submit a report, we'll investigate it and take the appropriate action. We'll get back to you only if we require additional details or have more information to share.
Product:
Forumrules
To achieve meaningful questions, we apply the following rules:
First, read the manual;
Check if your question has been asked previously;
Try to ask your question as clearly as possible;
Did you already try to solve the problem? Please mention this;
Is your problem solved by a visitor then let him/her know in this forum;
To give a response to a question or answer, do not use this form but click on the button 'reply to this question';
Your question will be posted here and emailed to our subscribers. Therefore, avoid filling in personal details.
You will receive an email to register for one or both of the options.
Get your user manual by e-mail
Enter your email address to receive the manual of Olympus Stylus 730 Quick Start Guide in the language / languages: English as an attachment in your email.
The manual is 0,6 mb in size.
You will receive the manual in your email within minutes. If you have not received an email, then probably have entered the wrong email address or your mailbox is too full. In addition, it may be that your ISP may have a maximum size for emails to receive.
The manual is sent by email. Check your email
If you have not received an email with the manual within fifteen minutes, it may be that you have a entered a wrong email address or that your ISP has set a maximum size to receive email that is smaller than the size of the manual.
The email address you have provided is not correct.
Please check the email address and correct it.
Your question is posted on this page
Would you like to receive an email when new answers and questions are posted? Please enter your email address.