Nikon Callaway id TECH / Measurement and Display
External display and contents
After the power is turned on, the internal
and external LEDs are illuminated until
either the POWER or MODE button is
pressed.
If 30 seconds pass without operation, the
power turns off.
before power turns off, this screen is
displayed.
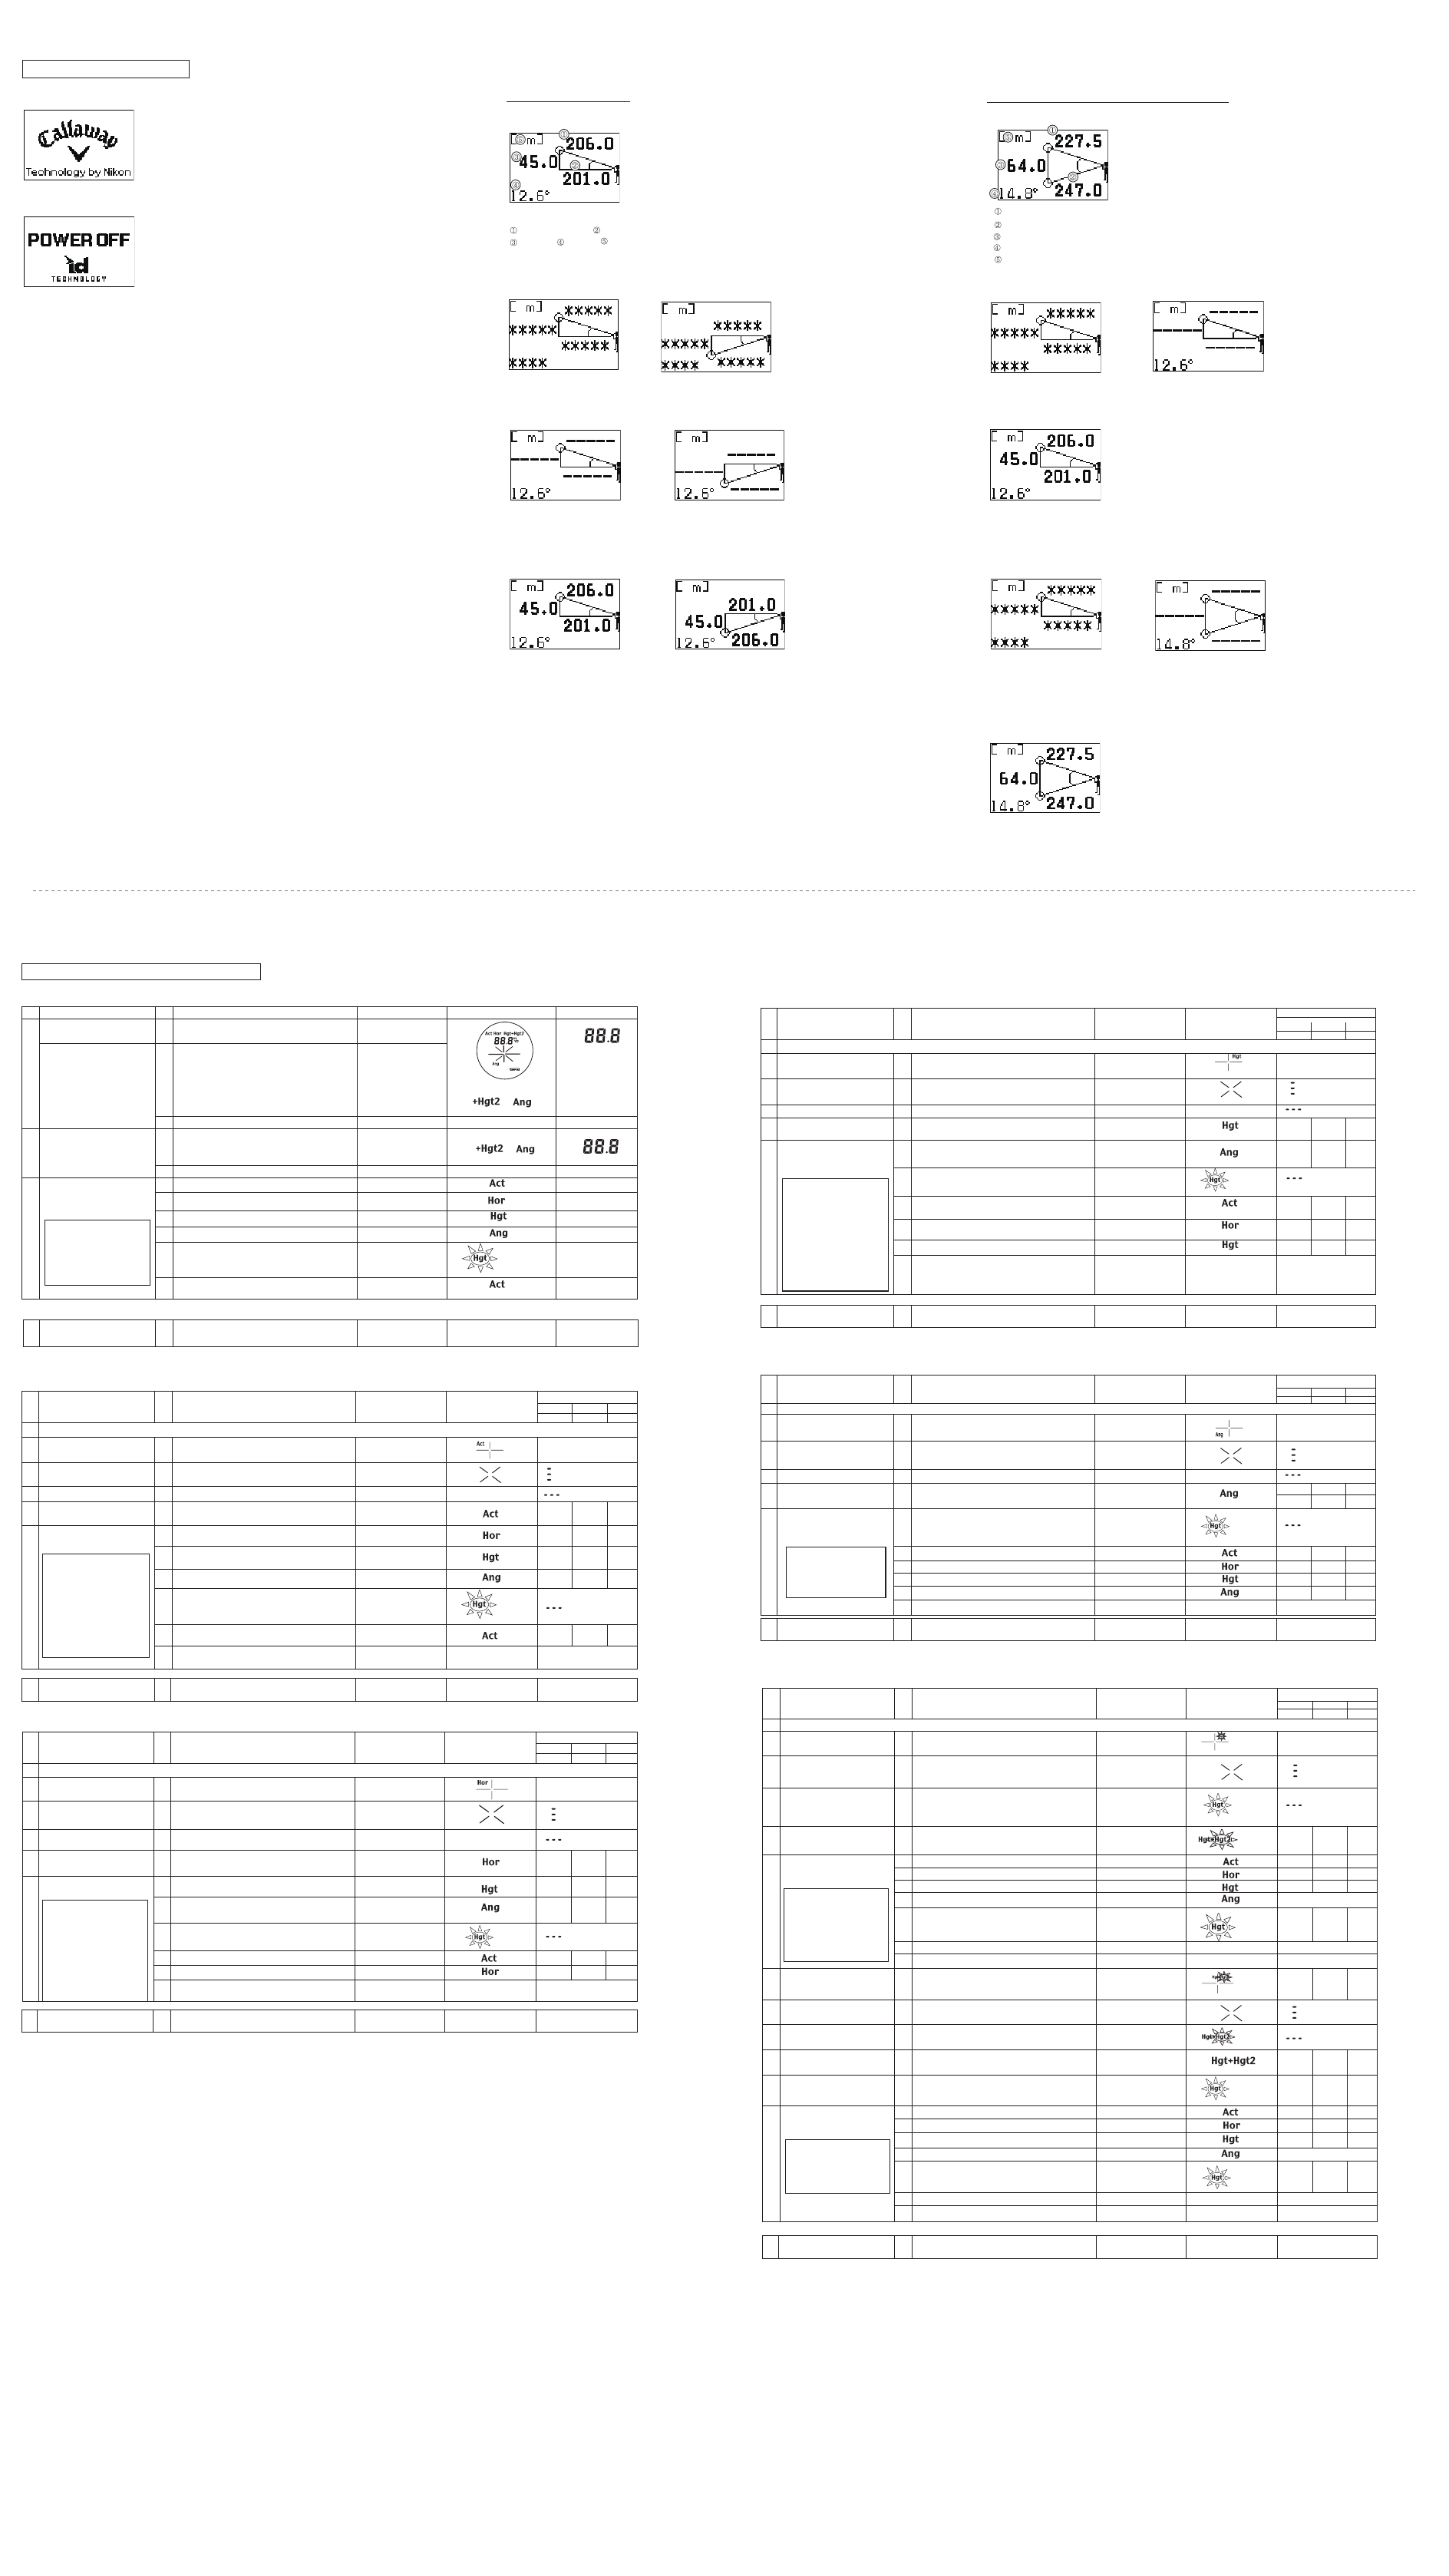
After measurement, all data “linear
distance, horizontal distance, height and
angle” are displayed. Units can be shown
in meters, yards or feet.
indicated by
°(degree).
[ m ] : meter
[ YD ] : yards
[ f t ] : feet
Linear distance Horizontal distance
Height Angle Unit
[While measuring]
When the target is upward
When the target is downward
[Measurement unsuccessful or unable to measure]
When the target is upward
When the target is downward
With negative values,
the “– (minus)” symbol is not shown.
[Measurement complete]
[Power On]
[Power off notice]
[Results]
1 Point Measurement
When the target is upward
When the target is downward
After measuring two points, " Linear
distance to two points" and " V
separation (height) and angle between
two points" are displayed. Units can be
shown in meters, yards or feet.
are indicated by (degree).
Linear distance (1st point)
Linear distance (2nd point)
V
Angle of two points
Unit
Measure the distance between two points
[Measuring 1st point]
(Angle measurements never fail.)
[Results of 1st point]
[Measuring 2nd point ]
(Although the point is located
downward, display shows the
upward position.)
(Angle measurements never fail.)
[Display of results for two points]
[Results]
[Failed to measure 1st point]
[Failure to measure 2nd point]
8 Power off
Regardless of process, after 30 seconds 30 seconds
since your last operation, power turns off. without operation
Operation/Results Work Button Display Display examples
0 Switch for FULL/Limited Perform this operation MODE
modes when power is off. +(follow by) POWER
Operation is complete (1) Initial screen
When switching to Limited mode
When the symbol (shown on right) does not appear
Limited mode is switched to Full mode.
After approx. two seconds, proceed to (2).
(2) Measurement standby
Last use symbol
1 Power On Initial screen
POWER
All symbols (while pressing)
Measurement standby When this symbol (shown on right)
does not appear, Limited mode is set.
Measurement standby
Last Use mode symbol
2 Selecting and setting
(1) Linear distance【 3】
n/a
Limited mode (2) Horizontal distance
【4 】
MODE n/a
(3) Height (from horizontal)【 5】 MODE
n/a
(4) Angle (from horizontal)【 6】 MODE
n/a
(5)
V
【7 】
MODE
blinks.
n/a
Return to 2-(1) Linear distance, then repeat.
n/a
The angles and heights
between two points are
displayed only at the FULL
mode setting.
Linear distance, Horizontal
distance and height are
displayed when FULL/Limited
mode is set.
Initial screen (FULL mode)
Operation/Results W Button Display
Display examples
meter yards feet
Elevation(°) Depression(°)
4
Seeking your target
Horizontal distance
(Align the reticle with target.)
4-2 Measurement With the POWER button depressed, continuous measurement
POWER
(Laser irradiate symbol is displayed.) is possible for up to 20 seconds. (When done, 4-3 display appear)
Failure to measure Repeat step 4-1.
Measurement OK
Horizontal distance
201 220 660
Follow by 4-5 or 4-1.
Data display after
switching modes
(1) Height (from horizontal)【 5】 MODE
45.0 49.2 146
(2) Angle (from horizontal)【 6】 MODE 13 -13
(3)
V【 7】 MODE
blinks
(4) Linear distance【 3】 MODE
206 225 676
(5) Horizontal distance MODE 201 220 660
Return to 4-5-(1), then repeat.
MODE
(In Limited mode, return to 4-5-(1), then repeat (1), (4) and (5))
Operation/Results Work Button Display
meter yards feet
Elevation(°) Depression(°)
3
Seeking your target
Linear distance
(Align the reticle with target)
Measurement
With the POWER button depressed, continuous measurement
POWER
(Laser irradiate symbol is displayed.) is possible for up to 20 seconds. (When done, 3-3 display appears.)
Failure to measure Repeat step 3-1.
3-4 Measurement OK Linear distance
206 225 676
Follow by 3-5 or 3-.1
3-5 Data display after
witching modes
(1) Horizontal distance【4】 MODE
201 220 660
(2) Height (from horizontal)【 5】 MODE 45.0 49.2 146
(3) Angle (from horizontal)【 6】 MODE 13 -13
(4)
V【 7】
MODE
blinks
(5) Linear distance MODE 206 225 676
Return to 3-5-(1) and repeat.
MODE
(In Limited mode, return to 3-5-(1), then repeat (1),(2) and (5))
【0 • 1 • 2 】 Power On/Off and others
See the relevant section in this manual for each mode setting and display
【3 】 Linear distance mode
8
Power off
Regardless of process, after 30 seconds 30 seconds
since your last operation, power turns off. without operation
Switching the measurement
unit changes it for each
mode. The POWER button
can be used to measure in
each mode.
The angle and vertical
separation (height between
two points) are displayed
when set at FULL mode.
Limited mode shows linear
distance, horizontal distance
and height.
8 Power off
Regardless of process, after 30 seconds 30 seconds
since your last operation, power turns off. without operation
Measuring procedures and internal display
【4】 Horizontal distance mode
Switching the measurement
unit changes it for each
mode. The POWER button
can be used to measure in
each mode.
The angle and vertical
separation (height between
two points) are displayed
when set at FULL mode.
Limited mode shows linear
distance, horizontal distance
and height.
Operation/Results Work Button Display
Display examples
meter yards feet
Elevation(°) Depression(°)
6 Measurement with angle mode setting (only at FULL mode setting)
Seeking your target
Angle (from horizontal)
(Align the reticle with target.)
Measurement With the POWER button depressed, continuous measurement
POWER
(Laser irradiate symbol is displayed.) is possible for up to 20 seconds. (When done 6-3 display appears)
6-3 Failure to measure Repeat step 6-1.
Measurement OK
Angle (from horizontal) 13 -13
Follow by 6-5 or 6-1.
5.2 -5.2
Data display after
switching modes (1) Vertical separation between two points【 7】 MODE
blinks
(2) Linear distance【 3】 MODE 206 225 676
(3) Horizontal distance【 4】 MODE
201 220 660
(4) Height ( from horizontal)【 5】 MODE 45.0 49.2 146
(5) Angle (from horizontal) MODE 13 -13
Return to 6-5-(1), then repeat.
Operation/Results W Button Display
meter yards feet
Elevation(°) Depression(°)
Seeking your target
Height (from horizontal)
(Align the reticle with target)
Measurement With the POWER button depressed, continuous measurement
POWER
(Laser irradiate symbol is displayed.) is possible for up to 20 seconds. (When done, 5-3 display appear)
Failure to measure Repeat step 5-1.
Measurement OK Linear distance
45.0 49.2 146
Follow by 5-5 or 5-1.
5-5
Data display after
switching modes
(1) Angle( from horizontal)【 6】 MODE
13 -13
(2) V【 7】 MODE
blinks
(3) Linear distance【 3】 MODE 206 225 676
(4) Horizontal distance【 4】 MODE 201 220 660
(5) Height (from horizontal) MODE
45.0 49.2 146
Return to 5-5-(1) and repeat.
MODE
(In Limited mode, return to 5-5-(3),
then repeat (3), (4) and (5).
【5】 Height mode
【6】
Switching the measurement
unit changes it for each
mode. The POWER button
can be used to measure in
each mode.
See the relevant section.
The angle and vertical
separation (height between
two points) are displayed
when set at FULL mode.
Limited mode shows linear
distance, horizontal distance
and height.
8 Power off
Regardless of process, after 30 seconds 30 seconds
since your last operation, power turns off. without operation
【7】 V
Operation/Results Work Button Display
Display examples
meter yards feet
Elevation(°) Depression(°)
7 Measurement with V
7-1 Seeking your target V
blinks
(Align the reticle with target) (1st target)
7-2 Measurement
POWER
(Laser irradiate symbol is displayed)
Failure to measure Follow by 7-1
blinks
Repeat 7-1, 7-2, 7-3 until measurement is complete.
Measurement OK
Height of 1st target (from Horizontal)
blinks
104 114 341
followed by 7-5 or 7-6.
7-5 Data display after (1) Linear distance (1st target)【 3】 MODE
247 270 810
switching modes (2) Horizontal distance (1st target)【 4】 MODE 224 245 735
(3) Height (from horizontal) (1st target)【 5】 MODE 104 114 341
(4) Angle (from horizontal) (1st target)【 6】 MODE 25
(5) V
MODE
blinks
0.0 0.0 0.0
7-5-(follow by 6-1 or 6-2)
(6-1) Return to 7-5-(1), then repeat. MODE
(6-2) follow by 7-3 or 7-4 After aiming, POWER
7-6 Aiming (2nd target) Vertical separation (height between two points)
blinks
104 114 341
(Align the reticle with target) (2nd target)
(Result shown is the height of the 1st target)
Measurement
POWER
(Laser irradiate symbol is displayed)
Failure to measure Follow by 7-6
blinks
Repeat 7-6,7-7 and 7-8 until measurement is complete
Measurement OK Vertical separation (height between two points)
64.0 70.0 210
After 2 seconds move to7-10
V
blinks
64.0 70.0 210
Follow by 7-1
Date display after (1) Linear distance (2nd target)【 3】 MODE
228 249 898
switching modes (2) Horizontal distance (2nd target)【 4】 MODE
224 245 735
(3) Height (from horizontal) (2nd target)【 5】 MODE
40.0 43.8 131
(4) Angle (from horizontal) (2nd target)【 6】 MODE
10
(5) Vertical separation (height between two points)
MODE
blinks
64.0 70.0 210
Fol
(6-1) Return to 7
MODE
(6-2) Follow by 7-3 or 7-4 After aiming POWER
Switching the measurement
unit changes it for each
mode. The POWER button
can be used to measure in
each mode
See the relevant section.
If the mode is switched, the
2nd target cannot be
measured
Switching the measurement
unit changes it for each
mode. The POWER button
can be used to measure in
each mode
See the relevant section.
Switching the measurement
unit changes it for each
mode. The POWER button
can be used to measure in
each mode
See the relevant section.
8 Power off
Regardless of process, after 30 seconds 30 seconds
since your last operation, power turns off. without operation
8 Power off
Regardless of process, after 30 seconds 30 seconds
since your last operation, power turns off. without operation