U heeft een set Nemef veiligheidsbijzetsloten aangeschaft die voldoen
aan de SKG
H
®
kwaliteitseisen, wat staat voor optimale inbraakwerend-
heid, kwaliteit en duurzaamheid. Bovendien zijn deze producten
geschikt voor gebruik ten behoeve van het Politiekeurmerk Veilig
Wonen
®
.
Toepassing:
• Deze Nemef veiligheidsbijzetsloten kunnen toegepast worden in hou-
ten deuren en altijd in combinatie met de meegeleverde veiligheids-
sluitkommen.
•
Veiligheidssluitkom dient gemonteeerd te worden in sterke kozijnstijl
(muurstijl òf tussenstijl breder dan 85mm). Tussenstijlen smaller dan
85mm dienen versterkt te worden met bijvoorbeeld een dwarsstijl òf
dedeurdientvoorzientewordenvan een (extra) Nemef SKG
HH
®
haak-
schootslot.
• Bij voorkeur monteren op ± 40-50 cm vanuit boven- en onderzijde
deur.
• In hardhouten deuren en kozijnen schroefgaten altijd (met een kleine-
re diameter dan die van de schroef) voorboren.
• Dit product nooit smeren met olie maar met een smeermiddel speci-
aal voor sloten, bv. Nemef Snel slotspray.
• Om storingen te voorkomen adviseren wij om de voorplaat van het
slot niet te schilderen.
• Gelijksluitende bijzetsloten zijn na te bestellen.
• Neem bij problemen of vragen contact op met uw leverancier of schrijf
naar Nemef consumentenservice, Antwoordnummer 1312, 7300 VB
Apeldoorn.
Montage:
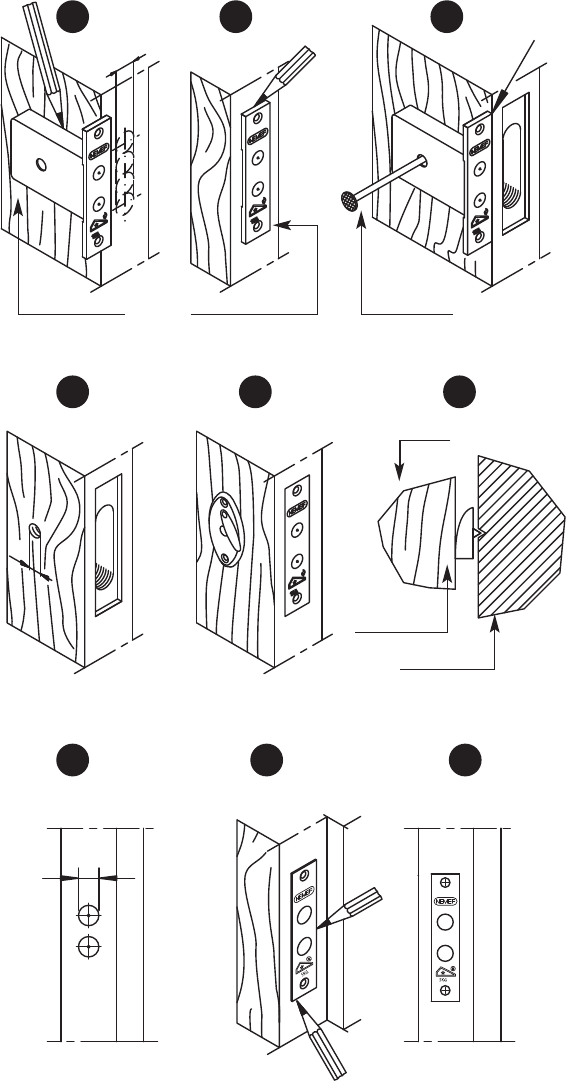
1. Teken boven- en onderzijde van slotkast af op sluitkant deur op
gewenste hoogte (bij voorkeur op kniehoogte, ± 40 cm). Trek een ver-
ticale hartlijn tussen deze lijnen en boor hierop een rij gaten (boor-
maat ø 16 mm en 75 mm diep). Steek hout weg tussen geboorde
gaten zodat slot moeiteloos in uitsparing past (figuur 1).
2. Teken nu omtrek van de voorplaat af en steek het met een beitel op 4
mm diepte uit zodat voorplaat vlak ligt met de deur (figuur 2).
3. Houdt het slot op juiste plaats tegen de deur. Teken nu boorgat voor
de sleutel af (figuur 3). (Let op: voorkant voorplaat gelijk aan kopse
kant deur, zie pijl)
3.1Boormaat sleutelgat ø 10 mm (figuur 3.1).
4. Monteer het slot in de deur met spaanplaatschroeven 4x40 mm.
Bevestig de rozetten met de meegeleverde schroeven (figuur 4). Het
rozet met afdeklipje hoort aan de buitenzijde.
5. Sluit de deur en draai met de sleutel de schoten uit tegen het kozijn
zodat de punten van de schoten een afdruk in het kozijn achterlaten
(figuur 5).
6. Boor op de afgetekende plaatsen (exact) 2 gaten ø 16 mm met een
diepte van 30 mm (figuur 6).
7. Plaats de sluitkom en teken de de omtrek af op het kozijn. Steek op
de afgetekende plaatsen het hout 2 mm diep weg zodat de sluitkom
vlak ligt met het kozijn (figuur 7).
8. Monteer de sluitkom met spaanplaatschroeven 4x40 mm (figuur 8).
123
45
6
78
SLOTKAST
DEUR
SCHOOT
KOZIJN
VOORPLAAT
±
ø2mm
3.1
16
1
6
10
Need help? Post your question in this forum.
Report abuse
Libble takes abuse of its services very seriously. We're committed to dealing with such abuse according to the laws in your country of residence. When you submit a report, we'll investigate it and take the appropriate action. We'll get back to you only if we require additional details or have more information to share.
Product:
Forumrules
To achieve meaningful questions, we apply the following rules:
First, read the manual;
Check if your question has been asked previously;
Try to ask your question as clearly as possible;
Did you already try to solve the problem? Please mention this;
Is your problem solved by a visitor then let him/her know in this forum;
To give a response to a question or answer, do not use this form but click on the button 'reply to this question';
Your question will be posted here and emailed to our subscribers. Therefore, avoid filling in personal details.
Register
Register getting emails for Nemef 1008 at:
new questions and answers
new manuals
You will receive an email to register for one or both of the options.
Get your user manual by e-mail
Enter your email address to receive the manual of Nemef 1008 in the language / languages: Dutch as an attachment in your email.
The manual is 0,11 mb in size.
You will receive the manual in your email within minutes. If you have not received an email, then probably have entered the wrong email address or your mailbox is too full. In addition, it may be that your ISP may have a maximum size for emails to receive.
The manual is sent by email. Check your email
If you have not received an email with the manual within fifteen minutes, it may be that you have a entered a wrong email address or that your ISP has set a maximum size to receive email that is smaller than the size of the manual.
The email address you have provided is not correct.
Please check the email address and correct it.
Your question is posted on this page
Would you like to receive an email when new answers and questions are posted? Please enter your email address.