Display shows the total number of folders and files.
• Press FOLDER UP (8) to skip to the next folder and display the folder number.
• Press FOLDER DN (7) to skip to the previous folder and display the folder number.
In playback mode:
1. Press FOLDER UP (8) to play the first track in the next folder.
2. Press FOLDER DN (7) to play the first track in the previous folder.
3. Turn the TUNING knob (13)to SKIP - / TUNING – to go back to the previous track within the
same folder. Turn it to SKIP + / TUNING + to go to the next track within the same folder.
4. When playing the last track of the current folder, turn to SKIP + / TUNING + will bring you to
the first track of next folder.
PLAY MODE
In CD/MP3 mode, press PLAY MODE (3) repeatedly to select among:
• REPEAT - Repeats current track.
• REPEAT FOLDER - Repeats all files in the current folder. (MP3/WMA only)
• REPEAT ALL - Repeats the entire disc.
• RANDOM - Random playback.
• Off - Normal playback.
Note: In programmed playback mode, REPEAT FOLDER and RANDOM play modes cannot be
selected.
PROGRAMMED PLAYBACK
CD
Programmed playback enables tracks on a disc to be played in the desired order. Up to 20
tracks can be programmed.
1. Press the “MEMORY” button (6).
2. Turn the SKIP - / TUNING – or SKIP + / TUNING + knob (13) to select the desired track
number.
3. Press “MEMORY” button (6) again to memorize the track.
4. Repeat steps 2 and 3 until all desired tracks are programmed.
5. Press the “PLAY/PAUSE” button (2) to start. “ ” & “MEMORY” are shown on the CD display.
6. Press “STOP” button (4) to stop programmed playback.
7. Open the CD door or turn off the CD palyer to clear programmed memory.
Note: Programming can only be made when the player is in stop mode.
MP3
Same as CD programmed playback operation with addition of folder number.
You can select the desired folder number by FOLDER UP / FOLDER DN button. Press MEMORY
button (6) to memorize the selected folder. Then select the desired track number as described
above.
Note: Programming can only be made when the player is in stop mode.
ID3
During MP3 / WMA playback, if the current track has ID3 tag, the title, artist and album name
scrolls across the display. If the current track does not have ID3, display will show the current
folder and file number only.
GB - 1
M-26 RD
Please read the instruction carefully
before operating the unit.
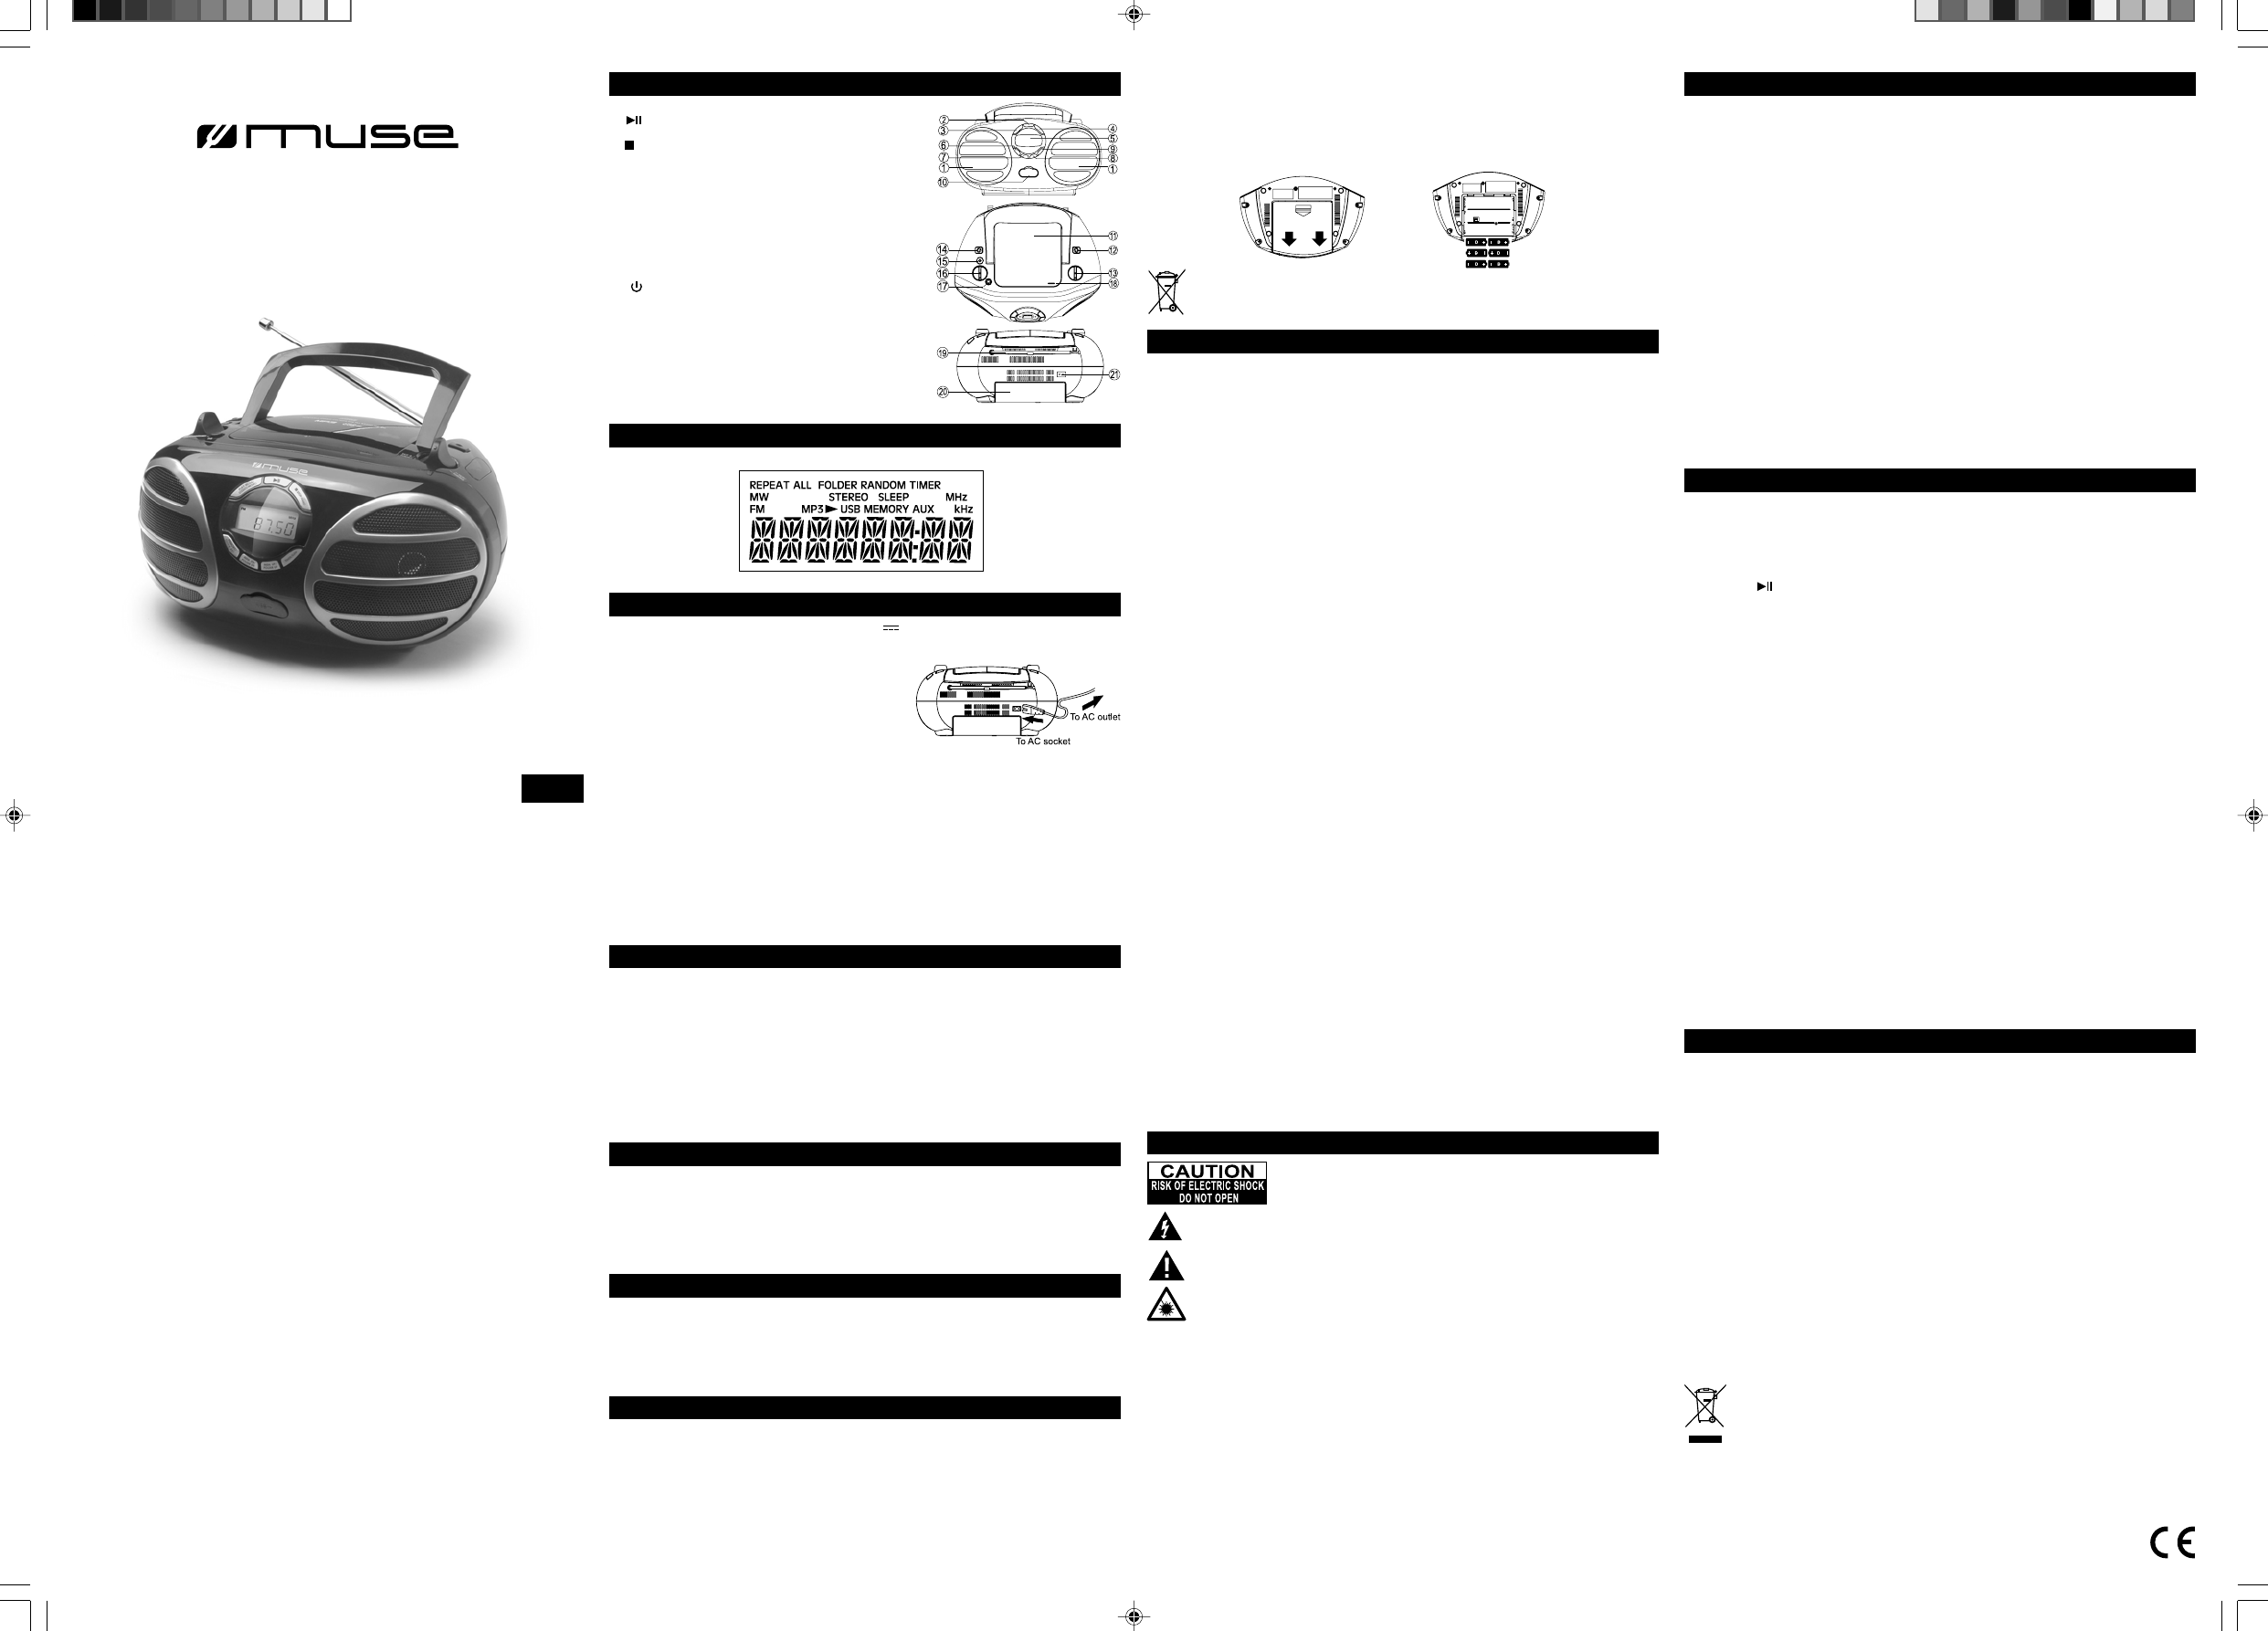
LOCATION OF CONTROLS
GB - 2GB - 3
GB - 5GB - 6GB - 7GB - 4
User Manual
PORTABLE RADIO CD PLAYER WITH USB
1. SPEAKER
2. PLAY / PAUSE button
3. PLAY MODE / STEREO/ MONO button
4. STOP / BAND button
5. DISPLAY
6. MEMORY / CLOCK ADJ. button
7. MEM. DN / FOLDER DN button
8. MEM. UP / FOLDER UP button
9. TIMER / SLEEP button
10. USB port
11. CD door
12. FUNCTION button
13. TUNING control (SKIP - / TUNING - or
SKIP + / TUNING +)
14. STANDBY button
15. AUX IN jack
16. VOLUME control
17. EQ button
18. CD door OPEN/CLOSE button
19. Telescopic antenna
20. Battery compartment
21. AC socket
POWER SUPPLY
This unit operates on AC (230V~50Hz) or DC (9V 6 X D/LR20/UM-1).
USING BATTERIES
To switch from AC power supply to battery power supply, disconnect the AC cord from the AC
inlet, then disconnect main unit. Battery power will be cut automatically while the cord is connected.
Note: plug is used as the disconnect device. The disconnect device shall remain readily operable.
When the volume decrease, or the sound distorts, replace all of the batteries with new ones.
Open the lid of the battery compartment on the bottom and insert six (size D) batteries(not
supplied), with the + and - marks correctly aligned, then close the lid.
CLOCK AND TIMERS SETTING
LISTENING TO THE RADIO
USING HOUSE CURRENT
Before use, check that the rated voltage of your unit
matches your local voltage. Connect the provided AC
power cord with this unit before inserting the cord into
a convenient standard AC outlet.
Before throwing any batteries away, consult your distributor who may be able to take
them back for specific recycling.
SPECIFICATIONS
WARNINGS
The lightning flash with arrowhead symbol within the triangle is a warning sign alerting
the user of “dangerous voltage” inside the unit.
The exclamation point within the triangle is a warning sign alerting the user of important
instructions accompanying the product.
CAUTION: Invisible laser radiation when open and interlocks defeated. Avoid exposure
to beam.
ATTENTION: To reduce the risk of electric shock, do not remove the
cover. There are no user serviceable parts inside the unit. Refer all
servicing to qualified personnel.
WARNING - To reduce the risk of fire or electric shock, do not expose this appliance to rain or
moisture.
Electrical Fast Transient (Burst) / ESD Remark:
- In case of malfunction due to electrical fast transient (Burst) or electrostatic discharge, just
reset the product (reconnect of power source may be required) to resume normal operation.
Electric Power
1 Power sources - Use on batteries or AC operation, as specified in the Operating
instructions and marked on the unit.
2 AC power cord
- When disconnecting the AC power cord, pull it out by the AC power plug. Do not pull the cord
itself.
- Never handle the AC power plug with wet hands, as this could result in fire or shock.
- Power cords should be firmly secured to avoid being bent, pinched, or walked upon. Pay
particular attention to the cord from the unit to the power socket.
- Avoid overloading AC power plug and extension cords, beyond their capacity, as this could
result in fire or shock.
- To be completely disconnect the power input, the mains plug of apparatus shall be
disconnected from AC outlet.
- The mains plug of apparatus should not be obstructed OR should be easily accessed during
intended use.
3 When not in use - Unplug the AC power cord from the AC outlet or remove all the batteries
if the unit will not be used for several months or more. When the cord is plugged in a small
amount of current continues to flow to the unit, even when the power is turned off.
PRECAUTIONS
CARE AND MAINTENANCE
If at any time in the future you should need to dispose of this product please note that
Waste electrical products should not be disposed of with household waste. Please
recycle where facilities exist. Check with your Local Authority or retailer for recycling
advice. (Waste Electrical and Electronic Equipment Directive)
Clean your unit with a damp (never wet) cloth. Solvent or detergent should never be used.
Avoid leaving your unit in direct sunlight or in hot, humid or dusty places.
Keep your unit away from heating appliances and sources of electrical noise such as
fluorescent lamps or motors.
If drop-outs or interruptions occur in the music during CD play, or if the CD fails to play at all,
its bottom surface may require cleaning.
Before playing, wipe the disc from the center outwards with a good soft cleaning cloth.
The ventilation should not be impeded by covering the ventilation openings with items, such
as newspapers, table-cloths, curtains, etc. 5cm distances around the apparatus for sufficient
ventilations.
Attention should be drawn to the environmental aspects of battery disposal; the use of
apparatus in tropical moderate climates.
The marking artwork was located in bottom enclosure.
The product function maybe reset when it is subjected to electrostatic discharge disturbance
test.
To reduce the risk of fire or electric shock, do not expose this appliance to rain or moisture.
To be completely disconnect the power input, the mains plug of apparatus shall be
disconnected from the mains.
Excessive sound pressure from earphones and headphones can cause hearing loss.
Battery shall not be exposed to excessive heat such as sunshine, fire or the like.
Do not throw batteries in fire!
The apparatus shall not be exposed to dripping or splashing and that no objects filled with
liquids, such as vases, shall be placed on apparatus.
No naked flame sources such as lighted candles should be placed on the apparatus.
1.
2.
3.
4.
5.
6.
7.
8.
9.
10.
11.
12.
13.
14.
15.
Due to continuing improvement, the features and the design are subject to change without
notice.
Where to place the item :
Today’s furniture is coated with a wide variety of lacquers and synthetic-coatings that are treated
with an extensive range of cleaning products. Therefore, the possibility that some of these sub-
stances contain components that react adversely to the rubber feet of the item and soften them,
cannot be completely excluded. The rubber feet of the appliance can cause discoloring to furni-
ture surfaces. If necessary, place the appliance on a non-slide surface.
FM 87.5 - 108 MHz
MW 522 - 1620kHz
MW Built - in ferrite bar
FM Rod antenna
2x1W (RMS)
3" 8 OHM
3.5MM
AC : 230V~50Hz
DC : 9V ( 6 x 1.5V LR20/”D”/UM1 )
310(L) x 247(D) x 158(H)mm
1.85 KGS
RADIO SECTION
Tuning ranges:
Antennas:
GENERAL
Output power:
Speaker:
Phones jack:
Power source:
Dimensions:
Weight
English
CLOCK
If the clock is not set, the time digits blink.
1. In Standby mode, press the MEMORY / CLOCK ADJ. button (6), the hour digits blink.
2. Use the TUNING control (SKIP - / TUNING – or SKIP + / TUNING +) (13) to set the hour,
press MEMORY / CLOCK ADJ. (6) when done, the minute digits blink.Turn the SKIP - / TUN-
ING – or SKIP + / TUNING + knob (13) to set the minute, press MEMORY / CLOCK ADJ. button
(6) to save time setting.
ON/OFF TIMER
You can automatically turn on the unit on radio, CD or USB to wake you up for example.
1. In standby mode, press and hold SLEEP/TIMER button (9) to access timer settings.
2. Display shows “ON TIMER”, and then hour digits blink. Use the TUNING control (SKIP - /
TUNING – or SKIP + / TUNING +) (13) to set the hour, press TIMER button (9) when done, the
minute digits blink. Turn the SKIP - / TUNING – or SKIP + / TUNING + knob (13) to set the
minute, press TIMER button (9) to save the setting. The display shows “OFF TIMER”
3. Set the switch OFF time by the same process as described above.
4. Select a timer ON mode between CD, USB, TUNER and AUX with SKIP - / TUNING – or SKIP
+ / TUNING + control (13) and confirm with TIMER button (9). Then select the timer on volume
by SKIP - / TUNING – or SKIP + / TUNING + knob (13).
5. Press TIMER button (9) to save the settings.
Note: The icon “TIMER” is displayed when timer is activated.
Canceling the On/Off Timer
In standby mode, press TIMER button (9) repeatedly until the icon “TIMER” disappear.
SLEEP TIMER
You can select a duration in minutes before the unit turns off automatically.
In playback mode, press and hold SLEEP button (9) to select 90, 80, 70, 60, 50, 40, 30, 20 or,
10 minutes.
• The SLEEP icon is displayed when sleep mode is activated.
• Sleep mode is automatically de-activated when the unit is turned off, and “SLEEP” icon will
disappear on the display.
LCD display
1. Press STANDBY button (14) to turn on the unit.
2. Press FUCTION button (12) to select the radio mode.
3. Select FM or MW with STOP/BAND button (4).
Note: Extend or reposition the antenna (19) for better FM reception. Rotate the unit for better
MW reception.
Select FM stereo or FM mono mode with PLAY MODE / STEREO/ MONO button (3)
4. Use the TUNING control (13) to tune to a station.
- Turn to SKIP - / TUNING – to decrease radio frequency.
- Turn to SKIP + / TUNING + to increase radio frequency.
- Turn and hold the TUNING knob to automatically tune to the next station.
5. Adjust your desired volume with VOLUME control (16).
6. To switch off the unit and stop listening to radio, press STANDBY button (14).
Setting preset stations
1. In radio mode, press STOP/BAND (4) to select radio band.
2. Use TUNING control (13) to select the station to be memorized as a preset station.
3. Press MEMORY / CLOCK ADJ. button (6).
4. Press MEM. DN / FOLDER DN button (7) or MEM. UP / FOLDER UP button (8) repeatedly to
assign the preset station number.
5. Press MEMORY / CLOCK ADJ. button (6) to confirm.
6. Repeat steps 2 to 5 to set additional preset stations.
Listening at presets stations
1. Press STOP/BAND (4) to select radio band.
2. Press MEM. DN / FOLDER DN button (7) or MEM. UP / FOLDER UP button (8) repeatedly to
access the desired preset stations.
Note: There are 20 preset locations for the FM band and 20 for the MW.
COMPACT DISC PLAYBACK(CD and MP3)
1. Press STANDBY button (14) to turn on the unit.
2. Press FUNCTION button (12) to select the CD mode.
3. Open the disc holder by pushing the OPEN/CLOSE CD button (11).
4. Insert a disc with the label side facing up.
5. Close the disc holder.
6. Start playback of the CD with PLAY/PAUSE button (2)
Note: Press button once to pause playback, press again to resume.
7. Stop playback with STOP button (4).The display shows the total number of tracks of the disc.
Searching for a track
During playback,turn the TUNING knob (13) to the desired track.
Playback resumes from the selected track.
Turn to SKIP - / TUNING –to return to the beginning of the track.
Turn to SKIP + / TUNING +to go to the next track.
Searching for a passage within a track
Turn and hold the SKIP - / TUNING – or SKIP + / TUNING + control (13), release it as soon as
you recognize the desired passage. CD playback resumes from this point.
CD SECTION
Channels:
S / N ratio:
Wow & Flutter:
Sampling frequency:
Quantization:
Pick up light source:
Pick up wave length:
CD SECTION
2 channels
60 dB
undetectable
44.1 kHz 8 x over sampling
1 bit DA converter
Semi - conductor laser
790 mm
Note on CD-R/RW discs
- Because of non-standardized format definition/ production of CD-R/RW, playback quality and
performance are not guaranteed.
- Manufacturer is not responsible for the playability of CD-R/RW due to recording conditions,
such as PC performance, writing software, media ability, etc.
- Do not attach a seal or label to either side of the CD-R/RW disc. It may cause a malfunction.
- It is recommended to record only audio files on CD-R/RW discs for easy reading.
- Do not try to open the disc compartment during playback.
- Do not touch the lens. That may cause malfunction.
USB OPERATION
PLAYBACK
1. Press FUNCTION button (12) to select the USB mode.
2. Connect USB flash memory or MP3 player into the USB port. The display will show total folder
and track number.
3. Press the PLAY/PAUSE button (2) to start playback.
PLAY MODE and PROGRAMMED PLAYBACK
Please refer to CD MP3 PLAY MODE and PROGRAMMED PLAYBACK
Note: Manufacturer is not responsible for the playability of USB flash memory or MP3 player due
to recording condition, capacity, interface compatibility, etc.
Due to different formats, reading time may differ between MP3 players.
USB connection can be direct or with a cable of max. 1m length.
AUXILIARY INPUT
1. Plug one end of cable (not included) into the AUX IN socket on the unit.
2. Plug the other end of the cable into the Headphone or Line Out socket of the external source.
3. Press the FUNCTION button (12) on the unit to select Auxiliary function. “AUX” indicator is
displayed.Operate your external auxiliary source as usual. Selections will be heard through
the unit’s speakers.
4. Adjust the volume to desired level.
5. To stop playback, disconnect your auxiliary source from the AUX IN jack.
SOUND CONTROLS
Volume
Adjust the volume level with VOLUME control. There are a total of 40 volume levels.
Preset Equalizer
Press the EQ button to toggle among the different sound effects (FLAT/ JAZZ/ ROCK/ CLAS-
SIC/ POP). The current selection is shown on the display briefly.
RD-2853 IB MUSE 001 REV2-GB.p652010-5-6, 10:471
Need help? Post your question in this forum.
Report abuse
Libble takes abuse of its services very seriously. We're committed to dealing with such abuse according to the laws in your country of residence. When you submit a report, we'll investigate it and take the appropriate action. We'll get back to you only if we require additional details or have more information to share.
Product:
Forumrules
To achieve meaningful questions, we apply the following rules:
First, read the manual;
Check if your question has been asked previously;
Try to ask your question as clearly as possible;
Did you already try to solve the problem? Please mention this;
Is your problem solved by a visitor then let him/her know in this forum;
To give a response to a question or answer, do not use this form but click on the button 'reply to this question';
Your question will be posted here and emailed to our subscribers. Therefore, avoid filling in personal details.
Register
Register getting emails for Muse M-26 at:
new questions and answers
new manuals
You will receive an email to register for one or both of the options.
Get your user manual by e-mail
Enter your email address to receive the manual of Muse M-26 in the language / languages: English as an attachment in your email.
The manual is 0,44 mb in size.
You will receive the manual in your email within minutes. If you have not received an email, then probably have entered the wrong email address or your mailbox is too full. In addition, it may be that your ISP may have a maximum size for emails to receive.
If you have not received an email with the manual within fifteen minutes, it may be that you have a entered a wrong email address or that your ISP has set a maximum size to receive email that is smaller than the size of the manual.
The email address you have provided is not correct.
Please check the email address and correct it.
Your question is posted on this page
Would you like to receive an email when new answers and questions are posted? Please enter your email address.