2. Press TUNING knob, the unit will display station frequency and pre-memory address
(00~99), then rotate TUNING knob, find the station frequency and address which you will
delete.
3. Long press MEM. / DEL. button until the number address and “ “ indicator flash in the
display.
4. Within 3 seconds press MEM. /DEL. button, the stored station is deleted.
DELETE ALL STORED STATIONS
1. Turn on the radio.
2. Press TUNING knob, the unit will display station frequency and pre-memory address.
3. Long press MEM. / DEL. button until “ “ and “ “ indicator flash in the display.
4. Within 3 seconds press MEM. / DEL. button, the whole stored stations are deleted.
Note:
When operating ATS function, all previous station memory will be deleted. New
memory will be started from “ ”.
TO STOP THE ALARM
*Press SNOOZE button to stop the alarm temporarily, the alarm will ring again in 10 min. The
corresponding ” ” or ” ” indicator will flash on display when snooze function is activated.
Battery Power indicator
“ “The battery has enough power
“ “ The battery power shortage
SLEEP Indicator
TIMER ON Indicator
Temperature indicator
Timer A/B Set Indicator
Small Number display
*Turn off the unit: display alarm time or temperature
*Turn on the unit: display electric field intensity, S/N,
Clock and temperature
S/N Indicator
AM or PM of 12 Hour Mode Indicator
*The default time mode of the unit is 24 Hour mode
Electric field intensity
S/N (Signal/Noise)
Memory Address Indicator
FM Frequency (MHz)
MW Frequency (kHz)
Big Number display
*Turn off the unit: display clock or system code
*Turn on the unit: display station frequency
FM Stereo Indicator
Band indicator
GB - 2
GB - 3
GB - 6GB - 7
GB - 1
GB - 5
WORKING WITH MEMORY
If at any time in the future you should need to dispose of this product please note
that Waste electrical products should not be disposed of with household waste.
Please recycle where facilities exist. Check with your Local Authority or retailer for
recycling advice.(Waste Electrical and Electronic Equipment Directive)
M-088R
User Manual
MW / FM-STEREO DSP RADIO
PLEASE READ THE INSTRUCTION CAREFULLY
BEFORE OPERATING THE UNIT.
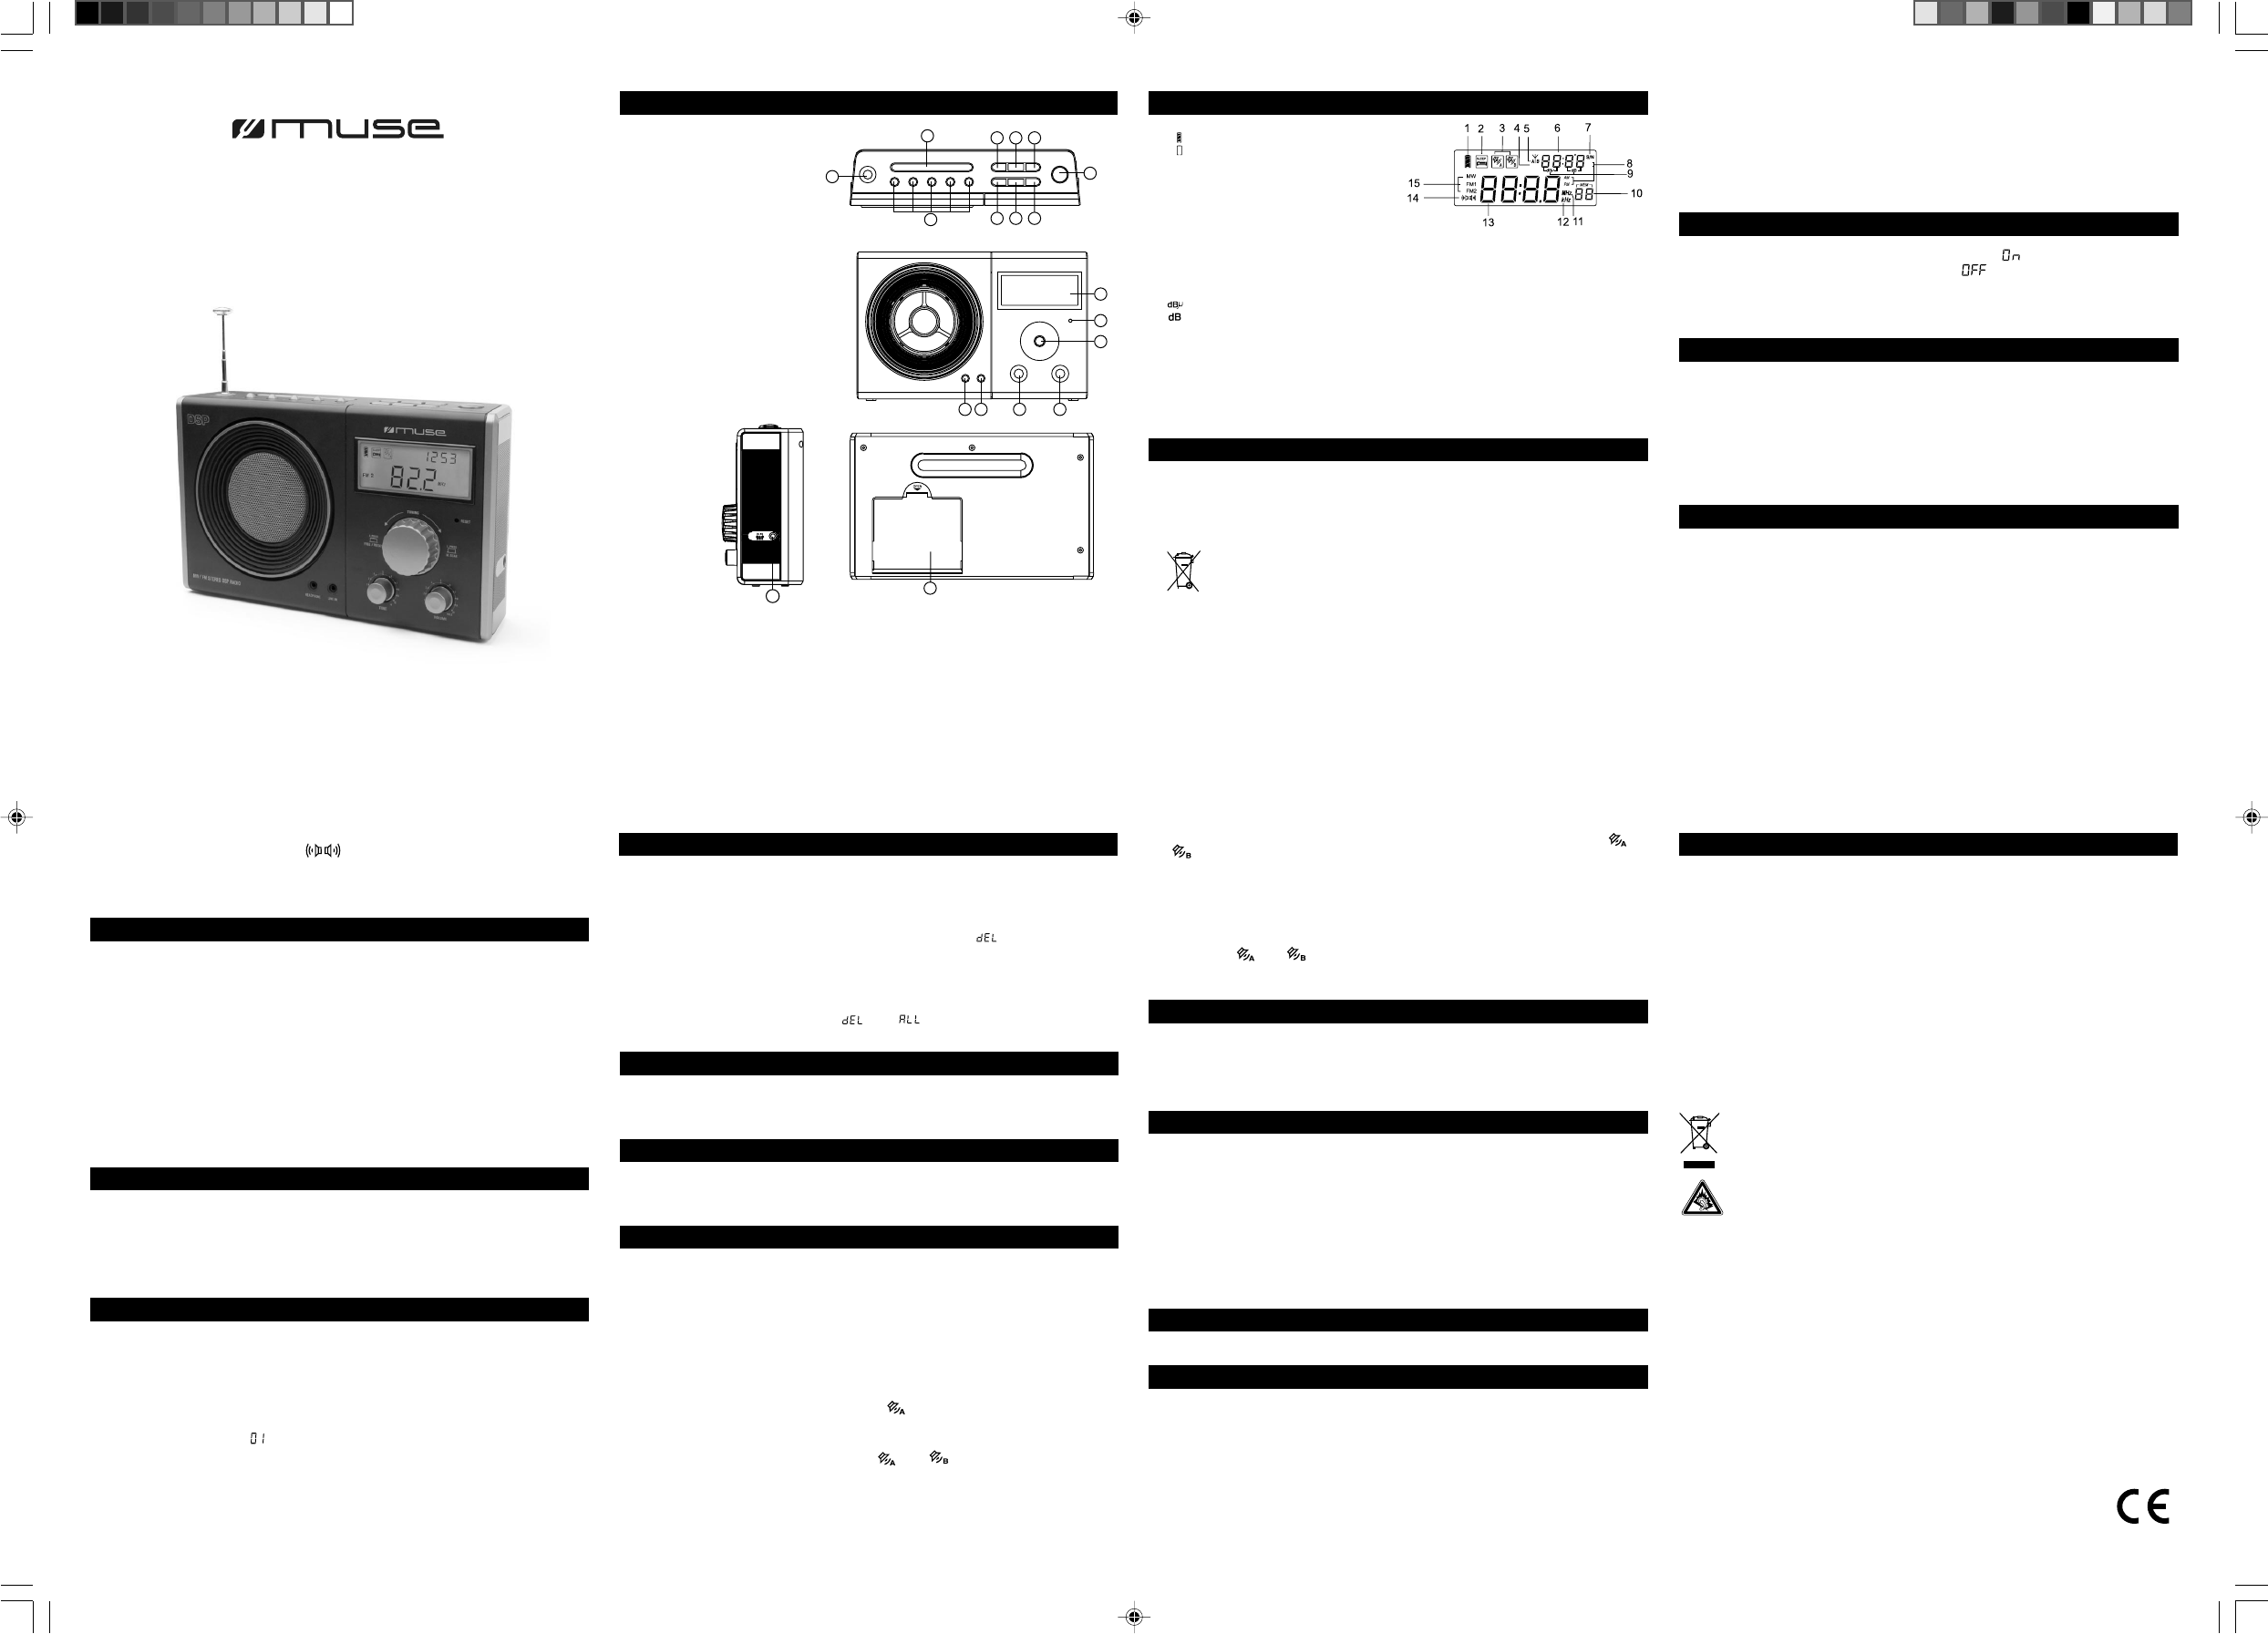
CONTROL LOCATIONS
1. POWER/ SLEEP button
2. TIME SET/DISPLAY/STEREO
button
3. TIMER B button
4. TIMER A button
5. AUTO SCAN / ATS button
6. BAND /FM1 SET button
7. MEM./DEL.(Memory/ Delete)&
12/24 Hour button
8. SNOOZE / LIGHT button
9. Favorite 1-5 Stations button
10. FM antenna
11. HEADPHONE jack
12. LINE IN jack
13. LCD display
14. TONE knob
15. TUNING knob
16. VOLUME knob
17. Battery compartment
18. RESET button
19. DC 6V jack
8
9
657
324
10
1
19
LCD DISPLAY
POWER SUPPLY
Battery Operation
1. Remove the lid of the battery compartment
2. Before inserting the batteries, observe the polarities (+ and -) of the battery, then relate the
polarities to the engraved diagram inside the battery compartment. Insert 4x R20/ SIZE “D”
batteries (not supplied) into the compartment.
3. Replace the lid.
Before throwing any batteries away, consult your distributor who may be able to
take them back for specific recycling.
NOTES:
- Do not mix different types of batteries or old batteries with new ones.
- Never recharge the batteries , apply heat to them or take them apart.
- In order to avoid leakage, always remove the batteries when unit will not be used for a long
period of time.
- Danger of explosion if battery is incorrectly replaced. Replace only with the same or equiva
lent type.
WARNING!
The AC adaptor is used as the disconnect device and it shall remain readily operable. To be
completely disconnected the power input, the AC adaptor of the apparatus shall be discon-
nected from the mains completely. The AC adaptor should not be obstructed or should be
easily accessed during intended use.
TURN ON/OFF THE UNIT
Press the POWER/SLEEP button, release it when “ ” appears in the display.
Press the POWER/SLEEP button, release it when “ ”appears in the display.
CAUTION:
The unit has FM automatic detective function. If the station broadcasting stops, the
unit will turn off automatically within 5 minutes.
PRE-SETTING FM FREQUENCY RANGE
We have divided FM into FM1 & FM2
- FM1 can be pre-setting into 3 different FM frequency ranges: 76~90 MHz (for Japan) ,
87~108 MHz , 88~108 MHz
- To select your desire FM1 frequency, in OFF mode press down FM1 SET/BAND button until
76, 87 or 88MHz appear on the LCD. Release the button to confirm it as your selection, or
press down again the FM1 SET/BAND button to select the next frequency range.
- Frequency range for FM2 is 65~108MHz.
LISTEN TO THE RADIO
USING ANTENNA
- When listening to FM broadcasting, extend the ANTENNA and change its length and
direction to find the position which gives the best reception.
- When listening to MW broadcast, rotate the unit to find the position which gives the best
reception.
Each band can store 100 stations, in total 300 station memories (MW/FM1/FM2) can be
saved.
STORING FAVORITE STATION
Select your desired station, long press FAVORITE 1-5 buttons until “ P1~5 ” indicator flashing
on the lower right corner, then press again the same button (FAVORITE 1-5) to confirm the
setting.
To listen to your favorite station, select the desired band (MW/FM1/FM2), then press
FAVOURITE 1~5 buttons.
AUTO TUNING STORAGE (ATS)
Turn on the unit, select band, hold down the AUTO SCAN/ ATS button until frequency changed
and address indicator flashes in the display.
The ATS function will stop automatically after all strong station being stored. Then
you can directly rotate the TUNING knob to listen to those stored stations.
DELETE PRESET STATIONS
SLEEP TIMER FUNCTION
1.In OFF mode, short press POWER/SLEEP button. “SLEEP” icon appears on display.
2. Within 3 seconds rotate the TUNING knob to adjust your desired auto turn-off time:01,05,
10,15,30,45,60,75,90,120,150,180,210,240,270,300,330,360,390,420,450 or 480 minutes.
SELECT 12/24 FORMAT
Factory default is 24HR format.
To change 12HR format, turn off the unit and long press 12/24 button unit “12H” indicator
flashes in the display. Press again the button to confirm your adjustment.
CLOCK AND TIMER (ALARM) FUNCTION
TIME SETTING
With the unit turned off, hold down the TIME button until hour digit flashes in the display,
then rotate TUNING knob to adjust hour. After setting hour, immediately press the TIME
button, then minute digit flashes in the display, rotate TUNING knob to change minute.
After 3 seconds, it will automatically confirm the clock setting.
TIMER A & B SETTING
Turn off the unit, long press the TIMER A button until hour digit flashes and “A” indicator
appears on the display, then rotate TUNING knob to adjust hour. After hour setting,
immediately press the TIMER A button, then minute digit flashes in the display, rotate
TUNING knob to adjust minute. Press again TIMER A button to confirm setting or wait for 3
seconds, it will automatically confirm the setting. indicator appears on diaplay.
The adjustment of TIMER B is the same as TIMER A.
TO TURN ON/OFF ALARM CLOCK FUNCTION
Press TIMER A or TIMER B button to display ” ” or ” ” in the display. The unit will
auto turn on at the preset time and frequency, and after 30 minutes it will automatically turn
off.
To turn off the alarm function, press TIMER A or TIMER B button again to have the ” ”
or ” ”indicator disappear when the unit is on OFF status.
Note:
LINE IN
1.Connect your auxiliary source (e.g mp3 player) to the LINE IN jack on the unit.
2.Start playback from your auxiliary source.
3.Disconnect your auxiliary source from the LINE IN jack to switch back to listen to the radio.
Note: If no audio signal input, the unit will turn off automatically within 5 minutes.
RESET PROCEDURE
If the radio does not function and the solutions below do not resolve the problem, perform a
‘ reset ‘. To reset the M-088R, unplug the external adaptor(if one is being used) and remove
the batteries from the battery compartment. Insert a pointed object, such as straightened
paper clip, into the RESET hole on front of the radio and gently press and release . Then
plug in the AC adaptor or reinstall the batteries.
WILL NOT TURN ON
1. Assure that the radio has power (batteries installed or AC adaptor plugged in).
2. If using an AC adaptor, assure that it is plugged into the house-hold outlet (main socket)
and into the radio’s DC socket. Take care not to plug it into the earphone socket.
3. Assure that batteries are inserted with correct polarity.
4. Assure that the batteries are not depleted.
TO ILLUMINATE THE DISPLAY
In radio or line in mode, press LIGHT button to illuminate the display for a few seconds.
TO VIEW THE DISPLAY INFORMATION
In radio or line in mode, press DISPLAY button repeatedly to view the temperature, clock time,
electric field intensity and S/N.
In OFF mode, press DISPLAY button repeatedly to view the temperature, Timer A time and
Timer B time.
MORE INFORMATION
- Keep product out of direct sunlight. Exposure to direct sunlight or extreme heat (such as
inside a parked car) may cause damage or malfunction.
- Do not expose to rain or moisture.
- Do not use the unit immediately after transportation from a cold place to a warm place;
condensation problem may result.
- The apparatus should not be exposed to dripping or splashing.
- Do not place objects filled with liquids, such as vases, on the apparatus.
- No naked flame sources, such as lighted candles, should be placed on the apparatus.
- Do not throw battery in fire!
- Attention should be drawn to the environmental aspects of battery disposal.
- The battery shall not be exposed to excessive heat such as sunshine, fire or the like
- Excessive sound pressure from earphones and headphones can cause hearing loss.
- Under the influence of electrical fast transient or/and electrostatic phenomenon, the product
may malfunction and require user to power reset.
-The AC adaptor is used as the disconnect device and it shall remain readily operable. To be
completely disconnected the power input, the AC adaptor of the apparatus shall be
disconnected from the mains completely. The AC adaptor should not be obstructed or should
be easily accessed during intended use.
In full power, the continuous listening of the player may damage the user’s hearing.
11
121416
15
18
13
17
Use the unit without the battery
1. The unit can be used without the battery. Turn the unit off and remove the batteries.
2. Plug the AC adaptor’s circular connector into the unit’s DC 6V jack. Plug the other end of
the AC adaptor into a working wall outlet.
3. Operate your unit as described in this manual.
1.
2.
3.
4.
5.
6.
7.
8.
9.
10.
11.
12.
13.
14.
15.
After auto turn on the unit, only POWER/SLEEP button and SNOOZE / LIGHT button will
work, other buttons will be locked, you can press the POWER/SLEEP button to discharge it.
Remark: During FM1 selected (76-90MHz) or (87-108MHz), MW frequency range will change
to (522-1620kHz); If FM1 selected (88-108MHz), MW frequency will change to (520-1710kHz).
BAND SELECTION
Turn on the unit. Press BAND button to select MW, FM1 or FM2 band.
AUTO SCAN TUNING
Press AUTO SCAN button once, the unit will auto tune into the station and will stop once
station being received. You can press again to search another station.
MANUAL TUNING
Rotate TUNING knob to search your desired station.
VOLUME & TONE CONTROL
- Rotate the VOLUME control knob to your desired volume.
- Rotate the TONE control knob to adjust your desired tone.
MEMORY SCAN
Long press TUNING knob to scan each stored stations for 5 seconds.
MEMORY SEARCH
Turn on the unit, short press the TUNING knob to have pre-memory address(00~99) display
on the right bottom corner, and then rotate TUNING knob to select your preference stored
station.
TO STORE STATION INTO MEMORY
Tune to your desired station, short press MEM./DEL. button to have pre-memory
address (00~99) flashing. The unit will pick up the next available memory address for you; or
you can select your own desire memory address by rotating TUNING knob, then short press
MEM./DEL. button to confirm your setting.
LISTENING TO FM STEREO
Press STEREO/DISPLAY button until indicator appears in the display when using
stereo earphones for the listening.
Note:
For weak station broadcasting, suggest to turn off the “Stereo” function.
GB - 4
AC Adaptor:
Input: AC 230V~50Hz
Output: DC 6V,500mA
*Press POWER/ SLEEP button to stop the alarm. The alarm will be on the following day at the
same time.
R-2277 IB MUSE 001 REV0 GB.p652008-3-21, 16:281
Need help? Post your question in this forum.
Report abuse
Libble takes abuse of its services very seriously. We're committed to dealing with such abuse according to the laws in your country of residence. When you submit a report, we'll investigate it and take the appropriate action. We'll get back to you only if we require additional details or have more information to share.
Product:
Forumrules
To achieve meaningful questions, we apply the following rules:
First, read the manual;
Check if your question has been asked previously;
Try to ask your question as clearly as possible;
Did you already try to solve the problem? Please mention this;
Is your problem solved by a visitor then let him/her know in this forum;
To give a response to a question or answer, do not use this form but click on the button 'reply to this question';
Your question will be posted here and emailed to our subscribers. Therefore, avoid filling in personal details.
Register
Register getting emails for Muse M-088 at:
new questions and answers
new manuals
You will receive an email to register for one or both of the options.
Get your user manual by e-mail
Enter your email address to receive the manual of Muse M-088 in the language / languages: English as an attachment in your email.
The manual is 0,75 mb in size.
You will receive the manual in your email within minutes. If you have not received an email, then probably have entered the wrong email address or your mailbox is too full. In addition, it may be that your ISP may have a maximum size for emails to receive.
The manual is sent by email. Check your email
If you have not received an email with the manual within fifteen minutes, it may be that you have a entered a wrong email address or that your ISP has set a maximum size to receive email that is smaller than the size of the manual.
The email address you have provided is not correct.
Please check the email address and correct it.
Your question is posted on this page
Would you like to receive an email when new answers and questions are posted? Please enter your email address.