US EN
QUICK ST
For a full e
(av
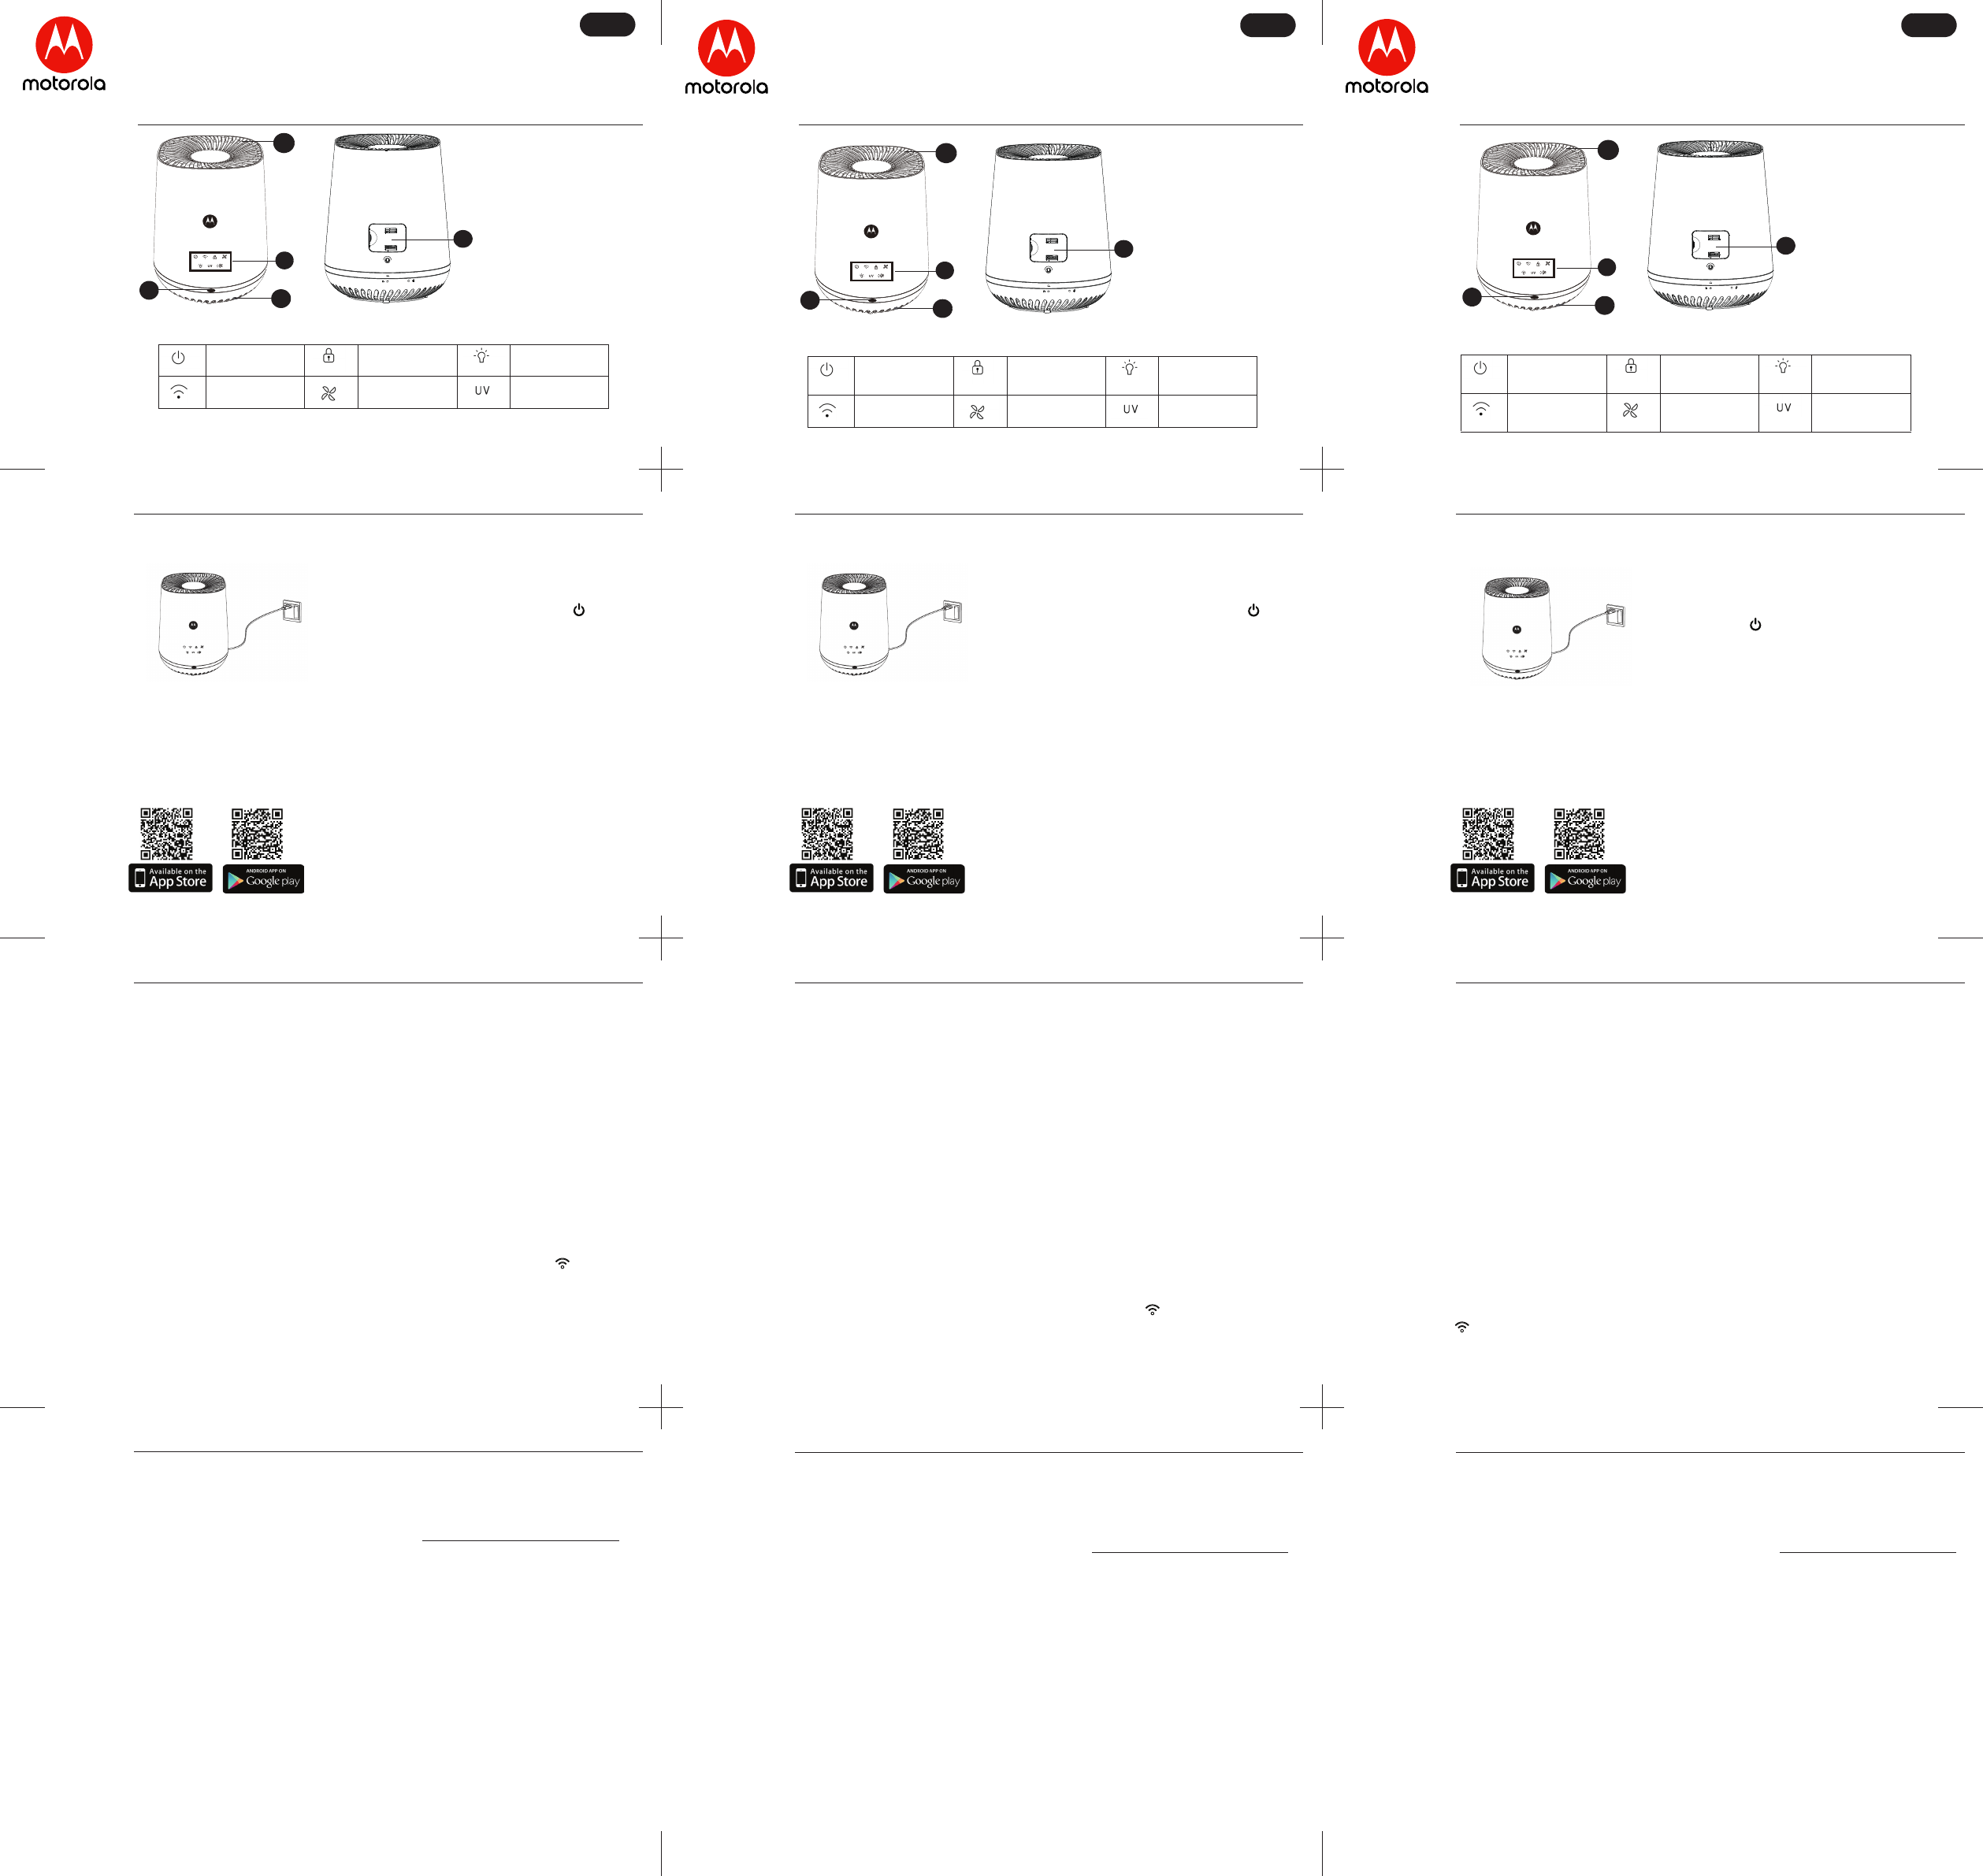
1. Ov
Key Descriptions
On/
Child Lo
Button
Night Light
Button
Pair Button
Fan Spe
Button
UV Lamp
Button
2
4
3
5
6
1
1. Air Outlet
2. Control
(with LED Backlight)
3. Air Quality Indicator
4. Air Inlet
5. Air Quality Se
nsor
Door
MODEL:
MBP87SN
Pair the Air Purifier with y
®
/ iPad
®
.
1. Run Hubble for Smart Nu App on your Andr
®
/ iPad
®
.
2. Ensure that y
®
/ iPad
®
is connect
®
rout
3. Folloeate y
connect t
®
.
4. Login to yHubble account, and tap on Smart Ai
to ent
5. TSkip to Setup , then tap Ne to search for Air Purifier
6. T
®
/ iPad
®
, exit to Settings , open Wi-Fi
®
then
select the SSID of the Air Purifier fr
7. TaNext , then Sear to start netw
8. Select a W
®
network fr
®
passw
tap Submit (orSearch for iOS devic
9. It will take a few miAir Purifier to c
®
network.
10. TGet Started when the Air Purifier is succesHubble for
Smart Nursery App
Note
If you fail to complete the setup process, press the PAIR button until the
backlight blinks to enter registration mode and repeat the above steps again.
Install Hubble for Smart Nursery App on your Android™ De
iPhone
®
/ iPad
®
.
Please take note of the follo
Smartphones/Tablets: And
®
only.
Minimum requirement: iOS
®
8.0, Android™ 4.4
For more informatio http:// hubblehome.com/requirements
DownlHubble for Smart Nursery App from
the App Stor
Google Pla
TM
Stor
TM
devices.
2. Setting up the Smart Air Purifier
1. Connect the Smart Air Purifier to the
electrical outlet.
2. T to
switch on the de
3. Gener
If your product is not working propthis Quick Start Guide
Contact Custo
US and Canada
Consumer Products and A
Thank y
by Binat
What Does this W
Subject to the eNA
branded pr
this produ
workmanshipnsumer usage for the period outlined below
W
Who is co
This W
What will BINA
BINA
reasonable time, will at no char
does not conform t
refurbished/ products, Acc
What Other Limitations Ar
ANY IMPLIED WWITHOUT LIMIT
W
SHALL BE LIMITED T THIS LIMITED W
THE REP
W
CA FR
GUIDE DE DÉMARRA
Pour les caract
l'utilisat
1. Pr
2
4
3
5
6
1
1. Sortie d'air
2. Panneau de c
(av
DEL)
3. Indicateur de la qualité
de l'air
4. Entrée d'air
5. Trappe du capteur de
qualité de l'air
Principales commandes
T
Arrê
T
verr
enfant
T
veilleuse
T
couplage
T
du ventilat
T
lampe UV
MODÈLE :
MBP87SN
Couplage du purificateur d'air a
iPhone® ou v
1.
Démarre
Hubble for Smart Nurse
sur v
iPhone® ou iPad®.
2.
V
routeur W
3.
Suiv
vous
4.
Connectez-v
Hubble for Smart Nurse
et tapez sur
Purificat
d'air intel
(Smart A
pour accéder au m
purificateur d'air
5.
T
Sauter à la c
(Skip to Setup
Suivant
(Next)pour
chercher le purificateur d'air
6.
Entre
Réglages
(Settings
ouvre
7.
T
Suivant
(Ne
Chercher
(Search) pour lanc
réseau.
8.
Sélectionne
sur
En
(Submit) (ou
Chercher
(Sear
9.
La conne
10.
T
Démarr
(
succè
Hubble f
.
Remarque
Si la configuration échoue, maintenez la touche de couplage enfo ncée jusqu'à ce
que le rétroéclairage clignote pour passer en mode de couplage, pu is répétez les
étapes ci-dessus.
Installation de l'application Hubble for Smart Nursery sur v
Android™ ou votr
V
Smartphones/Tablettes : Android™ et iOS® seulement.
Configuration minimale : iOS® 8.0, Android™ 4.4.2 ou
Pour plus de détails, rendez
THubble for Smart
Nursery sur l'App S
sur Google Play
TM
Stor
Android
TM
.
2. Installation du purificat
1. Branche
une prise électrique.
2. Appuye
pour allumer l'appareil.
US ES
GUÍA RÁPID
Par
consulte la G
1. Descripción gener
2
4
3
5
1
1. Salida de air
2. Panel de c
retr
3. Indicador de Calidad del
aire
4. Entr
5. Tapa del Sensor de
calidad del aire
Descripciones de las teclas
Botón de
Encendido/
Apagado
Botón de Bloqueo
para niños
Botón de Luz
nocturna
Botón Vi
Botón de
V
ventilador
Bot
Lámpara UV
MODEL
MBP87SN
Vincular el Purificador de Air
iPhone®/ iPad®.
1. Ejecute la Aplicación Hubble for Smart Nursery en su Dispositiv
iPhone®/ iPad
2. Asegúrese de q/ iPhone®/ iP
rout
3. Siga las instruc
conectarse al Purificad
4. Inicie sesión en su cuenta Hubble for Smart Nu, y toque Smart Air Purifier
(Purificador de air
Purificador de aire
5. TSkip to Setup , después toque Next para buscar el Purificador de aire
6. Tfirmar
Settings, abra WiFi® después selec
air
7 TNe, después Search par
8. Selec
después toque Sub (o Search para dispositiv
9. Al Purificador de aire le llev
10. TGet Started cuando
la Aplicación Hubble.
NOTA
Si no completa el proceso de configurac el botón Vincular
hasta que la luz de fondo parpadee para acceder al modo registro y repita los
pasos anteriores.
Instalar la Aplicación Hubble for Smart Nu
Android™ / iPhone®/ iPad®.
Por fav
Teléfono
Requisi
Para obtener más información, vi: https://hubblehome.com/requirements
Descargue la aplicación Hubble for Smart Nursery
de App Stor
Play
TM
Stor
TM
.
2. Configurca
1. Conecte el Purificador de aire int
al tomacorrient
2. T
AP para enc
dispositivo
3. Información gener
Si su producto no está funcionando correctamente, lde usuario
inic
Contáctese con el Servicio de
1-88
Garanacc
Gracias por c
Binatone Electronics Internati
¿Qué cobertur
Sujeto a las ex
Motorola ("Producto") o todo accesori
utilizado con est
obra cnes normales de uso por parte del consumidor para el período que se
detalla a continu
¿Quién está cubierto
La presente Garantía cubre solamente al primer comprador usuario y no es transferi
¿Qué hará
BINA
come
se ajuste a esta Garantía. Posiblemente se uti
funcionalmente similares r
¿Qué otr
CUA
COMERCIABI
DEBEN RESTRINGIR A LA DURA
REP
3. Informations génér
Si votre produit ne fonctionne pas cor
Guide de l'utilisateur.
Adressez-vous à notre service cli
USA et Canada site W
Garantie limitée pour les produits et acc
Nous vous r
licence par Binatt
Que co
Sous réservsous, la
ce pr
être utilisé a
défauts de maus r
la période stipulée ci
pas transf
Qui est couv
La présente Gar
tran
Que f
BINAr
discrétioalement ra
Ac
des Produits,
fonctionnalités sont équiv
Quelle sont les autres limites de la Garantie ?
T