750907
1
Zoom out
Zoom in
Previous page
1/2
Next page
EU EN
QUICK START GUIDE
For a full explanation of all features and instructions, please refer to the User’s Guide (available for
download from www.motorolastore.com).
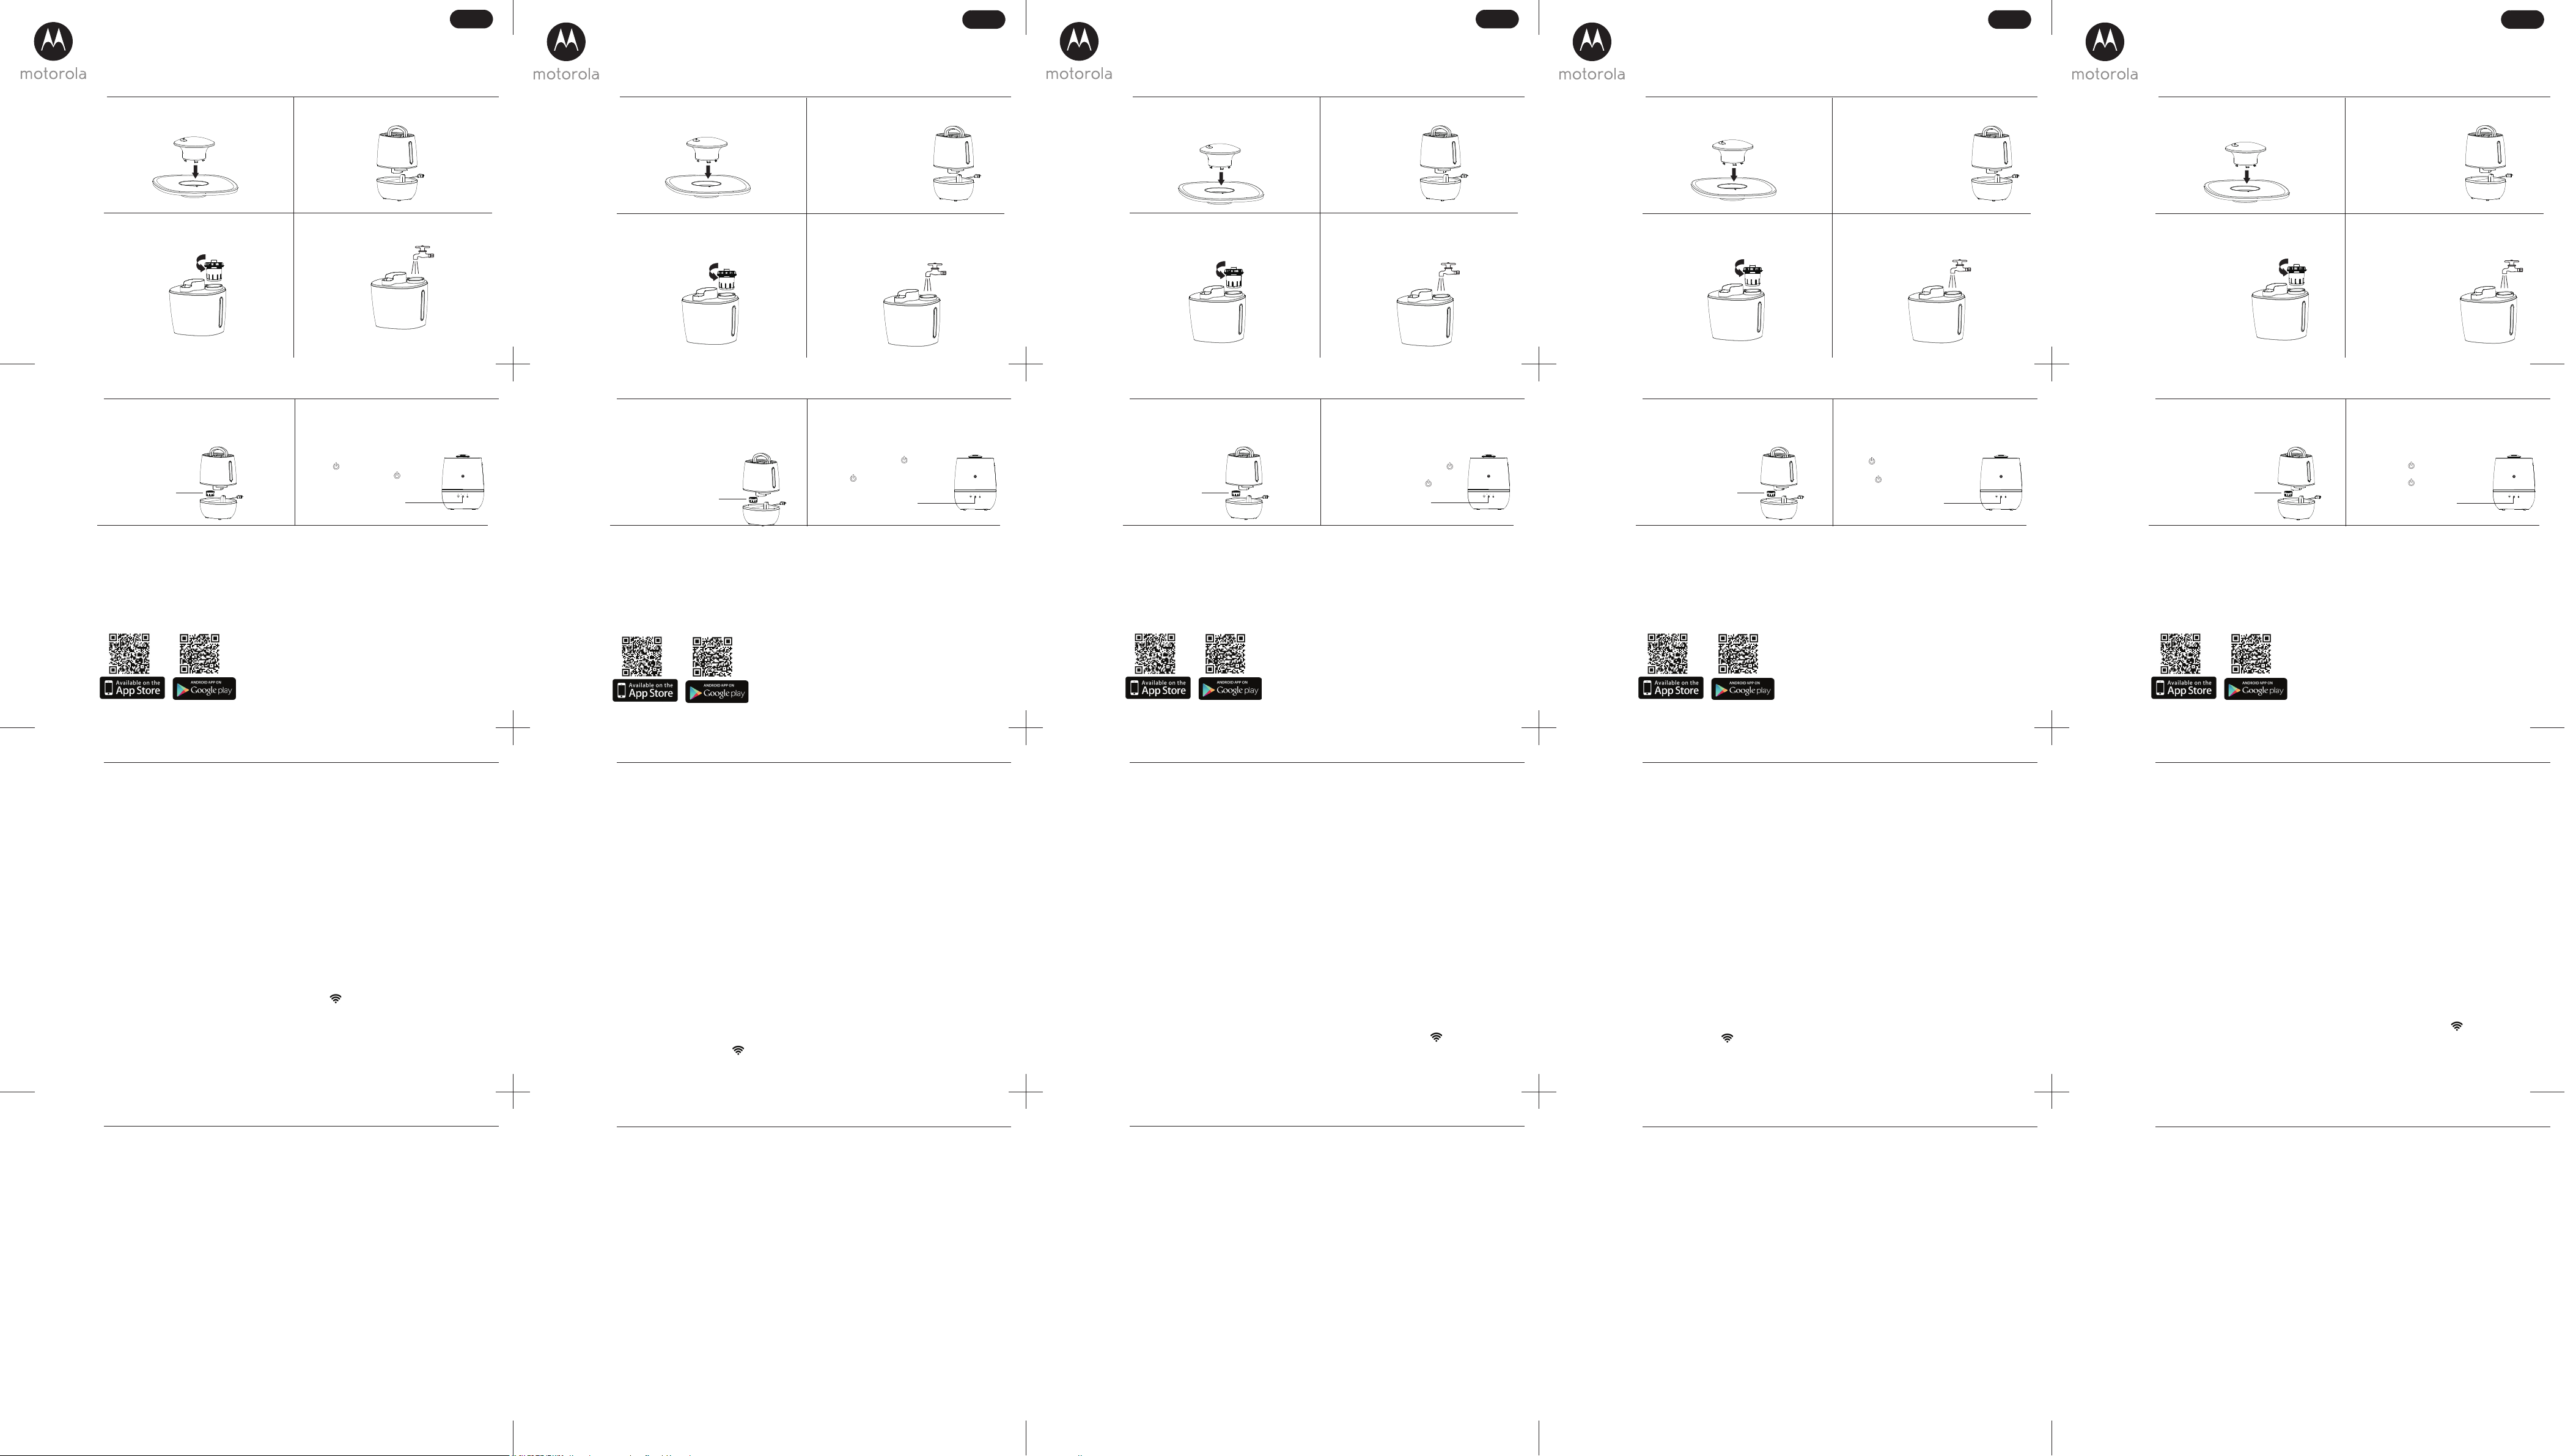
1. Setting up Humidifier+
MODEL:
MBP83SN
1. Remove the mist lid from the top of the
Humidifier and plug the mist outlet into the
lid.
2. Lift up the handle on top of the water tank and
remove the water tank from the Humidifier
base.
3. Snap the handle back into place, then turn
the water tank upside, remove the tank cap
by twisting it counter clockwise.
4. Fill the water tank with clean, cool water and
replace the tank cap by turning it clockwise
until tight.
Pair Humidifier+ with your Android™ Devices / iPhone®/ iPad®.
1. Run Hubble Connect for Smart Nursery App on your Android™ Device / iPhone®/ iPad®.
2. Ensure that your Android™ Device / iPhone®/ iPad® is connected to the Wi-Fi® router.
3. Follow the in-app instructions to create your Smart Nursery Account and connect to
Humidifier+ via Wi-Fi®.
4. Login to your Hubble Connect for Smart Nursery account, and tap on Humidifier+ to enter
Humidifier setup mode.
5. Tap on Skip to Setup, then tap Next to search for Humidifier+.
6. Tap the SSID to confirm. (For iPhone® / iPad®, exit to Settings, open Wi-Fi® then select the
SSID of Humidifier+ from the list)
7. Tap Next, then Search to start network searching.
8. Select a Wi-Fi® network from the network list, enter Wi-Fi® password and then tap Submit
(or Search for iOS device).
9. It will take a few minutes for Humidifier+ to connect to the Wi-Fi® network.
10. Tap Get Started when Humidifier+ is successfully connected to Hubble Connect for Smart
Nursery App.
Note:
If you fail to complete the setup process, tap the PAIR key twice within 3 seconds on powering
up to enter registration mode and repeat the above steps.
Install Hubble Connect for Smart Nursery App on your Android™ Devices /
iPhone®/ iPad®.
Please take note of the following minimum system requirements:
Smartphones/Tablets: Android™ and iOS® only.
Minimum requirement: iOS® 8.0, Android™ 4.4.2 or higher.
For more information, please visit: http:// hubblehome.com/requirements
Download Hubble Connect for Smart Nursery App
from the App Store for iOS devices or from the Google
PlayTM Store for AndroidTM devices.
5. Install the water filter to the Humidifier base,
then replace the water tank on the
Humidifier base. Ensure that the water tank
is firmly seated.
6. Attach the mist lid back to the Humidifier, then
connect one end of the power adapter into the
power port on the Humidifier and the other end
to the mains power socket.
water filter
The 0 Mist On/Off LED will light up.
Tap the Mist On/Off key 0 to turn
mist On.
Mist On/Off Key
2. General Information
If your product is not working properly, read this Quick Start Guide or the User’s Guide.
Contact Customer Service:
+491805 938 802 (Europe) E-mail: motorola-mbp@tdm.de
Consumer Products and Accessories Limited Warranty ("Warranty")
Thank you for purchasing this Motorola branded product manufactured under license by Binatone
Electronics International LTD ("BINATONE").
What Does this Warranty Cover?
Subject to the exclusions contained below, BINATONE warrants that this Motorola branded product
("Product") or certified accessory ("Accessory") sold for use with this product that it manufactured
to be free from defects in materials and workmanship under normal consumer usage for the period
outlined below. This Warranty is your exclusive warranty and is not transferable.
THIS WARRANTY GIVES YOU SPECIFIC LEGAL RIGHTS, AND YOU MAY HAVE OTHER RIGHTS
THAT VARY BY STATE, PROVINCE OR COUNTRY. FOR CONSUMERS WHO ARE COVERED BY
CONSUMER PROTECTION LAWS OR REGULATIONS IN THEIR COUNTRY OF PURCHASE OR, IF
DIFFERENT, THEIR COUNTRY OF RESIDENCE, THE BENEFITS CONFERRED BY THIS LIMITED
WARRANTY ARE IN ADDITION TO ALL RIGHTS AND REMEDIES CONVEYED BY SUCH CONSUMER
PROTECTION LAWS AND REGULATIONS. FOR A FULL UNDERSTANDING OF YOUR RIGHTS YOU
SHOULD CONSULT THE LAWS OF YOUR COUNTRY, PROVINCE OR STATE.
Who is covered?
This Warranty extends only to the first consumer purchaser, and is not transferable.
What will BINATONE do?
BINATONE or its authorised distributor at its option and within a commercially reasonable time, will at
no charge repair or replace any Products or Accessories that does not conform to this Warranty. We
may use functionally equivalent reconditioned/ refurbished/ pre-owned or new Products,
EU DE
KURZANLEITUNG
Für weitere Informationen (u. a. zu den einzelnen Funktionen) bitte die Bedienungsanleitung zurate
ziehen (zum Download unter www.motorolastore.com verfügbar).
1. Einrichten des Humidifier+
MODELL:
MBP83SN
1. Entfernen Sie den Deckel vom Humidifier,
und setzen Sie den Auslass in den Deckel
ein.
2. Klappen Sie den Griff am Wasserbehälter aus,
und heben Sie den Behälter aus der Humidifier-
Basisstation.
3. Klappen Sie den Griff wieder ein. Drehen
Sie anschließend den Behälter um, und
entfernen Sie den Deckel. Hierfür gegen
den Uhrzeigersinn drehen.
4. Füllen Sie den Behälter mit sauberem, kaltem
Leitungswasser auf. Bringen Sie den Deckel
wieder an, und drehen Sie ihn im
Uhrzeigersinn fest.
Herstellen der Verbindung von Humidifier+ und Android™-Gerät, iPhone
®
bzw. iPad
®
1. Führen Sie die
Hubble Connect for Smart Nursery
-App auf Ihrem Android™-Gerät, iPhone
®
bzw.
iPad
®
aus.
2. Stellen Sie sicher, dass Ihr Android™-Gerät, iPhone
®
bzw. iPad
®
mit Ihrem WLAN-Router
verbunden ist.
3. Befolgen Sie die App-Anweisungen, um ein „Smart Nursery“-Konto zu erstellen und die WLAN-
Verbindung mit dem Humidifier+ herzustellen.
4. Melden Sie sich in Ihrem
Hubble Connect for Smart Nursery
-Konto an, und tippen Sie anschließend
auf
Humidifier+
, um den Setup-Modus aufzurufen.
5. Tippen Sie auf
Skip to Setup
(Weiter zur Einrichtung) und anschließend auf
Next
(Weiter), um die
Suche nach dem Humidifier+ zu starten.
6. Tippen Sie zur Bestätigung auf den SSID. (Für iPhone
®
bzw. iPad
®
: Gehen Sie auf dem Home-
Bildschirm zu
Einstellungen
>
WLAN
, und tippen Sie auf den SSID vom Humidifier+.)
7. Tippen Sie auf
Next
(Weiter) und anschließend auf
Search
(Suchen).
8. Wählen Sie Ihr WLAN-Netzwerk aus der Liste der angezeigten Netzwerke aus, geben Sie Ihr WLAN-
Passwort ein, und tippen Sie auf
Submit
(Senden) bzw. bei einem iOS-Gerät auf
Search
(Suchen).
9. Warten Sie ein paar Minuten, bis sich der Humidifier+ mit dem WLAN-Netzwerk verbunden hat.
10. Tippen Sie dann auf
Get Started
(Los geht's), sobald Humidifier+ und die
Hubble Connect for Smart
Nursery
-App verbunden sind.
Hinweis:
Wenn die Verbindungsherstellung fehlschlägt, tippen Sie beim Einschalten des Humidifier+
zweimal auf die WLAN-Taste , um den Setup-Modus aufzurufen.
Installieren der „Hubble Connect for Smart Nursery“-App auf Android™-
Gerät, iPhone® bzw. iPad®
Bitte beachten Sie die folgenden Mindestsystemanforderungen:
Smartphones/Tablets: Nur Android™ und iOS®
Mindestanforderung: iOS® 8.0 bzw. Android™ 4.4.2 oder höher
Weitere Informationen finden Sie unter http://hubblehome.com/requirements.
Laden Sie die Hubble Connect for Smart Nursery-App
aus dem App Store (iOS-Geräte) oder vom Google
PlayTM Store (AndroidTM-Geräte) herunter.
5. Setzen Sie den Wasserfilter und
anschließend den Wasserbehälter wieder in
die Humidifier-Basisstation ein. Der Behälter
muss fest in der Station sitzen.
6. Bringen Sie die Abdeckung wieder am
Humidifier an. Schließen Sie dann das Netzteil
am Humidifier an, und stecken Sie es
anschließend in eine Steckdose.
Wasserfilter
Die Verneblungs-LED (0) leuchtet
nun auf. Tippen Sie auf die EIN/AUS-
Taste 0, um den Humidifier
einzuschalten.
Nebel ein/aus
2. Allgemeine Informationen
Wenn Ihr Produkt nicht richtig funktioniert, ziehen Sie zuerst diese Kurzanleitung bzw. die
Bedienungsanleitung zurate.
Wenden Sie sich an den Kundendienst:
Eingeschränkte Garantie für Konsumgüter und Zubehör („Garantie“)
Vielen Dank, dass Sie dieses Produkt der Marke Motorola gekauft haben, das von Binatone Electronics
International LTD („BINATONE“) unter Lizenz gefertigt wird.
Was deckt diese Garantie ab?
Vorbehaltlich der unten angegebenen Ausschlüsse garantiert BINATONE, dass dieses von ihm gefertigte
Produkt der Marke Motorola („Produkt“) oder zugelassenes Zubehör („Zubehör“), das für die
Verwendung mit diesem Produkt verkauft wird, bei normaler Nutzung durch den Verbraucher für den
unten angegebenen Zeitraum frei von Material- und Fertigungsfehlern ist. Diese Garantie ist Ihre
ausschließliche Garantie und nicht übertragbar.
DIE RECHTE DES KÄUFERS NACH DER JEWEILS GELTENDEN NATIONALEN
GESETZGEBUNG, WERDEN VON DIESER GARANTIE NICHT BERÜHRT. DIESE GARANTIE GILT
ZUSÄTZLICH ZU DEN ANWENDBAREN GEWÄHRLEISTUNGS- UND HAFTUNGSREGELUNGEN
UND BESCHRÄNKT NICHT DIE RECHTE VON VERBRAUCHERN GEGENÜBER VERKÄUFERN
ODER ANDERE ZWINGENDE BZW. GEMÄSS DEM RECHT DER ALLGEMEINEN
GESCHÄFTSBEDINGUNGEN NICHT ABDINGBARE RECHTE NACH NATIONALEM ODER
EUROPÄISCHEM RECHT.
Was ist abgedeckt?
Diese Garantie erstreckt sich nur auf den Erstkäufer und ist nicht übertragbar.
Was wird BINATONE tun?
BINATONE oder sein autorisierter Händler wird nach eigener Wahl und innerhalb kommerziell
angemessener Zeit alle Produkte und Zubehörteile, die dieser Garantie unterliegen, kostenlos reparieren
oder ersetzen. Wir können funktionell gleichwertige aufgearbeitete/überholte/gebrauchte oder neue
Tel.: 01805 938 802 E-Mail: motorola-mbp@tdm.de
EU FR
GUIDE DE DÉMARRAGE RAPIDE
Pour les caractéristiques et les instructions complètes, veuillez consulter le Guide de l'utilisateur
(téléchargeable sur
www.motorolastore.com).
1. Installation de l'Humidificateur+
MODÈLE :
MBP83SN
1. Retirez le couvercle de brumisation du
haut de l'humidificateur et connectez la
buse de brumisation au couvercle.
2. Soulevez la poignée située sur le dessus du
réservoir d'eau et retirer le réservoir de la base
de l'humidificateur.
3. Repliez la poignée, retournez le réservoir et
enlevez le bouchon en le tournant dans le
sens inverse des aiguilles d'une montre.
4. Remplissez le réservoir d'eau propre et
fraîche et refermez fermement le bouchon
en le tournant dans le sens des aiguilles
d'une montre.
Couplage de l'Humidificateur+ avec vos appareils Android™ Devices / iPhone® ou
iPad®.
1. Démarrez l'application Hubble Connect for Smart Nursery sur votre appareil Android™,
iPhone® ou iPad®.
2. Vérifiez que votre appareil Android™, iPhone® ou iPad® est connecté au routeur Wi-Fi®.
3. Suivez les instructions de l'application pour créer votre compte Smart Nursery et vous
connecter à l'Humidificateur+ via le Wi-Fi®.
4. Connectez-vous à votre compte Hubble Connect for Smart Nursery et tapez sur
Humidifier+ pour lancer le mode de configuration de l'humidificateur.
5. Tapez sur Skip to Setup (Sauter à la configuration), puis sur Next (Suivant) pour chercher
l'Humidificateur+.
6. Entrez le SSID pour confirmer. (Pour l'iPhone et l'iPad, allez à Settings (Réglages), ouvrez
WiFi, puis sélectionnez le SSID de l'Humidificateur+ dans la liste).
7. Tapez sur Next (suivant), puis sur Search (Chercher) pour lancer la recherche d'un réseau.
8. Sélectionnez un réseau Wi-Fi® dans la liste, entrez le mot de passe Wi-Fi®, puis tapez sur
Submit (Envoyer) (ou tapez sur Search (Chercher) pour un appareil iOS).
9. La connexion de l'Humidificateur+ au réseau Wi-Fi® demande quelques minutes.
10. Tapez sur Get Started (Démarrer) lorsque la connexion de l'Humidificateur+ à l'application
Hubble Connect for Smart Nursery est réussie.
Remarque :
Si la configuration échoue, tapez deux fois sur la touche PAIR (COUPLAGE) en 3 seconde
pendant la mise sous tension pour passer en mode de couplage, puis répétez les étapes ci-dessus.
Connexion de la Machine à rêves à vos appareils Android™, à votre iPhone®
ou à votre iPad®.
Veuillez noter les configurations système minimales suivantes :
Smartphones/Tablettes : Android™ et iOS® seulement.
Configuration minimale : iOS8, Android 4.4.2 ou version ultérieure.
Pour plus de détails, rendez-vous sur : http:// hubblehome.com/requirements
Téléchargez l'application Hubble Connect for Smart
Nursery sur l'App Store pour les appareils iOS® sur
Google PlayTM Store pour les appareils AndroidTM.
5. Installez le filtre à eau sur la base de
l'humidificateur, puis remettez le réservoir
en place sur la base. Veillez à ce que le
réservoir soit bien emboîté.
6. Remettez le couvercle de brumisation en place
sur l'humidificateur, puis branchez la fiche de
l'adaptateur secteur à la prise de
l'humidificateur et l'adaptateur secteur à une
prise de courant.
Filtre à eau
La DEL Marche/Arrêt de la brume 0
s'allume. Appuyez sur la touche
Marche/Arrêt de la brume 0 pour
démarrer la diffusion de brume.
Touche Marche/Arrêt de la
brume
2. Informations générales
Si votre produit ne fonctionne pas correctement, lisez ce Guide de démarrage rapide ou le Guide
de l'utilisateur.
Adressez-vous à notre service clientèle :
+33 (0) 170700859 (France) +32 (0) 25887046 (Belgique) Courriel : motorola-mbp@tdm.de
Garantie limitée pour les produits et accessoires grand public (« Garantie »)
Merci d'avoir acheté ce produit de marque Motorola fabriqué sous licence par Binatone Electronics
International LTD (« BINATONE »).
Que couvre la présente Garantie ?
Sous réserve des exclusions ci-dessous, la société BINATONE garantit que ce produit (« Produit »)
de marque Motorola ou cet accessoire certifié et vendu pour être utilisé avec le Produit
Accessoire ») fabriqué par BINATONE est exempt de défauts de matériaux et de fabrication, sous
réserve d’une utilisation normale pendant la période stipulée ci-dessous. La présente Garantie est
votre unique garantie et n’est pas transférable.
LA PRÉSENTE GARANTIE VOUS CONFÈRE DES DROITS LÉGAUX SPÉCIFIQUES ; IL EST
POSSIBLE QUE VOUS AYEZ D'AUTRES DROITS POUVANT VARIER EN FONCTION DE L'ÉTAT, DE
LA RÉGION OU DU PAYS. POUR LES CONSOMMATEURS COUVERTS PAR LES LOIS ET
RÉGLEMENTATIONS DE PROTECTION DES CONSOMMATEURS DANS LE PAYS D'ACHAT OU,
S'IL DIFFÈRE, DANS LEUR PAYS DE RÉSIDENCE, LES AVANTAGES OCTROYÉS PAR LA
PRÉSENTE GARANTIE LIMITÉE SONT ACCORDÉS EN SUS DE L'ENSEMBLE DES DROITS ET
RECOURS CONFÉRÉS PAR LESDITES LOIS ET LESDITES RÉGLEMENTATIONS DE PROTECTION
DES CONSOMMATEURS. POUR UNE BONNE COMPRÉHENSION DE VOS DROITS, CONSULTEZ
LA LÉGISLATION DE VOTRE PAYS, PROVINCE OU ÉTAT.
Qui est couvert ?
La présente Garantie couvre uniquement le premier acheteur du Produit et n’est pas transférable.
Que fera BINATONE ?
BINATONE ou son distributeur agréé réparera ou remplacera gratuitement, à sa discrétion et
pendant une période commercialement raisonnable, tout Produit ou Accessoire qui ne serait pas
EU NL
SNELSTARTGIDS
Voor een volledige uitleg van alle functies en instructies, verwijzen wij u naar de gebruikershandleiding
(downloaden op www.motorolastore.com).
1. De Humidifier+ instellen
MODEL:
MBP83SN
1. Verwijder het sproeideksel van de
bovenkant van de Humidifier en plaats de
sproei-uitlaat op het deksel.
2. Til de hendel aan de bovenkant van de
waterreservoir op en verwijder
het waterreservoir uit de basis
van de Humidifier.
3. Duw de hendel weer op zijn plaats, draai het
waterreservoir om en verwijder de
reservoirdop door deze naar links te
draaien.
4. Vul het waterreservoir met schoon, koud
water en bevestig de reservoirdop door
deze naar rechts vast te draaien.
Koppel de Humidifier+ met uw Android™ apparaat / iPhone®/ iPad®.
1. Activeer
Hubble Connect for Smart Nursery App
op uw Android™ apparaat / iPhone
®
/
iPad
®
.
2. Zorg ervoor dat uw Android™ apparaat / iPhone
®
/ iPad
®
is aangesloten op de Wi-Fi
®
router.
3. Volg de in-app aanwijzingen om uw Smart Nursery Account aan te maken en de Humidifier+ via
Wi-Fi
®
aan te sluiten.
4. Aanmelden bij uw
Hubble Connect for Smart Nursery
account, en tik op
Humidifier+
om de
instellingsmodus van de Humidifier te activeren.
5. Tik op
Skip to Setup (Instellen overslaan)
, en dan op
Next (Volgende)
om naar de Humidifier+ te
zoeken.
6. Tik op SSID om te bevestigen. (Voor iPhone
®
/ iPad
®
, de
Settings (Instellingen)
sluiten, Wi-Fi
®
openen en SSID van Humidifier+ uit de lijst selecteren)
7. Tik op
Next (Volgende)
, dan
Search (Zoeken)
om het netwerk te zoeken.
8. Selecteer een Wi-Fi
®
netwerk uit de netwerklijst, voer het Wi-Fi
®
wachtwoord in en tik dan op
Submit (Versturen)
(of
Search (Zoeken)
voor iOS apparaat).
9. Het zal een paar minuten duren voordat de Humidifier+ contact maakt met het Wi-Fi
®
netwerk.
10. Tik op
Get Started (Beginnen)
wanneer de Humidifier+ is aangesloten op de
Hubble Connect for
Smart Nursery App
.
Opmerking:
Als de installatie mislukt, tik dan tijdens het inschakelen twee keer binnen 3 seconden op de PAIR
(KOPPELING) knop om de aanmeldingsmodus te openen en herhaal bovenstaande stappen.
Installeer Hubble Connect for Smart Nursery App op uw Android™ apparaat /
iPhone®/ iPad®.
Let op de minimale systeemvereisten:
Smartphones/Tablets: Alleen Android™ en iOS®.
Minimale vereisten: iOS® 8.0, Android™ 4.4.2 of hoger.
Voor meer informatie kunt u terecht op: http:// hubblehome.com/requirements
Download Hubble Connect for Smart Nursery App van
de App Store voor iOS apparaten of van de Google
PlayTM Store voor AndroidTM apparaten.
5. Installeer het waterfilter in de basis van de
Humidifier, en plaats het waterreservoir terug
op de basis van de Humidifier. Zorg ervoor dat
het waterreservoir stevig
vastzit.
6. Bevestig het sproeideksel weer aan de humidifier,
en sluit het ene uiteinde van de stroomadapter aan
op de voedingsingang van de humidifier en het
andere uiteinde op het stopcontact.
waterfilter
De 0 Sproeier Aan/Uit LED gaat
branden. Tik op de Sproeier Aan/Uit
knop 0 om de sproeier in te
schakelen.
Sproeier Aan/Uit
knop
2. Algemene informatie
Als uw product niet goed werkt, lees dan deze Snelstartgids of de Gebruikershandleiding.
Neem contact op met Klantenservice:
+31 (0) 202621966 (Nederland) +32 (0) 25887046 (België) E-mail: motorola-mbp@tdm.de
Beperkte garantie voor consumentenproduct en accessoires ("Garantie")
Dank u voor de aankoop van dit onder Motorola-product, dat onder licentie is vervaardigd door
Binatone Electronics International LTD ("BINATONE").
Wat wordt gedekt door deze garantie?
BINATONE garandeert onder voorbehoud van het navolgende dat dit product, verkocht onder de
merknaam van Motorola ("Product"), of de gecertificeerde accessoire ("Accessoire") verkocht voor
gebruik met dit product, geen defecten zal vertonen in materialen en productie bij
consumentgebruik gedurende de hieronder beschreven periode. Deze Garantie is uw exclusieve
garantie en is niet overdraagbaar.
DEZE GARANTIE GEEFT U SPECIFIEKE WETTELIJKE RECHTEN EN U KUNT ANDERE RECHTEN
HEBBEN DIE PER LAND KUNNEN VERSCHILLEN. VOOR CONSUMENTEN DIE GEDEKT ZIJN ONDER
WETGEVING VOOR CONSUMENTENBESCHERMING IN HUN LAND VAN AANKOOP OF HUN LAND
VAN VERBLIJF, KUNNEN DE DOOR DEZE GARANTIE GEBODEN VOORDELEN EEN AANVULLING ZIJN
OP ALLE RECHTEN EN VERHAALSMOGELIJKHEDEN DIE DEZE WET- EN REGELGEVING VOOR
CONSUMENTENBESCHERMINGSWETTEN BIEDT. RAADPLEEG DE WETTELIJKE RECHTEN IN UW
LAND VOOR EEN VOLLEDIG BEGRIP VAN UW RECHTEN.
Wie is gedekt?
Deze Garantie is uw exclusieve garantie en is niet overdraagbaar.
Wat zal BINATONE doen?
BINATONE of zijn geautoriseerde distributeur zal naar eigen goeddunken en binnen een zakelijk
redelijke termijn, elk product of accessoire die niet voldoet aan deze garantie repareren of
vervangen. Wij kunnen functioneel equivalente soortgelijke / gereviseerde / gebruikte of nieuwe
producten, accessoires of onderdelen gebruiken.
EU ES
GUÍA DE INICIO RÁPIDO
Para acceder a una explicación completa de todas las funciones e instrucciones, consulte el Manual de
usuario (disponible para descarga en www.motorolastore.com).
1. Configuración del Humidificador+
MODELO:
MBP83SN
1. Extraiga la tapa de nebulización de la parte
superior del humidificador y conecte la
salida de nebulización a la tapa.
2. Levante el asa de la parte superior del depósito
de agua y extraiga el depósito de agua de la
base del humidificador.
3. Encaje el asa de nuevo en su sitio, luego gire
el depósito de agua hacia arriba, y extraiga
el tapón del depósito girándolo hacia la
izquierda.
4. Llene el depósito de agua limpia y fresca, y
vuelva a colocar el tapón del depósito
girándolo hacia la derecha hasta que esté
bien ajustado.
Empareje el Humidificador+ con su dispositivo Android™/iPhone
®
/iPad
®
.
1. Ejecute la aplicación
Hubble Connect for Smart Nursery
en su dispositivo Android™/iPhone
®
/
iPad
®
.
2. Asegúrese de que su dispositivo Android™/ iPhone
®
/ iPad
®
esté conectado al router Wi-Fi
®
.
3. Siga las instrucciones de la aplicación para crear su cuenta de Smart Nursery y conectarse al
Humidificador+ mediante Wi-Fi
®
.
4. Inicie sesión en su cuenta de
Hubble Connect for Smart Nursery
y pulse en
Humidifier+
(Humidificador+) para acceder al modo de configuración de la aplicación.
5. Pulse
Skip to Setup
(Proceder con la configuración) y, a continuación,
Next
(Siguiente) para
buscar el Humidificador+.
6. Pulse el SSID para confirmar (en iPhone
®
/iPad
®
, salga a
Ajustes
, abra Wi-Fi
®
y seleccione en la
lista el SSID del Humidificador+).
7. Pulse
Next
(Siguiente) y
Search
(Buscar) para empezar a buscar la red.
8. Seleccione una red Wi-Fi
®
de la lista de redes, introduzca la contraseña de la Wi-Fi
®
y pulse
Submit
(Enviar) (o
Search
(Buscar), en caso de tratarse de un dispositivo iOS).
9. El Humidificador+ tardará unos minutos en conectarse a la red Wi-Fi
®
.
10. Pulse
Get Started
(Comenzar) cuando el Humidificador+ se haya conectado correctamente a la
aplicación
Hubble Connect for Smart Nursery
.
Nota:
Si el proceso de configuración no se realiza correctamente, pulse la tecla PAIR dos veces en un
periodo de tres segundos tras encender el dispositivo del humidificador para acceder al modo de
registro y repetir los pasos anteriores.
Instale la aplicación Hubble Connect for Smart Nursery en su dispositivo
Android™/iPhone®/iPad®.
Tenga en cuenta los siguientes requisitos mínimos del sistema:
Smartphones/tablets: solo Android™ y iOS®.
Requisitos mínimos: iOS® 8.0, Android™ 4.4.2 o superior.
Para más información, visite: http://hubblehome.com/requirements
Descargue la aplicación Hubble Connect for Smart
Nursery de App Store, si dispone de un dispositivo iOS,
o de Google PlayTM, si dispone de un dispositivo
AndroidTM.
5. Instale el filtro de agua en la base del
humidificador y, a continuación, vuelva a
colocar el depósito de agua en la base del
humidificador. Asegúrese
de que el depósito de agua
esté colocado de manera
firme.
6. Acople la tapa de nebulización al humidificador, y
conecte un extremo del adaptador de corriente al
conector de alimentación del humidificador, y el
otro extremo a la toma de corriente eléctrica.
filtro de agua
El LED de nebulización activada/
desactivada 0 se iluminará. Pulse el
botón de nebulización activada/
desactivada 0 para activar la
nebulización.
Tecla de nebulización
activada/desactivada
2. Información general
Si su producto no está funcionando correctamente, lea esta Guía de inicio rápido o el Manual de
usuario.
Póngase en contacto con el servicio de atención al cliente:
0911366203 Correo electrónico: motorola-mbp@tdm.de
Garantía limitada para productos y accesorios de consumo ("Garantía")
Le agradecemos la compra de este producto marca Motorola, fabricado bajo licencia por Binatone
Electronics International LTD ("BINATONE").
¿Qué cubre esta garantía?
Sujeto a las exclusiones presentes a continuación, BINATONE garantiza que este producto (el
"Producto") o accesorio certificado (el "Accesorio") de marca Motorola vendido con este producto ha
sido fabricado libre de fallos en materiales y en la mano de obra con un uso de consumo normal durante
el periodo especificado a continuación. Esta Garantía es su única garantía, y no puede transferirse.
ESTA GARANTÍA LE PROPORCIONA DERECHOS LEGALES ESPECÍFICOS, Y PUEDE TENER
OTROS DERECHOS QUE DEPENDERÁN DEL ESTADO, PROVINCIA O PAÍS. PARA LOS
CONSUMIDORES QUE ESTÉN CUBIERTOS POR LAS LEYES O NORMATIVAS DE PROTECCIÓN
DEL CONSUMIDOR EN SU PAÍS DE COMPRA O, SI ES DIFERENTE, EN SU PAÍS DE RESIDENCIA,
LOS BENEFICIOS APORTADOS POR ESTA GARANTÍA LIMITADA SE SUMAN A TODOS LOS
DERECHOS Y RECURSOS OFRECIDOS POR DICHAS LEYES Y NORMATIVAS DE PROTECCIÓN
DEL CONSUMIDOR. PARA CONOCER PLENAMENTE SUS DERECHOS, DEBE CONSULTAR LA
LEGISLACIÓN VIGENTE EN SU PAÍS, PROVINCIA O ESTADO.
¿Quién recibe esta cobertura?
Esta Garantía cubre únicamente al primer comprador, y no es transferible.
¿Qué hará BINATONE?
BINATONE o su distribuidor autorizado, según elija y dentro de un tiempo comercialmente
razonable, reparará o sustituirá de forma gratuita todos aquellos Productos o Accesorios que no
1


Need help? Post your question in this forum.

Forumrules


Report abuse

Libble takes abuse of its services very seriously. We're committed to dealing with such abuse according to the laws in your country of residence. When you submit a report, we'll investigate it and take the appropriate action. We'll get back to you only if we require additional details or have more information to share.

Product:

For example, Anti-Semitic content, racist content, or material that could result in a violent physical act.

For example, a credit card number, a personal identification number, or an unlisted home address. Note that email addresses and full names are not considered private information.

Forumrules

To achieve meaningful questions, we apply the following rules:

Register

Register getting emails for Motorola MBP83SN at:


You will receive an email to register for one or both of the options.


Get your user manual by e-mail

Enter your email address to receive the manual of Motorola MBP83SN in the language / languages: English, German, Dutch, French, Spanish as an attachment in your email.

The manual is 1,76 mb in size.


You will receive the manual in your email within minutes. If you have not received an email, then probably have entered the wrong email address or your mailbox is too full. In addition, it may be that your ISP may have a maximum size for emails to receive.

Others manual(s) of Motorola MBP83SN

Motorola MBP83SN User Manual - English - 28 pages

Motorola MBP83SN User Manual - Dutch - 32 pages


The manual is sent by email. Check your email

If you have not received an email with the manual within fifteen minutes, it may be that you have a entered a wrong email address or that your ISP has set a maximum size to receive email that is smaller than the size of the manual.

The email address you have provided is not correct.

Please check the email address and correct it.

Your question is posted on this page

Would you like to receive an email when new answers and questions are posted? Please enter your email address.


Info