Quick Start Guide
For a full e
download fr
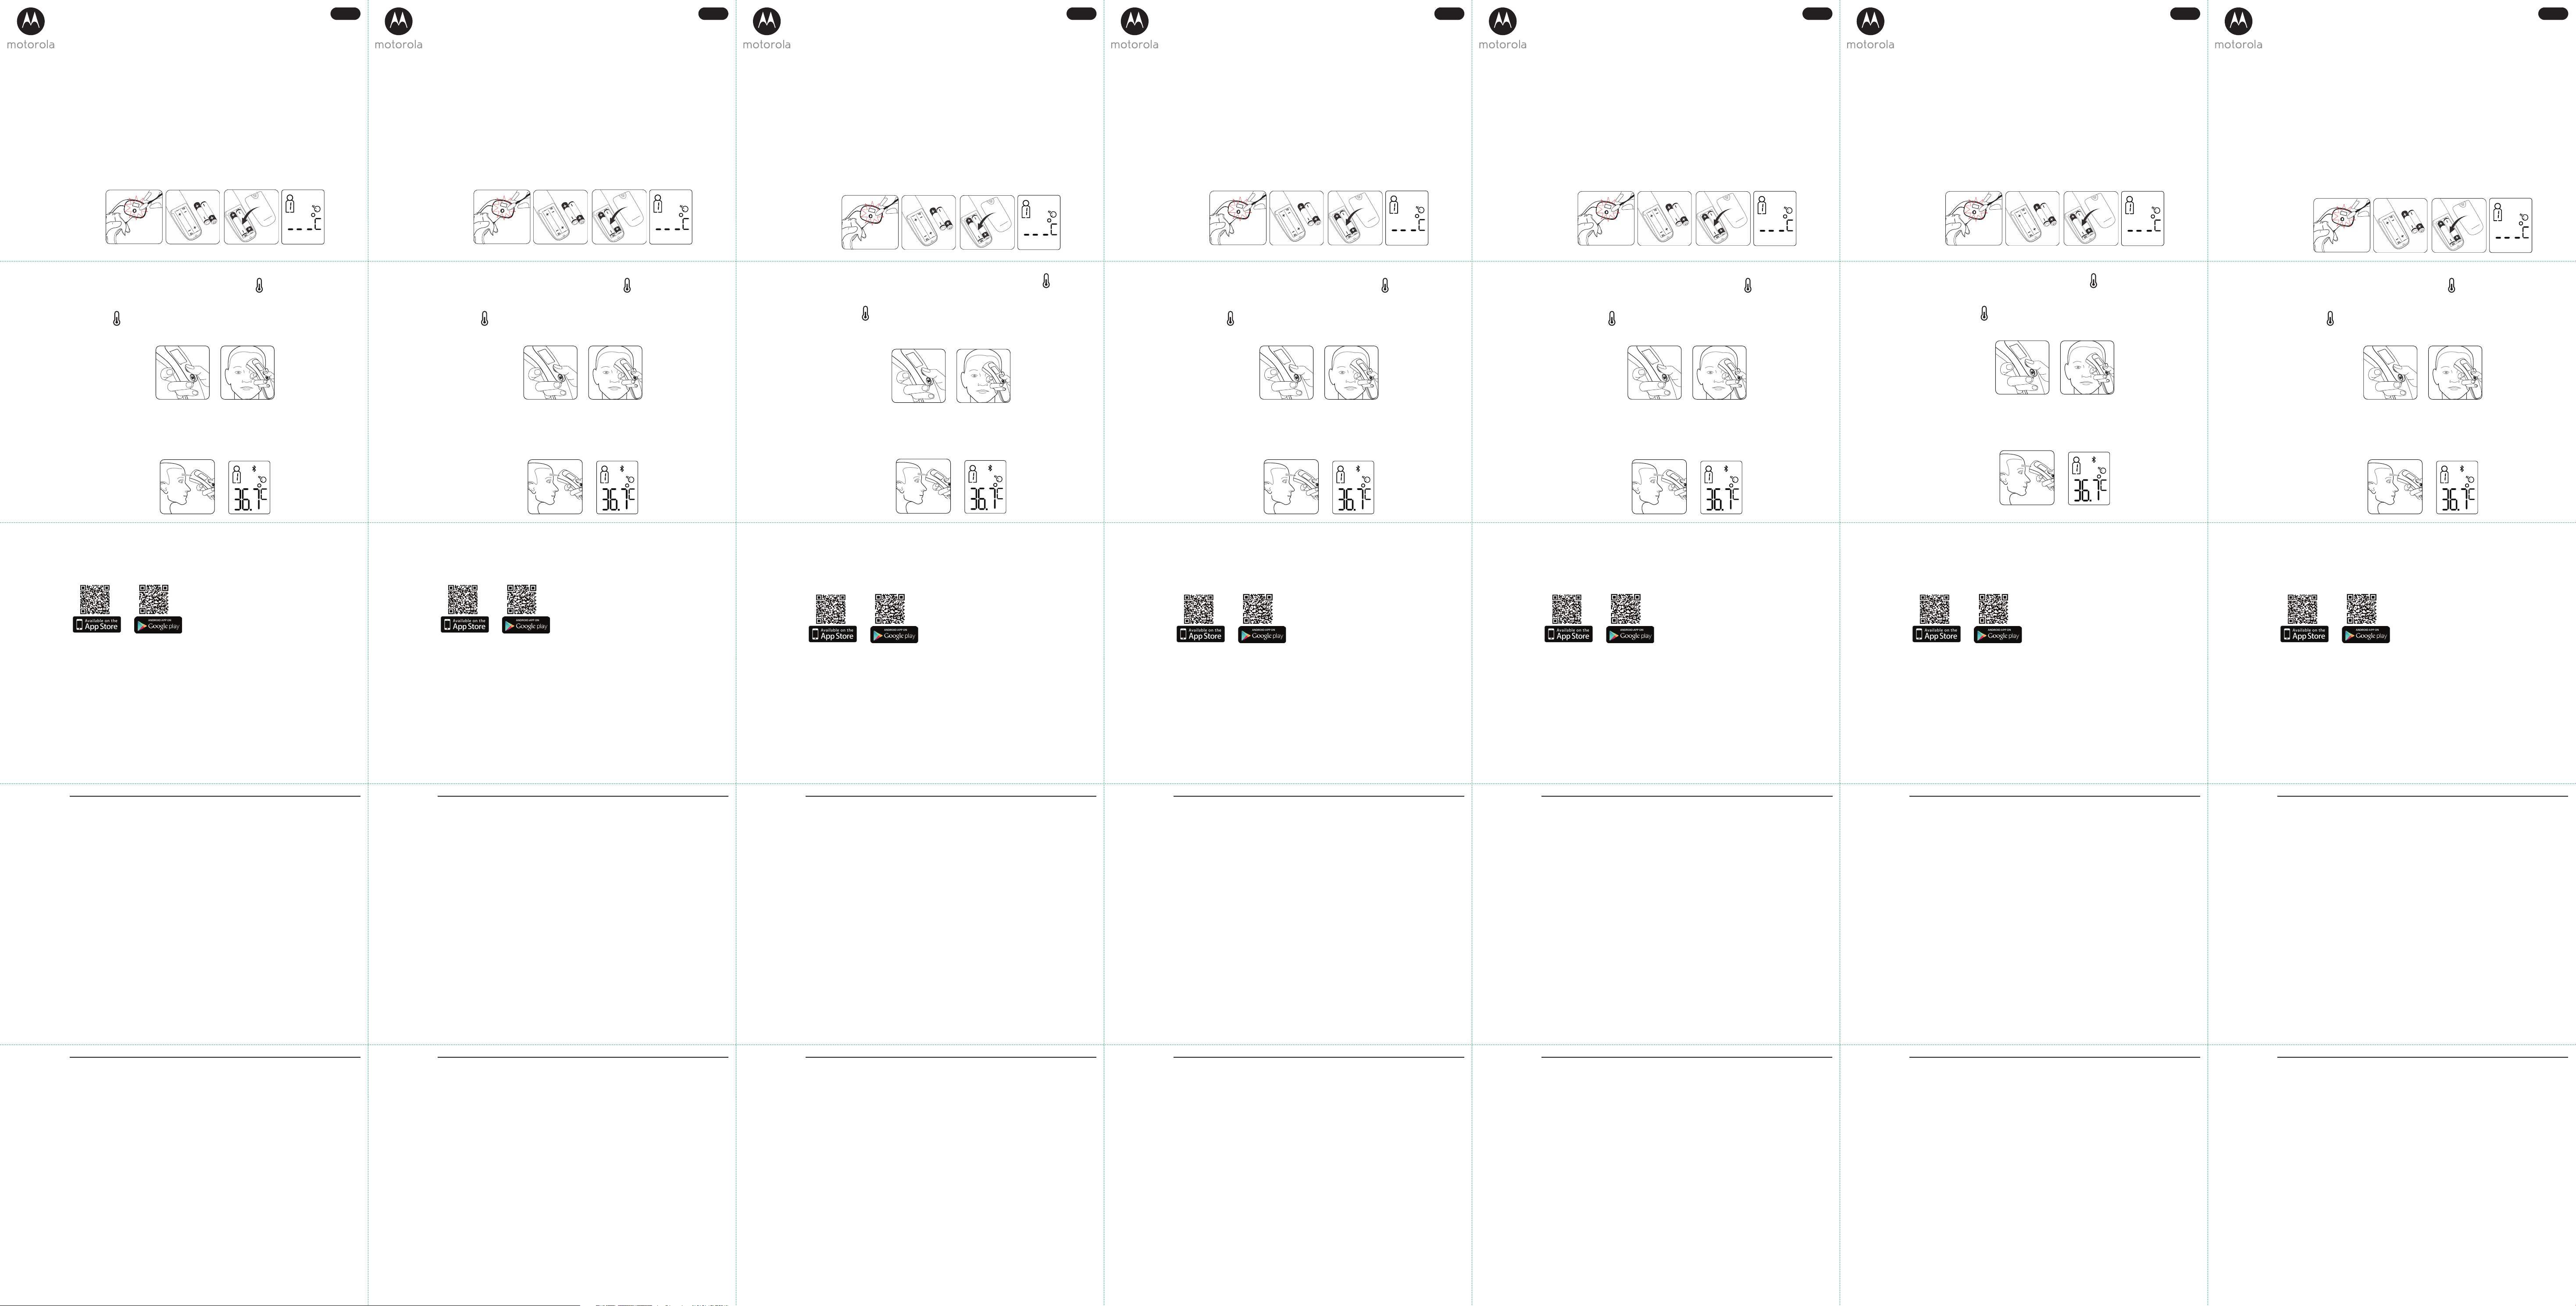
1. Setting Up the Smart T
1. The k
slightly moistened with alc
clean cotton s
taking temper
2. Skin surface lipids on the f
for
measuring.
3. If the temper
until the thermometer temper
to use.
4. Please open the battery c
Once batt
will appear as in the figure t
itself o
Quick Start Guide
For a full e
download fr
1. Setting Up the Smart T
1. The k
slightly moistened with alc
clean cotton s
taking temper
2. Skin surface lipids on the f
for
measuring.
3. If the temper
until the thermometer temper
to use.
4. Please open the battery c
Once batt
will appear as in the figure t
itself o
HO
1. Place the thermometer in y ] button.
• Do not pres
• Make sur
2. Pres ] button, keeping the thermomet
sound. The backlit scr
3. Read the t
Caution:
Aft
for
for
the thermometer should be br
devic
HO
1. Place the thermometer in y ] button.
• Do not pres
• Make sur
2. Pres ] button, keeping the thermomet
sound. The backlit scr
3. Read the t
Caution:
Aft
for
for
the thermometer should be br
devic
Please take not
Smartphones/ T® only
Minimum requir® 8.0, Andr
For mor
Install Hubble Connect f®/ iPad®.
Download Hubble Connect for Smart Nursery App fr
App Stor
for Andr
Please take not
Smartphones/ T® only
Minimum requir® 8.0, Andr
For mor
Install Hubble Connect f®/ iPad®.
Download Hubble Connect for Smart Nursery App fr
App Stor
for Andr
Pair the Smart Ear Thermomet®/iPad ®.
1. Run the Hubble Connect for Smart Nursery app on y®/iPad®.
2. T®/iPad®.
3. Follo
Thermometer via Bluet
4. Log in to y
Thermometer t
5. T
thermometer is swit
6. Pair the Thermometer via Bluetooth, then tap Ne
7. Search f
8. P
9. It will tak
10. T
Smart Nursery app.
Note:
Should you f
2. Gener
If your pr
Contact Cust
+44 (0) 844 557 08 +44 (0) 8187 62092(ROI)
(* Calls cost 7p per minute plus y
Consumer Pr
Thank y
Electronics Int
What Does This W
Subject to the e
(“Product”) or c
free fr
below
Importer: Binatone T
1 Apsley W T
Who Is co
This W
What W
BINA
no charge r
W
or parts.
2. Gener
If your pr
Contact Cust
+491805 938 802 (Eur E-mail: motor
Consumer Pr
Thank y
Electronics Int
What Does This W
Subject to the e
(“Product”) or c
free fr
below
Importer: Binat
Bosstr T
Who Is co
This W
What W
BINA
no charge r
W
or parts.
UK_EN EU_EN
MODEL:
MBP70SN
MODEL:
MBP70SN
Schnellstartanleitung
Um eine ausführliche Erklärung aller Funktionen und Anleitungen zu erhalten, lesen Sie bitt
Benutzerhandbuch (v
1. Inbetriebnahme des Intelligent
Stirnthermomet
1. Eine wesentliche V
Oberfläche des Sensors vorsichtig mit einem W
angefeuchtet haben, sauber und wischen Sie die Oberfläche anschließend sof
sauberen W
Sensor absolut trock
2. Lipide auf der Hautoberfläche k
dass die Stirn ger
Minuten, be
3. F
wart
Zimmertemper
4. Önen Sie bitte die Batt
V
ein und das L
beliebige T
MESSEN DER STIRNTEMPERA
1. Nehmen Sie das Thermometer in die Hand und legen Sie Ihr ] T
• Drücken Sie die T
• V
2. Halten Sie die [ ] T
Stirn, bis Sie den „DIDI“ Piepton hör
Messv
3. Lesen Sie die T
Achtung:
Nach dem Drücken der Mes
Thermometer mes
Stirntemper
signalisiert, dass das Thermomet
bis 5 cm. Andernfalls schaltet das Ger
Bitte beachten Sie die f
Smartphones/T®
Mindestanfor® 8.
Um mehr zu erfahr
Installier
iPhone®/ iPad®.
Laden Sie die Hubble Connect for Smart Nursery -
App Stor
Android™-Ger
V® /iP® .
1. Starten Sie die „Hubble Connect f®/iPad®.
2. Aktivier®/iPad ®.
3. Folgen Sie den App-int
Thermometer über Bluet
4. Melden Sie sich bei Ihrem „Hubble C
T
5. Berühr
Thermometer zu suchen. S
dann „Next“.
6. V
7. Suchen Sie nach dem Gerät. W
For
8. Das T
9. Es dauert einige Sek
hergest
10. Berühren Sie „
Nursery“-
Hinw
Sollte der K
EU_DE
MODELL:
MBP70SN
Guía de inicio r
La Guía del usuario contiene una e
(descar
1. Configur
par
1. La clav
un palito de algodón liger
A continuación, séquelo inmediatament
asegurarse de que el sensor es
2. Los lípidos superficiales de la piel de la frent
raz
minutos antes de t
3. Si la temper
área de medición, esper
minutos, antes de usarlo
4. Abra el c
han instalado las pilas, el termómetr
la figura de la iz
apague.
CÓMO T
1. Coloque el termómetr ].
• No presione el bot
• Compruebe que la sonda está limpia ant
2. Presione el bot ] manteniendo el termómetr
La pantalla retr
3. Lea la t
At
Después de presionar el bot
y el termómetr
de la frent
termómetr
standb
T
Smartphones/ T® solamente.
Requisitos mínimos: iOS® 8.
Par
Instale la app Hubble Connect f®/
iPad®.
Descargue la app Hubble Connect fdel
App Stor
dispositivos Andr
Empareje el T® /iP® .
1. Ejecute la app Hubble Connect f®/iPad®.
2. Activ® /iPad®.
3. Siga las instruc
medio del Bluetooth.
4. Entre en su cuenta Hubble C
Thermometer” (T
5. Pulse en “Skip to Setup” (
termómetr
6. Empareje el termómetr
7. Busque el dispositivo
For
8. Empar
9. La c
(c
10. Pulse “Get Started” (
Hubble Connect for Smart Nursery
Nota:
Si el proc
EU_ES
MODEL
MBP70SN
Guida r
Per la spiegazione esaustiv
(scaricabile dal sito w
1. Configur
intelligent
1. Il fatt
bastoncino c
quindi asciugare immediatament
prima di misurar
2. I lipidi sulla superficie cutanea possono causar
che la front
temper
3. Se la temper
misurazione
prima dell'uso.
4. Aprire il c
installato le ba
illustr
spegne automaticament
COME MISURARE LA TEMPERA
1. Aerr ].
• Non premer
• Assicur
2. Premer ] tenendo il t
un segnale acustico
3. Legger
Att
Dopo av
termometr
della front
necessario a
di standb
Requisiti minimi di sist
Smartphone/tablet: esclusiv® .
Requisti minimi: iOS® 8.0
Per ulteriori informazioni, visitar
Installa l'app Hubble Connect f®/
iPad®.
Scarica l'app Hubble Connect for Smart Nursery dall'App
Stor
Android™.
Abbinare il t®/ iPad®.
1. Aprire l'app Hubble C®/ iPad®.
2. Attiv®/ iPad®.
3. Seguir
termometr
4. Ac
For
5. Selezionar
sia acceso
6. Abbinare il termometr
7. Cer
8. Abbinar
9. Il t
“Continue”.
10. Quando il termometr
selezionar
Nota:
Se il proc
EU_IT
MODELL
MBP70SN
Snelstart
V
downloaden v
1. De smart contactlo
1. Het belangrijkst
te r
schoon te v
W
temper
2. Lipiden op het huidoppervlak van het v
aldus voor da
voor
3. Als de temper
totda
thermometer gebruikt.
4. Open het batterijdeksel en ins
Eenmaal de batterijen zijn geïns
verschijnt het v
apparaat opnieuw in t
HOE DE V
1. Neem de thermometer in uw hand met uw duim op de [ ] knop.
• Druk nog niet op de knop.
• Zor
2. Druk op de [ ] knop en houd de thermometer dicht tegen uw v
geluid hoort. Het verlicht
3. Lees de t
Opgelet:
Na het drukken op de metingknop
en de thermometer
voorhoof
de thermometer dichter t
gebeurt, gaat het apparaa
Houd rek
Smartphones/ T®.
Minimum ver® 8.
V
Installeer de Hubble Connect f®/
iPad®.
Download de Hubble CApp vanaf
de App Stor
Stor
Koppel de smart v® /iP® .
1. Start de Hubble Connect for Smart Nursery App op uw Andr® / iPad®.
2. Schakel Bluet®/iPad®.
3. V
met de thermometer via Bluetooth.
4. Meld u aan op uw Hubble Connect for Smart Nursery ac
Thermometer om de ins
5. T
thermometer te z
(V
6. Koppel de thermometer via Bluet
7. Zoek naar het appar
Thermometer”.
8. De thermomet
9. Het duurt enk
Tik op “C
10. Tik op "Get S
Nursery app is verbonden.
Opmerking:
Als de instelpr
EU_NL
MODEL:
MBP70SN
Guide de démarr
Pour tous les détails sur les car
(disponible au t
1. Configur
sans contact
1. La précision des r
délicatement a
à l'aide d'un autre c
minutes afin de v
2. Si la peau du front es
préalable
3. Si la tempér
mesure
ambiante.
4. Ouvre
l'appareil. Une f
s'illumine de la manière indiquée ci-c
bouton pour le r
COMMENT PRENDRE LA TEMPÉRA
1. Prene ].
• N'appuye
• Assur
2. Appuye ] en tenant le thermomètr
rétr
3. Il ne v
Att
Quand le bouton de mesur
et le thermomètre
tempér
dev
l'appareil se r
V
Smartphones/tablett® seulement.
Configur® 8.
Pour plus de détails, v
Installez l'applica
iPhone®/ iPad®.
THubble Connect f
depuis l'App Stor
boutique Google Play™ pour les appar
Appairage du thermomètr®/iPad®:
1. Lancez l'applica®/ iPad®.
2. Activ®/iPad®.
3. Cr
thermomètre via Bluet
4. Connecte
thermomètre fr
5. Appuy
thermomètre
6. Procédez à l'appair
7. La recher
For
8. L
9. L
secondes. Allez dans "C
10. Une fois le thermomètr
appuye
Remarque:
Si le proc
EU_FR
MODÈLE:
MBP70SN
2. Allgemeine Informationen
Falls Ihr Pr
Benutzerhandbuch.
W
01805 938 802 E-Mail: motor
Eingeschränk
Vielen Dank, dass Sie dieses Pr
Electronics Int
W
V
hergest
zur V
den unten genannten Z
ausschließliche Garantie und nicht übertr
Importeur: Binat
Bosstr T
Für wen gilt die Gar
Diese Garantie gilt nur für den Erstk
W
BINA
angemessenen Z
reparier
oder neue Produk
2. Información gener
Si su product
Póngase en contact
0911366203 Correo electr
Garantía limitada de Pr
Le agradec
Binatone. Electr
¿Qué cubr
Sujeto a las e
marca MO
product
normales de uso por el periodo de tiempo indicado a continuación. Esta gar
suya y no es tr
Importador: Binatone C
Bosstr T
¿Qué cubr
Esta gar
¿Qué har
BINA
raz
con esta gar
repar
2. Informazioni gener
Se il prodott
Contattar
0260060660 E-mail: motor
Garanzia limitata per i pr
Grazie per a
Electronics Int
Che cosa c
Con le esclusioni elencate di seguit
(“Prodott
difetti di materiali e f
Garanzia si applica esclusiv
Importator
Bosstr T
Chi è copert
Questa Garanzia si applica esclusiv
Che cosa f
BINA
commer
che non è conforme a ques
ricondizionati/
2. Algemene informatie
Als uw product niet naar behor
Neem contact op met de klantenservic
+31 (0) 202621966 (Nederland) +32 (0) 25887 E-mail: motor
Beperkte gar
Hartelijk dank v
Electronics Int
W
BINA
(“
in materiaal en v
beschre
Importeur: Binat
Bosstr T
Wie is gedekt?
Deze gar
W
BINA
redelijk
of verv
nieuwe pr
2. Informations génér
Si votr
d'emploi.
Pour contact
170 25887046 (Belgique Courriel : motor
Garantie limit
Nous vous r
par Binatone Electr
Que couvr
Sous réserv
("Produit") de mar
("Ac
réserv
unique garantie et n’
Importateur: Binat
Bosstr T
Qui est couv
La présent
Que fer
BINA
une période commer
présent
neufs, dont les fonctionnalités sont équiv