EU EN
QUICK ST
F
download from www
1.
Setting up yo
MODELS:
MBP845CONNECT
MBP845CONNECT
MBP845CONNECT
MBP845CONNECT
WARNING:
Strangulation Hazard:
Children have
STRANGLED in cords.
Keep this cord out of the
reach of children (more
than 1m away).
Never use extension
cords with AC Adapters.
Only use the AC
Adapters provided.
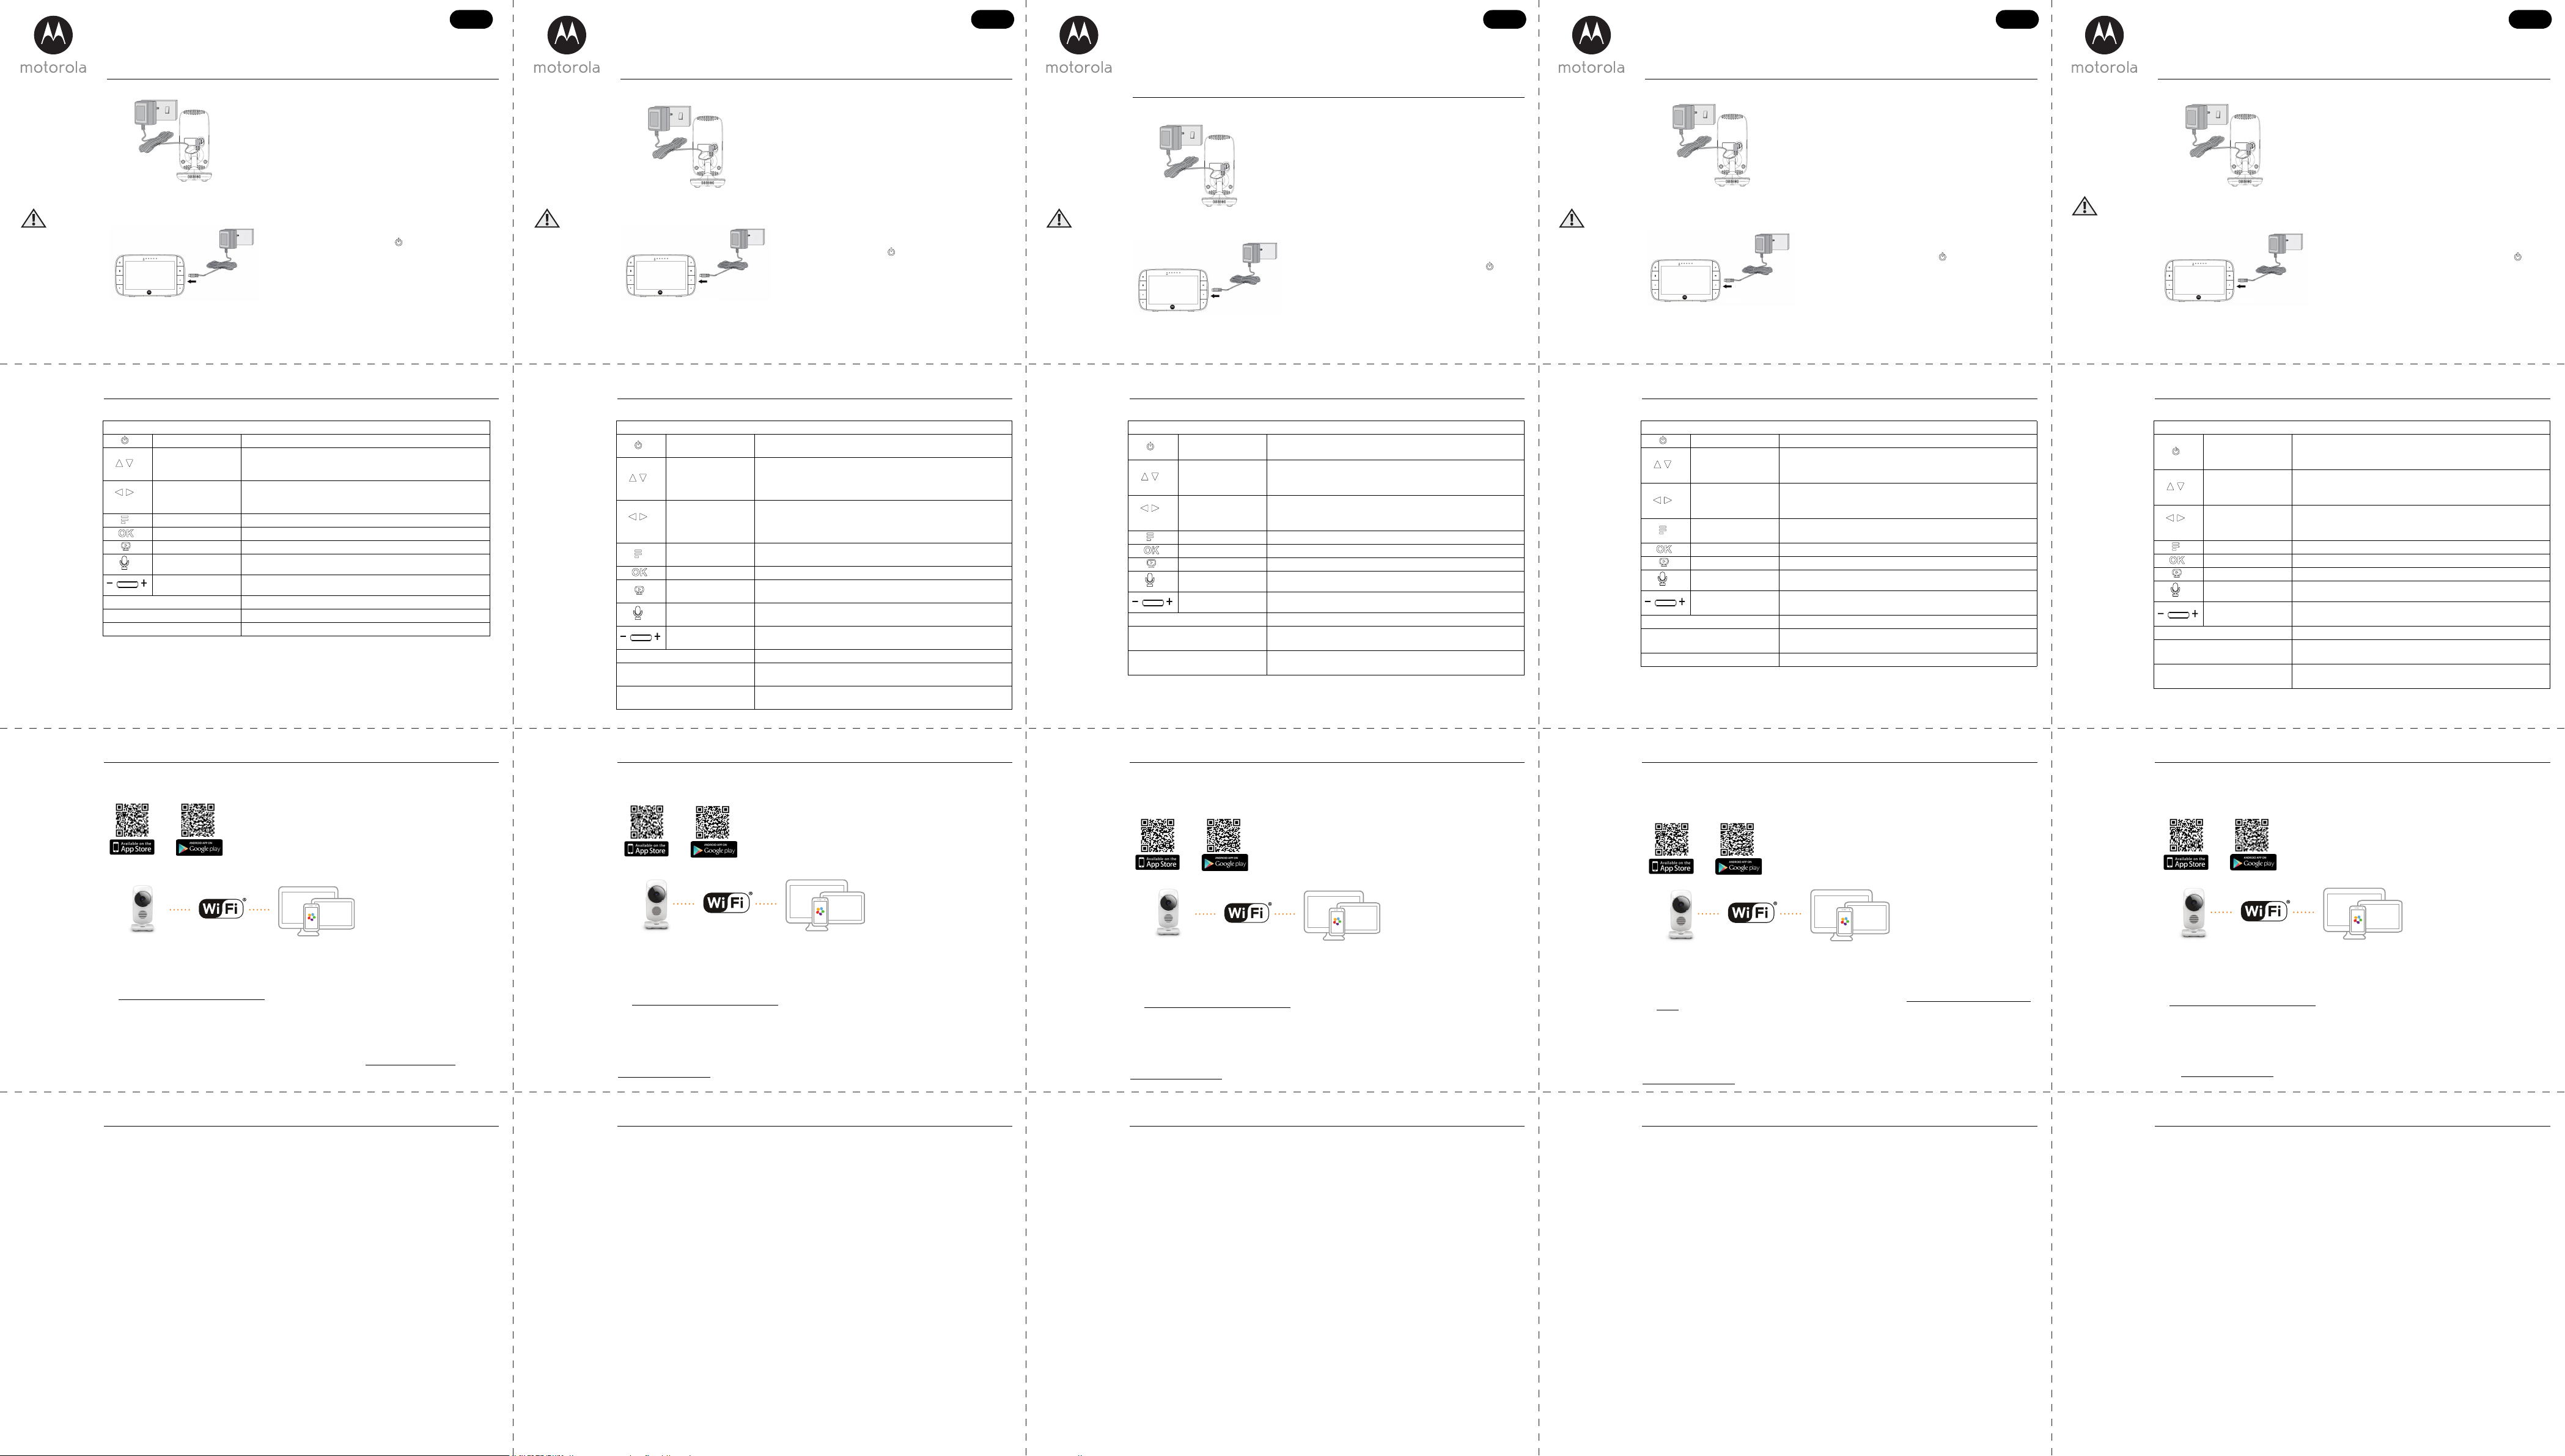
• Insert the DC p
the back of the Baby Unit.
• Connect the other end of the power ad
power socket.
• Slide the ON/OFF sw
indicator lig
Note
Only use the enclosed
• Connect t
Unit and the other end to a suit
• Press and hold the POWE0 on the
Unit to switch it ON.
Note
Only use the e
Charge for at least 16 hours
A. Baby Unit
B. Par
2. Basic operation of the k
Parent U
0 ON/OFF button Press and hold to turn the Par
+ -UP/DO Press to adjust menu settings.
When viewing a zoomed image, press and hold
image upward or do
< >LEFT/RIGHT
buttons
Press to acc
When viewing a zoomed image, press and hold
image leftward or rightward.
M MENU Press to open menu options or exit the menu.
O OK button Press to confirm a selection.
V VIDEO button Press to turn
T T Press and hold to talk to your bab
V Press -/+ to
Baby Unit
ON/OFF switch Slide the ON/OFF switch to switch the Baby Unit ON/OFF
PA Press and hold to pair with the Parent Unit.
1. Open the Hubble for M
2. F
®
Camera.
3. Log in to your acc
https:/nnected.com/#login on your PC to access your live camera stream.
Please tak
Smartphones/T
PC (only for viewing –
®
7, Mac OS
®
10.7, Chrome™ 24
®
9, Safari
®
6,
®
18, Adobe
®
Flash
®
15, Java™
® requirements:
At least 0.6 Mbps upload ba
http:/
A. Install Hubble for Motorola Monitors App.
• Scan the QR code with y
Motor
Google PlayTM Store for TM devices.
• Install Hubbl
Wi-Fi® Camera Connect to Internet
via Wi-Fi® Compatible
Viewing D
B. V
3. Setting up the Camera Unit for W® Internet Vie
4. General Information
If your proart Guide or the User’s Guide of one of
on page 1.
Contact Customer Servic
+491805 938 802 in Europe
Email: motorola-mbp@tdm.de
Consumer P Limited W
Thank you for purchasing this Motorola brand
Electronics International L
What Does this W
Subject to the exclusions contained below, BINATONE warrants that this Motorola brande
("Product") or certified accessory ("for use wi
be free from defects in materials and workmanship under normal consumer usage for the period
outlined below. This W
THIS WARRANTY GIVES YRIGHTS, AND Y
THAT V
CONSUMER PROTECTION LAWS OR REGS IN THEIR C
DIFFERENT
WARRATS AND REMEDIES CONVEYED BY SUCH
CONSUMER PRS. F
RIGHTS Y Y
Who is cov
This Warranty extends only to the first consumer purchaser
What will BINATONE do
BINATONE or its authorised distrib and within a commercially reasonable time, will at
no charge repair or replace an
may use functd/ r
Accessories or parts.
EU DE
KURZANLEITUNG
Eine vollständige Erklärung aller F
Bedienungsanleitung (kann von wwwrolahome.com herunter
1.
Einrichten Ihres digitalen Video-Babym
MODELLE:
MBP845CONNECT
MBP845CONNECT
MBP845CONNECT
MBP845CONNECT
WARNUNG:
Strangulierungsgefahr:
Kinder haben sich mit
Kabeln STRANGUL
Dieses Kabel außerhalb
der Reichweite von
Kindern aufbewahren
(mehr als 1 m entfernt).
Verwenden Sie keine
Verlängerungskabel mit
Netzteil
Sie nur das mitgelieferte
Netzteil.
• Schließen Sie da
an der Seite des Bab
• Schließen Sie den anderen Stecker des Netzteils an eine
geeignete Netzsteckdose an.
• Schieben Sie den EIN/AUS-
Aus-/V
Hinweis
Verwenden Sie nur da
A. Stromverso
• Schließe
Elterngerät
Netzsteckdose
• Halten Sie die POWER-T0 oben am Elternger
um das Gerät einzuschalten.
Hinweis
Verwenden Sie nur
Vor demVoVo
lang aufladen.
B. Stromvers
2. Grundlegende Bedienung der T
Elterngerät
0 EIN/ Halten Sie die T
auszuschalten.
+ -
T
OBEN/
NACH UNTEN
Drücken S
vorzu
Halten Sie bei der Anzeige eines gezoomten Bildes diese T
um das Bild nach oben
< >T
NACH RECHTS
Drücken S
aufzurufen.
Halten Sie bei der Anzeige eines gezoomten Bildes diese T
um das Bild nach links
M MENÜ- Drücken Sie diese Te Menüoptionen zu öffnen oder
um das Menü zu beenden.
O OK- Drückeine Auswahl zu bestätigen.
V VIDEO- Drücken Sie diese T den LCD-Bildschirm ein-
auszuschalten.
T SPRECHEN- Halten Sie diese T
sprechen.
Lautstärk Drücken Sie -/+, um die L
auszuwählen.
Babygerät
EIN/ Schieben Sie den EIN/
auszuschalten.
PA PAIR H
abzustimmen.
3. Einstellen der Kamera für die Wi-F
®
-Internet-Anzeige
A. Insta
• Scannen Sie den QR-Code mit Ihrem in
die App „Hubble for M
oder vom Google Play
TM
Store für Android
TM
-Geräte herunter
• Installiere
B. Anzeige auf k
Wi-Fi®-Kamera Verbinden mit dem
Internet über Wi-Fi® Kompatible
Anzeigegeräte
1. Öffnen Sie die App „
2. Befolgbble-K
zu verbinden.
3. Melden Siiblen Smartphone, T
https:/ auf Ihrem PC an,
Bitte bean Mindestsystemanforderungen:
Smartphones/T
PC (nur für das Anzeigen – NICHT für das Einrichten): Windows® 7, Mac OS® 10.7, Ch
Explorer® 9, Safari® 6, Firefox® 18, Adobe® Flas® 15, Java™ 7
Wi-Fi® -Anforderungen:
Mindestens 0,6 Mbps Upload-Bandbreite pro Kamera. T-Geschwindigkeit unter:
http:/
4. Allgemeine Informationen
W Sie diese Kurzanleitung bzw. die Bedienungsan-
leitung zu einem de
W
01805 938 802 in Deutschland
Email: motorola-mbp@tdm.de
Eingeschränkte Garantie für Kumgüter und Zubehör („Garantie“)
Vielen Dank, dass Sie dieses Produkt der Mark
Electronics International LNE“) unter Lizenz ge
W
V
gefertigte Produkt der Marke Motorola („Produkt“) oder zugelassenes Zubehör („Zubehör“), das für
die V
den unten angegebenen Z
ausschließliche Garantie und nicht übertragbar
DIE RECHTE DES KÄUFERS NACH DER JEWEIL
WERDEN VON DIESER GARANTIE NICHT BERÜHRT DIESE GARANTIE GIL
ANWENDBAREN GEWUNGSREGELUNGEN UND BESCHRÄNKT NICHT
DIE RECHTE VON VERBRAUCHERN GEGENÜBER VERKÄ
GEMÄSS DEM RECHT DER ALLGEMEINEN GESCHÄFTSBEDINGUNGEN NICHT ABDINGBARE
RECHTE NACH NATIONALEM ODER EUROP
W
Diese Garantie erstreckt sich nur auf den Erstkäufer und ist nicht übertragbar
W
BINATONE oder sein autorisierter Händler wird nach eigener Wahl und innerhalb k
angemessener Zeit alle Ple, die dieser Garantie unterliegen, k
reparieren oder ersetzen. Wir köonell gleichwertige aufearbeitete/überholte/
gebrauchte oder neue Produkte, Z
EU FR
GUIDE DE DÉMARRAGE RAPIDE
Pinstructions complètes, veuillez consulter le Guide de l'utilisateur
(téléchargeable sur www
1. Installation de votre moniteur vidéo numérique pour
bébé
MODÈLES:
MBP845CONNECT
MBP845CONNECT
MBP845CONNECT
MBP845CONNECT
AVERTIS
:
Danger d’étranglement :
des enfants se sont
accidentellement
ÉTRANGLÉS avec les
cordons. Tenez ce
cordon hors de po
des enfants (à
mètre de distance).
N’utilisez jamais de
prolongateurs avec les
adaptateurs secteur.
Utilisez uniquement les
adaptateurs secteur
fournis.
• Branchez la fiche CC de l'adaptateur secteur à la
sur le côté de l’unité bébé.
• Branchez l’une prise de courant adéquate.
• F
marche/
Remarque
Utilisez uniquement
A. Alimentation électriqu
• Branchez le connecteur micro USB de l’adaptateur secteur à
l’unité parentsaptateur à
adéquat
• Appuyez longuement sur la touche MARCHE/ARRÊT 0 en haut
de l'
Remarque
Utilisez uniquement l'adaptateur
Chargez pendant au mo
B. Alimentation électrique de l’unité pa
2. F
Unité parent
0 T
ARRÊT
Appuyez longuement pour mettre l’unité parents sous ou hors
tension.
+ -T
Appuyez pour effectuer les
Dans une image zoomée, maintenez cette touche enfoncée
pour déplacer l'image v
< >T
DROITE
Appuyez pour accéder aux différentes options du menu.
Dans une image zoomée, maintenez cette touche enfoncée
pour déplacer l'image v
M T Appuyez pour afficher le menu ou pour sortir.
O T Appuyez pour confirmer une sélection.
V T Appuyez pour activer ou désactiver l’
T T Maintenez cette touche enfoncée pour parler à votre bébé.
T Appuyez sur -/+ pour régler le v
Unité bébé
Commutateur MARCHE/
ARRÊT F
pour mettre celle-ci sous ou hors tension.
P Maintenez cette touche enfoncée pour coupler l’unité bébé
avec l’unité par
3. Installation de la caméra a
®
sur
Internet
A. Installation Hubble for Motoro
• Scanne
l'application
appareils iOS ou sur Google Play
• Insta
B. V
Caméra Wi-Fi® Connexion à Inte
via le Wi-Fi® Appare
pour le visionnage
1. Ouvrez l'application H
2. Suivez les instructi® .
3. Connectez
https:/ sur votr
V système mini
Smartphones/TiOS 7, Android™ 4.2
PC (seulement pour la visualisation, PAS pour la configuration) : Windows® 7, Mac OS® 10
Internet Explorer® 9, Safari® 6, Firefox® 18, Adobe® Flash® 15, Java™ 7
Configuration Wi-Fi® min
Bande passante de téléchargement ≥ 0,6 Mbps par caméra. T
http:/
4. Généralités
Si votre produionne pas correctement, lisez ce guide de démarrage ou le guide uti
l'un des modèles listés en page 1.
Adressez-vous à notre service clientèle :
0170700859 en France
025887046 en Belgique
Courriel : motorola-mbp@tdm.de
Garantie limitée pour les produits et a
Merci d'av fabpar Binatone Electronics
International L
Que couvre la présente Garantie ?
Sous réserve des ex, la société BINA
(« Produit ») drtif
(« Accessoire ») fabriqué par BINATONE est ex
réserve d’une utilisation norm
unique garantie et n’est pas transférable.
LA PRÉSENTE GARANTIE VOITS LÉGAUX SPÉCIFIQUES ; IL
QUE VOUS AYEZ D'
OU DU P
PROTEC D'
PP
ACCORDÉS EN SUS DE L
LESDITES RÉGLEM DES CONSOMMATEURS. POUR UNE BONNE
COMPRÉHENSION DE VO
OU ÉT
Qui est couvert
La présente Garantie couvre uniquement le premier acheteur du Produit et n’est pas transférable.
EN NL
SNELST
V en instructies, verwijzen wij u naar de
Gebruikershandleiding (downloaden van www.motorolahome.com).
1.
Uw Digital Video Babyfoon opstellen
MODELLEN:
MBP845CONNECT
MBP845CONNECT
MBP845CONNECT
MBP845CONNECT
WAARSC
:
Wurgingsgevaar:
Kinderen kunnen
GEWURGD worden met
snoeren. Houd dit snoer
buiten het bereik van
kinderen (meer dan 1
meter afstand).
Gebruik nooit
verlengsnoeren met AC-
adapters. Gebruik alleen
de meegeleverde
AC-adapter
• Steek de kleine stekk
achterkant van het Babyt
• Sluit het andere uiteind
stopcontact.
• Schuif de AAN/UIT-schak
kopp
Opmerking
Gebruik uitsluitend de meegelever
A. V
• Sluit de micr
Oudertoestel en het andere uiteinde op een geschikt
stopcontact.
• Houd de POW0 aan de bovenkant
ingedrukt om
Opmerking
Gebruik uitsluitend de meegeleverde ad
Ten minste 16 uur oplade
B. V
2. Basisfuncties van de knoppen
Oudertoe
0 AAN/UIT Ingedrukt houden om het Oudertoestel AAN/UIT te schakelen.
+ -HOGER/LAGER-
knoppen
Indrukken om de instellingsopties te openen.
Bij weergav
beeld omhoog of omlaag te verplaatsen.
< >LINKS/RECHTS-
knoppen
Indrukken om andere menu
Bij weergav
beeld links of rech
M MENU-knop Indrukken op de menu-opties te openen of het menu af te
sluiten.
O OK- Indrukken om een keuz
V VIDEO-knop Indruk
T SPREEK Ingedrukt houden om tegen uw kind te sprek
V Druk op -/+ om het vo
selecteren.
Babytoestel
AAN/UIT V
te schak
K Ingedrukt houden om met het oudertoestel te koppelen.
3. De camera instellen v®
Internetw
A. De Hubble for Motor Monitors App
• Scan de
Motorola Monitors
Google PTM Store voor Android TM apparaten.
• Installeer de Hubble for
B. Gebruik met compatibele smartphones, tablets en computers.
Wi-Fi® Camera Aansluiten op het
Internet via Wi-Fi®C
Weergave
1. Gebruik de Hubb
2. V®
Camera.
3. Meldt u aan bij uw account op uw compatibele smartvia https:/
#login op uw pc v
Controleer de onderstaa
Smartphones/T
PC (alleen voor weergave - NIET voor installatie): Windows® 7, Mac OS® 10.7, Chrome™ 24, Internet Explorer®
9, Safari® 6, Firefox® 18, Adobe® Flash ® 15, Java™ 7
Wi-Fi® vereisten
T
http:/
4. Algemene informatie
Als uw product niet goed fartgids lezen of de Gebruikershandleiding v
van de modellen vermeld op pagina 1 raad
Contact opnemen met Klantenservice:
0202621966 in Nederland
025887046 in België
Email: motorola-mbp@tdm.de
Beperkte garantie voor consumentenproduct en accessoires ("Garantie
Dank u voor de aankoop v
Binatone El
W
BINATde dat dit product, verk
van Motorola ("Product"
product, geen defecten zal v
hieronder beschrev
DEZE GARANTIE GEEFTJKE RECHTEN EN U KUNT ANDERE RECHTEN
HEBBEN DIE PER LAND KUNNEN VERSCHILLEN. V
ONDER WETGEVING V
HUN LAND V
AANVULLING ZIJN OP ALLE RECHTEN EN VERHAALSMOGELIJ
REGELMINGSWETTEN BIEDT RAADPLEEG DE
WETTELIJKE RECHTEN IN UW LAND VOOR EEN V
Wie is ged
Deze Garantie is uw exrantie
W
BINATONE of zijn geautoriseerde distributeur zal naar eigen goeddunken en binnen een zakelijk
redeliv
Wij kunnen functioneel
accessoires of onderdelen gebrui
EU ES
GUÍA DE INICIO RÁPIDO
Para acceder a una explicación completa de todas las funciones e ins
de usuario (que se puede descargar de www
1. Configuración del vigilabebés con vídeo digital
MODEL
MBP845CONNECT
MBP845CONNECT
MBP845CONNECT
MBP845CONNECT
ADVERTENCIA
:
Riesgo de
estrangulamiento: Los
niños se han
ESTRANGULADO con
los cabl
este cabl
alcance de los niños (a
una distancia superior a 1
metro). No utilice nunca
alargaderas con los
adaptadores de CA.
Utilice únicamente los
adaptadores de CA
proporcionados.
• Inserte el conect
entrada de CC sit
• Conecte el ot
de corrient
• Deslice el
posición ENCENDIDO
enciende.
Nota
Utilice únicamente e
A. F
• Conecte la clav
unidad para pa
eléctrica adecuada.
• Mantenga pulsado e0 de la
parte superior
Nota
Utilice únicamente el a
Cargue el dispositivo durante al m
por primera v
B. F
2. F
Unidad para padr
0
Botón
ENCENDIDO/
AP
Mantener pulsado para encender y apagar la unidad para
padres.
+ -Botones ARRIBA/
ABAJO
Pulsar para cambiar los ajustes del menú.
Mientras ve una imagen con zoom aplicado, mantener pulsada
para mover la imagen hacia arriba o hacia aba
< >Botones
IZQUIE
DERECHA
Pulsar para acceder a diferentes opciones de menú.
Mientras ve una imagen con zoom aplicado, mantener pulsada
para mover la imagen hacia la izquierda o la derecha.
M Botón MENÚ Pulsar para abrir las opcio
O Botón OK Pulsar para confirmar una selección.
V Botón VÍDEO Pulsar para encender y apagar la pantalla LC
T Botón HABLAR Mantener pulsado para hablarle a su bebé.
Botone Pulsar -/+ para seleccionar el nivel de v
padres.
Unidad para bebé
Interruptor de ENCENDIDO/
AP
Deslice el interruptor de ENCENDIDO/AP
encender o apagar la unidad para bebés.
PA EMPAREJAR M
para padres.
3. Configuración de la unidad de cámara para
visualización a trav®
A. Instale la apbble for Motorola Monitors.
• Escanee el código QR con su disposi
aplicación Hubble f
iOS o de Google PlayTM en di TM.
• Insta
B. V
Cámara Wi-F® Conexión a
a través de Wi® Dispositivos de
visualización co
1. Abra la apl
2. Siga las instrucciones de la aplicación para crear su cuenta de Hubble y conectarse a su cámara Wi-Fi® .
3. Inicie sesión en su cuenta desde su smartphone o tableta comp
https:/ en su PC
T
Smartphones/tabletas: iOS 7, Android™ 4.2
PC (solo para vi® 7, Mac OS® 10.7, Chrome™ 24, I
Explorer® 9, Safari® 6, Firefox® 18, Adobe® Flas® 15, Java™ 7
Requisitos de Wi-Fi® :
Al menos 0,6 Mbps de ancho de banda de subida por cada cámara. Pruebe la velocidad de su conexión a Inter
net en: http:/
4. Información general
Si su producto no funciona rápi
de los modelos indi
Picio de atención al cliente:
0911366203 de
Email: motorola-mbp@tdm.de
Garantía limitaccesorios de c
Le agradecemos la compra de este producto marca M licencia por Binatone
Electronics International
¿Qué cubre esta garantía?
Sujeto a las excl
o accesorio certificado (el "Accesorio") de marca Motorola vendi
libre de fara con un uso de consumo normal durante el periodo
especificado a continuació su única garantía, y no puede t
ESTA GARANTÍA LE PROPORCIONA DERECHOS LEGALES ESPECÍFICOS, Y P
DERECHOS QUE DEPENDERÁN DEL ESTADO, PROVINCIA O PAÍS. PARA LOS CONSUMIDORES QUE
ESTÉN CUBIERTOS POR LAS LEYES O NORMATIVAS DE PROTEUMIDOR EN SU PAÍS
DE COMPRA O, SI ES DIFERENTE
ESTA GARANTÍA LIMITADA SE SUMAN A TODOS LOS DERECHOS
DICHAS LEYES Y NORMATIVAS DE PROTECCIÓN DEL CONSUMIDOR. PARA CONOCER PLENAMENTE
SUS DERECHOS, DEBE CONSULTAR LA
¿Quién recibe esta cobertura?
Esta Garantía cuber com
¿Qué hará BINATONE?
BINATONE o su distribuidor autorizadoy dentrmercialmente razonable,
reparará o sustituirá de forma gratuita todos os
esta Garantía. Podr
funcionalmente equivalentes.