1
2
3
O
P
E
N
O
P
E
N
C
L
O
S
E
C
L
O
S
E
Marking point on
squeezing body cover
Marking point on
squeezing cup
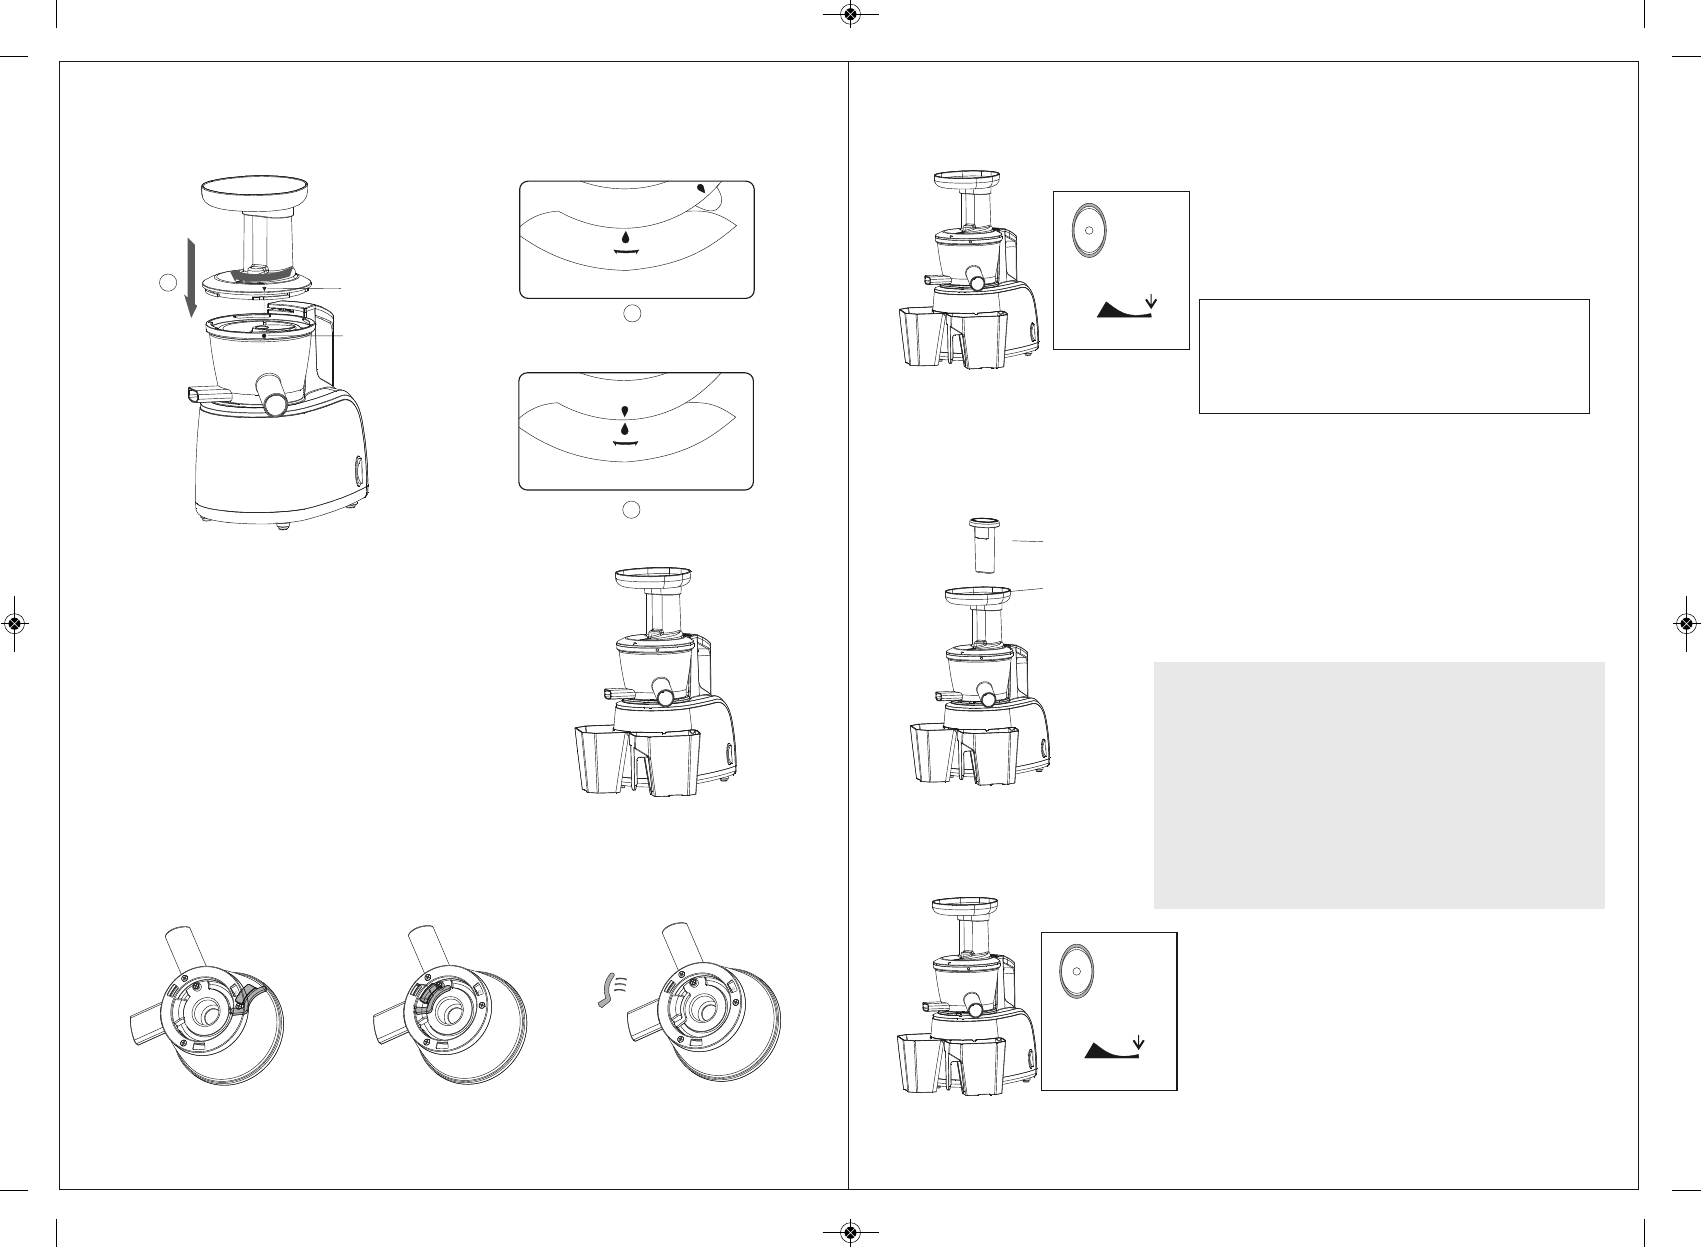
5. Install the squeezing body cover
① When it is installed downwards, the marking
point on squeezing body cover shall align
with that on the squeezing cup.
②③ Make “ ” at the back of the protruding part
of squeezing body cover rotate towards
“ ” on squeezing cup in clockwise direction
and lock.
Assembly of squeezing rubber pad
Bottom of squeezing cup
Insertion direction of rubber pad
Tight insertion
使用方法
N
otes
: P
lease don't use wet hand switch operate
Before put into fruits and vegetable, don'
t
let
unit run free, Otherwise it may damage the unit.
Turn on the switch (forward)
Forward: Make fruits and vegetables pushed
downwards for squeezing.
Reverse: Fruits and vegetables return upwards
Make the clean fruits and vegetables (if the size of the
fruits and vegetables is larger than that of the feed in-
let, please make them cut into the blocks with proper
size) put into the feed inlet, and make the pushed in-
wards by the pushing rod.
Note: Please use fresh fruits and vegetables to make
the juice. The stale fruits and vegetables that have
been stored in refrigerator for a long time shall be used
after being immersed in cold water for over 10min.
* The kernel of fruits must be removed.
After the squeezing process is completed, please
press the stop switch, and pull out the power plug.
Warning: Please do not store the squeezed juice
for a long time.
The machine is inapplicable to crush grains
(motor clamp and mechanical failure are liable
to be caused).
Pushing rod
Feed inlet
S
top
O N
R
Corotation
R
everse
Reverse
Forward
Press
Stop
O N
R
Corotation
Reverse
Reverse
Forward
Press
5
6
Unterseite des
Pressbechers
Schieben Sie die Gummi-
dichtung in die Öffnung
Fest andrücken
Montage der Gummidichtung des Pressbechers
Die Gummiabdichtung kann zur Reinigung ein Stück herausgezogen werden.
Danach drücken Sie diese gemäss den nun folgenden Abbildungen wieder zurück.
Die Markierung auf
dem Fülltrichter/
Deckel ist ein
kleines Dreieck
Die Markierung auf
dem Pressbecher
ist ein weißer
Punkt
Fülltrichter offen (OPEN)
Fülltrichter geschlossen (CLOSE)
5. So installieren Sie den Fülltrichter/Deckel auf dem Press-
becher .
(Abbildung 1) Das Dreieck auf dem Fülltrichter zeigt auf den
weißen Punkt auf dem Pressbecher. Der Deckel sitzt nun
bündig auf dem Pressbecher. Gegenüber auf dem Deckel ist
ein weiteres Zeichen (Tropfenform), das Sie in den Spalt am
Motorgehäuse drehen, von der OPEN in die CLOSE Position.
(Abbildungen 2 und 3) Diese Drehung bietet einen leichten
Widerstand, bis die beiden Markierungen (Tropfenform)
aufeinander weisen.
6. Wie abgebildet stellen Sie die Auffangbecher für den Saft
und für das Fruchtmark unter die entsprechenden Öffnungen.
Schalten Sie den Schalter auf „ON”, schieben Sie
die Früchte-/Gemüsestücke durch den Fülltrichter,
falls die Maschine stoppt, mit R(Reverse) Frucht-
und Gemüsestücke wieder zurück nach oben
drehen.
Wichtiger Hinweis: Bedienen Sie den Schalter
NICHT mit nassen Händen.
Lassen Sie die Presse nicht ohne Inhalt leer
drehen. Schalten Sie das Gerät erst ein, wenn der
Fülltrichter gefüllt wird.
Stampfer
Fülltrichter
Schneiden Sie die gewaschenen Frucht-/Gemüsestücke in
kleine Teile, damit diese gut in den Fülltrichter passen.
Verwenden Sie den Stampfer, um die Teile nach unten zu
drücken.
Verwenden Sie frische Produkte. Lassen Sie lange
gelagertes Obst und Gemüse erst 30-45 min in kaltem
Wasser weichen.
Kerne und Steine müssen entfernt werden.
Sollte die Maschine plötzlich stoppen, dann schalten Sie
diese erst auf O(Stopp) und dann drücken Sie auf R
(Reverse-zurück).
Der Inhalt wird wieder retour gedreht, dann wieder auf
ON.
Wiederholen Sie das 3 mal.
Legen Sie Ihre Hand bei der retour Funktion auf den
Deckel, um zu vermeiden dass dieser sich löst.
Wenn es nach 3x noch immer nicht läuft, dann ziehen Sie
den Stecker und demontieren die Presse zur Reinigung.
Harte Nahrungsmittel (z.B. Karotten) schneiden Sie am
Besten in lange dünne Stücke.
Wenn Sie mit dem Pressen fertig sind, schalten Sie
das Gerät auf O (Stopp) und ziehen den Stecker.
Bewahren Sie den gepressten Saft nicht länger als
24 Stunden.
Die Maschine eignet sich nicht zum Pressen von
Nüssen, harten Getreidekörnern oder Samen.
(Motorschaden oder technischer Schaden)
Es besteht keine Garantie auf den Sieben.