12 Password Protection
To protect the recorder against unauthorized
change of menu settings, it will be possible to acti-
vate a two-stage password protection.
With the user password, it will be possible to
access the submenu VIDEO SEARCH (
chapter 9)
to replay recordings or to export video files. Further-
more, remote control of the camera (
chapter 11)
will also be possible.
For all other settings in the menu, knowledge of
the administrator password will be essential.
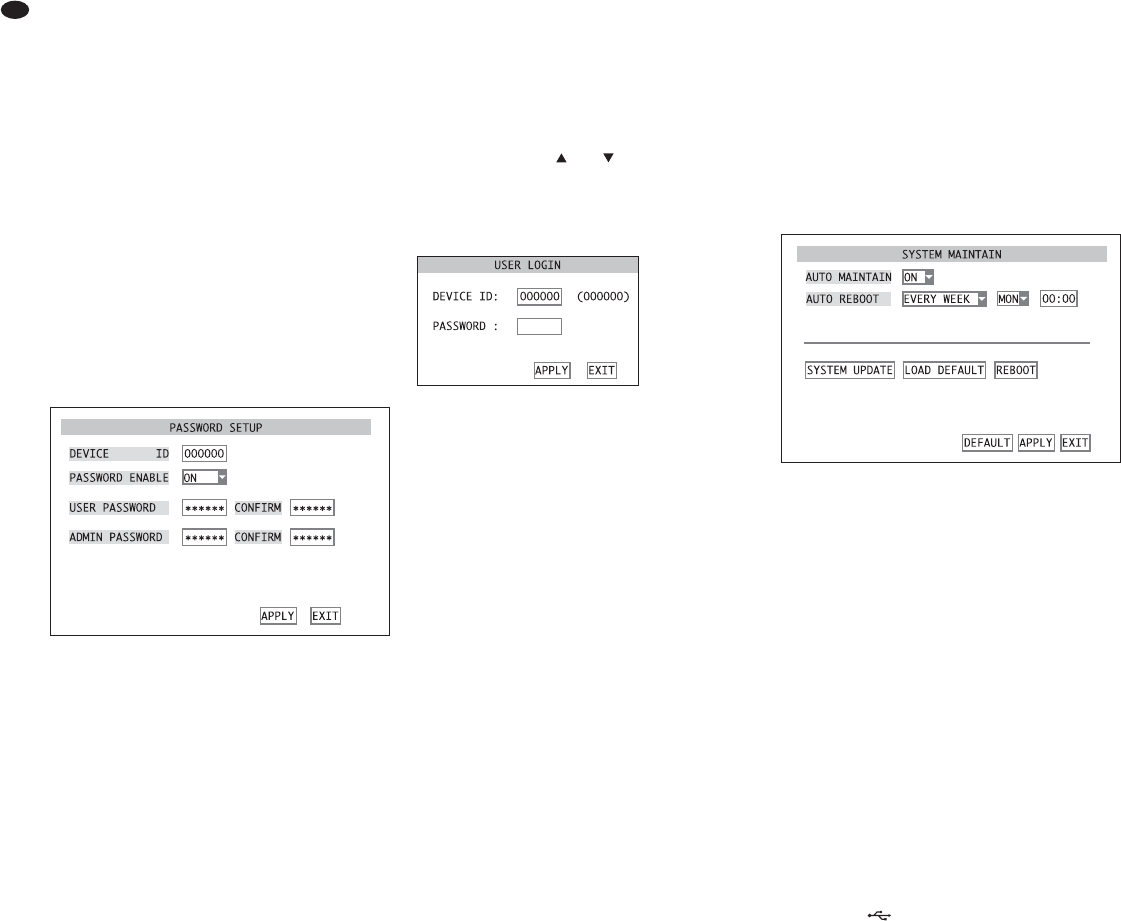
12.1 Configuring the password protection
To configure the passwords:
1) Activate the main menu (
MAIN MENU, fig. 10).
2) Activate the submenu
SYSTEM/ SYSTEM SETUP
(fig. 11).
3) Activate the submenu
PASSWORD/ PASSWORD
SETUP
(fig. 45).
4) In the input field
DEVICE ID, the preset value
OOOOOO can usually be maintained as a device
number. If the number is modified, you will have
to remember it later when entering the password
for operating the recorder.
5) In the list field next to
PASSWORD ENABLE, define if
a password protection is to be used (ON) or not
(OFF).
6) If
ON has been selected, enter a 6-digit number to
be used as a user password in the input field next
to USER PASSWORD (detailed description of an
input
chapter 6.2.3). To confirm it, repeat this
number next to
CONFIRM.
Enter a 6-digit number to be used as an
administrator password in the input field next to
ADMIN PASSWORD . To confirm it, repeat this num-
ber next to CONFIRM and memorize it well!
7) To store the settings, click the button
APPLY, then
confirm the message inserted “Saved success-
fully!
” by clicking the button OK.
8) To exit the submenu, click the button
EXIT or the
right mouse button or press the button MENU /
ESC (7) or MENU (32).
12.2 Activating the password protection
To activate the password protection after exiting the
setting menu:
1) Activate the menu list (fig. 8) [click the right
mouse button or press the button PTZ (16), SEL /
EDIT (9) or SEL (33)].
2) Activate the list entry
MENU LOCK [click it or select
it with the buttons and (8 or 29) and confirm
with the button SEL / EDIT (9) or SEL (33)].
If the main menu, the submenu item VIDEO SEARCH
or
PTZ is activated, the window USER LOGIN (fig. 46)
will appear.
To gain access:
1) Enter the device number in the input field
DEVICE
ID
: (detailed description of an input
chap-
ter 6.2.3). The preset number 000000 may be
maintained if it has not been changed in the sub-
menu PASSWORD/ PASSWORD SETUP (
fig. 45,
chapter 12.1).
2) Enter the user password or administrator pass-
word in the input field
PASSWORD:.
3) Click the button
APPLY. If the input is correct,
access corresponding to the password will be
granted.
If the input of the device number is incorrect,
the message “
Device number error!” will ap-
pear; if the password is incorrect, the message
“Incorrect password!” will appear.
Confirm the message with
OK, correct the input
and accept it with APPLY.
Note: If the user password was entered to activate
the submenu
VIDEO SEARCH or PTZ, the message
“Limited Authority!” will appear when another
menu item is selected. To be able to enter the
administrator password for access to the menu item
desired, it will be necessary to exit the menu first and
to select the item MENU LOCK from the menu list.
13 System Maintenance
In the submenu SYSTEM MAINTAIN, it will be pos-
sible to reset the recorder to the factory settings, to
update the firmware (operating system of the
recorder) or to restart the recorder manually or auto-
matically at regular intervals.
1) Activate the main menu (
MAIN MENU, fig. 10).
2) Activate the submenu
SYSTEM/ SYSTEM SETUP
(fig. 11).
3) Activate the submenu
MAINTAIN/ SYSTEM MAIN-
TAIN
(fig. 47).
4) In the list field next to
AUTO MAINTAIN, define if
the recorder is to be restarted at regular intervals
(ON) or not (OFF).
When the recorder is restarted regularly, it
may be possible e. g. to detect a defective hard
disk and to report the defect.
5) If
ON has been selected, define next to AUTO
REBOOT
if the restart is to made EVERY DAY,
EVERY WEEK or EVERY MONTH. Then define the
time and, if required, the day or day of the week.
6) To restart the recorder manually, click the button
REBOOT and click OK in the confirmation prompt
appearing. To abort the process, click CANCEL.
7) To reset the recorder to the factory settings, click
the button
LOAD DEFAULT and click OK in the con-
firmation prompt pointing out that all settings
made by the user will be lost. To abort the
process, click CANCEL.
8) Via the button SYSTEM UPDATE, it will be pos-
sible to load a new operating software on the
recorder from a storage medium connected to the
USB port (22). Indication of the current sys-
tem information will be described in the chapter
below (
chapter 13.1).
9) To reset all settings of this submenu to the factory
settings, click the button
DEFAULT.
10)To store the settings, click the button
APPLY, then
confirm the message inserted “Saved success-
fully!
” by clicking the button OK.
11)To exit the submenu, click the button
EXIT or
click the right mouse button or press the button
MENU / ESC (7) or MENU (32):
㊼
Submenu SYSTEM MAINTAIN
㊻
Window USER LOGIN
㊺
Submenu PASSWORD SETUP
34
GB