en cs de fr
Smar
Installation
Mio™
terminal
preve
time and
For regulatory identification purposes
MiT
Directive 2004/108/EC.
Visit MiT
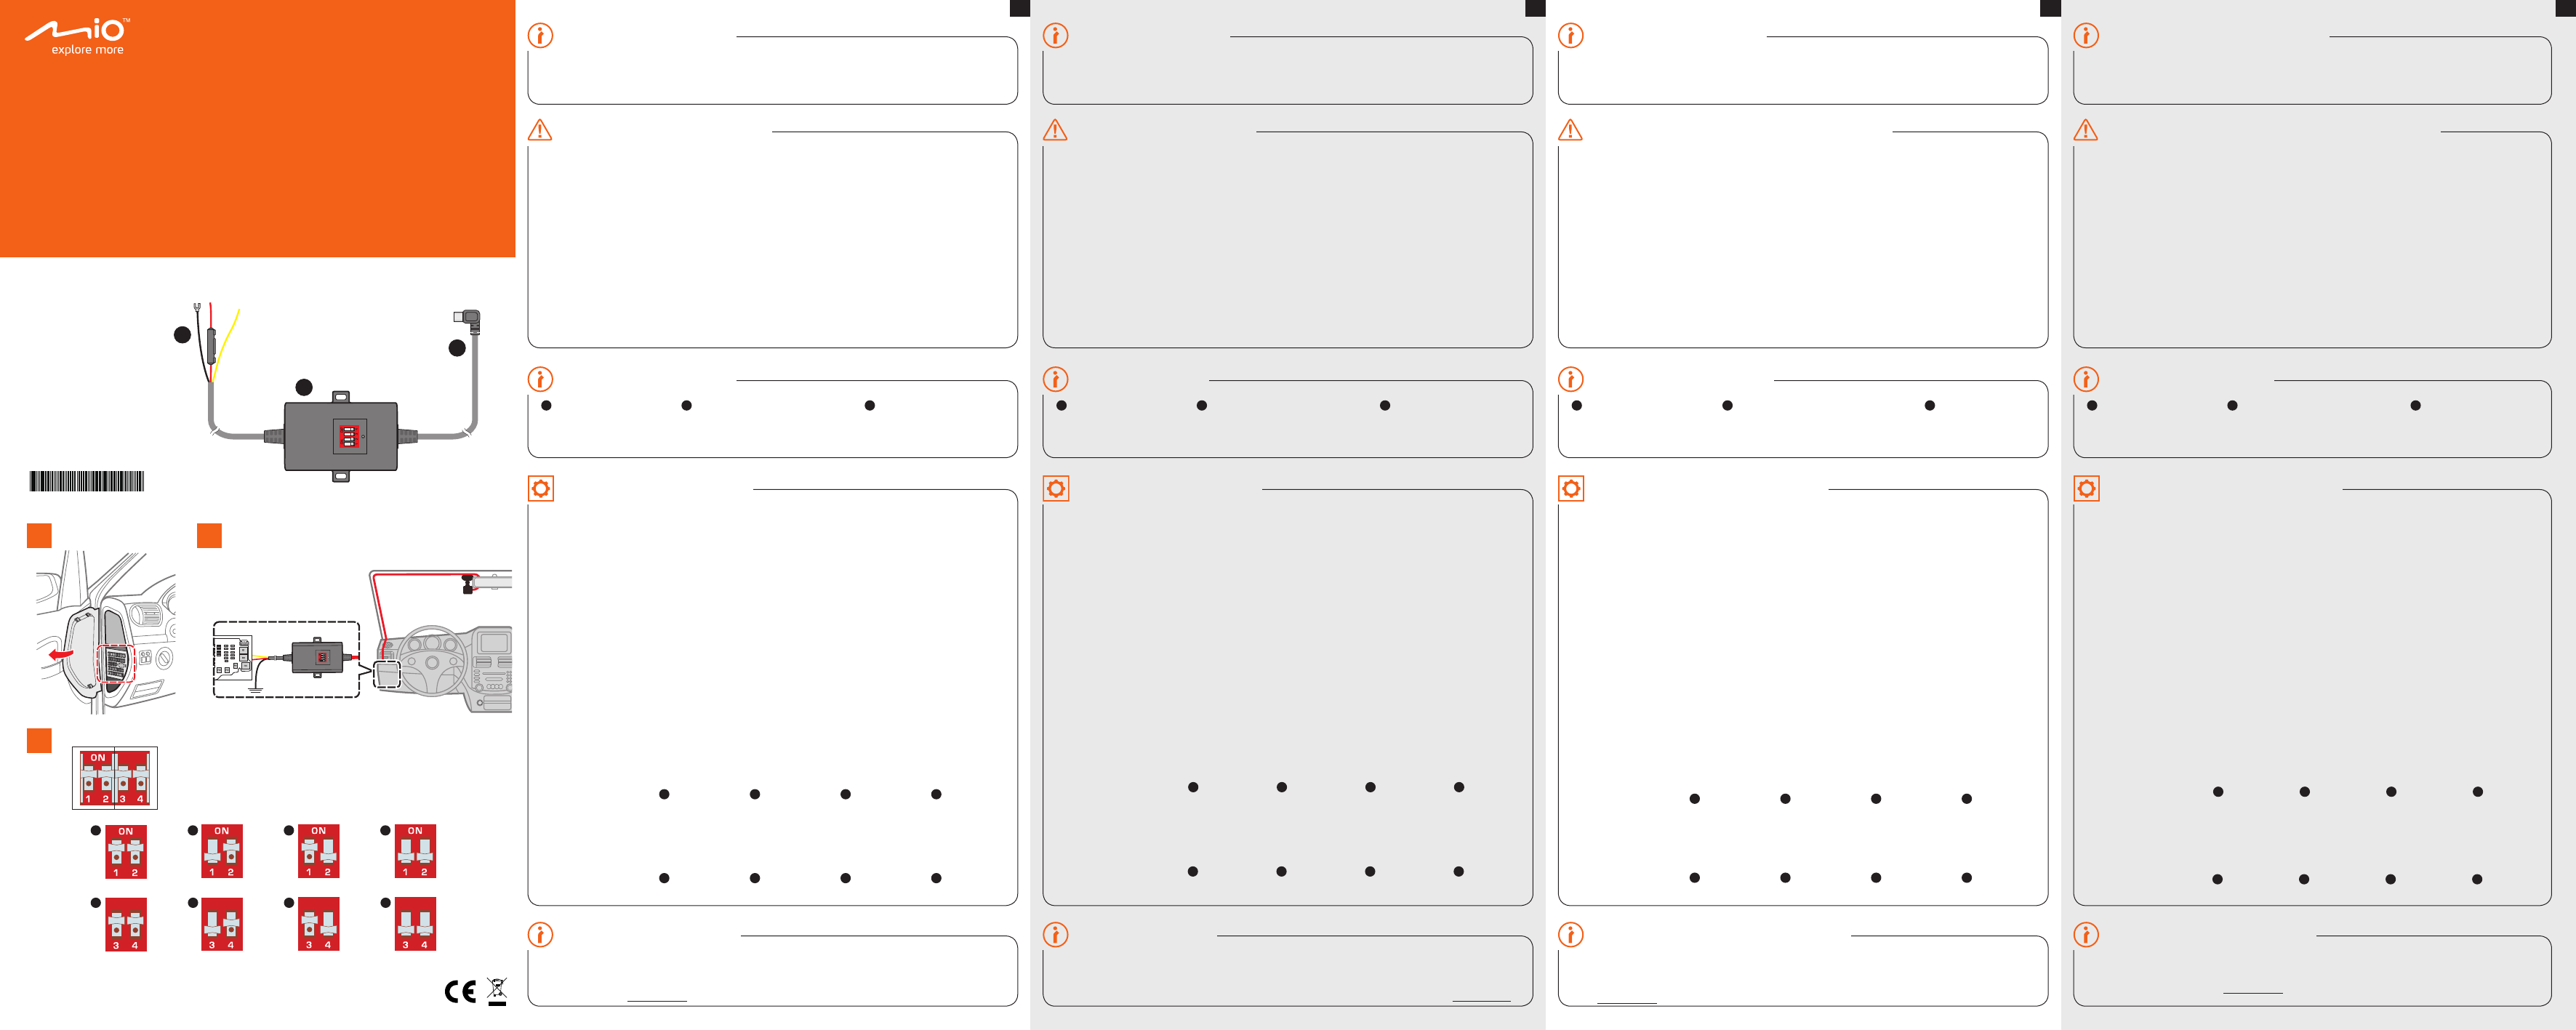
1
Fuse cable
- ACC (yellow wire)
- B+ (red wir
- GND (black wire)
2
Main unit of
- Time &
- LED indicator
3
Mini-USB connector
Connects to
Rated input voltage: DC 12~2
WARNING! Do not use
that have DC 12~2
Follow
There may be deviations in
sure to
Never attempt to
attempt to repair could cause
any warranty
Y
replacement or r
Do not drop
When installing, mounting and storing please do so in a dry place.
Please check the installation and
MiT
What is Smart Box?
For More Information
P
P
Installation an
1. Locate and open
Please note that
vary depending
that you contact a skilled installer (e.g.
2-a. Check and confirm the v
Y
Use the electricity
turned off
wire (B+) to
Use the electricity
off,
The black wire (GND) must be connected
this product may not work pr
a screw hole on an
2-b. C
red.
Length of
A-pillar so that it
with the
3. Set up the
Setting up the
power to
Switch 1 & 2:
Passenger
T
1
1 ON / 2
12.6V
25.2V
2
1 OFF / 2
12.8V
25.6V
3
1 ON / 2
13.0V
26.0V
4
1 OFF / 2
11.8V
23.6V
Setting up the
turned off), the power to
Switch 3 & 4:
5
3 ON / 4
12 hours
6
3 OFF / 4
24 hours
7
3 ON / 4
36 hours
8
3 OFF / 4
48 hours
Smart Bo
courant cons
garé.
elle
À des
présente, MiT
2004/108/CE.
Consultez le site internet MiT
l'enregistreur
1
Câble Fusible
- ACC (fil jaune)
- B+ (fil rouge)
- T
2
Unité principale Smart Bo
- T
réglage de
- Indicateur LED
3
Connecteur mini
Se connecte à l'enregistreur
T
Attention! Ne pas utiliser une tension
véhicules qui
Suivez les instructions d'installation ci-dessous
Il peut y avoir
environnements
d'éteindre l'enregistr
N'essayez jamais de
démontage, une modification ou
causer des blessures
V
pas couverts par la garantie, remplacement
Ne laissez pas tomber l'appar
Lors de l'installation, le montage et le stockage, assurez-v
V
MiT
ci-dessus.
Qu'est-ce que Smart Box?
P
Pièces et f
P
Installation et con
1. Localisez et ouvrez la boîte
Notez que les illustrations
boîte à fusibles peut
l'installation, nous vous r
personnel de service
2-a. Vérifiez et confirmez la
en fonction
Utilisez le testeur électrique pour
véhicule est arrêté. P
lumières de porte, etc. Branchez le
Utiliser le testeur électrique pour
véhicule est arrêté. P
Le fil noir (GND)
connectée à la terre, ce pr
fixer le
2-b. C
LED qui s’
La longueur du câble
haut et le support de sorte
n’interfère pas avec les airbags
3. Réglez la
Réglage
prédéfinie, le courant de l'enr
Commutateurs 1 & 2:
V
/
Ca
1
1 ON / 2
12,6V
25,2V
2
1 OFF / 2
12,8V
25,6V
3
1 ON / 2
13,0V
26,0V
4
1 OFF / 2
11,8V
23,6V
Réglage
véhicule est désactiv
Commutateurs 3 & 4: R
5
3 ON / 4
12 heures
6
3 OFF / 4
24 heur
7
3 ON / 4
36 heures
8
3 OFF / 4
48 heures
Die Mio™
ist sehr nüt
der
Spannung blo
Zur Richtlinienidentifikation: Die Mio™ Smart Bo
MiT
EG übereinstimmt.
Den vollständigen
lesen (www.mio.com).
1
Fuse cable
- ACC (Anschlusskabel)
- B+ (rotes Kabel)
- MASSE (schwarzes Kabel)
2
Hauptgerät der
- Zeit & Spannung Einstellungsschalter
- LED Anzeige
3
Mini-USB-Anschluss
Anschluss an den
Recorder
Nenneingangsspannung: DC 12 ~ 24
Warnung! K
12 ~ 24
Folgen
Es könnte
W
V
Modifizierung oder ein R
Sachbeschädigungen verursachen und
Sie müssen das Produkt
Missbrauch werden nicht
Lassen Sie Ihr
Nehmen Sie
Bitte überprüfen Sie r
MiT
V
W
W
T
V
Installation un
1. Öffnen Sie
Bitt
kann
empf
2-a. Überprüfen Sie die F
unterschiedlich. Sie müssen
V
Fahrzeug aus ist. Zum Beispiel
Sie das rote Kabel (B+) an
V
Fahrzeug aus ist. Zum Beispiel
Das schwarze Massekabel (GND) muss mit einem Metallteil des F
W
eine Schraube nutzen, um
Schraubenöffnung an einem Metallteil zu finden).
2-b. V
Anzeige sollte rot leuchten.
Die Länge des beiliegenden Kabels beträgt etwa 4,5 Meter
Innenverdeck und
Kabelinstallation nicht die F
3. Stellen Sie
Einstellung der
wird die
Schalter 1 & 2: Spannungseinstellungsschalter
Auto/RV:
LKW/Bus:
1
1 AN / 2
12,6V
25,2V
2
1 AUS / 2
12,8V
25,6V
3
1 AN / 2
13,0V
26,0V
4
1 AUS / 2
11,8V
23,6V
Einstellung der Zeit:
überschreitet, wird
Schalter 3 & 4: Zeiteinstellungsschalter
5
3 AN / 4
12 Stunden
6
3 AUS / 4
24
7
3 AN / 4
36 Stunden
8
3 AUS / 4
48 Stunden
Mio™
pojistk
zabránit
čas a napětí
Pro účely regulatorní identifikace b
MiT
2004/108/EC.
Plné
1
Kabel pojistky
- ACC (žlutý kabel)
- B+ (červený kabel)
- GND (černý kabel)
2
Hlavní jednotka Smart Bo
- Spínače nastavení času a napětí
- Kontrolka LED
3
Konektor mini-USB
Připojení k rekor
Nominální vstupní napětí: DC 12 ~ 2
V
napětí DC 12 ~ 24
Dodržujte níže uvedené pokyny k instalaci nebo
V napětí v
používáno déle než 2
Zásadně se nepokoušejte přístroj r
jakéhokoli pokusu
nebo škodám na majetku.
Produkt musíte používat tak, jak je zam
zárukou, nárok
Zabraňte pádu přístroje ani jej nevystavujte silným nárazům.
Instalaci, montáž a skladování prov
Pravidelně kontrolujte instalaci a pr
MiT
Co je Smart Box?
Další informace
Části a funkce
Zásady a upozornění
Instalace a nas
1. Vyhledejte a otevřete pojistk
Upozorňujeme, že
závislosti na modelu vo
kontaktovali zkušeného
2-a. Pomocí testo
Napětí svého v
K nalezení pojistky, která zajišťuje napájení i
Například, nouzové světla,
T
světla. Do pojistky zapojte žlutý kabel (ACC).
Černý kabel (GND) musí b
uzemněn, nemusí řádně fungo
se na kovo
2-b. Smart Bo
rozsvítí červeně. P
Délka dodaného kabelu je zhruba 4,5 metru. Kabel můžete
vám nepřekážel během jízdy
další bezpečnostní funk
3. Pomocí spínačů nastavte napětí a čas.
Nastavení napětí: Pokud napětí baterie
hodnota napětí, automaticky dojde k
Spínač 1 & 2: Spínače pr
Os
Ná
1
1 ZAP / 2 ZAP
12,6V
25,2V
2
1
12,8V
25,6V
3
1 ZAP / 2
13,0V
26,0V
4
1
11,8V
23,6V
Nastavení času: Pokud upl
vypnutí zapalování v
Spínač 3 & 4: Spínače pr
5
3 ZAP / 4 ZAP
12 hodin
6
3
24 hodin
7
3 ZAP / 4
36 hodin
8
3
48 hodin
1
2
3
5 6 1 5 N 4 6 7 0 0 4 5 R 0 0
3
1
5
2
6
3
7
4
8
1 2
a.
b.