2405
94
Zoom out
Zoom in
Previous page
1/116
Next page
94
O
VERSPEELSTAND
Camera op de computer aansluiten
Controleer of de batterij voldoende energie levert voordat u de camera op de computer aansluit. Het
symbool voor volle batterijen moet te zien zijn. Het gebruik van een netstroomadapter (apart verkrijg-
baar) is bij overspelen overigens te prefereren boven batterijvoeding. Gebruikers van Windows 98 of
98 Second Edition dienen eerst de tekst op blz. 95 te lezen over installatie van de USB-driver voordat
ze de camera op de computer aansluiten.
1. Start de computer. De computer moet aan staan voordat u de
camera aansluit.
2. Plaats de geheugenkaart in de camera. Instructies over het ver-
wisselen van een geheugenkaart terwijl de camera op de compu-
ter is aangesloten vindt u op blz. 102.
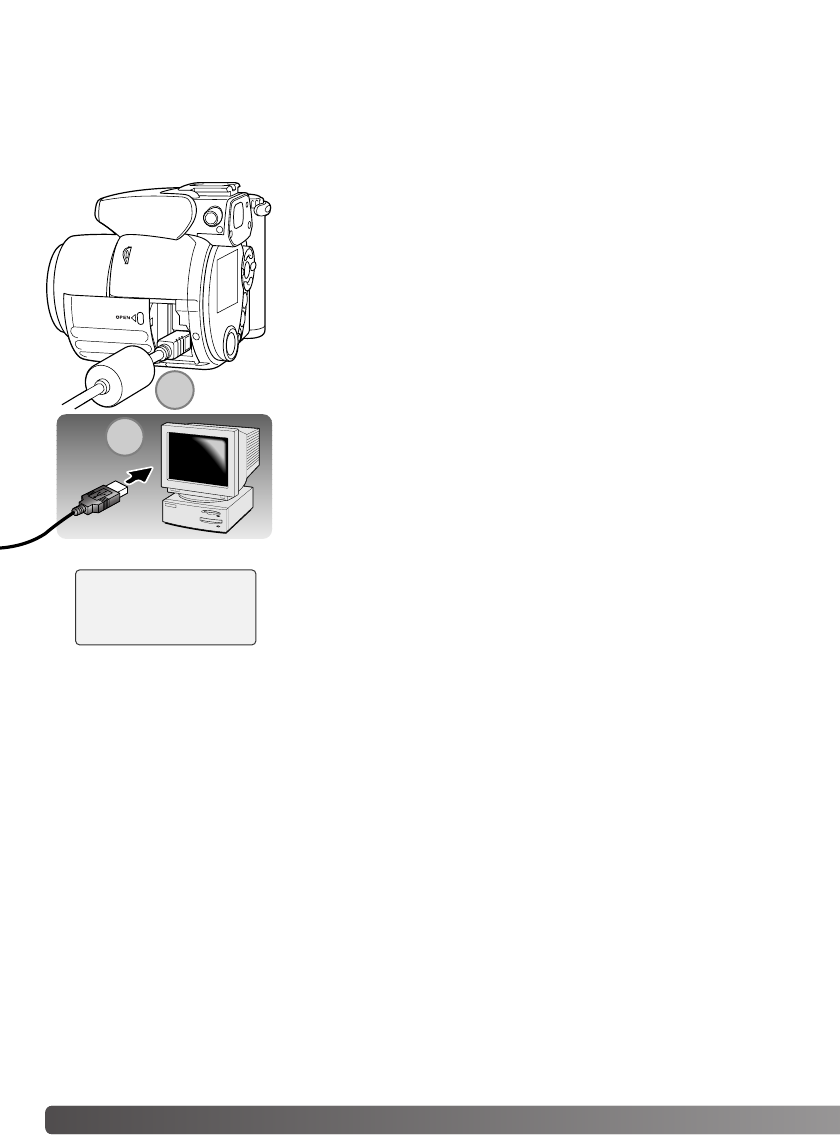
3. Schuif het deurtje van de kaartruimte open. Sluit de kleine stekker
van de USB-kabel aan op de camera. De driehoekige markering
op de stekker moet naar de achterkant van de camera wijzen. Let
er op dat de stekker stevig vast zit.
4. Steek het andere eind van de USB-kabel in de USB-aansluiting
van de computer. Let er op dat de stekker stevig vast zit. De came-
ra moet rechtstreeks op de USB-aansluiting van de camera zijn
aangesloten. Gebruik van een USB-hub (een meerweg-koppelstuk)
kan ertoe leiden dat er storing optreedt.
5. Druk op de hoofdschakelaar om de camera aan te zetten. De
USB-verbinding wordt automatisch tot stand gebracht; er verschijnt
een scherm dat de status aangeeft. De monitor gaat uit wanneer
de verbinding tot stand is gebracht. Wordt de USB-verbinding niet
tot stand gebracht, ontkoppel dan de camera en herstart de com-
puter. Herhaal de aansluitprocedure.
Initializing USB connection.
3
4
94


Need help? Post your question in this forum.

Forumrules


Report abuse

Libble takes abuse of its services very seriously. We're committed to dealing with such abuse according to the laws in your country of residence. When you submit a report, we'll investigate it and take the appropriate action. We'll get back to you only if we require additional details or have more information to share.

Product:

For example, Anti-Semitic content, racist content, or material that could result in a violent physical act.

For example, a credit card number, a personal identification number, or an unlisted home address. Note that email addresses and full names are not considered private information.

Forumrules

To achieve meaningful questions, we apply the following rules:

Register

Register getting emails for Minolta Dimage Z1 at:


You will receive an email to register for one or both of the options.


Get your user manual by e-mail

Enter your email address to receive the manual of Minolta Dimage Z1 in the language / languages: Dutch as an attachment in your email.

The manual is 4,53 mb in size.


You will receive the manual in your email within minutes. If you have not received an email, then probably have entered the wrong email address or your mailbox is too full. In addition, it may be that your ISP may have a maximum size for emails to receive.

Others manual(s) of Minolta Dimage Z1

Minolta Dimage Z1 User Manual - English - 116 pages

Minolta Dimage Z1 User Manual - German - 116 pages


The manual is sent by email. Check your email

If you have not received an email with the manual within fifteen minutes, it may be that you have a entered a wrong email address or that your ISP has set a maximum size to receive email that is smaller than the size of the manual.

The email address you have provided is not correct.

Please check the email address and correct it.

Your question is posted on this page

Would you like to receive an email when new answers and questions are posted? Please enter your email address.


Info