This toy uses 3 alkaline batteries (AA, LR6, 15A or equivalent).
Este juguete utiliza 3 pilas alcalinas (AA, LR6, 15A o equivalente).
Ce jouet nécessite 3 piles alcalines (AA, LR6, 15A ou l’équivalent).
Dieses Spielzeug wird mit 3 Alkali-Batterien betrieben (AA, LR6, 15A oder Entsprechung).
Dit speelgoed gebruikt 3 alkaline batterijen (AA, LR6, 15A of gelijkwaardig).
Questo giocattolo usa 3 batterie alcaline (AA, LR6, 15A o equivalenti).
Este brinquedo emprega 3 pilhas alcalinas (AA, LR6, 15A ou equivalente).
Non-rechargeable batteries included
Incluye pilas no recargable
Piles fournie non-rechargeable
Nichtwiederaufladbare Batterien inbegriffen
Niet-oplaadbare batterijen meegeleverd
Batteria non ricaricabile fornita
Pilhas não-recarregável incluída.
BATTERY INSTALLATION / INSTALACIÓN DE LA PILA / MISE EN PLACE DE LA PILE / BATTERIEEINBAU / BATTERIJPLAATSING / INSTALLAZIONE DELLA BATTERIA / INSTALAÇÃO DE PILHAS
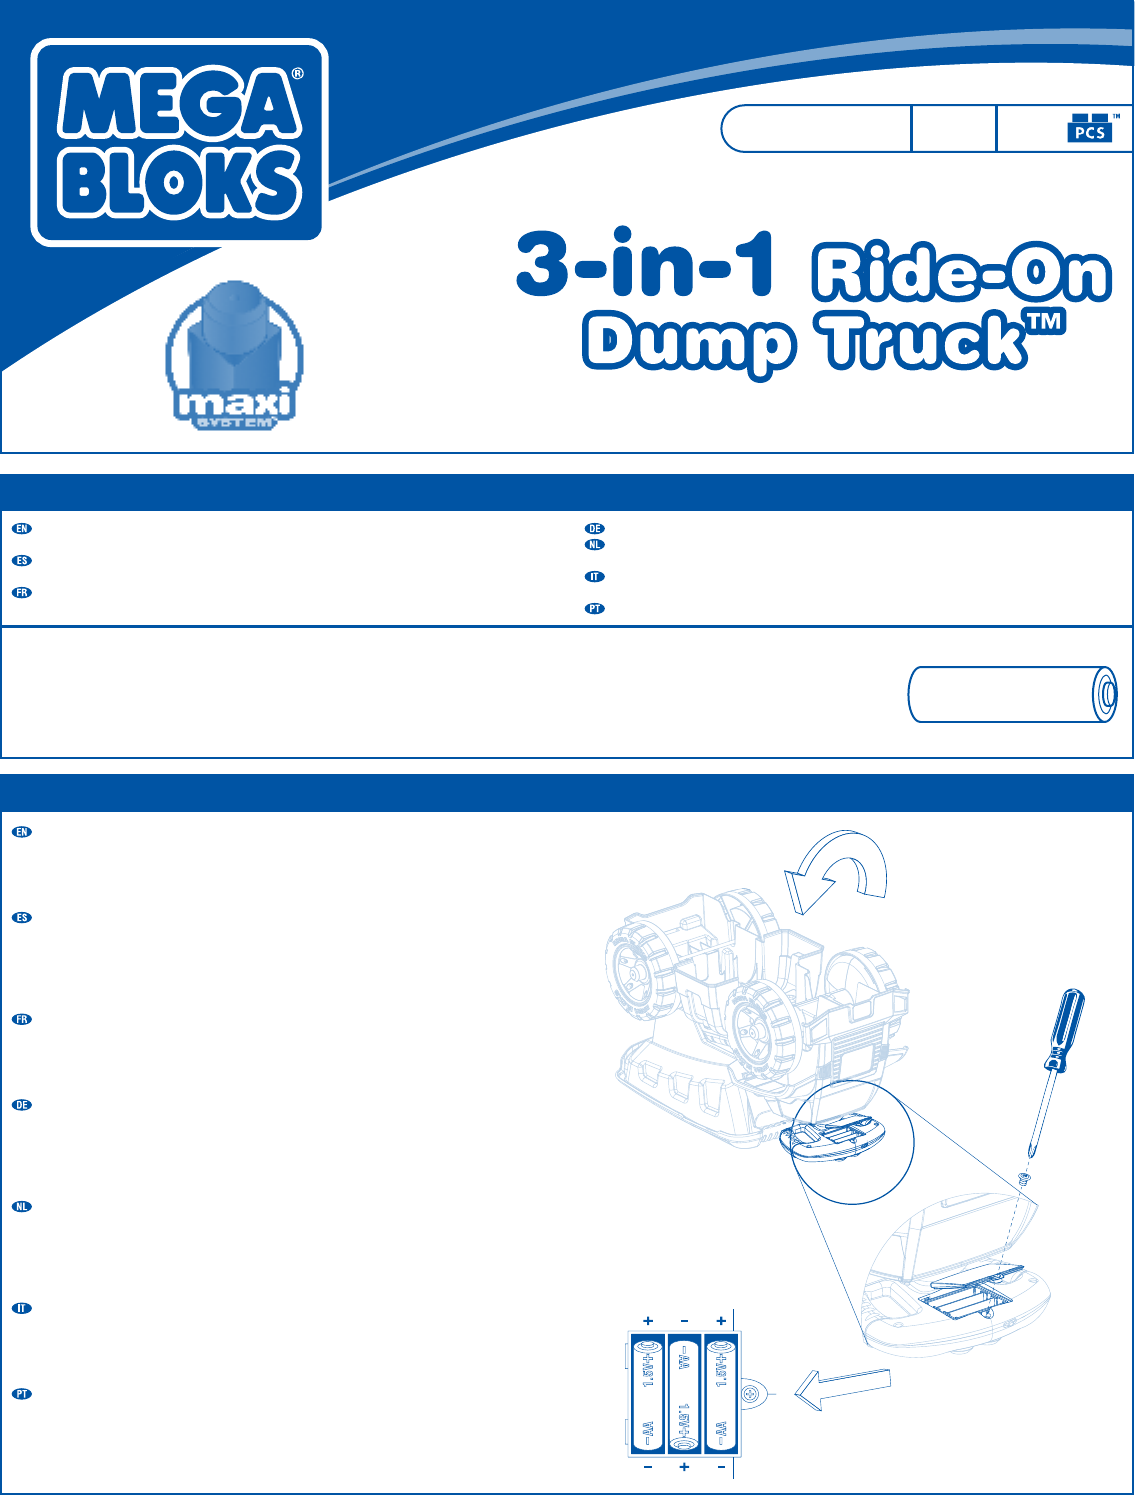
BATTERY INSTALLATION
• Use a phillips (star-bit) screwdriver to unscrew the door of the battery compartment.
• Lift and remove the compartment door.
• Insert the batteries according to the correct polarity shown.
• Replace the door and the screw, do not over-tighten the screw.
INSTALACIÓN DE LAS PILAS
• Utilizar un destornillador en cruz (o con punta de estrella) para abrir la tapa del
compartimiento de las pilas.
• Levantar y retirar la tapa del compartimiento de las pilas.
• Colocar las pilas respetando la polaridad indicada.
• Reponer la puerta y el tornillo, evitando apretarlo demasiado.
MISE EN PLACE DES PILES
• Avec un tournevis cruciforme, dévisser la porte du compartiment à piles.
• Soulever et ouvrir la porte du compartiment.
• Mettre en place les piles suivant la polarité indiquée.
• Remettre en place la porte et la vis, sans trop serrer cette dernière.
BATTERIEN EINSETZEN
• Einen Kreuzschlitz-Schraubendreher benutzen, um die Abdeckung des
Batteriefachs loszuschrauben.
• Die Abdeckung des Batteriefachs anheben und abnehmen.
• Die Batterien einsetzen. Dabei auf die richtige Polarität achten.
• Tür und Schraube wieder einsetzen, ohne diese Schraube übermässiganzuziehen.
INLEGGEN VAN DE BATTERIJEN
• Gebruik een kruiskopschroevendraaier om het klepje van het batterijenvak
los te schroeven.
• Licht het klepje op en verwijder het.
• Leg de batterijen in met inachtneming van de juiste polariteit, zoals aangegeven.
• Plaats het paneel en de schroef terug en draai niet te vast aan.
INSTALLAZIONE DELLA BATTERIA
• Utilizzare un cacciavite a croce per rimuovere lo sportello d’accesso alla batteria.
• Sollevare e rimuovere lo sportello.
• Inserire le batterie secondo le corrette polarità illustrate.
• Rimettere a posto lo sportello e vite, non stringere troppo la vite.
INSTALAÇÃO DE PILHAS
• Usar uma chave de parafusos Philips (ponta em forma de estrela) para
desaparafusar a tampa do compartimento de pilhas.
• Levantar e retirar a tampa do compartimento.
• Inserir as pilhas de acordo com as polaridades correctas mostradas.
• Repor a tampa e o parafuso sem apertar este demasiadamente.
Please read these instructions carefully before first use and keep them for
future reference.
Leer estas instrucciones cuidadosamente antes de la primera utilización
y guardarlas para referencia futura.
Il est recommandé de lire attentivement ce feuillet avant la première
utilisation et de le conserver pour référence future.
Die Gebrauchsanleitung bitte durchlesen und aufbewahren.
Wij raden u aan deze handleiding zorgvuldig te lezen en te bewaren
voor eventuele raadpleging op een later tijdstip.
Leggere le istruzioni prima di cominciare ad usare il gioco e conservarle
per referenze future.
Leia as instruções antes do primeiro uso e guarde-as para futura referência.
Libble takes abuse of its services very seriously. We're committed to dealing with such abuse according to the laws in your country of residence. When you submit a report, we'll investigate it and take the appropriate action. We'll get back to you only if we require additional details or have more information to share.
Product:
Forumrules
To achieve meaningful questions, we apply the following rules:
First, read the manual;
Check if your question has been asked previously;
Try to ask your question as clearly as possible;
Did you already try to solve the problem? Please mention this;
Is your problem solved by a visitor then let him/her know in this forum;
To give a response to a question or answer, do not use this form but click on the button 'reply to this question';
Your question will be posted here and emailed to our subscribers. Therefore, avoid filling in personal details.
Register
Register getting emails for Mega Bloks 522 at:
new questions and answers
new manuals
You will receive an email to register for one or both of the options.
Get your user manual by e-mail
Enter your email address to receive the manual of Mega Bloks 522 in the language / languages: English, German, Dutch, French, Italian, Portuguese, Spanish as an attachment in your email.
The manual is 2,77 mb in size.
You will receive the manual in your email within minutes. If you have not received an email, then probably have entered the wrong email address or your mailbox is too full. In addition, it may be that your ISP may have a maximum size for emails to receive.
The manual is sent by email. Check your email
If you have not received an email with the manual within fifteen minutes, it may be that you have a entered a wrong email address or that your ISP has set a maximum size to receive email that is smaller than the size of the manual.
The email address you have provided is not correct.
Please check the email address and correct it.
Your question is posted on this page
Would you like to receive an email when new answers and questions are posted? Please enter your email address.