• All efforts by the patient to support their arm can
increase blood pressure.
• Make sure you are in a comfortable, relax position
and do not activate any of the muscles in the
measurement arm during measurement. Use a
cushion for support if necessary.
• If the arm artery lies lower or higher than the
heart, a false reading will be obtained.
• A loose or open cuff causes false reading.
• With repeated measurements , blood accumulates
in the arm which can lead to false reading.
Consecutive blood pressure measurements should
be repeated after 1 minute pause or after the
arm has been held up in order to allow the
accumulated blood to flow away.
Influencing and evaluating readings
• Measure your blood pressure several times, then record and compare the
results. Do not draw any conclusions from a single reading.
• Your blood pressure readings should always be evaluated by a doctor who is
also familiar with your personal medical history. When using the unit regularly
and recording the values for your doctor, you should visit the doctor from time
to time to keep him updated.
• When taking readings, remember that the daily values are influenced by
several factors. Smoking, consumption of alcohol, drugs and physical exertion
influence the measured values in various ways.
• Measure your blood pressure before meals.
• Before taking readings, allow yourself at least 5-10 minutes rest.
• If the systolic and diastolic readings seem unusual (too high or too low) on
several occasions, despite correct use of the unit, please inform your doctor.
This also applies to the rare occasions when an irregular or very weak pulse
prevents you from taking readings.
Starting up
Insert / replace batteries
You must insert the batteries provided before you can use your unit. The lid of
the battery compartment
is located on the underside of the unit. Open it,
remove it and insert the 4 AA LR6 type 1.5 V batteries supplied. Ensure correct
polarity when inserting the batteries (as marked inside the battery compartment).
Close the battery compartment. Replace the batteries if the change battery
symbol
appears on the display
or if nothing appears on the display after
the unit has been switched on.
Using a Mains Adaptor
Alternatively, you can use the unit with a special mains adaptor (MEDISANA
Art.–No. 51125). This connects to the socket
provided at the back of the
unit. In this case the batteries remain in the unit. Inserting the connector into
the back of the blood pressure monitor switches the batteries off mechanically.
It is necessary, therefore, to plug the mains adaptor into the mains socket
first of all and then to connect it to the blood pressure monitor. If the blood
pressure monitor is no longer being used, first remove the connector from
the blood pressure monitor and then pull the mains adaptor out of the mains
socket. Doing this means that the date and time will not have to be reset each
time.
Settings
1. User setting:
Press SET button
when power off. Continue to above step, the screen will
display , press + or - button, it will be changed between user and user
and and . Press SET button
when you confirm the user, then it will enter
into the year setting mode.
NOTE: press the button
, to quick change the user when power off.
2. Year setting:
The input for setting the year then starts flashing. Keep pressing the + or -
button until the required year appears. Press SET button
when you confirm
the year, then it will switch to the month and date setting mode.
3. Month and date setting:
The input for setting the month then starts flashing. Keep pressing the + or -
button until the required month appears. Press SET button
when you confirm
the month, then it will set the date.
As with the month setting, keep pressing the + or - button until the required
day appears. Press SET button
when you confirm the date, then it will switch
to the time setting mode.
4. Time setting:
The input for setting the hour then starts flashing. Keep pressing the + or - button
until the required hour appears. Press SET button
when you confirm the hour.
The input for setting the minute then starts flashing. As with the hour setting,
keep pressing the + or - button until the required minute appears. Press SET
button
when you confirm the minute, which will complete the setting mode.
CL appears in the display. You can quit set-up mode by pressing SET button
.
If the batteries are changed the information is lost and the date and time must
be set again.
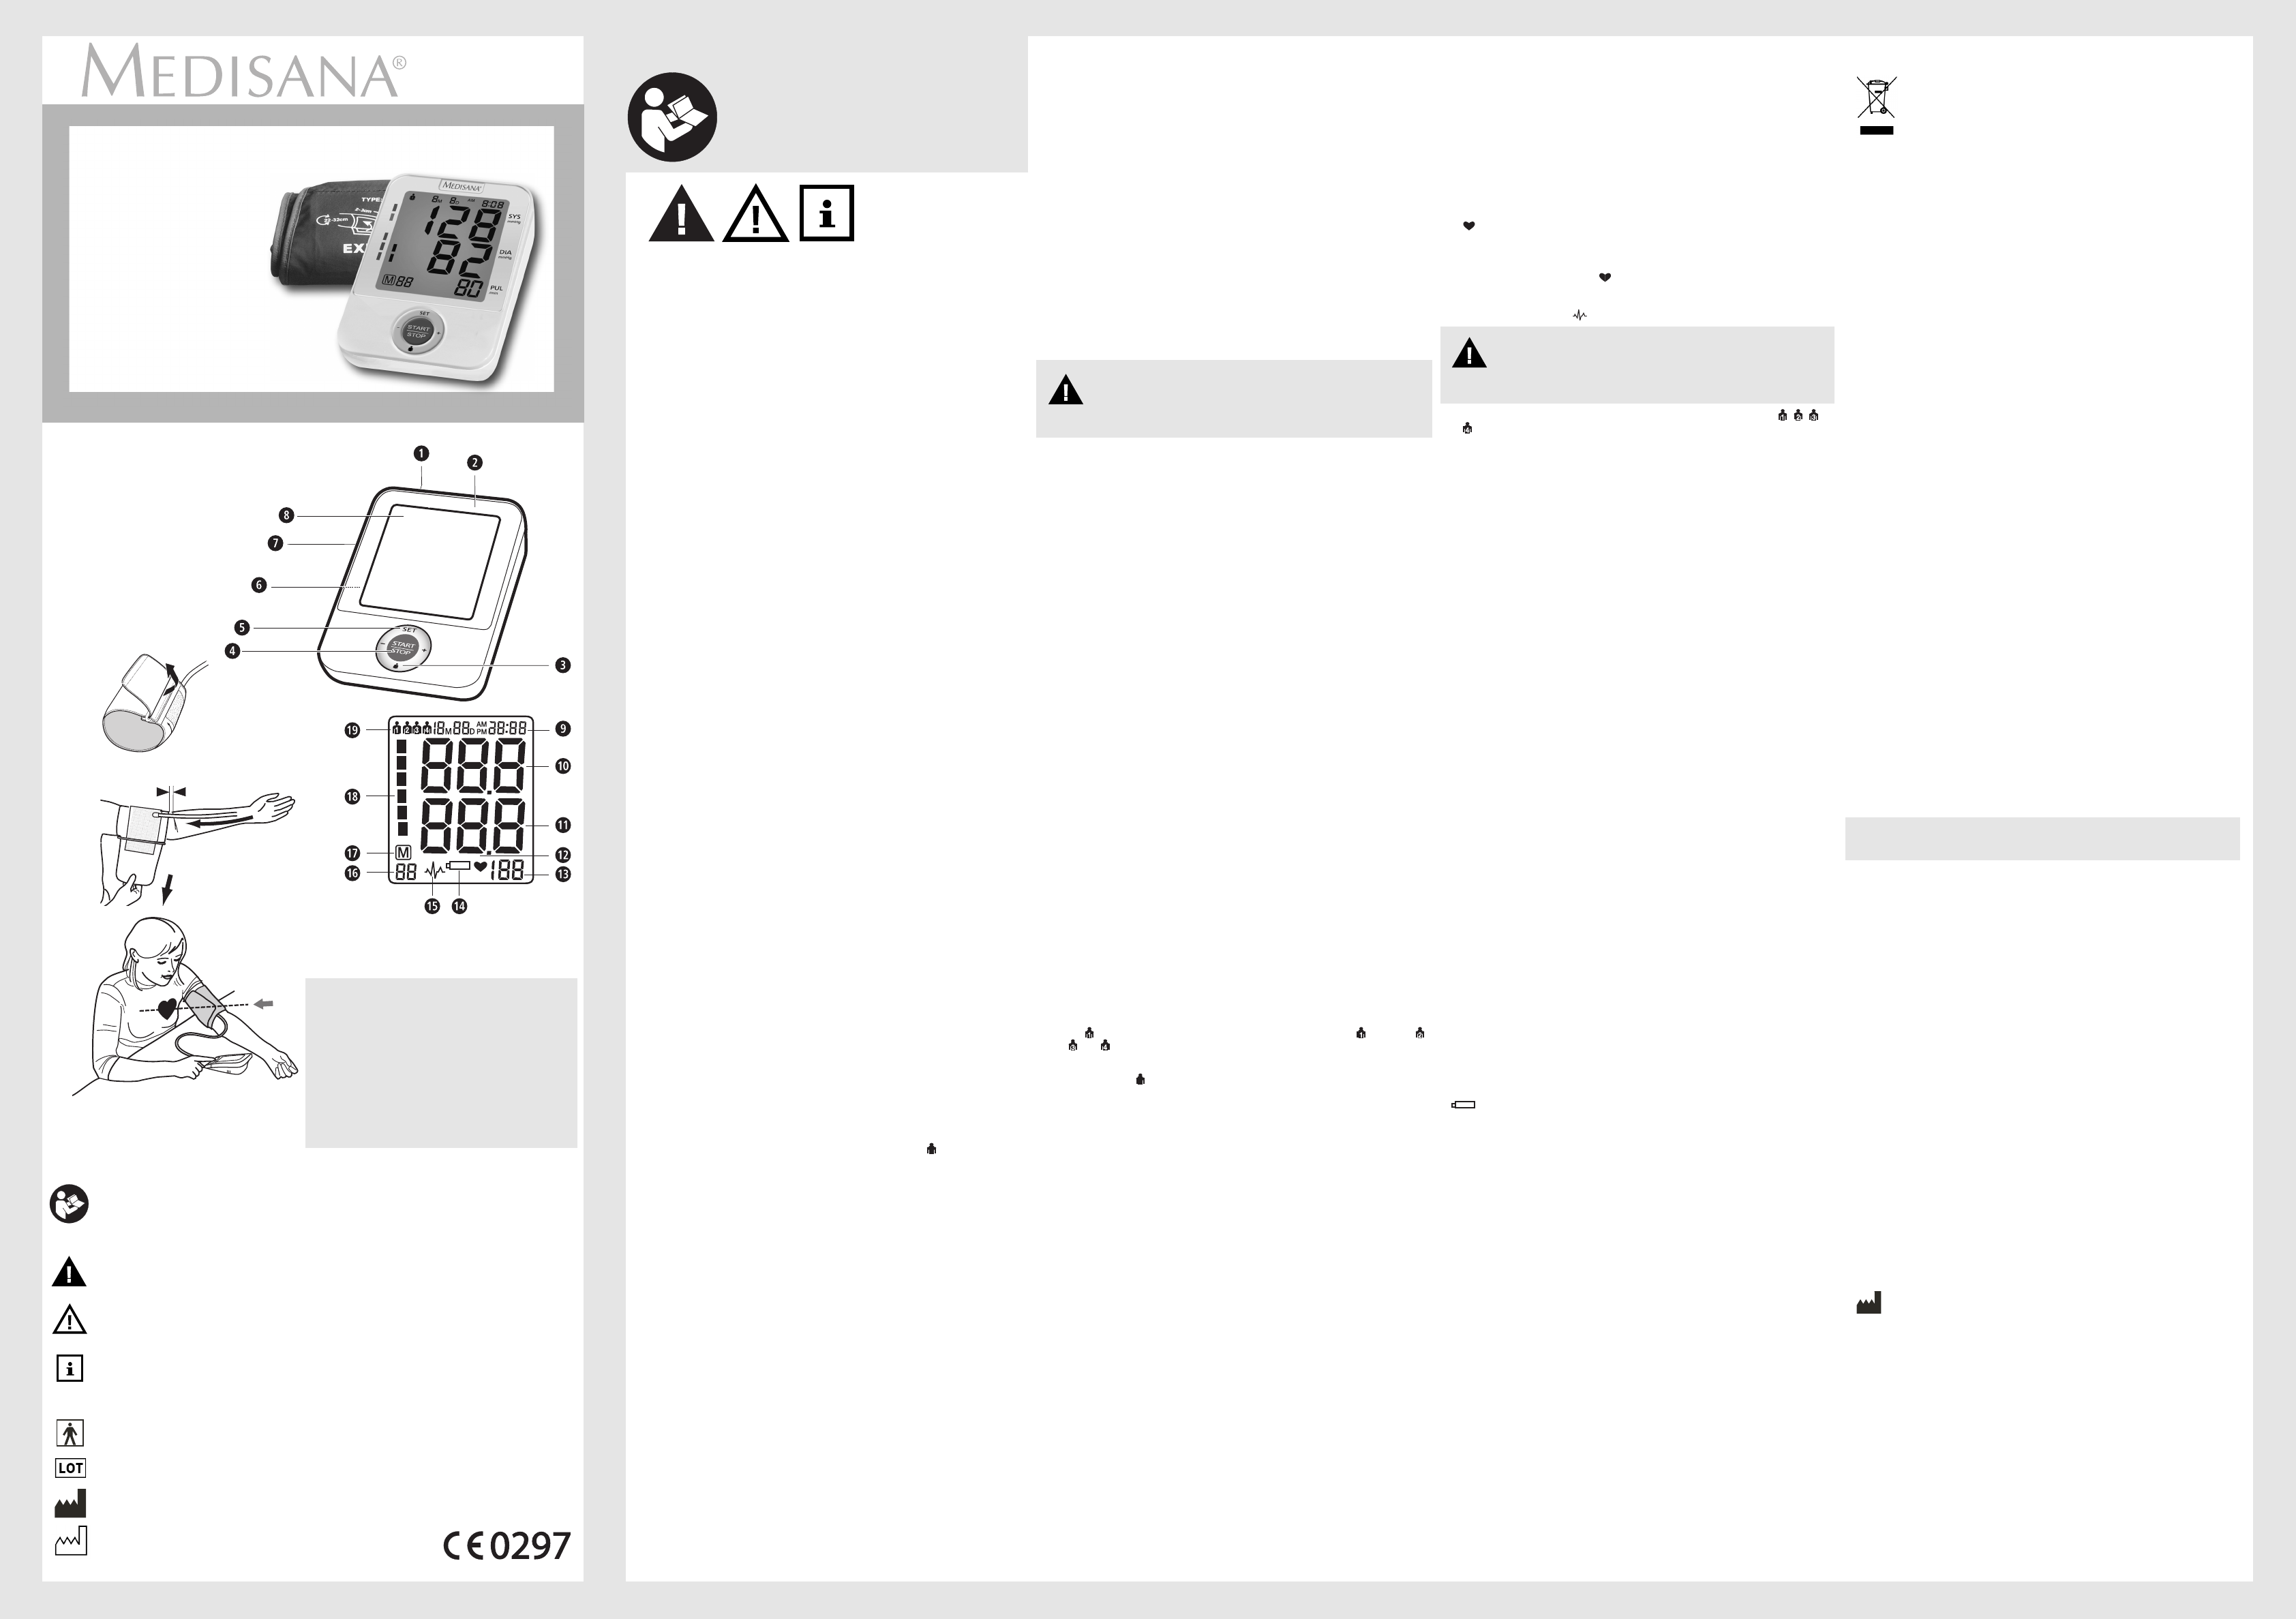
Fitting the cuff
1. Push the end piece of the air tube
into the hole on the left side of the unit
prior to use.
2. Slide the open end of the cuff through the metal bracket so that the Velcro
fastener is on the outside and it becomes a cylindrical form (Fig.1). Slide the
cuff over your left upper arm.
3. Position the air hose in the middle of your arm in line with your middle finger
(Fig.2) (a). The lower edge of the cuff should be 2 - 3 cm above the crease of
the elbow. (b). Pull the cuff tight and close the Velcro fastener. (c).
4. Measure the pulse on your bare arm.
5. Only position the cuff on the right arm if it cannot be used on the left arm.
Always carry out measurements on the same arm.
6. Correct measuring position for sitting (Fig.3).
WARNING
Blood pressure that is too low represents just as great a health
risk as blood pressure that is too high! Fits of dizziness may lead
to dangerous situations arising (e.g. on stairs or in traffic)!
How is blood pressure measured?
The MEDISANA BU A50 is a blood pressure unit which is used to measure blood
pressure at the upper arm. The measurement is carried out by a microprocessor,
which, via a pressure sensor, measures the vibrations resulting from the inflation
and deflation of the cuff over the artery.
Blood pressure classification WHO
These values have been specified by the World Health Organisation (WHO)
without making any allowance for age.
Low blood pressuresystolic <100 diastolic <60
Normal blood pressure(green display area
)
systolic 100 - 139 diastolic 60 - 89
Forms of high blood pressure / hypertension
Mild hypertension(yellow display area
)
systolic 140 – 159 diastolic 90 – 99
Moderate hypertension(orange display area
)
systolic 160 – 179 diastolic 100 – 109
Severe hypertension(red display area
)
systolic >_180 diastolic >_110
WARNING
Do not take any therapeutic measures on the basis of a self
measurement. Never alter the dose of a medicine prescribed
by a doctor.
Taking a blood pressure measurement
After the cuff has been appropriately positioned,the measurement can begin:
1. Switch the unit on by pressing the START/STOP button
.
2. If the START/STOP button
is pressed, two short beeps are heard and all
display characters are shown (display test). This test can be used to check that
the display is indicating properly and in full.
3. The unit is ready for measurement and the number 0 flashes for 2 seconds. It
automatically inflates the cuff slowly in order to measure your blood pressure.
The rising pressure in the cuff is shown on the display.
4. The unit inflates the cuff until sufficient pressure has built up for a
measurement. Then the unit slowly releases air from the cuff and carries
out the measurement. When the device detects the signal, the heart symbol
on the display starts to flash, you can hear the beep for every
heartbeat once the heartbeat signal is detected.
5. When the measurement is finished, you can hear a long beep and the cuff is
deflated completely. The systolic and diastolic blood pressure and the pulse
value with the pulse symbol appear on the display
. The blood pressure
indicator
flashes next to the relevant coloured bar depending on the WHO
blood pressure classification. If the unit has detected an irregular heartbeat,
the arrhythmia display also flashes.
Need help? Post your question in this forum.
Report abuse
Libble takes abuse of its services very seriously. We're committed to dealing with such abuse according to the laws in your country of residence. When you submit a report, we'll investigate it and take the appropriate action. We'll get back to you only if we require additional details or have more information to share.
Product:
Forumrules
To achieve meaningful questions, we apply the following rules:
First, read the manual;
Check if your question has been asked previously;
Try to ask your question as clearly as possible;
Did you already try to solve the problem? Please mention this;
Is your problem solved by a visitor then let him/her know in this forum;
To give a response to a question or answer, do not use this form but click on the button 'reply to this question';
Your question will be posted here and emailed to our subscribers. Therefore, avoid filling in personal details.
Register
Register getting emails for Medisana BU A50 at:
new questions and answers
new manuals
You will receive an email to register for one or both of the options.
Get your user manual by e-mail
Enter your email address to receive the manual of Medisana BU A50 in the language / languages: English as an attachment in your email.
The manual is 1,04 mb in size.
You will receive the manual in your email within minutes. If you have not received an email, then probably have entered the wrong email address or your mailbox is too full. In addition, it may be that your ISP may have a maximum size for emails to receive.
If you have not received an email with the manual within fifteen minutes, it may be that you have a entered a wrong email address or that your ISP has set a maximum size to receive email that is smaller than the size of the manual.
The email address you have provided is not correct.
Please check the email address and correct it.
Your question is posted on this page
Would you like to receive an email when new answers and questions are posted? Please enter your email address.