3
Attentie: u dient niet alleen rekening te houden
met de omgevingstemperatuur voor dit type
product maar tevens met de volgende aanwijzin-
gen: wanneer de bewaartemperatuur onder de
aangeduide minimum waarde daalt, wordt de
bewaartemperatuur in het vriesvak niet meer
gegarandeerd; u kunt de bewaarde levensmid-
delen dan het beste zo snel mogelijk nuttigen.
• Volg de raadgevingen van de fabrikant op met
betrekking tot waar en hoe u spijzen en dranken
bewaart of invriest. Ontdooide diepvriesproduc-
ten mogen, om gezondheidsredenen, niet
wederom ingevroren worden.
• De vriezende binnenwanden of -vlakken in het
apparaat bevatten koelmiddel. Plaats geen
scherpe voorwerpen tegen zo’n wand of vlak en
schraap evenmin met metalen voorwerpen rijp of
ijs af. Lekkage kan het gevolg zijn, hetgeen een
onherstelbare schade aan het apparaat en be-
derf van de levensmiddelen veroorzaakt.
• Geen voorwerpen of methodes gebruiken om het
ontdooiproces te versnellen die niet door de fa-
brikant zijn aangegeven.
• Nooit metalen voorwerpen gebruiken om het
apparaat schoon te maken; dit zou het apparaat
kunnen beschadigen.
• Plaats geen koolzuurhoudende of mousserende
dranken in het vriesvak, het vriesgedeelte of de
vriezer; de blikjes of flesjes kunnen door bevrie-
zing van de inhoud exploderen.
Installatie
• Overtuig u er van dat het apparaat niet op het
aansluitsnoer staat.
Belangrijk: Als het aansluitsnoer beschadigd
raakt, moet het snoer, eventueel met stekkers,
vervangen worden; deze onderdelen zijn verkrijg-
baar bij onze service-afdeling.
• Tijdens normaal gebruik worden de condensor
en de compressor die zich op de achterkant van
het apparaat bevinden, warm. Om veiligheidsre-
denen moet de ventilatie zodanig zijn als
aangegeven in de speciale afbeelding.
Attentie: zorg ervoor dat de ventilatie-openin-
gen tijdens gebruik niet worden afgedekt.
• Plaats het apparaat met z’n achterkant zo dicht
mogelijk bij een muur. Hiermee voorkomt u ver-
brandingsletsel door aanraking van hete tot zeer
hete delen.
• Afhankelijk van de wijze van transport kan olie
vanuit de compressor in het koelcircuit gevloeid
zijn. Wacht, na het plaatsen van het apparaat,
ten minste een half uur alvorens de stekker in
het stopcontact te steken. Na achteroverliggend
vervoer ten minste een halve dag. Daarmee
geeft u de olie de gelegenheid in de compressor
terug te vloeien. Apparaten welke van een
absorptie-unit voorzien zijn kunnen direct in
bedrijf genomen worden. Controleer circa 24 uur
na het in bedrijf stellen of het apparaat naar
behoren werkt.
Milieubescherming
Belangrijk: Dit apparaat bevat, zowel in het koel-
circuit als in de isolatie, geen ozononvriendelijke
stoffen. Het apparaat moet niet weggegooid wor-
den samen met het huisvuil of met gesloopte
apparaten. Afgedankte koel- en vriesapparaten
moeten volgens de plaatselijke regelingen op
deskundige wijze verwerkt worden. Informeer bij
uw gemeente naar de mogelijkheden in uw woon-
plaats. Vermijden dat het koelcircuit wordt
beschadigd, vooral aan de achterkant in de buurt
van de warmtewisselaar. De materialen in dit
apparaat die voorzien zijn van het symbool
zijn geschikt voor recycling.
22
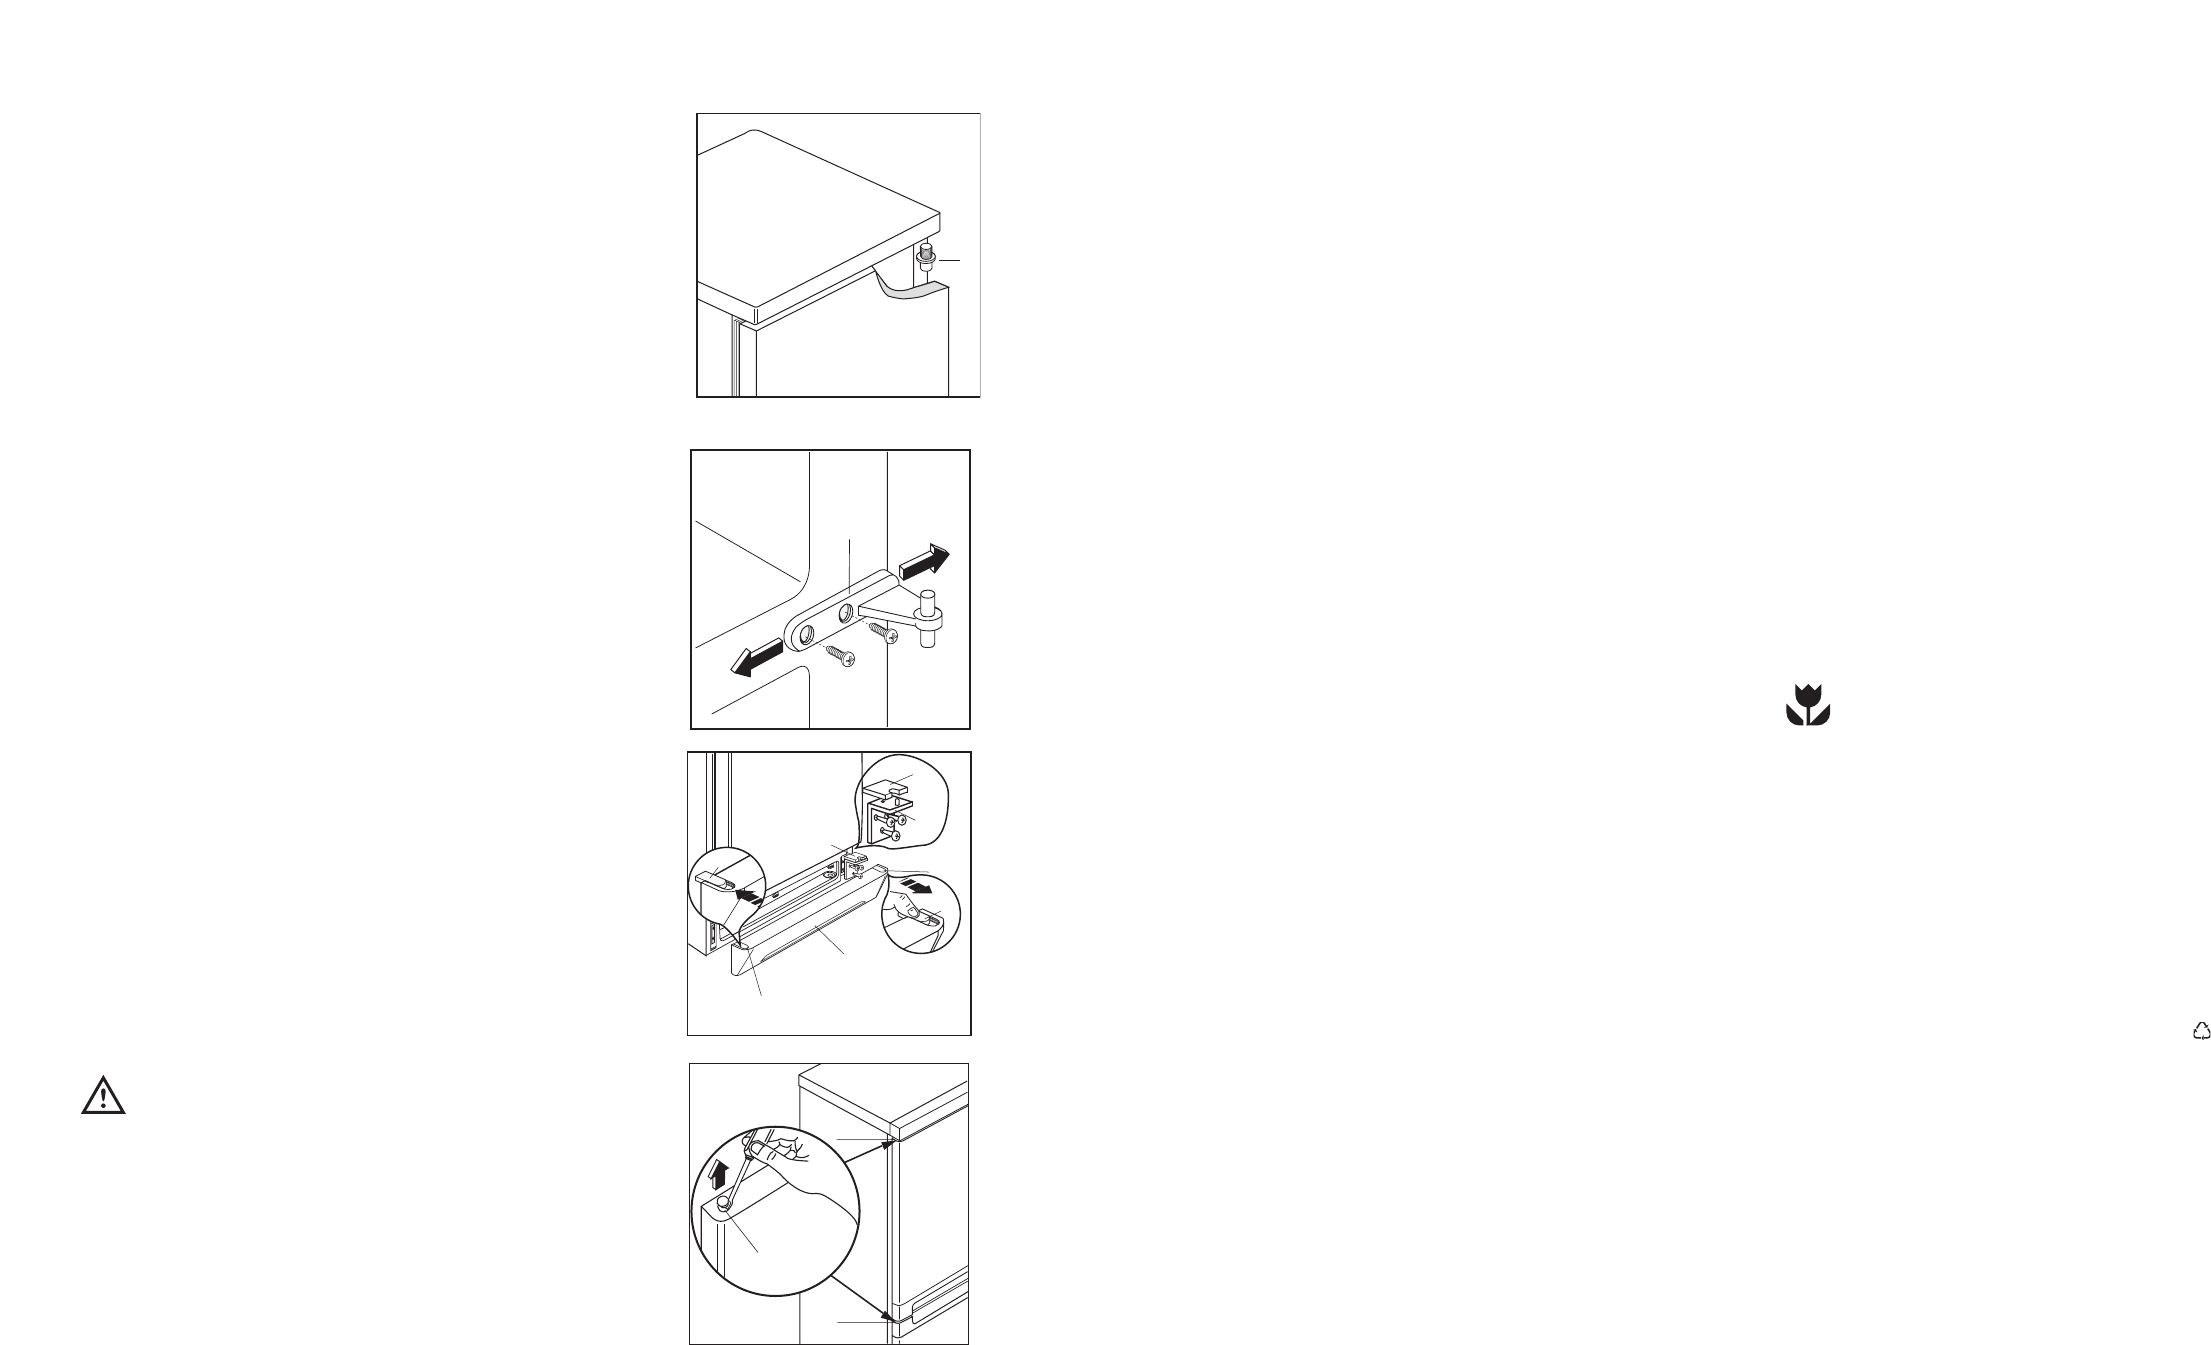
Door reversibility
1. Unplug the appliance from the power supply
before carrying out the below-mentioned opera-
tions.
2. Remove the ventilation grill (D).
3. Remove the plug (G) and unscrew the bottom
hinge (E).
4. Remove the freezer door by releasing it from the
middle hinge (H).
5. Unscrew the middle hinge.
6. Remove the fridge door by releasing it from the
top hinge pin (D).
7. Remove the pin (D) from the top hinge, then
mount these on the opposite side, after having
removed the plugs (I) which must be refitted on
the other side.
8. Refit the fridge door.
9. Replace the middle hinge to the left hand side.
10.Replace the freezer door.
11.Screw down the bottom hinge (E) on the oppo-
site side by using the screws previously
removed.
12.Refit the plug (G) on the bottom hinge . Remove
the plug (F) from the ventilation grill (D) and
replace it on the opposite side.
13.Re-assemble the ventilation grill (D).
The doors can be aligned by adjusting both the mid-
dle and top hinges.
The middle hinge can be adjusted horizontally, with
the help of a tool, after having slackened the two
screws.
The top hinge is adjusted by slackening the nut with
a 10 mm spanner and then proceeding as shown in
the Figure.
Warning:
After having reversed the opening direction of
the doors check that all the screws are properly
tightened and that the magnetic seal adheres to
the cabinet. If the ambient temperature is cold (i.e.
in Winter), the gasket may not fit perfectly to the
cabinet. In that case, wait for the natural fitting of
the gasket or accelerate this process by heating up
the part involved with a normal hairdrier.