5
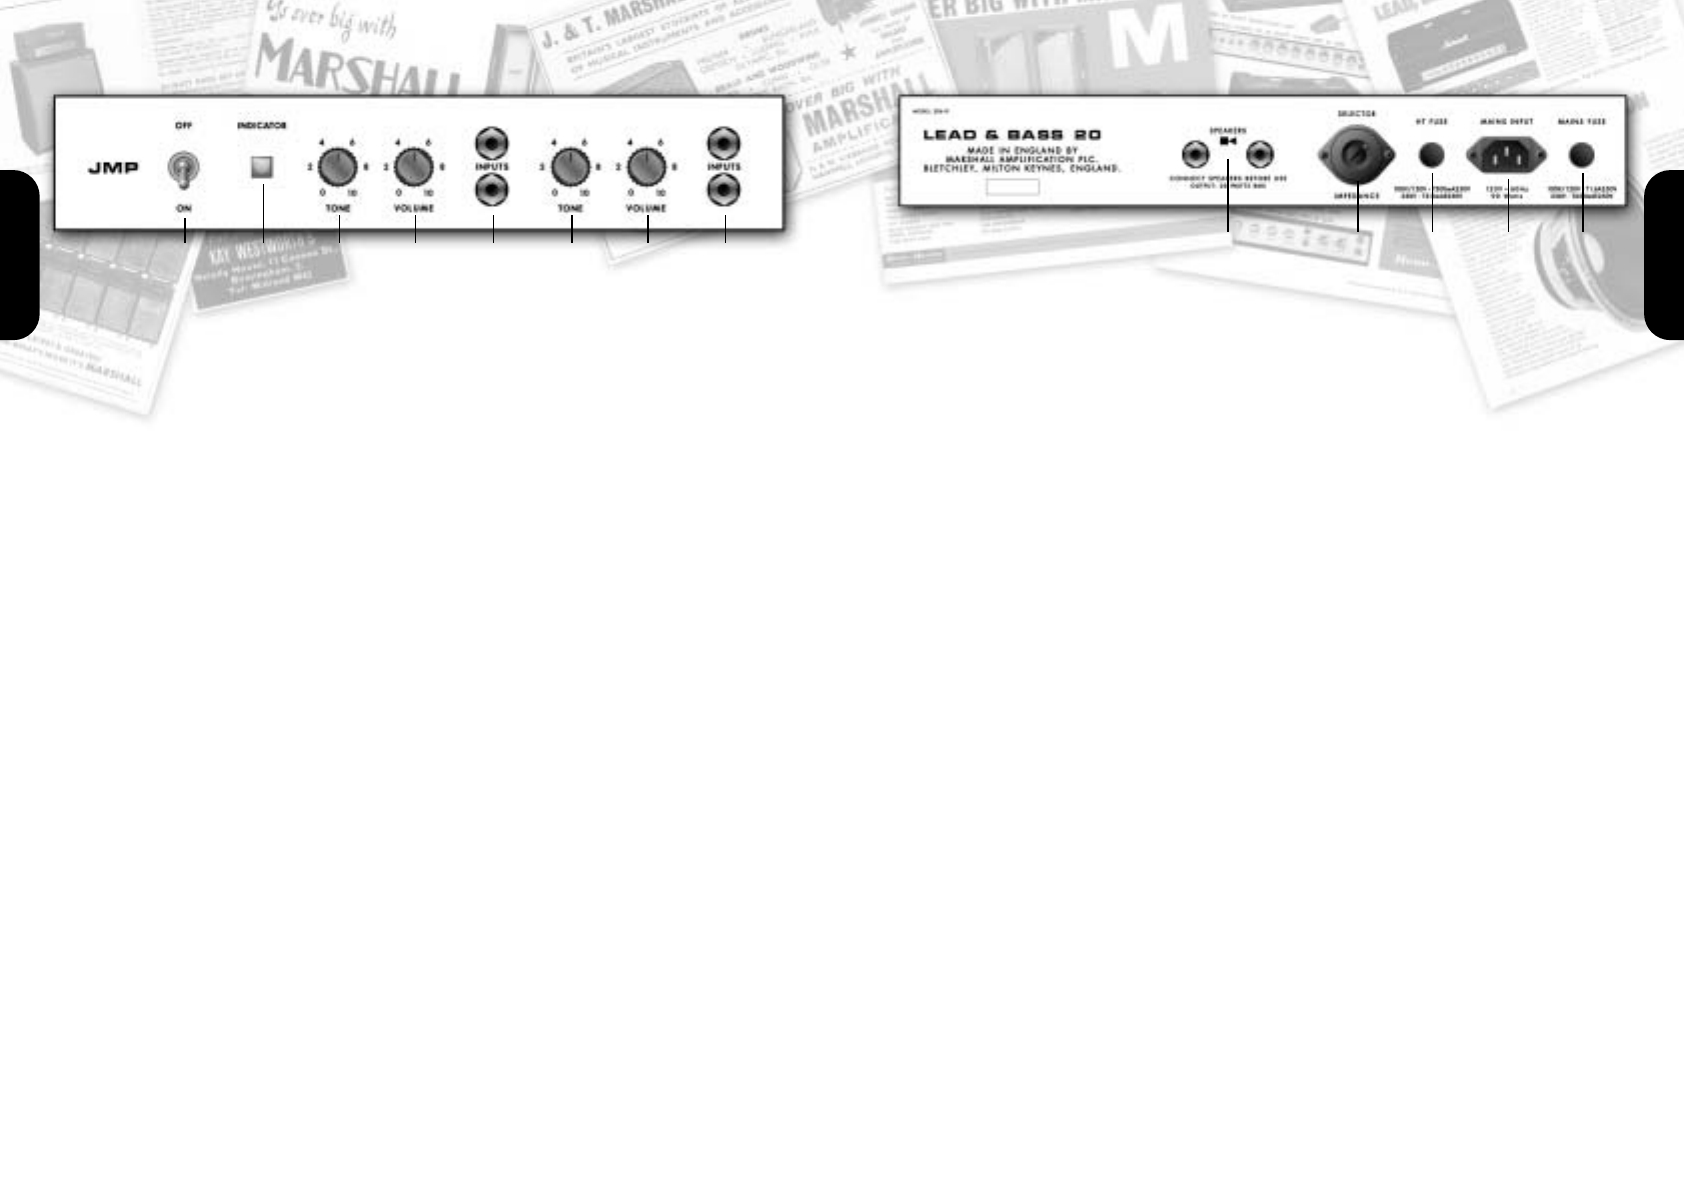
1. POWER SWITCH
This is the On/Off switch for mains power to the
amplifier.
Note: Please ensure the amplifier is switched off
and unplugged from the mains electricity supply
whenever it is moved.
2. INDICATOR
This 6.3 Volt incandescent filament indicator will
light up when your amplifier is switched on. It will
not be lit when the amplifier is switched off and/or
is not receiving mains power.
LEAD CHANNEL
3. TONE CONTROL
This adjusts the tonal character of the Lead
Channel. Turning this control clockwise increases
the amount of high frequencies (treble) in the
sound.
4. VOLUME CONTROL
This controls the volume of the Lead Channel.
Turning it clockwise increases the volume level of
the channel.
5. LEAD CHANNEL INPUTS
These are the guitar inputs for the Lead Channel.
The top input is ‘high sensitivity’ and the bottom
input is ‘low sensitivity’, the latter being 6dB lower
in volume than the former with a darker sound.
Always use a high-quality, screened guitar lead.
BASS CHANNEL
6. TONE CONTROL
This adjusts the tonal character of the Bass
Channel. Turning this control clockwise increases
the amount of high frequencies (treble) in the
sound.
7. VOLUME CONTROL
This controls the volume of the Bass Channel.
Turning it clockwise increases the volume level of
the channel.
8. BASS CHANNEL INPUTS
These are the guitar inputs for the Bass Channel.
The top input is ‘high sensitivity’ and the bottom
input is ‘low sensitivity’, the latter being 6dB lower
in volume than the former with a darker sound.
Always use a high-quality, screened guitar cable.
Performance Note: Bridging or
‘jumping’ the two channels
Because both Channels of the 2061X have the
same number of gain stages (one) and are
therefore in phase with each other, it is possible to
bridge them together (a.k.a. ‘slaving’, ‘jumping’,
‘linking’ or even ‘daisy-chaining’) and use them
both at the same time, enabling you to expand
upon the amps tonal possibilities by mixing the
Lead and Bass channels together.
The most common way of doing this is to plug your
guitar into the top (high sensitivity) input of one of
the two channels and then run a short ‘jumper’
guitar cable (i.e. a screened cable) from that
channel’s bottom (low sensitivity) input to one of
the other channel’s two inputs.
It is also possible to plug your guitar into the
bottom (low sensitivity) input of one of the two
channels and then run the ‘jumper’ cable from its
top (high sensitivity) input to one of the other
channel’s two inputs. This less-common approach
can also yield some interesting tonal variations.
2061X Front Panel
ENGLISH
1 2 3 4 5 6 7 8
4
1. LOUDSPEAKER OUTPUTS
There are two parallel loudspeaker output jacks
provided for connection to speaker extension
cabinet(s). Please always ensure that the
amplifier’s output impedance is set correctly (item 2).
WARNING! Never use the head without a load
attached!
Always use a non-screened Marshall approved
speaker lead when connecting an extension
cabinet to these units.
2. OUTPUT IMPEDANCE SELECTOR
Matches the amplifier’s output to the load (speaker)
impedance.
As is the case with any Marshall all-valve amplifier
it is imperative that: a) the amplifier is connected to
a load whilst in operation and b) the impedance
selected on the amplifier matches the total
impedance of the extension speaker cabinets being
used.
WARNING! An extension speaker cabinet with an
impedance of less than 4 Ohms, or two extension
cabinets of 4 Ohms or less should NOT be used
with this head.
The amp should be completely powered down
before the Output Impedance Selector is turned.
Failure to comply with any of the points raised in
this section will result in damage to the amplifier.
3. H.T. FUSE
The correct value of H.T. fuse is specified on the
rear panel of the amplifier. NEVER attempt to
bypass the fuse or fit one of the incorrect value.
4. MAINS INPUT
Your amp is provided with a detachable mains
(power) lead, which is connected here. The specific
mains input voltage rating of your amplifier is
shown on the back panel. Before connecting for the
first time, please ensure that your amplifier is
compatible with your electricity supply. If you have
any doubt, please get advice from a qualified
technician. Your Marshall dealer will help you in this
respect.
5. MAINS FUSE
The correct value of mains fuse is specified on the
rear panel of the amplifier. NEVER attempt to
bypass the fuse or fit one of the incorrect value.
ENGLISH
2 3 4 51
2061X Rear Panel
Follow all instructions and heed all warnings
KEEP THESE INSTRUCTIONS !