Benodigd gereedschap: Stanley-mes, punang, combinaetang en heteluchtblazer /verfstripper.
Inhoud krimpkousconnectorset voor Beginlas: 1) 2 x krimpkous met lijm 3mm lengte 40mm
2) 1 x krimpkous met lijm 9mm lengte 35mm
3) 1 x krimpkous met lijm 6mm lengte 60mm
4) 1 x krimpkous met lijm 18mm lengte 180mm
5) 3 x kabelverbinders ( 2 x blauw en 1 x geel )
Inhoud krimpkousconnectorset voor eindlas: 6) 1 x krimpkous met lijm 9mm lengte 35mm
7) 1 x krimpkous met lijm 12mm lengte 80mm
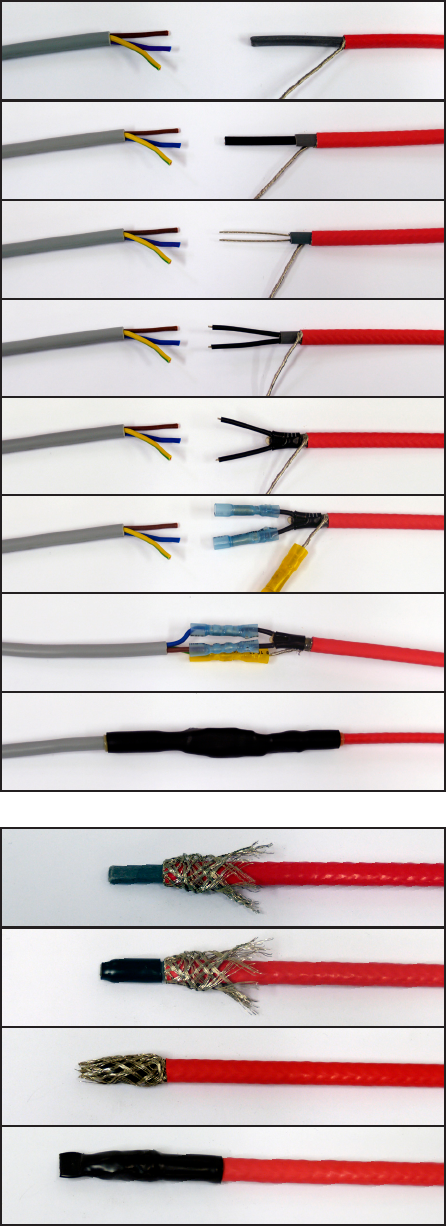
Voorbereiding van het voedingseind: (aansluing
naar de voedingskabel)
Strip nauwkeurig 80mm van de buitenmantel, ontvlecht het
aardingsvlechtwerk en draai deze in elkaar als aarddraad.
Verwijder voorzichg 60mm van de vrijgekomen rode
isloaemantel, zodat de koolstof kern ( zwart) volledig zichtbaar
wordt tot op 10mm van de aarddraad.
Verwijder het koolstofmateriaal zonder de stroomgeleiders
(voedingskabels) te beschadigen, zodat deze volledig bloot komen
te liggen
Schuif de twee krimpiloses (1) over de twee voedingskabels en
één krimpisolae (2) over de aarddraad. Krimp vervlogens deze 3
krimpisolaes volledig met de heteluchtblazer.
Schuif krimpisolae (3) over de twee voedingskabels tot aan de
aarddraad. Krimp deze vervolgens en dicht het open stuk tussen
de twee voedingskabels meteen met de punang. Gesmolten lijm
verschijnt dan aan de randen. Er is nu een duidelijke scheiding
gemaakt tussen de twee voedingskabels.
Het voedingseind is nu klaar voor aansluing op de schakelaar,
geaarde stekker of voor verlenging met een drie-aderige
stroomkabel geschikt voor netspanning. Aansluing aljd over de
aardlek groep en overeenkomsg de NEN 1010 normen. Voor een
correcte en waterdichte aansluing kan gebruik worden gemaakt
van de bijgeleverde kabelverbinders (5) ( 1 x geel voor aarde en 2
x blauw voor voedingskabels ) en krimpisolae (4) welke tevens
na montage m.b.v. een heteluchtblazer kan worden afgewerkt.
Afwerken en isoleren van het kabeleinde
Strip de buitenmantel tot op 60mm van het eind van de kabel.
Stroop de aardvlechtmantel terug over de kabel.
Schuif krimpisolae (6) 20mm over het eind van de kabel. Krimp
deze vervolgens en knijp het eind samen met een combinaetang
tot een plae en waterdichte afdichng ontstaat. ( belangrijk is
dat intern in de kabel, de voedingskabels elkaar niet raken of in
verbinding staan.
Schuif de aardvlechtmantel terug in de oude posie.
Schuif krimpisolae (7) tot minstens 10mm voorbij de reeds
gestripte aardmantel. Krimp deze vervolgens volledig en druk het
open einde goed samen met de combinaetang.
Need help? Post your question in this forum.
Report abuse
Libble takes abuse of its services very seriously. We're committed to dealing with such abuse according to the laws in your country of residence. When you submit a report, we'll investigate it and take the appropriate action. We'll get back to you only if we require additional details or have more information to share.
Product:
Forumrules
To achieve meaningful questions, we apply the following rules:
First, read the manual;
Check if your question has been asked previously;
Try to ask your question as clearly as possible;
Did you already try to solve the problem? Please mention this;
Is your problem solved by a visitor then let him/her know in this forum;
To give a response to a question or answer, do not use this form but click on the button 'reply to this question';
Your question will be posted here and emailed to our subscribers. Therefore, avoid filling in personal details.
Register
Register getting emails for Magnum Ideal at:
new questions and answers
new manuals
You will receive an email to register for one or both of the options.
Get your user manual by e-mail
Enter your email address to receive the manual of Magnum Ideal in the language / languages: Dutch as an attachment in your email.
The manual is 0,96 mb in size.
You will receive the manual in your email within minutes. If you have not received an email, then probably have entered the wrong email address or your mailbox is too full. In addition, it may be that your ISP may have a maximum size for emails to receive.
The manual is sent by email. Check your email
If you have not received an email with the manual within fifteen minutes, it may be that you have a entered a wrong email address or that your ISP has set a maximum size to receive email that is smaller than the size of the manual.
The email address you have provided is not correct.
Please check the email address and correct it.
Your question is posted on this page
Would you like to receive an email when new answers and questions are posted? Please enter your email address.