815408
1
Zoom out
Zoom in
Previous page
1/3
Next page
www.littletikes.com
www.littletikes.co.uk
www.littletikes.fr
www.littletikes.nl
www.littletikes.pl
XIM625121-1 - 10/11
625121M
625381M
A
D
C
B
E
Adult assembly required / Le montage devra être effectué par un adulte /
Debe ser armado por un adulto
(Recommended)
(Recommandé)
(Recomendado)
A. Body / Carrosserie / Cuerpo
B. Yoke / Étrier / Pieza de enganche
C. Handle / Poignée / Mango
D. Side rail with umbrella opening
Rail latéral avec ouverture pour parasol
Baranda lateral con oricio para la
sombrilla
E. Side rail / Rail latéral / Baranda lateral
F. End rails (2) / Rails d’extrémité (2)
Barandas de extremos (2)
G. Wheels (4) / Roues (4) / Ruedas (4)
Parts List / Liste des Pieces / Lista de Partes
L x6 3/4" Screw
Vis de 1.9 cm (3/4 po)
Tornillo de 1.9 cm (3/4")
G x4
O x4 P x2
I
H x4
J x2
ENGLISH
EXPLORER™ WAGON (625121M)
EXPLORER™ WAGON with UMBRELLA
(625381M)
Ages: 1-1/2 years and up
Please save sales receipt for proof of purchase.
WARNING:
ADULT ASSEMBLY REQUIRED.
Keep these instructions for future reference.
Prior to assembly, this package contains small parts:
hardware which is a choking hazard and may contain
sharp edges and sharp points. Keep away from children
until assembled.
When not pulled by an adult, avoid using this wagon
near swimming pools, on or near steps, hills, roadways or
inclines.
When a child is in wagon, all sides must be assembled.
Shoes must be worn at all times.
Maximum weight: 300 lbs. (136.1 kg). Limit 2 children.
This product is intended for use by children ages
1 1/2 years and up.
Adult supervision required. Do not leave children
unattended.
Protect your eyes. Always wear safety glasses when using
a hammer.
When temperatures fall below 0°F/-18°C, outdoor use of
this product is not recommended. In extreme cold, plastic
materials lose resilience and may become brittle and crack
upon impact. Store product in a warmer, protected place.
ASSEMBLY HINTS
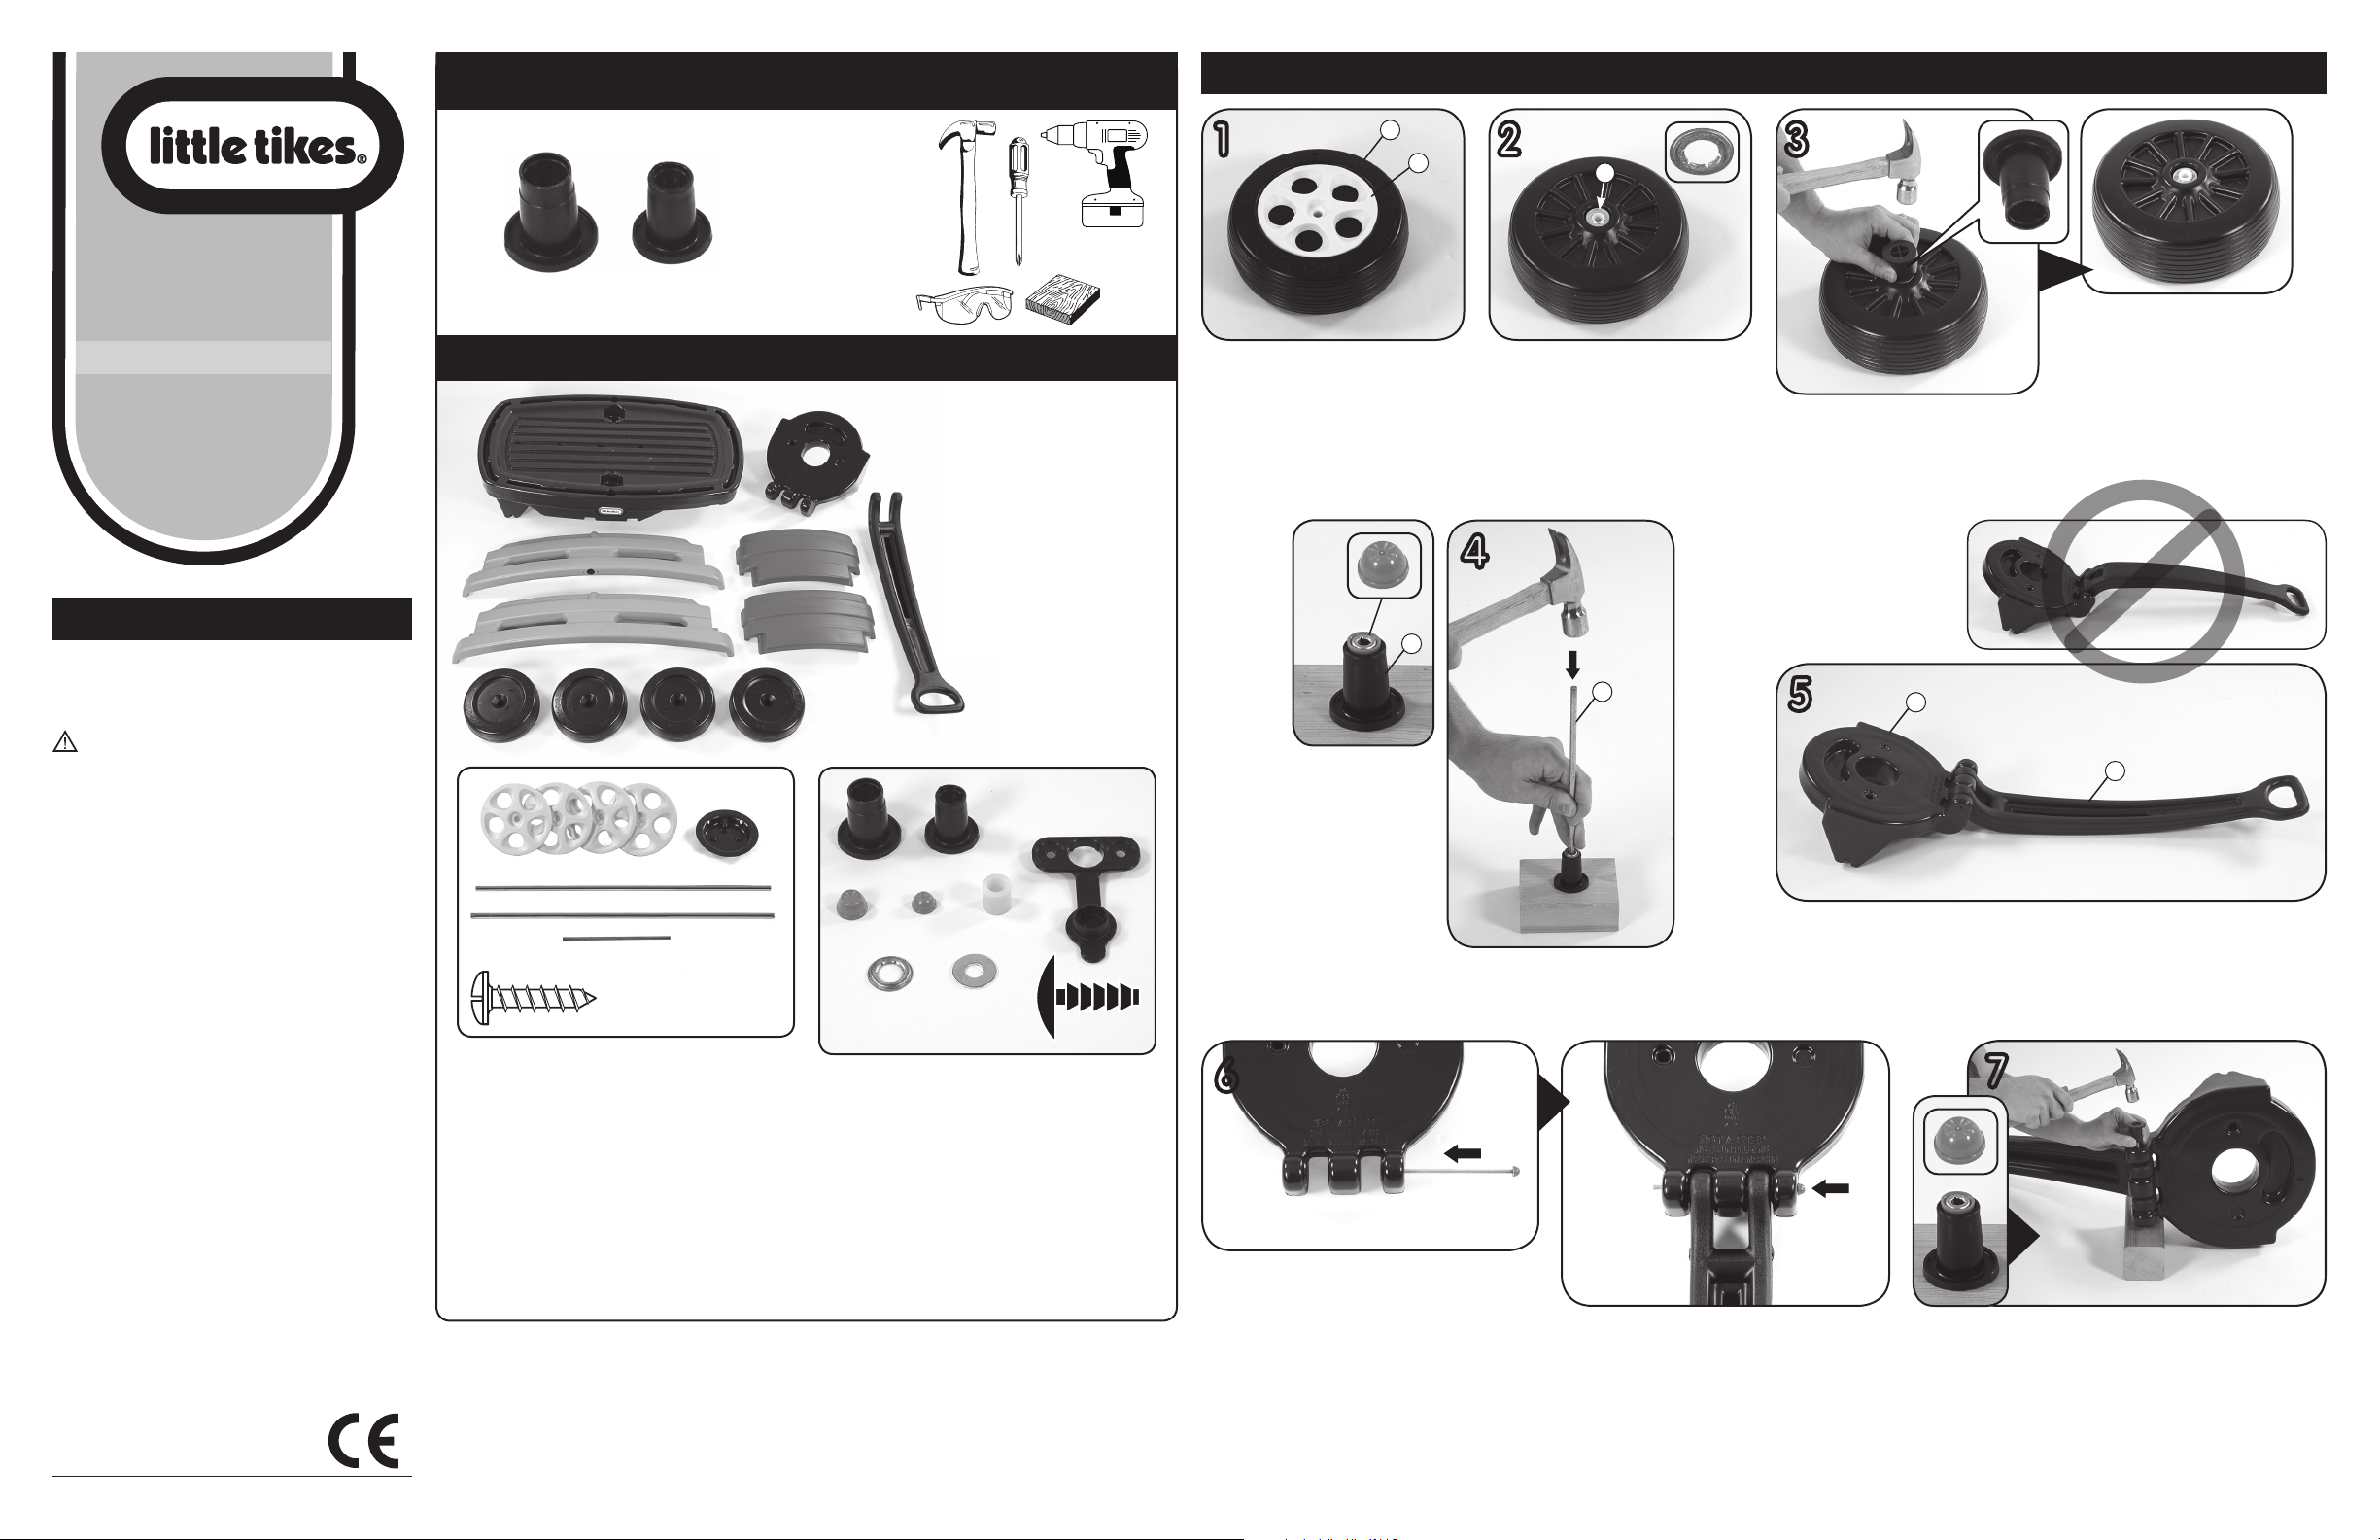
When installing handle (Illus. 5) make sure the recess in handle
faces up.
CONSUMER SERVICE
TOLL-FREE NUMBER:
United States:
www.littletikes.com
1-800-321-0183
Monday - Friday
The Little Tikes Company
2180 Barlow Road
Hudson, OH 44236
E-mail: littletikes.cares@littletikescare.com
United Kingdom:
www.littletikes.co.uk
Little Tikes
MGA Entertainment (UK) Ltd
50 Presley Way
Crownhill
Milton Keynes MK8 OES
Bucks, UK
E-mail: Info.LittleTikes@mgae.com
Printed in U.S.A. D.R.©2011 The Little Tikes Company
F x2
K
M
Tools required:
Outils Requis:
Herramientas
Requeridas:
(2) Cap nut tools
(included in hardware pack). Discard
after use.
(2) Outils pour écrou borgne
(inclus dans le sac de visserie). À jeter
après utilisation.
(2) Dispositivos para
remates
(incluidos con las piezas para montaje).
Descártelos después de utilizarlos.
M. Large cap nut tool / Outil pour grand écrou borgne
Dispositivo para remate grande
N. Small cap nut tool / Outil pour petit écrou borgne
Dispositivo para remate pequeño
O. Large cap nut (4) / Grand écrou borgne (4) / Remate grande (4)
P. Small cap nut (2) / Petit écrou borgne (2) / Remate pequeño (2)
Q. Bushing (4) / Bague (4) / Buje (4)
R. Retaining washer / Rondelle de retenue / Arandela de retención
S. Washers (4) / Roundelles (4) / Arandelas (4)
T. Umbrella plug / Bouchon pour parasol / Tapón de la sombrilla
U. Fastener (2) / Attaches (2) / Tornillo (2)
Assembly / Montage
/
Ensamblaje
1
Place hubcap (H) onto wheel (G). Repeat for
other 3 wheels.
Placez lenjoliveur (H) sur la roue (G). Répétez cette
étape sur les 3 autres roues.
Coloque el tapacubos (H) en la rueda (G). Repita en las
otras 3 ruedas.
Turn wheel over. Place retaining washer (R) onto
center of wheel. Repeat for other 3 wheels.
Retournez la roue. Placez la rondelle de retenue (R) au
centre de la roue. Répétez cette étape sur les 3 autres roues.
Dé vuelta la rueda. Coloque la arandela de retención (R) en el
centro de la rueda. Repita en las otras 3 ruedas.
Insert large cap nut tool (M) onto retaining
washer (R) and hammer into place. Repeat for
other 3 wheels.
Introduisez l’outil pour grand écrou borgne (M) dans la
rondelle de retenue (R) et martelez la rondelle pour la
xer. Répétez cette étape sur les 3 autres roues.
Inserte el dispositivo para remate grande (M) en la
arandela de retención (R) y marllelo para asentarlo en
su lugar. Repita en las otras 3 ruedas.
4
Important: place handle (C) onto yoke (B). Check to be sure orientation is correct.
Important : placez la poignée (C) sur l’étrier (B). Assurez-vous de l’orienter correctement.
Importante: Coloque el mango (C) en la pieza de enganche (B). Verique que la orientación sea la correcta.
3
Hint: pull handle back out for this step. Start small axle
through rst hole in yoke (B) as shown.
Conseil : enlevez la poignée durant cette étape. Introduisez le petit
essieu dans le premier trou de létrier (B) comme indiqué.
Consejo: Para este paso, quite el mango. Comience a pasar el eje
pequeño por el primer oricio de la pieza de enganche (B) tal y
como se muestra.
6
Re-insert handle (C) and continue to push small axle
through until end appears at other end as shown.
Remettez la poignée (C) et continuez à pousser le petit essieu
jusqu’à ce qu’il ressorte du côté opposé comme indiqué.
Vuelva a insertar el mango (C) y continúe pasando el eje pequeño
hasta que el extremo aparezca por el otro oricio tal y como se
muestra.
5
2
N
T
Q x4
S x4
R x4
H. Hubcaps (4) / Enjoliveurs (4) / Tapacubos (4)
I. Retaining cap / Capuchon de retenue / Tapa de retención
J. Large Axles (2) / Grands essieux (2) / Ejes grandes (2)
K. Small Axle / Petit essieu / Eje pequeño
L. 3/4” Screw (6) / Vis de 1,9 cm (6) / Tornillo de 1.9 cm (6)
Also included 1 decal sheet.
1 feuille d’autocollants également incluse.
También se incluye 1 hoja de calcomanías.
2.
1. Place small cap nut (P) into small cap nut
tool (N) as shown.
2. Hammer small axle (K) into small cap
nut (P).
1. Introduisez un petit écrou borgne (P) dans
l’outil pour petit écrou borgne (N) comme
indiqué.
2. Martelez le petit essieu (K) dans le petit écrou
borgne (P).
1. Coloque un remate pequeño (P) en el
dispositivo para remate pequeño (N) tal y
como se muestra.
2. Martille el eje pequeño (K) en el remate
pequeño (P).
1.
P
IMPORTANT! Make sure handle is in correct orientation.
IMPORTANT! Assurez-vous d’orienter la poignée correctement.
¡IMPORTANTE! Asegúrese que el mango esté orientado correctamente.
7
Turn yoke with handle on side. Insert block of wood under handle as
shown. Place small cap nut (P) onto into cap nut tool (N). Hammer cap nut
in place.
Posez l’étrier muni de la poignée sur le côté. Placez le morceau de bois sous la
poignée comme indiqué. Introduisez un petit écrou borgne (P) dans l’outil pour
écrou borgne (N). Martelez lécrou borgne pour le xer.
Apoye el mango con la pieza de enganche sobre un lado. Coloque un bloque de
madera debajo del mango tal y como se muestra. Coloque un remate pequeño (P) en
el dispositivo para remate (N). Marllelo para asentarlo en su lugar.
© The Little Tikes Company, an MGA Entertainment company. LITTLE TIKES® is a trademark of Little Tikes
in the U.S. and other countries. All logos, names, characters, likenesses, images, slogans, and packaging
appearance are the property of Little Tikes. Please keep this address and packaging for reference since
it contains important information. Contents, including specications and colors, may vary from photos
depicted on package. Instructions included. Please remove all packaging including tags, ties & tacking
stitches before giving this product to a child.
LIMITED WARRANTY
The Little Tikes Company makes fun, high quality toys. We warrant to the original purchaser that this
product is free of defects in materials or workmanship for one year * from the date of purchase (dated
sales receipt is required for proof of purchase). At the sole election of The Little Tikes Company, the only
remedies available under this warranty will be either replacement of the defective part of the product
or refund the purchase price of the product. This warranty is valid only if the product has been assembled
M
G
H
x4
R
R
x4
P
KB
C
N
and maintained per the instructions. This warranty does not cover abuse, accident, cosmetic issues such
as fading or scratches from normal wear, or any other cause not arising from defects in material and
workmanship.
U.S.A and Canada: For warranty service or replacement part information, please visit our website at www.
littletikes.com, call 1-800-321-0183 or write to: Consumer Service, The Little Tikes Company, 2180 Barlow
Road, Hudson OH 44236, U.S.A. Some replacement parts may be available for purchase after warranty
expires—contact us for details.
Outside U.S.A and Canada: Contact place of purchase for warranty service. This warranty gives you
specic legal rights, and you may also have other rights, which vary from country/state to country/state.
Some countries/states do not allow the exclusion or limitation of incidental or consequential damages,
so the above limitation or exclusion may not apply to you. *The warranty period is three (3) months for
daycare or commercial purchasers.
U x2
1


Need help? Post your question in this forum.

Forumrules


Report abuse

Libble takes abuse of its services very seriously. We're committed to dealing with such abuse according to the laws in your country of residence. When you submit a report, we'll investigate it and take the appropriate action. We'll get back to you only if we require additional details or have more information to share.

Product:

For example, Anti-Semitic content, racist content, or material that could result in a violent physical act.

For example, a credit card number, a personal identification number, or an unlisted home address. Note that email addresses and full names are not considered private information.

Forumrules

To achieve meaningful questions, we apply the following rules:

Register

Register getting emails for Little tikes 625381M Explorer Wagon at:


You will receive an email to register for one or both of the options.


Get your user manual by e-mail

Enter your email address to receive the manual of Little tikes 625381M Explorer Wagon in the language / languages: English, French, Spanish as an attachment in your email.

The manual is 4.97 mb in size.


You will receive the manual in your email within minutes. If you have not received an email, then probably have entered the wrong email address or your mailbox is too full. In addition, it may be that your ISP may have a maximum size for emails to receive.

The manual is sent by email. Check your email

If you have not received an email with the manual within fifteen minutes, it may be that you have a entered a wrong email address or that your ISP has set a maximum size to receive email that is smaller than the size of the manual.

The email address you have provided is not correct.

Please check the email address and correct it.

Your question is posted on this page

Would you like to receive an email when new answers and questions are posted? Please enter your email address.


Info