6
XIM623417 - 12/11
ww.litt le tis.co m
ww
www
ww
ww
Debe se r armdo por un adulto / Zusammenbau durch einen Erwachsenen erforderlich.
In elkar te zeen door een volwa ssee / Konieczny jest mo nta pzez oso by d orosłe
W x1
X x1
Tool req ui / Outl req ui s / Heam ien
Erforderliches Werkzeug / Benod i d gereed scha p
Naręd zia nie
A
B
C (2
D
E
F
G
H
IJ
L
KM O
V ( T ( U (
PQ
R
S
BB
D D
12
5
E
AA
C
H
I
K
D
J
1
2
34
12
6
EN
DISCOVERSOUNDS® ACTIVIT Y GAEN ™
Ages 6 months and up
Plea se savales reipt for proof of purc hase
W
ADULT ASSEMBLY REQUIR
• Keep thes e ins
• Prior to ashi s package consmall parhi ch
is a chokin g d ma y cont n sh ar p edge s an d sh ar p poi n
Keep away from children untl assemble
•Never place pro duc a wndo w where cords fm blind s or
drapn str angle a chine ver produc
cords, comy mo nids .
X x1
X x2
1
X x2
Wall wit
Shut
A. Small ar ch
B. Bl return
C. Shut
D. Shutt
wall
E. Win d
Ściana z okiennicami
A. Łuk mały
B. Rynna na kulki
C. Okiennice (2)
D. Ściana
E. Skrzynka na kwiaty
Mur avec volets
A. Petite voûte
B. Renvoi de la
balle
C. Volets (2)
D. Paroi de la
porte à jalousie
E. Jardinière
Wand mit
Fensterläden
A. Kleiner Bogen
B. Ballrückgabe
C. Fensterläden (2)
D. Wand mit
Fensterönung
E. Fensterkasten
Muur met luiken
A. Kleine boog
B. Balteruggave
C. Luiken (2)
D. Muur
E. Vensterbank
Pared con
contraventanas
A. Arco pequeño
B. Recipiente de bolas
C. Contraventanas (2)
D. Pared de las
contraventanas
E. Alfeizar de la ventana
Wall with Front
Door
F Largar ch
G. Mailbox
H. Mail
I. Door w
xyhon e
J. (2) Arch suppor
K. Front do
L. Teles cope
M. Teles cope base
N. Teles cope nut
O. Tes co
Ściana z drzwiami
frontowymi
F. Łuk duży
G. Skrzynka na listy
H. Podstawa skrzynki
na listy
I. Drzwi z cymbałkami
J. Podpory łuku (2)
K. Ściana frontowa
L. Teleskop
M.
N. Nakrętka mocująca
teleskop
O. Śruba mocująca
teleskop
Muur met voordeur
F. Grote boog
G. Brievenbus
H. Brievenbusbasis
I. Deur met xylofoon
J. Boogsteunen (2)
K. Muur voor
voordeur
L. Telescoop
M. Telescoopbasis
N. Telescoopmoer
O. Telescoopbout
Mur avec porte avant
F. Grande voûte
G. Boîte aux lettres
H. Socle de la boîte
aux lettres
I. Porte avec
xylophone
J. (2) supports de
voûte
K. Paroi de la porte
avant
L. Télescope
M. Socle du télescope
N. Écrou du télescope
O. Vis du télescope
Wand mit Haustür
F. Großer Bogen
G. Briefkasten
H. Briefkastenbasis
I. Tür mit Xylofon
J. Bogenstützen (2)
K. Wand mit
Türönung
L. Teleskop
M. Teleskopbasis
N. Mutter für
Teleskop
O. Schraube für
Teleskop
Pared con puerta
frontal
F. Arco grande
G. Buzón
H. Base del buzón
I. Puerta con xilófono
J. Soportes del arco (2)
K. Marco de la puerta
frontal
L. Telescopio
M. Base del telescopio
N. Tuerca del telescopio
O. Tornillo del telescopio
BATTERY SAFETY INFORIO N:
• Keep thes e ins
• Replace with 3 A A “LR6” 5 volts) alkaline bnot includ ed
(Rechay be subit uted.)
• The voltaf a fully-y is ofte
than that of a fre h alkaline batnd ed
that alkaline bat
besma nce and longer play ti
• Install batteries with the corr(+ an
• To ay leakage:
1. Follow the toy and baty man ull ation inst
2. Do no t mix old and new bat
3. Do no t mix standzi nc), ni ckel-
cadmium onickeo not mix dierent
brands of batteries. Only batteries of the same or equial ent typ
recomnd ed are to be used
4. When to y is no t used for an exnd ed perf time, remove
bato pream age to the un it.
5. Remove dead or exha usm produ ct.
6. Dispose of deapropo no t buro no t di
batteries in re as they may leak or explode.
• Make sure cover is pr operl y installen unit at all times.
• Do no t atto recharn- rechar
• Rechao bm thy be
rech
• Chargif rechargul d be do ne only b y an adul t.
• The supply termina ls are no t o be sho
NOTE: If the unit stops workin o r does n’rk a s it shoul d
the batteries for a fe w m inutes and the n r-i nse rf theris still a
problstall n e w baerie s.
FCC COM
NOTE : Thi s equipen t has been teso comply with the
limit a Class B digitl device, pursua nt to Part 15 o f the FCC Rules.
Thes e limito pr ovipr ote
harmfl inter n a reial insll ationhi s e
generse s and can radia te rao freq y enf no t
instn ac coh the iny c
harmfl inter o rao communi catio
guaranha t interl no t occn a partll ation. If
this equipmoe s cause harml intero or television
recephich ca n be dey tu
on, the user is encouraged to try to correct the intery one or
more of the fol
• Rie nt or re locanna .
• Incn be n t
Slide & Play
Center Walls
P. Arch for slide
Q. Play center
R. Slide
S. Play center base
T. (3) Letter blocks
U. (4) Balls
V. Wall knobs
Parois du toboggan et
du centre récréatif
P. Voûte pour le
toboggan
Q. Centre récréatif
R. Toboggan
S. Socle du centre
récréatif
T. (3) blocs avec lettre
U. (4) balles
V. Boutons de paroi
Rutsche und
Spielcenterwand
P. Bogen für
Rutsche
Q. Spielcenter
R. Rutsche
S. Spielcenterbasis
T. Sortierformen für
den Briefkasten
(3)
U. Bälle (4)
V. Wandknöpfe
Speelmuren
P. Glijbaanboog
Q. Speelunit
R. Glijbaan
S. Basis speelunit
T. Letterblokken (3)
U. Ballen (4)
V. Muurknoppen
Przesuń & Play
Ściany Center
P. Łuk nad
zjeżdżalnią
Q. Centrum
R. Zjeżdżalnia
S. Centrum bazy
T. Literki (3)
U. Kulki (4)
V. Nakrętki
montażowe
Paredes con tobogán
y Centro de juegos
P. Arco de tobogán
Q. Centro de juegos
R. Tobogán
S. Base del centro de
juegos
T. Bloques de letras (3)
U. Bolas (4)
V. Pomos de las
paredes
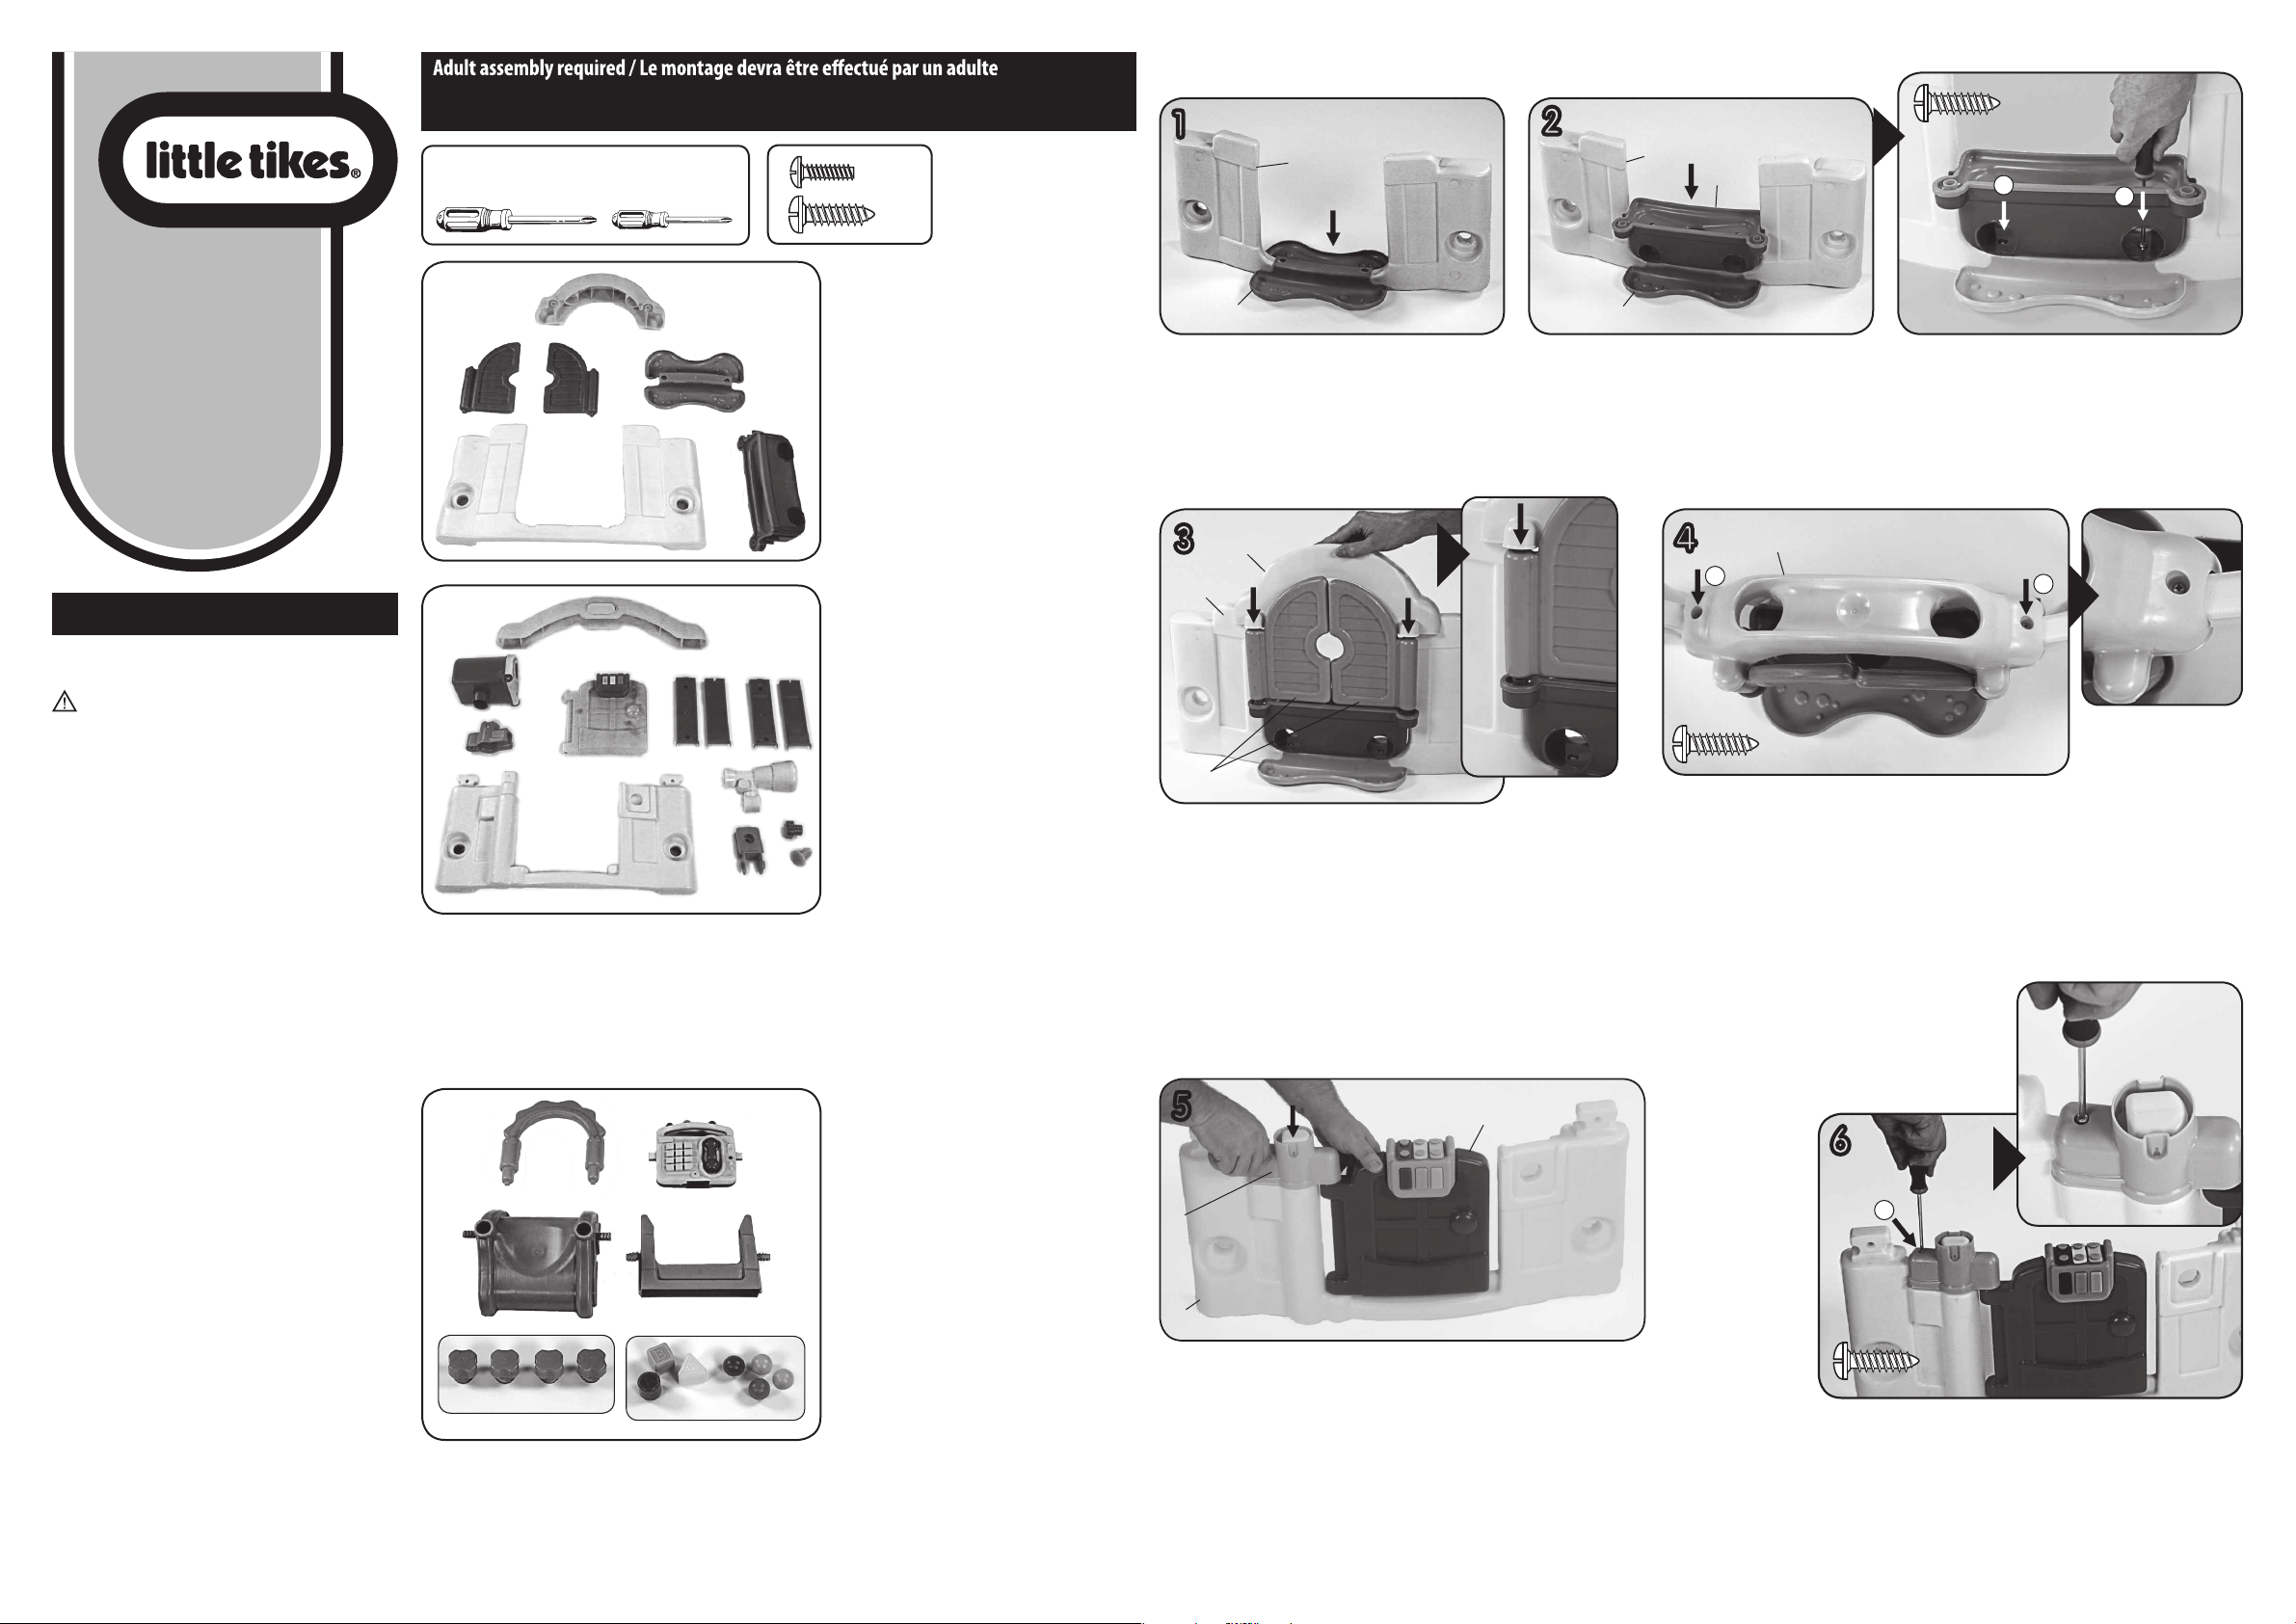
Wall with Shutters Assembly / Ensemble de mur avec volets / Ensamblaje de la pared con contraventanas
Zusammenbau der Wand mit Fensterläden / De muur met luiken in elkaar zetten / Montaż ściany z okiennicami
Place ball re ) onto sh utter do) a s shown.
Poser le renvoi de la balle (B) sur la paroi de la porte à jalousie (D) tel que
montré.
Coloque el recipiente de bolas (B) sobre la pared de las contraventanas (D),
como se muestra en la foto.
Die Ballrückgabe (B) wie dargestellt auf die Wand mit der Fensterönung
(D) setzen.
Plaats de balteruggave (B) op de muur (D) zoals wordt getoond.
Umieścić rynnę na kulki (B) na progu ściany (D), jak pokazano na ilustracji.
Place window b) ontl rs shown.
Poser la jardinière (E) sur le renvoi de la balle (B) tel que montré.
Coloque el alfeizar (E) sobre el recipiente de bolas (B), como se muestra
en la foto.
Den Fensterkasten (E) wie dargestellt auf die Ballrückgabe (B) setzen.
Plaats de vensterbank (E) op de balteruggave (B) zoals wordt getoond.
Umieścić skrzynkę na kwiaty (E) na rynnie na kulki (B), jak pokazano na
ilustracji.
Secur e usin g screws (X2 in locat
La retenir à l’aide de 2 vis (X) aux endroits indiqués.
Fíjelo con 2 tornillos (X) en los lugares señalados.
Wie dargestellt mit den Schrauben (X) x 2 in der angegebenen
Position sichern.
Schroef de delen aan elkaar met behulp van 2 schroeven (X).
Zamocować za pomocą wkrętów (X) x 2 we wskazanych miejscach.
1. Place sh utter s (C) x2 onto assemd wind ow box (E)
with pref
2. Place sm all ar ch (A) onto sh ut s an d shutte r d
wall (D). Hold i n p lace.
1. Plaats de 2 luiken (C) op de in elkaar gezette
vensterbank (E) met de juiste kant naar voren.
2. Plaats de kleine boog (A) op de luiken en de muur (D).
Houd beide op hun plek.
1. Umieścić okiennice (C) x 2 na uprzednio przymocowanej skrzynce
na kwiaty (E) preferowaną stroną na zewnątrz, jak pokazano na
ilustracji.
2. Umieścić łuk mały (A) na okiennicach i ścianie (D) i przytrzymać.
1. Poser les 2 volets (C) sur la jardinière (E) assemblée avec
le côté préféré orienté vers l’extérieur comme montré.
2. Poser la petite voûte (A) sur les volets et la paroi de la
porte à jalousie (D). La retenir en place.
1. Coloque las 2 contraventanas (C) sobre el alfeizar (E) con
el lado preferido hacia fuera, como se muestra en la foto.
2. Coloque el arco pequeño (A) sobre las contraventanas
(D)
y la pared y manténgalo sujeto.
1. Die Fensterläden (C) x 2 wie dargestellt mit der bevorzugten
Seite nach außen auf den montierten Fensterkasten (E) setzen.
2. Den kleinen Bogen (A) auf die Fensterläden und die Wand mit
der Fensterönung (D) setzen. In Position halten.
Secure using screws (X) x2 in locations shown.
Le retenir à l’aide de 2 vis (X) aux endroits indiqués.
Fíjelo con 2 tornillos (X) en los lugares señalados.
Wie dargestellt mit den Schrauben (X) x 2 in der
angegebenen Position sichern.
Schroef de boog vast met behulp van 2 schroeven (X).
Zamocować za pomocą wkrętów (X) x 2 we wskazanych
miejscach.
Wall wit h Foor Assem b / Ensemble de mur avec porte avant / Ensamblaje de la pared con puerta frontal
Zusammenbau der Wand mit Haustür / Muur met voordeur in elkaar zetten / Montaż ściany frontowej
1. Place door with xylophone (I) onto front
door wall (K).
2. Place mailbox base (H) onto door with
xylophone and front door wall as
shown. Hold in place.
1. Poser la porte avec le xylophone (I) sur
la paroi de la porte avant (K).
2. Poser le socle de la boîte aux lettres
(H) sur la porte avec le xylophone et la
paroi de la porte avant tel que montré.
Le retenir en place.
1. Coloque la puerta con el xilófono (I) en la
pared de la puerta frontal (K).
2. Coloque el buzón (H) sobre la puerta con
el xilófono y la pared de la puerta frontal,
como se muestra en la foto, y sujételo.
1. Plaats de deur met de xylofoon (I) in
opening van de muur (K).
2. Plaats de brievenbusbasis (H) op de
deur met de xylofoon en de muur, zoals
wordt getoond. Houd alles op z’n plek.
1. Umieścić drzwi z cymbałkami (I) na
ścianie frontowej (K).
2. Umieścić podstawę skrzynki na listy (H)
na drzwiach z cymbałkami i ścianie
frontowej, jak pokazano na ilustracji i
przytrzymać.
1. Die Tür mit dem Xylofon (I) auf die
Wand mit der Türönung (K) setzen.
2. Die Briefkastenbasis (H) wie dargestellt
auf die Tür mit dem Xylofon und die
Wand mit der Türönung setzen. In
Position halten.
Secur e usin g screws (X ) x1ions shown.
Le retenir à l’aide de 1 vis (X) aux endroits indiqués.
Fíjelo con 1 tornillo (X) en el lugar señalado.
Wie dargestellt mit der Schraube (X) x 1 in der
angegebenen Position sichern.
Schroef de delen aan elkaar met behulp van 1 schroef (X).
Zamocować wkrętem (X) x 1 we wskazanym miejscu.
N (V)