in the U.S. and other countries. All logos, names, characters, likenesses, images, slogans, and packaging
appearance are the property of Little Tikes. Please keep this address and packaging for reference since
it contains important information. Contents, including specications and colors, may vary from photos
depicted on package. Instructions included. Please remove all packaging including tags, ties & tacking
stitches before giving this product to a child.
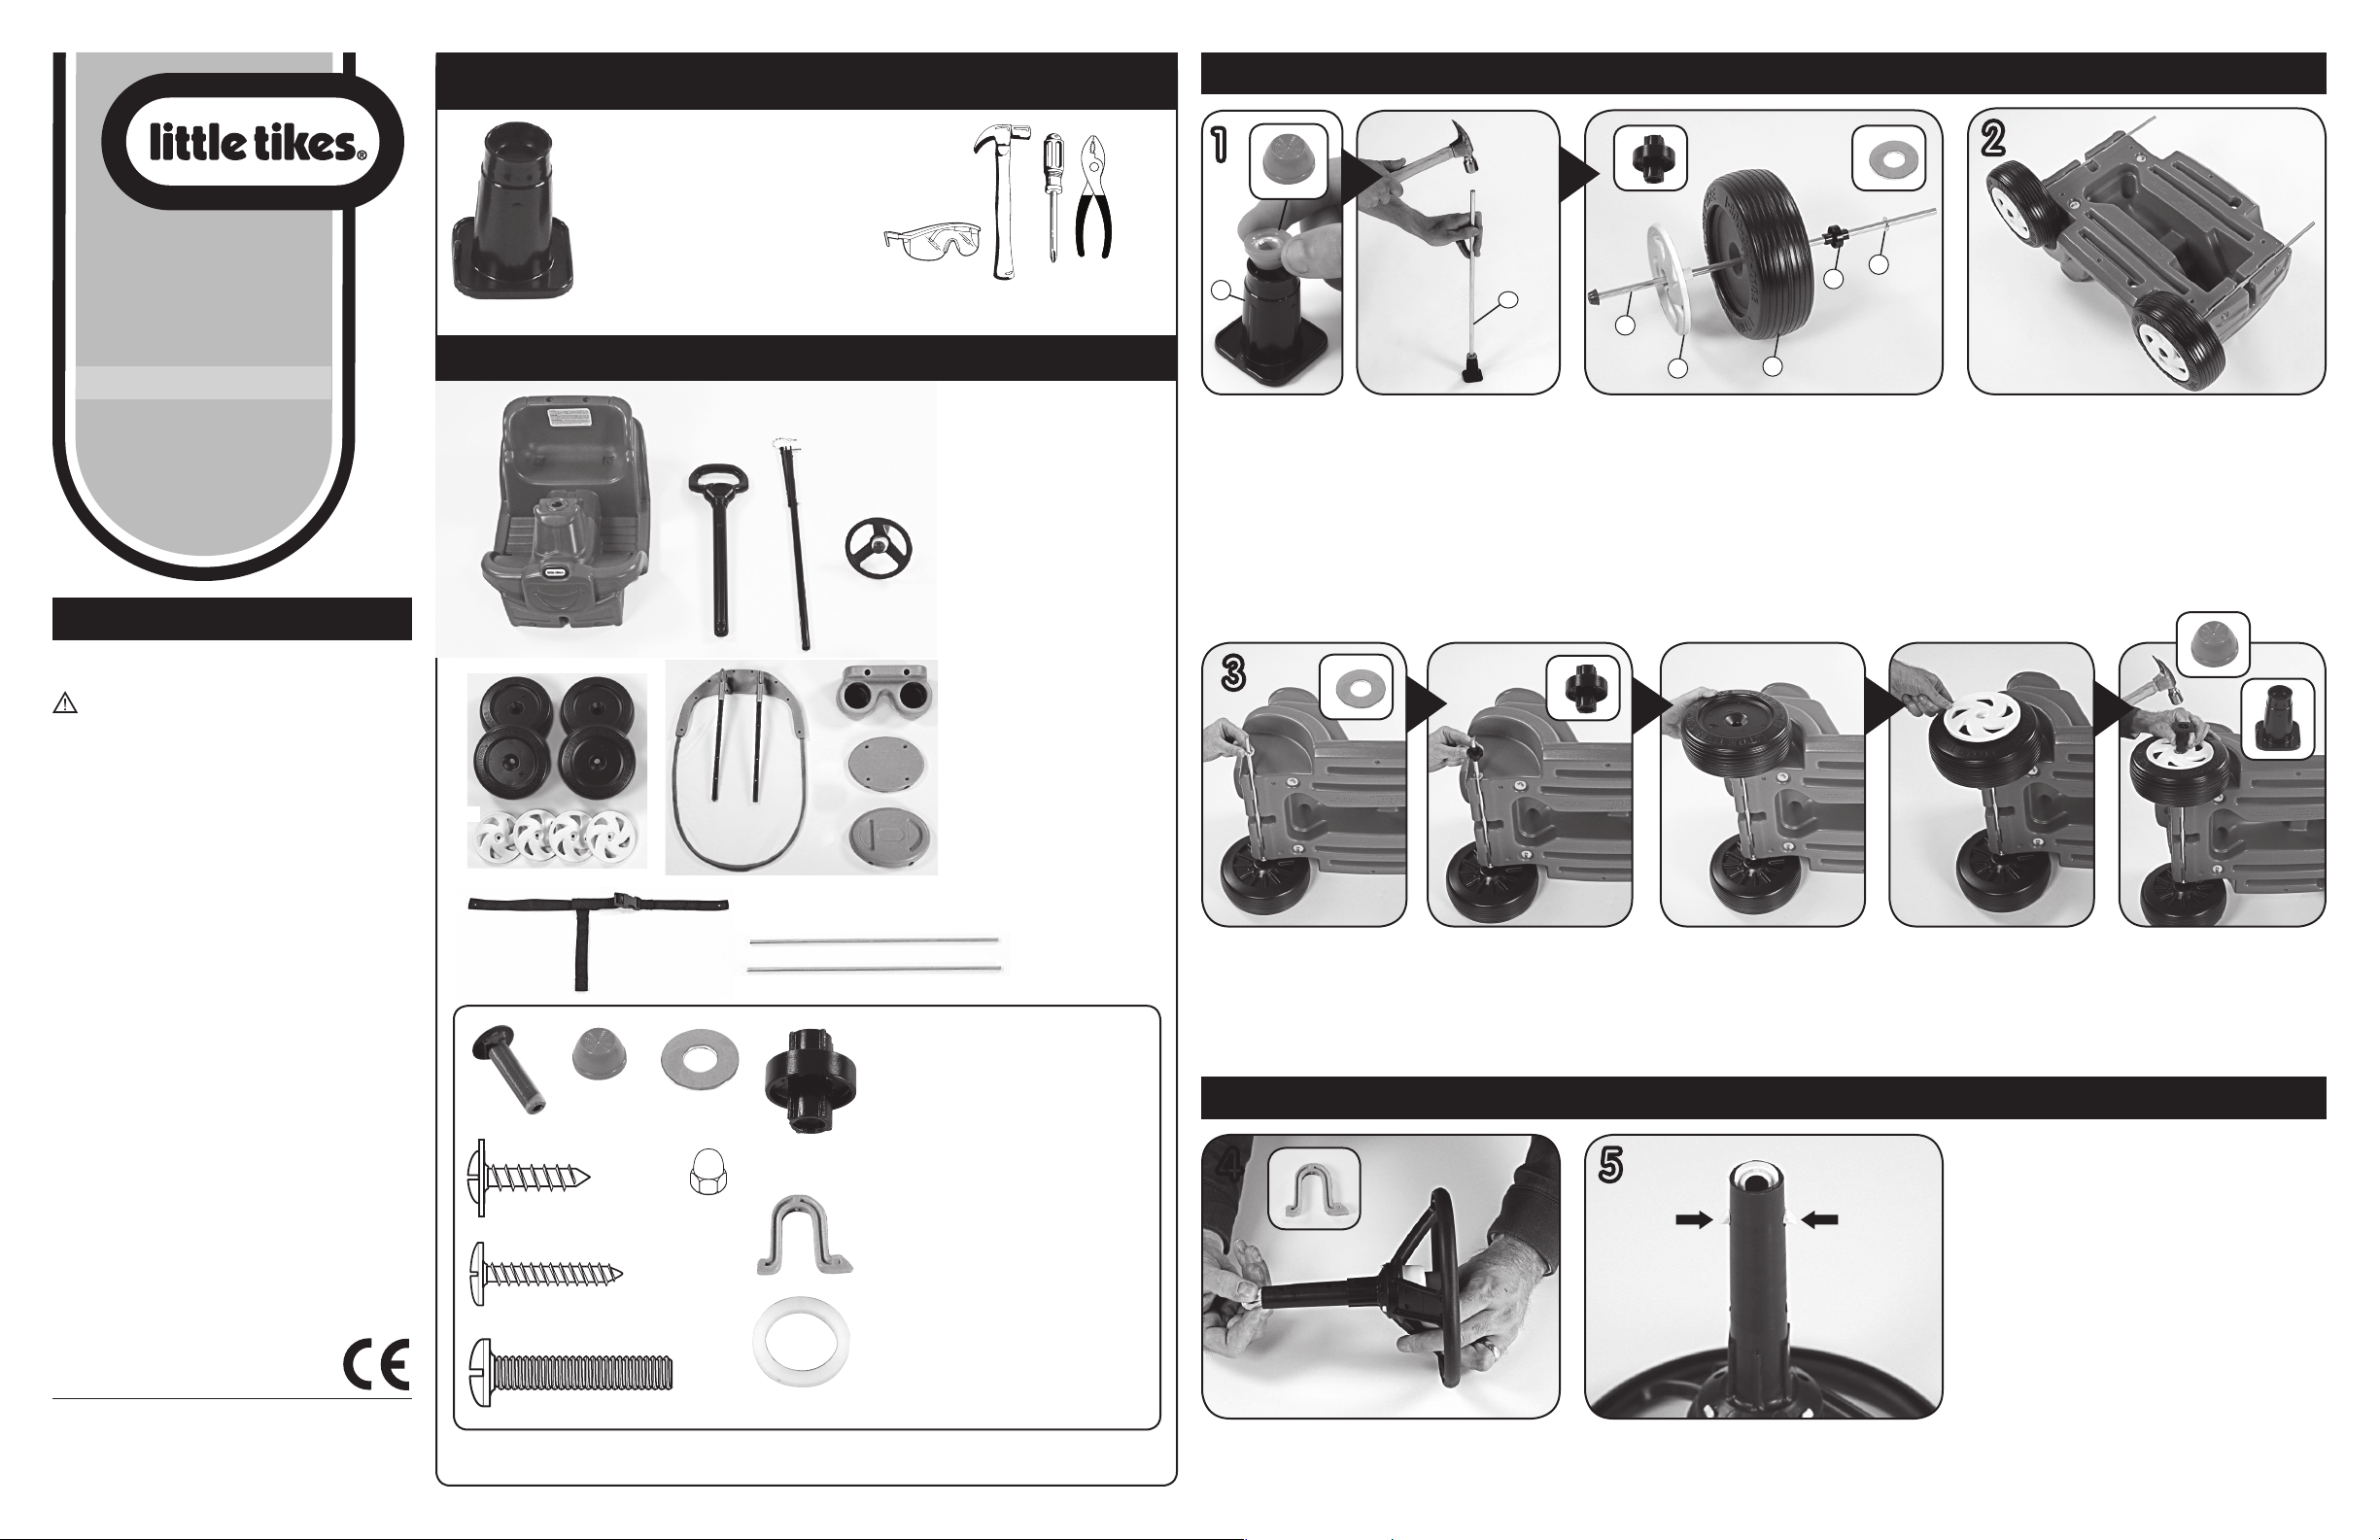
(1) Axle cap tool
(included in hardware pack). Discard after use.
(2) Outil pour capuchon d’essieu
(inclus dans le sac de visserie). À jeter après
utilisation.
(2) Dispositivos para remate
(incluidos con las piezas para montaje).
Descártelos después de utilizarlos.
Wheel Assembly / Assemblage des roues / Montaje de las ruedas
Also included 1 decal sheet. • 1 feuille d’autocollants également incluse. • También se incluye 1 hoja de calcomanías.
X x1
GH
I
J
E x4
F x4
L
1. Place axle cap (O) into axle cap tool (X) as shown.
2. Hammer axle (M) into axle cap (O).
3. Repeat steps 1 and 2 for other axle.
1. Placez un capuchon d’essieu (O) dans l’outil pour capuchon
d’essieu (X) comme illustré.
2. Martelez l’essieu (M) dans le capuchon d’essieu (O).
3. Répétez les étapes 1 et 2 pour l’autre essieu.
1. Coloque un remate del eje (O) en el dispositivo para remate del
eje (X) tal y como se muestra.
2. Martille el eje (M) en el remate (O).
3. Repita los pasos 1 y 2 en el otro eje.
1.
O
X
1
N x4
O x4
U x2
V x4
N. Bushing (4) / Bague (4) / Buje (4)
O. Axle Caps (4) / Capochon d’essieu (4) /
Remate del eje (4)
P. Steering Clip / Attache de direction /
Abrazadera del volante
Q. Barrel Bolt (2) / Boulon cylindrique (2) /
Perno pasador (2)
R.
5/8” Screw (3) / Vis de 1,6 cm (3) /
Tornillo de 1,6 cm (3)
S. 1” Screw (8) / Vis de 2,54 cm (8) /
Tornillo de 2,54 cm (8)
T. 1 1/4” Bolt (2) / Boulon de 3,17 cm (2) /
Perno de 3,17 cm (2)
U. Acorn Nut (2) / Écrou borgne (2) /
Tuerca ciega (2)
V. Washers (4) / Roundelles (4) / Arandelas (4)
W. Steering O Ring / Joint torique de direction /
Anillo del volante
W
M x2
2
2.
M
M
FE
N
V
x2
In order slide hubcap (F), wheel (E), bushing (N), washer
(V) onto assembled axle (M). Repeat for other assembled
axle (M).
Dans l’ordre, faites coulisser un enjoliveur (F), une roue (E), une
bague (N) et une rondelle (V) sur l’essieu assemblé (M). Répétez
cette procédure pour l’autre essieu assemblé (M).
En orden deslice un tapacubos (F), una rueda (E), un buje (N) y
una arandela (V) en el eje ensamblado (M). Repita en el otro eje
ensamblado (M).
Slide assembled axles (M) through axle guides as shown.
Glissez les essieux assemblés (M) à travers les guides d’essieu,
comme illustré.
Deslice los ejes ensamblados (M) por las guías del eje tal y como se
muestra.
Holding wheel assemblies in place, turn the Roadster onto it’s side and slide washer (V), bushing (N), wheel (E) and hubcap (F) onto open end of assembled axle (M). Using cap nut tool (X),
hammer a cap nut (O) onto open end of assembled axle (M). Repeat for other axle.
En maintenant l’assemblage pour les roues en place, couchez la voiture Roadster sur son côté et glissez la rondelle (V), la bague (N), la roue (E) et l’enjoliveur (F) sur l’extrémité ouverte de l’essieu assemblé (M). À
l’aide de l’outil pour écrou borgne (X), martelez un écrou borgne (O) sur l’extrémité ouverte de l’essieu (M). Répétez cette étape pour l’autre essieu.
Mientras sostiene en su lugar los conjuntos de las ruedas, coloque el coche sobre uno de sus lados y deslice la arandela (V), el cojinete (N), la rueda (E) y el tapacubos (F) en el extremo abierto del eje ensamblado
(M). Con el dispositivo para tuerca tapón (X) martille una tuerca tapón en el extremo abierto del eje ensamblado (M). Repita en el otro eje.
x2
Steering Wheel / Volant / Volante
4P5
Squeeze the prong end of the Steering Clip (P) while inserting it into Steering Wheel (D). Snap it into the 1st set of holes.
Pressez l’extrémité de la broche de l’attache de direction (P) tout en l’insérant dans le volant (D). Emboîtez dans le 1er ensemble de trous.
Apriete la punta de la abrazadera del volante (P) mientras la introduce en el volante (D). Encájela en el primer conjunto de oricios.
VN
3N
V
O
X
Tools required (not included):
Outils Requis (non compris):
Herramientas Requeridas
(no incluidas):
T x2
Bolt - 1 1/4" / Boulon- 3,17 cm / Perno de 3,17 cm
Libble takes abuse of its services very seriously. We're committed to dealing with such abuse according to the laws in your country of residence. When you submit a report, we'll investigate it and take the appropriate action. We'll get back to you only if we require additional details or have more information to share.
Product:
Forumrules
To achieve meaningful questions, we apply the following rules:
First, read the manual;
Check if your question has been asked previously;
Try to ask your question as clearly as possible;
Did you already try to solve the problem? Please mention this;
Is your problem solved by a visitor then let him/her know in this forum;
To give a response to a question or answer, do not use this form but click on the button 'reply to this question';
Your question will be posted here and emailed to our subscribers. Therefore, avoid filling in personal details.
Register
Register getting emails for Little tikes 622069M at:
new questions and answers
new manuals
You will receive an email to register for one or both of the options.
Get your user manual by e-mail
Enter your email address to receive the manual of Little tikes 622069M in the language / languages: English, German, Dutch, French, Polish, Spanish as an attachment in your email.
The manual is 5.42 mb in size.
You will receive the manual in your email within minutes. If you have not received an email, then probably have entered the wrong email address or your mailbox is too full. In addition, it may be that your ISP may have a maximum size for emails to receive.
The manual is sent by email. Check your email
If you have not received an email with the manual within fifteen minutes, it may be that you have a entered a wrong email address or that your ISP has set a maximum size to receive email that is smaller than the size of the manual.
The email address you have provided is not correct.
Please check the email address and correct it.
Your question is posted on this page
Would you like to receive an email when new answers and questions are posted? Please enter your email address.