RESET
Plasma
Timer Cancel
Program Week Holiday
SET/CLR
MinHour
Humidify
AUTO
AUTO SWING
JET
OPERATION
FAN SPEED
Program set
SUB FUNCTION
SET TEMP
Room Temp
HI
MED
LO
Heater
Defrost
Filter
Preheat
Out door
Timer
On
Set no. Time
Off
01 03 05 07 09 11 13 15 17 19 21 23
Time
Operation unit
3
8
5
9
10
11
12
13
14
2
1
6
4
7
17
16
15
ZONE
1234
Receiver de señales
Instrucciones de utilización
8 Aire acondicionado de canalización de techo
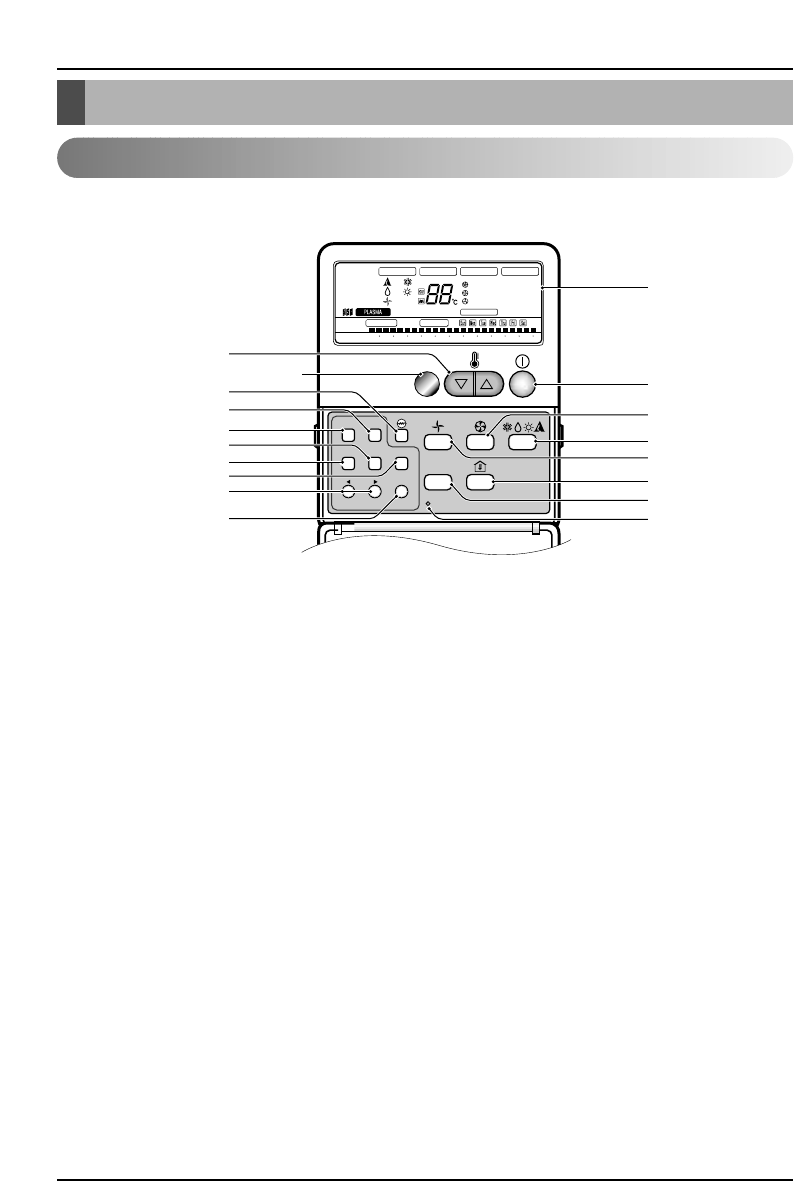
Funciones del mando a distancia -Tapa abierta
1. Pantalla de Parámetros
Muestra las condiciones de funcionamiento.
2. Botón “On/Off” (Encendido/Apagado)
El aparato se pone en marcha cuando se pulsa este
botón y se detiene cuando se vuelve a pulsar.
3. Botón “Set Temperature”
(Ajuste de la Temperatura)
Se utiliza para ajustar la temperatura cuando se
alcanza la temperatura deseada.
4. Botón “FAN Operation” (Funcionamiento del
VENTILADOR)
Se utiliza para hacer que circule el aire de la
habitación sin refrigeración o calefacción.
5.
Botón de calentador eléctrico (opcional)
Esté acostumbrado al conjunto la Calentadora
Eléctrica.
6. Botón “FAN Speed”
(Velocidad del VENTILADOR)
Se utiliza para ajustar la velocidad que se desea del
ventilador.
7. Botón “Operation Mode Selection” (Selección del
Modo de Funcionamiento)
Se utiliza para seleccionar el modo de funcionamiento.
• Modo de Funcionamiento Automático.
• Modo de Funcionamiento para Refrigeración.
• Modo de Funcionamiento “Soft Dry” (Seco Suave).
• Modo de Funcionamiento para Calefacción.
(Excepto modelo de refrigeración)
8. Botón “Timer Cancel” (Cancelación del
Temporizador)
Se utiliza para cancelar el temporizador.
9. Botón “Timer Set” (Ajuste del Temporizador)
Se utiliza para ajustar el temporizador cuando se
obtiene la hora deseada.
10. Botón “Week” (Semana)
Se utiliza par ajustar el día de la semana.
11. Botón “Weekly Timer” (Temporizador Semanal)
Se utiliza para ajustar el temporizador semanal.
12. Botón “Holiday” (Festivo)
Se utiliza para ajustar un día festivo de la semana.
13. Botón “Time Set” (Ajuste de la Hora)
Se utiliza para ajustar la hora del día y para cambiar
la hora en la función de temporizador semanal.
14. Botón “Set and Clear” (Ajuste y Borrado)
Se utiliza para ajustar y borrar el temporizador
semanal.
15. Botón “Room Temperature Checking”
(Comprobación de la Temperatura de la Habitación)
Se utiliza para comprobar la temperatura de la habitación.
16.
Botón Plasma Air Clean (opcional)
17. Botón “Reset” (Reajuste)
Se utiliza para ajustar la hora actual y borrar la
configuración de la hora.
❈
La temperatura del display puede ser diferente de la temperatura real de la habitación si el
control remoto se ha instalado expuesto a la luz solar directa o junto a una fuente de calor.
Instrucciones de utilización