481369
9
Zoom out
Zoom in
Previous page
1/21
Next page
NEDERLANDS
Gebruikershandleiding 9
Gebruiksinstructies
Koelgebruik
Autogebruik of Auto Wissel
Gezonde Ontvochtiging Gebruik
Kanteldeur
(geopend)
Verwarmingsgebruik
Signaaluitzender
Koelmodel ( ),
Hittepomp Model ( ) Gebruiksstand
Operation Mode
ON
OFF
CANCEL
AUTO CLEAN
SET
1
3
5
4
9
18
10
12
14
16
7
2
8
13
15
11
6
17
19
De controles zien er als volgt uit.
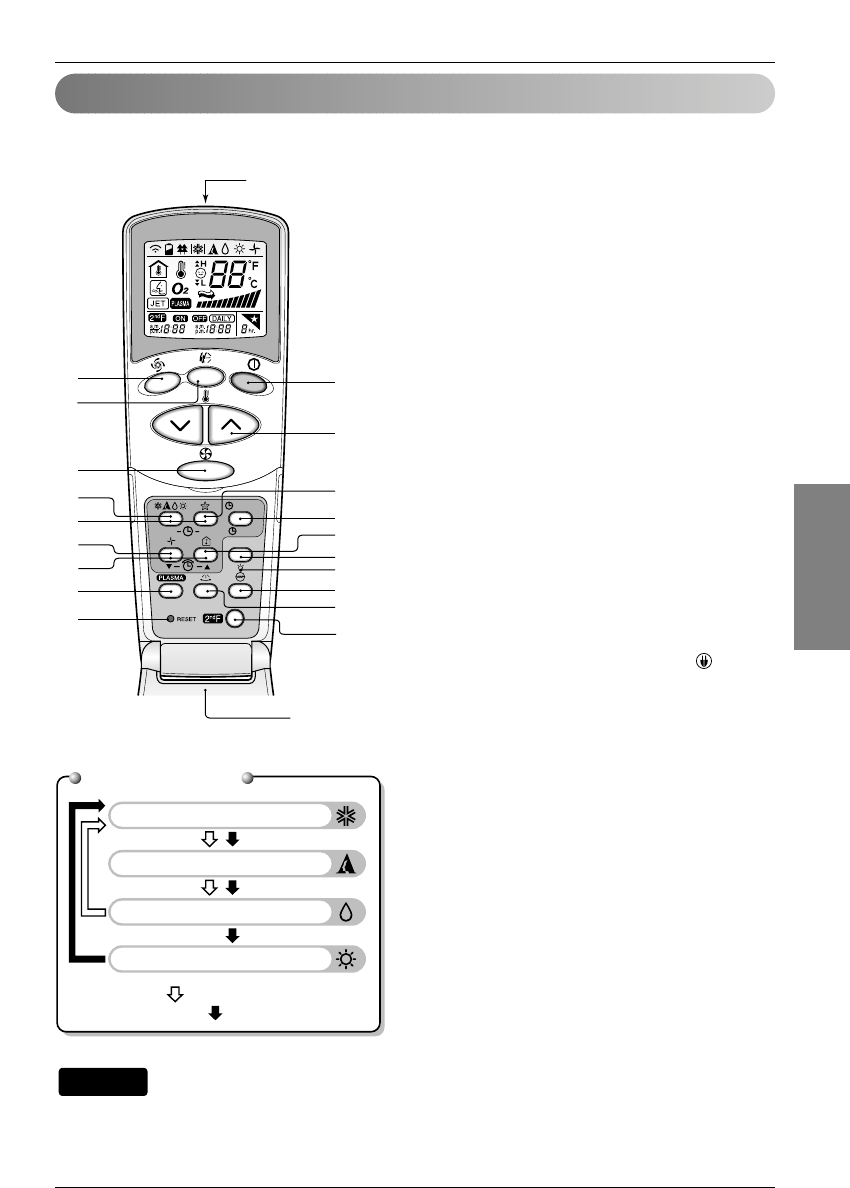
Draadloze Afstandsbediening
1. START/STOP KNOP
Schakelt het toestel IN/UIT.
2. GEBRUIKSMODUS KEUZEKNOP
Selecteert de gebruiksmodus
3. KAMER TEMPERATUUR INSTELLINGSKNOPPEN
Selecteert de kamertemperatuur
4. INDOOR VENTILATOR SNELHEID KEUZEKNOP
Selecteert de ventilatorsnelheid in vier stappen laag, medium,
hoog en CHAOS.
5. JET COOL KNOP
Start of stopt het snelle koelen, verwarmen. (de ventilator is op
hoge snelheid werkzaam in de koelstand, verwarmenmodus.)
6. CHAOS SWING KNOP
Stopt of start de beweging van de latten en stelt de gewenste
omhoog/omlaag richting van de luchtstroom in.
7. AAN/UIT TIMERKNOPPEN
Stelt de start- en stoptijd van gebruik in.
8. TIJDINSTELLING KNOPPEN
Past de tijd aan.
9. TIMER INSTELLEN/ANNULEREN KNOP
Stelt in en annuleert timergebruik
10. SLAAP STAND AUTO KNOP
Stelt de slaapstand in bij autogebruik.
11. LUCHTCIRCULATIE KNOP
Circuleert de lucht in de kamer zonder koelen of verwarmen.
ENERGIE BESPAREND KOELMODUS KNOP
(OPTIONEEL) voor inverter type modellen.
12. KAMERTEMPERATUUR CONTROLEREN KNOP
Controleer de kamertemperatuur.
13. PLASME KNOP (OPTIONEEL)
Start of stopt de plasmazuiveringsfunctie.
14. HORIZONTALE LUCHTSTROOM RICHTING CONTROLE
Stel het gewenste richting van de horizontale luchtstroom in.
15. RESET KNOP
Gebruik voor resettijd instellen.
16. 2
de
F KNOP
Gebruik bij modussen met blauw print onder de knoppen.
17. AUTO REINIG KNOP (OPTIONEEL)
Stelt de autoreinig modus in. Bij sommige modellen heeft de
knop een 2
de
functie om de helderheid van het LED te
controleren.
18. VERWARMER KNOP (OPTIONEEL)
(niet beschikbaar bij alle modellen)
19. LCD HELDERHEID KNOP (OPTIONEEL)
Pas de helderheid van het LCD aan.
Om de functies die blauw geprint zijn onder de knoppen, te gebruiken, drukt u eerst op de 2
de
F knop en dan op de
gewenste functieknop. Door op de 2
de
F knop te drukken wordt de blauwe print functie van de knoppen geactiveerd. Om
de functie te annuleren drukt u een nog een keer op de 2
de
F knop, of wacht u gewoon 10 seconden, waarna de functie
wordt opgeheven.
( )
9


Need help? Post your question in this forum.

Forumrules


Report abuse

Libble takes abuse of its services very seriously. We're committed to dealing with such abuse according to the laws in your country of residence. When you submit a report, we'll investigate it and take the appropriate action. We'll get back to you only if we require additional details or have more information to share.

Product:

For example, Anti-Semitic content, racist content, or material that could result in a violent physical act.

For example, a credit card number, a personal identification number, or an unlisted home address. Note that email addresses and full names are not considered private information.

Forumrules

To achieve meaningful questions, we apply the following rules:

Register

Register getting emails for LG A09AW1 at:


You will receive an email to register for one or both of the options.


Get your user manual by e-mail

Enter your email address to receive the manual of LG A09AW1 in the language / languages: Dutch as an attachment in your email.

The manual is 1,11 mb in size.


You will receive the manual in your email within minutes. If you have not received an email, then probably have entered the wrong email address or your mailbox is too full. In addition, it may be that your ISP may have a maximum size for emails to receive.

Others manual(s) of LG A09AW1

LG A09AW1 User Manual - English - 23 pages

LG A09AW1 User Manual - German - 23 pages


The manual is sent by email. Check your email

If you have not received an email with the manual within fifteen minutes, it may be that you have a entered a wrong email address or that your ISP has set a maximum size to receive email that is smaller than the size of the manual.

The email address you have provided is not correct.

Please check the email address and correct it.

Your question is posted on this page

Would you like to receive an email when new answers and questions are posted? Please enter your email address.


Info