WARNING:
If you don’t want to make ice cream or before assembling the ice cream maker make sure the ON/OFF switch
of the Dasher motor is in the OFF position and the electric power cord is unplugged.
IMPORTANT: Place the ice cream maker upright on a at surface for at least 12 hours before using it for the
time, to allow the oil contained in the compressor to set down.
1.The ice cream maker must be placed in upright position for whatever reason. It must never be laid on its side
or turned upside down, and never be moved especially when in use. This is very important.
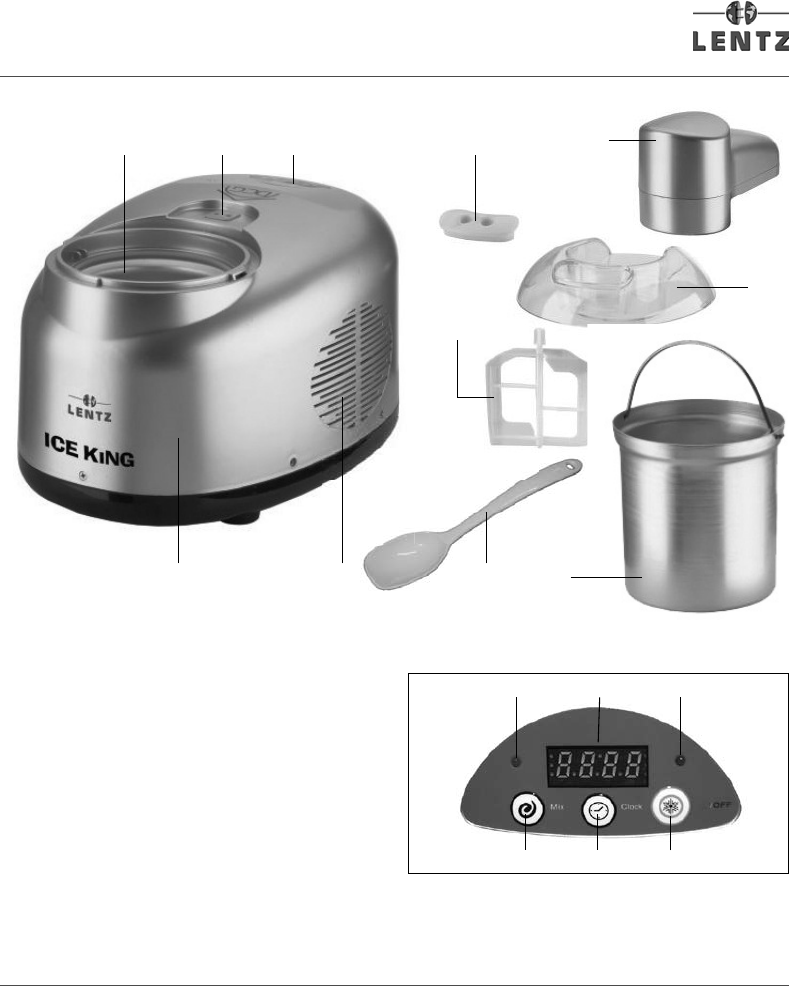
2.Before use, thoroughly wash all parts that will come into contact with the ice cream (including the xed
stainless steel cylinder, removable cylinder, dasher and transparent cover).
3.Pour a measure (2tbs) of surgical alcohol into the xed stainless steel cylinder and place the removable
cylinder inside the xed stainless steel cylinder .It is essential to perform this operation in order for the cold
be transmitted from the xed cylinder to the removable cylinder and thus guarantee the success of the ice
cream.
4.Install the dasher, transparent cover, and the dasher motor. Insert the dasher to dasher motor until the
dasher snap into position; otherwise the Ice cream maker will not give you the proper mixing action.
5.Removable cylinder should never be used in a conventional oven, microwave oven on top of the range of on
any other heated surface. If the removable cylinder is scratched of chipped, removable cylinder should not
be used to blend any liquids.
USING THE ELECTRONIC TIMER
The electric timer allows you to control the ON/OFF switch of the mixing motor power.
1.The protection will prolong 2~3minutes when start the chilling motor. After start the chilling motor, the indicator
light on the left will be bright and, the one on the right will be bright when put the plug in the socket.
2.The button on the left is the mixing power switch. Press the button after stalling the dasher then press the
switch on the mixing assembly, the mixing motor will start working. When the setting time nish, the buzzer
will work, it indicates that the process is nished and the power will be OFF automatically.
3.The power on the mixer there are three time option: 5 minutes, 15 minutes, 30 minutes. The power will be
OFF automatically and alarming after every process is nished. Then the indicating No. is 0 (tacitly approve
to 50minutes), the chilling motor will stop automatically after working for 70minutes.
Operating Instruction
1.Position the ice cream maker near an outlet on a at stable surface, allowing adequate space around it,
without obstructing the air circulation at the sides.
2.Check that the voltage indicated on the rating plate corresponds to the outlet’s voltage. Plug the power cord
into the outlet.
3.Turn on the chilling switch .The indicator light shows that the chilling system is started, the air circulating
through the air port of the machine.
4.Put 10g surgical alcohol in the xed stainless steel cylinder, then put the xed cylinder in the removable
cylinder. After 5 minutes put the ice cream in the removable cylinder and place the dasher in it, cover the
transparent cover, install the dasher motor (insert the hole correctly) , start the electric fan switch and put the
plug in the socket, then press the button ON start.
5.Chose different making time according to different season ,different temperature ,different ingredient and the
volume of the ice cream
P.S.: Chose 15minutes when the temperature is 1
o
C~3
o
C
Chose 30 minutes when the temperature is 13
o
C~30
o
C
Chose 40 minutes when the temperature is 27
o
C~35
o
C
1.The ingredient should be at refrigerator temperature best, never use hot ingredients.
2.Never ll the cylinder more than half full. During the last minutes of the preparation, the ice cream expands
in volume until it lls the cylinder.
3.During preparation, you can add chocolate chips, raisins, sesame, almond powder and other ingredients
through the opening in the cover. Alcoholic beverages should not be added until the end of preparation,
otherwise they will delay the chilling.
4.When the ice cream has reached a good consistency, the dasher rotation reverses direction, indicating that