BEKNOPTE HANDLEIDING
Belangrijk
• Voorafgaand aan de inbedri
'VEILIGHEIDS- EN TOELA
gebruik van de camera moet u deze voorschriften steeds in acht nemen respectievelijk
naleven!
• Verdere details en informatie over de hier niet behandelde camerafuncties, maar ook de
garantievoorwaarden en de bijbehorende contactgegevens vindt u in de uitvoerige handlei-
ding, die als u als PDF kunt ophalen op:
http://sofort.leica-camera.com
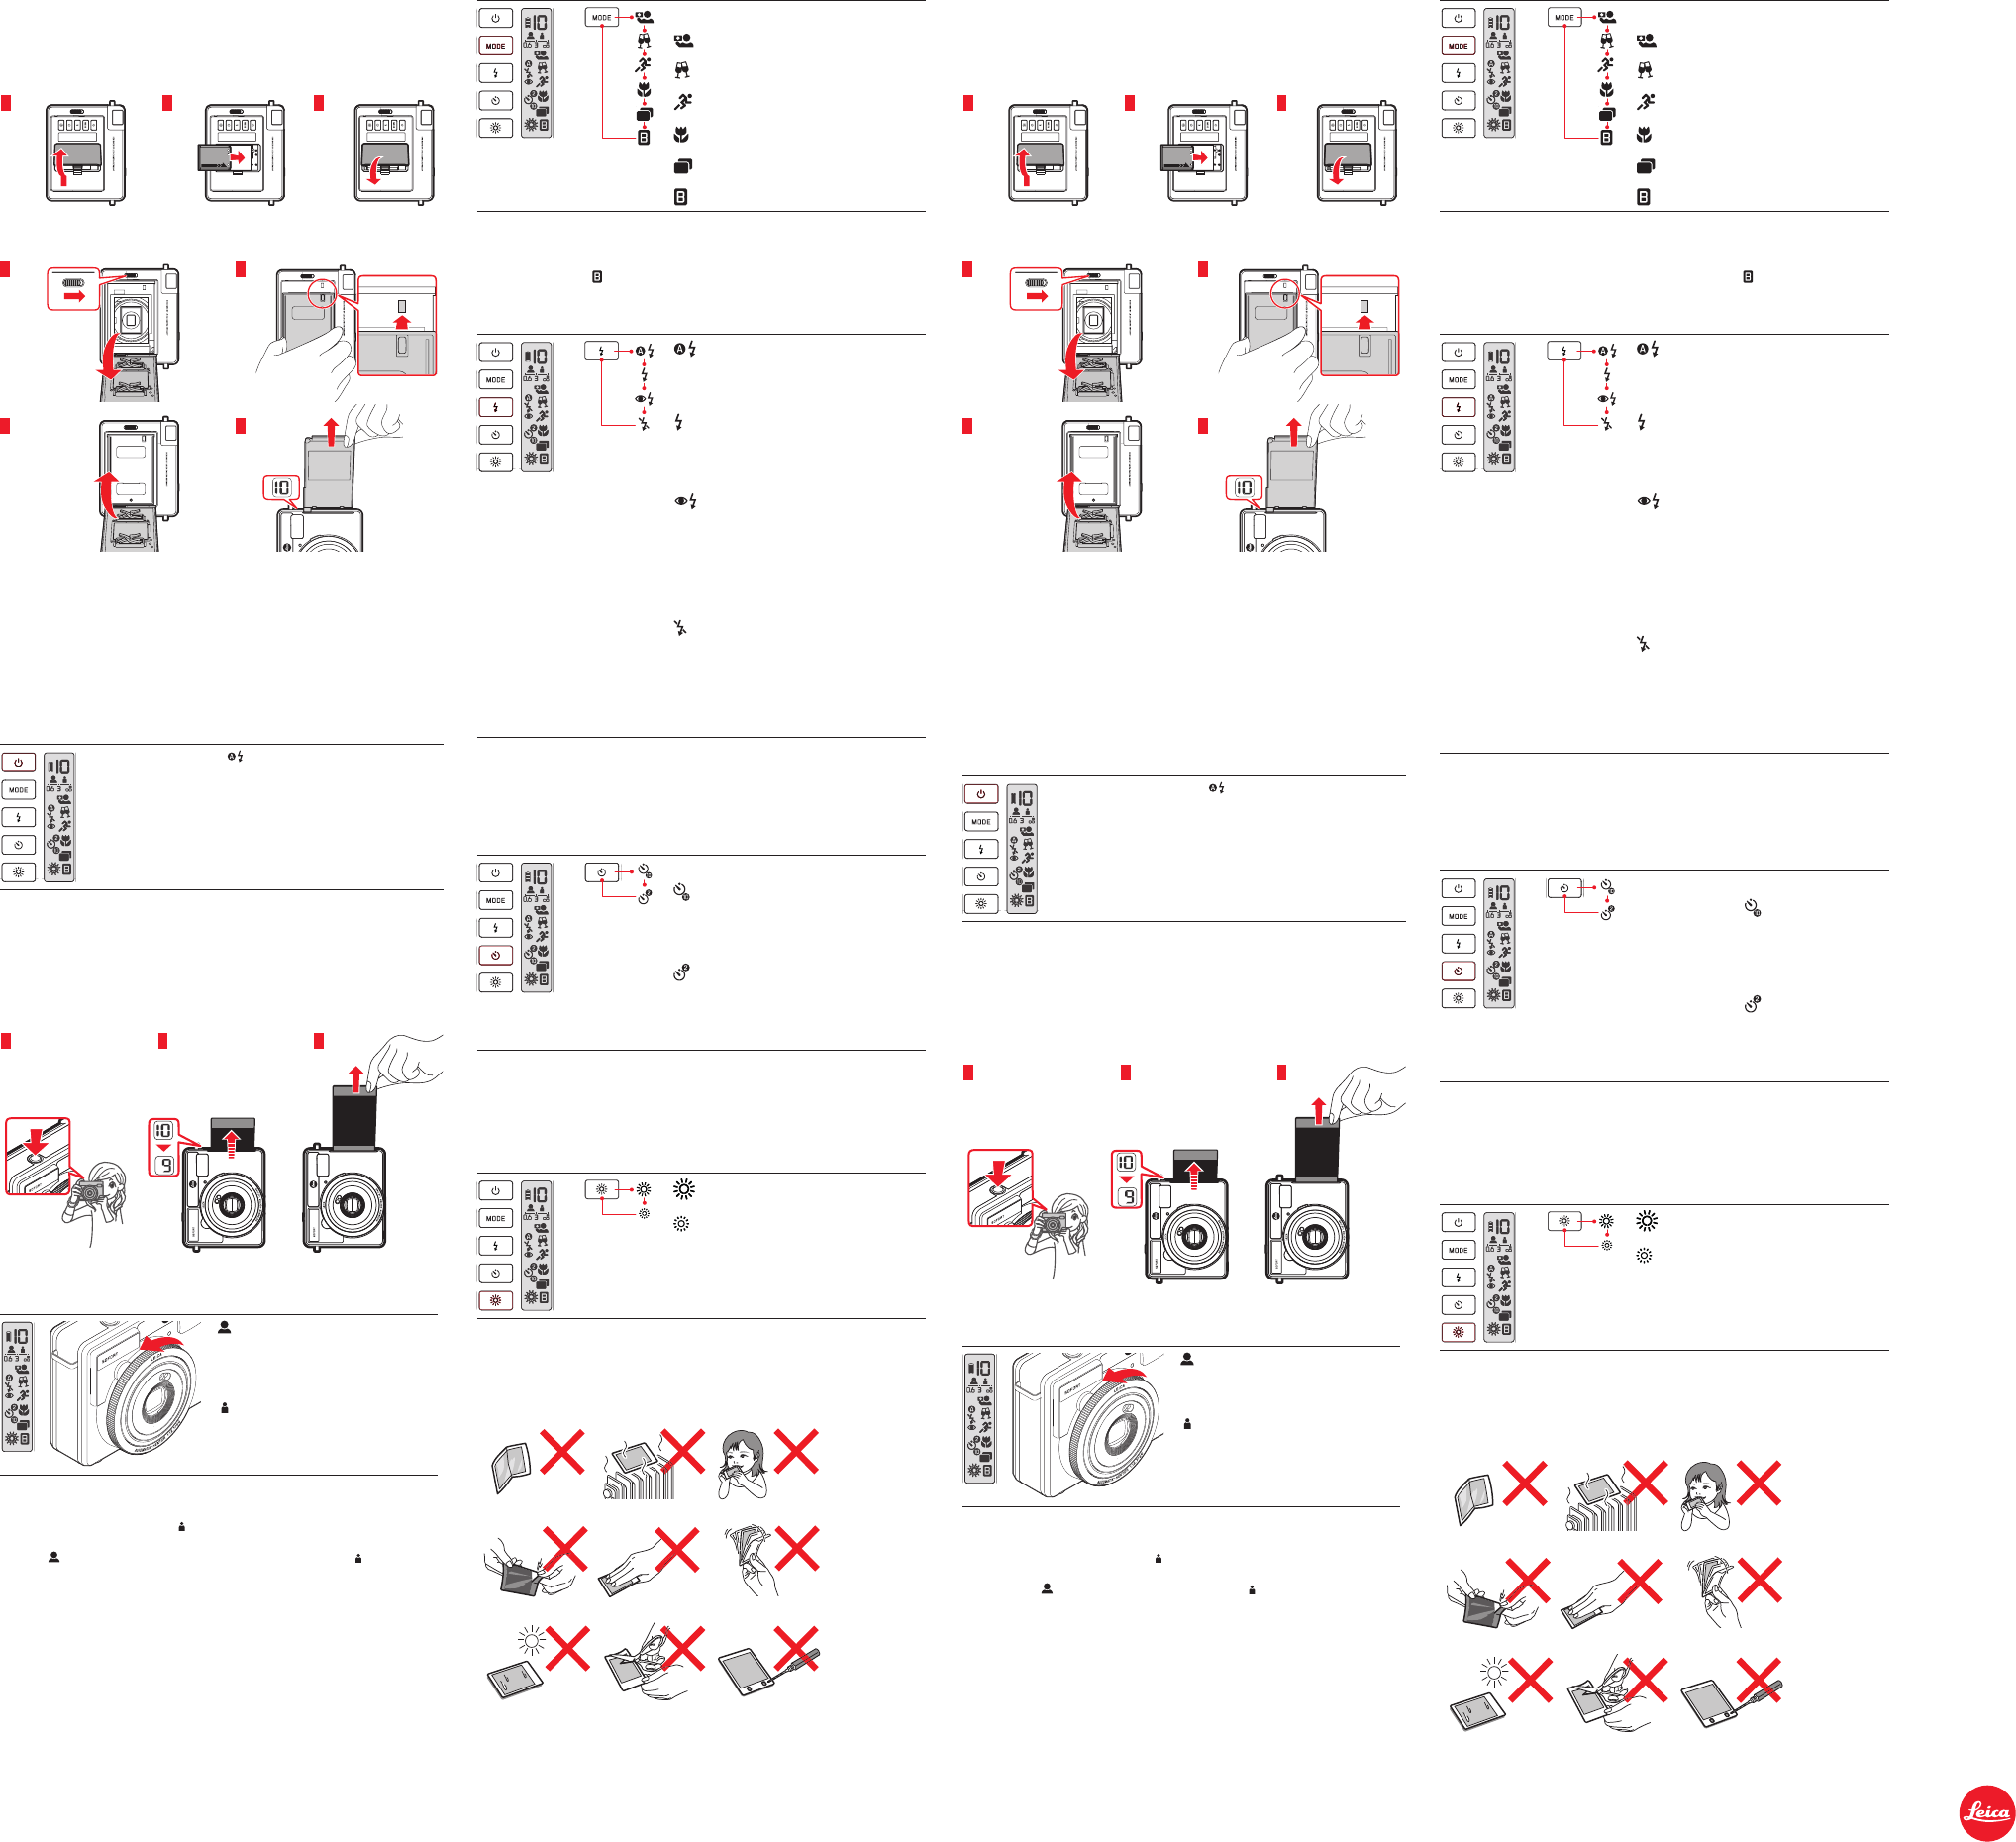
A. BA
1 2 3
B. FILMP
1
3
2
4
Aanwijzing
• Voor he
• Gebruik voor optimale resultaten de Leica directklaar-fi
• Het dekblad van het fi
pen. Wacht t
helemaal uit de camera neemt.
• Na het uitwerpen van het dekblad verschi10 in de teller (resterend aantal opnamen).
• Neem de voorzorgsmaatregelen uit deel E in acht.
C. FOTOGRAFEREN
Inschakelen
Bij het inschak in het weergavev
fl
Zolang fl
Aanwijzing
• Schak
te verminderen.
• De camera schakelt st
zeggen: als ondertussen geen bediening plaatsvindt.
De opname maken / afbeelding eruit nemen
1 2 3
Afstandsinstelling
Dichtbij-bereik 0,6-3m
Bijvoorbeeld voor selfi
portretfoto´s en opnamen van kleinere
groepen
V
Bijvoorbeeld voor ligg
Aanwijzing
• De instelring is geveerd; dat wil zegg
• Als de camera wordt ingesteld op
, schak
• Bij het inschak
dan is
ingeschak had ingesteld.
D. SELECTEERBARE BEDRIJFSMODI EN FUNCTIES
Motiefprogramma´s en speciale functies
In de fabrieksinstelling (g
omgevingslicht passend bi
enk
realiseren, kunt u kiezen uit zes speciaal daarop afgestemde programma's:
Fabrieksinstelling
Selfi(0,3 - 0,6m)
Feest (0,6 - 3m)
Sport (0,6 - 3m)
Macro (0,3 - 0,6m)
Dubbele belichting (0,6 - 3m)
Lange-tijdopname (3m - ∞)
Aanwijzing:
•
de fl
fabrieksinstelling (bi
is het fl
Flitsmodi
Fabrieksinstelling
Flitsmodus wordt in afhankelijkheid van het omgeving-
slicht automatisch geregeld.
Flitsen bij iedere opname
Bijvoorbeeld, om het hoofdmo
als het duidelijk donk
beeldveld.
V
Bijvoorbeeld, om het rode-og
Direct vóór een opname met fl
voorfl
Aanwijzing:
Houd de camera rustig, tot de opname plaatsvindt.
Flits uit
Bijvoorbeeld, als fl
om de lichtsfeer in een donk
trouwer weer te ge
Aanwijzing:
Houd de camera gedurende de opname rustig.
Aanwijzing:
•
verafbereik wordt ingeschak
camera wordt uitgeschak
Zelfontspanner
Fabrieksinstelling
-wachttijd:
Bijvoorbeeld, om ook in de afbeelding t
ontspanner indrukken zelfontspanner
circa 7s, en knippert ver opname
-wachttijd:
Bijvoorbeeld, om vervaging door het indrukk
ontspanner te vermijden
Ontspanner indrukken zelfontspanner
knippert circa 2s opname
Aanwijzing
•
in te drukk
•
Beeldhelderheid aanpassen
Voor iets lichter
Voor iets donk
Aanwijzing:
•
motiefprogramma wordt ingeschak
E. VOORZORGSMAA
GUIDA RAPID
Avv
• Prima di mettere in funzione la fot
"A
mento sicuro della fot
istruzioni.
• Per informazioni più dettagliate sulle funzioni della fotocamera non trattate in questo
documento e sulle condizioni di garanzia e i dati di contatto locali, consultare il manuale
completo, disponibile per il download in formato PDF all'indirizzo
http://sofort.leica-camera.com
A. INSERIMENTO DELLA BATTERIA
1 2 3
B. INSERIMENTO DEL P
1
3
2
4
Avv
• Quando si inserisce il pacco pellicola, assicurarsi che la batteria all'interno della fotocamera
sia carica.
• Per risultati ottimali, si consiglia di utilizzare la pellicola istantanea Leica.
• Il foglio di copertura del pacco pellicola viene espulso automaticamente dopo aver chiuso il
dorso. Attendere che l'espulsione automatica sia comple
copertur
• Dopo l'espulsione del foglio di copertura, nel contatore apparir10 (il numero delle pose
rimanenti).
• Fare riferimento anche alle precauzioni nel paragrafo E.
C. SCA
Accensione
All'accensione appare sul display ; quindi, questa icona lampeggia per
qualche istante; infi
modo fi
Fino a quando non viene raggiunto lo stato di pronto del fl
scatto rimane bloccato.
Avv
• Quando la fotocamera rimane inutilizzata, spegnerla per evitare di consumare inutilmente
carica della batteria.
• La fotocamera si spegne aut
durante questo periodo non viene eseguita alcuna operazione.
Scatto di una fotografi
1 2 3
Regolazione della messa a fuoco
Primo piano 0,6-3m
Ad esempio per "selfi
schermo e scatti di piccoli gruppi
Infi
Ad esempio per riprese di paesaggi
Avv
• La ghiera di regolazione è caricata a molla, ossia ritorna sempre nella sua posizione iniziale.
• Se la fotocamera viene impostata su
, si attiva il fl
• Quando si accende la fotocamera, le impostazioni attive sono sempre quelle di fabbrica. Ciò
signifi
è attivato anche se era stato impostat pr
mera.
D. MODALIT
Programmi personalizzati e funzioni speciali
Con le impostazioni di fabbrica (nessun indicatore) esposizione e attivazione del fl
controllate automaticament
soggetti e delle situazioni. Per alcuni tipi di sogg
determinati eff
Impostazione di fabbrica
Selfy (0,3 - 0,6m)
Festa (0,6 - 3m)
Sport (0,6 - 3m)
Macro (0,3 - 0,6m)
Doppia esposizione (0,6 - 3m)
Esposizione lunga (3m - ∞)
Nota:
•
distanza (cfr
sotto) vengono reimpostati sull'impostazione di fabbrica (con
il fl
Modalità fl
Impostazione di fabbrica
La modalità fl
in funzione della luce ambiente.
Flash a ogni scatto
Ad esempio, per illuminare il soggett
quando è nitidamente più scuro del resto del campo
immagine.
Prelampo
Ad esempio, per ridurre l'eff
tamente prima di uno scatto con fl
emessi tre prelampi di intensità minore.
Nota:
T
scattata la ripresa.
Flash OFF
Ad esempio in un museo, quando l'uso del fl
vietato, o per rendere in modo più realistico l'atmo-
sfera in un ambiente piuttost
Nota:
T
Nota:
•
modalità, b. viene attivato l'infi
d. viene spenta la fotocamera.
Autoscatto
Impostazione di fabbrica
T
:
Ad esempio, quando anche il fot
apparire nella foto, premere il pulsante di scatt Il
LED dell’autoscatto si accende per circa 7s, quindi
lampeggia per circa 3s Scatto
T
:
Ad esempio, per evitare il "mosso" quando si preme il
pulsante di scatto
Premere il pulsante di scatto Il LED dell'aut
lampeggia per circa 2s Scatto
Avv
•
pulsante di autoscatt
•
Regolazione della luminosità
Per foto un po' più chiare
Per foto un po' più scure
Nota:
•
attivato un altro programma personalizzato o c. la fot
E. PRECA
CPL30B101-100 93 723-I VII/ F
Leica Camera AG
I
Am Leitz-Park 5
I
35578 WETZLAR
I
DEUTSCHLAND
T
I
T +49 (0) 6441-2080-333
I
www.leica-camera.com