PAGE 4
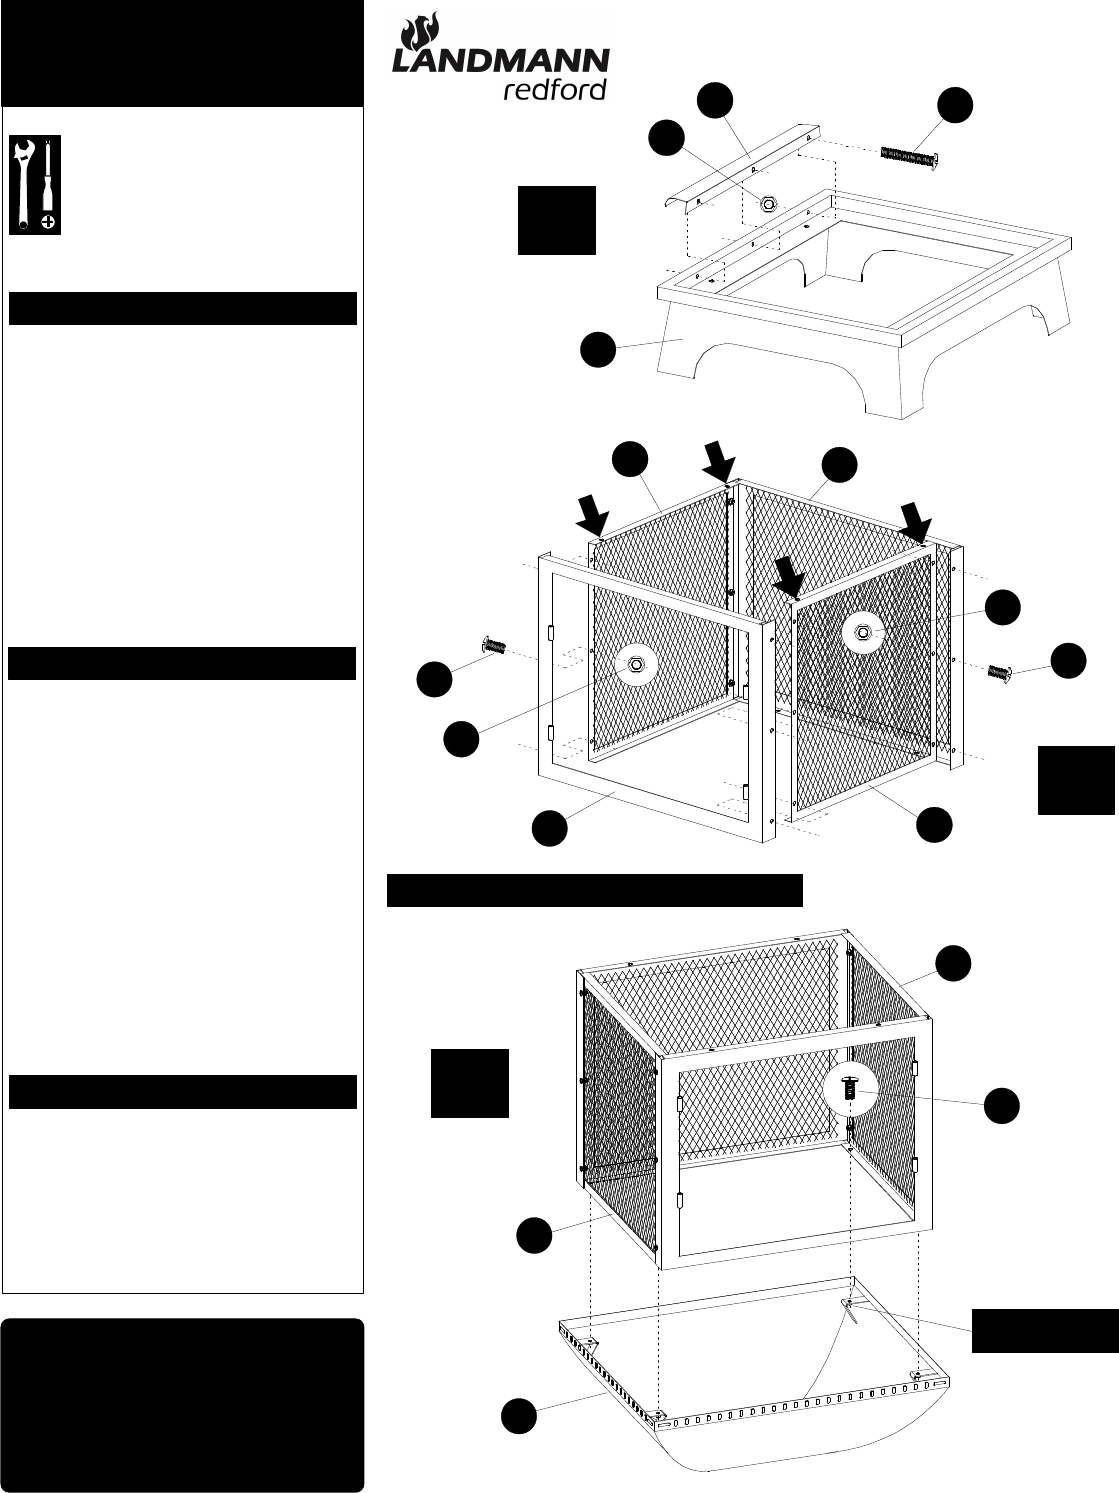
STEP 2: ASSEMBLE THE SPARK SCREEN
Assemble the [ 2 ] spark screen connectors
[ F ] to the back screen panel [ D ] and door
frame [ E ] using (12) 12MM bolts [ Q ] and
(12) flange hexnuts [ S ]. Assemble all parts
before tightening bolts securely.
Fije los [ 2 ] conectores de la pantalla chispero [ F ]
al panel de la pantalla trasera [ D ] y al marco de
la puerta [ E ] con (12) pernos de 12MM [ Q ] y
(12) tuercas de brida hexagonales [ S ]. Fije con
firmeza todas las partes antes de apretar los
tornillos.
Assembly time: 30 minutes
El tiempo de la asamblea: 30 minutos
A Phillips or plain screwdriver and an
adjustable wrench are needed for assembly.
Se necesita un destornillador Phillips o plano y una llave
ajustable para el armado.
PASO 2: ARME LA PANTALLA CHISPERO
STEP 1: ASSEMBLE DOOR ACCENT PANEL
Assemble the door accent panel [ J ] to the
base [ B ] using (3) 35MM bolts [ R ] and (3)
flange hexnuts [ S ]. Tighten bolts securely.
Fije el panel de la puerta con detalles [ J ] a la
base [ B ] con (3) pernos de 35MM [ R ] y (3)
tuercas de brida hexagonales [ S ]. Apriete los
pernos con firmeza.
PASO 1: ARME EL PANEL DE LA PUERTA CON DETALLES
STEP 3: ASSEMBLE SPARK SCREEN TO TOP
Place spark screen onto the top [ A ] and
assemble using (4) 12MM bolts [ Q ]. Tighten
bolts securely.
Coloque la pantalla chispero sobre la parte
superior [ A ] y fíjela con (4) pernos de 12MM
[ Q ]. Apriete los pernos con firmeza.
PASO 3: ARME LA PANTALLA CHISPERO PARTE SUPERIOR
DO NOT RETURN PRODUCT TO THE STORE.
IF YOU HAVE QUESTIONS OR HAVE
TROUBLE WITH ASSEMBLY, PLEASE CALL
1-800-321-3473 FOR ASSISTANCE.
NO DEVUELVA EL PRODUCTO A LA TIENDA. SI
TIENE PREGUNTAS O PROBLEMAS DURANTE EL
ARMADO, LLAME AL 1-800-321-3473 PARA
OBTENER AYUDA.
F
D
E
F
Q
S
S
Q
2
STEP
FIREPLACE ASSEMBLY
INSTRUCTIONS
INSTRUCCIONES PARA
ARMAR LA CHIMENEA
NOTE ORIENTATION OF SCREENS FOR STEPS 2 AND 3
NOTA ORIENTACION DE LA PANTALLA PARA PASOS 2 Y 3
3
STEP
A
WELDED HEXNUT
SOLDADO TUERCA
HEXAGONAL
F
F
Q
B
J
R
S
1
STEP