IMPORTANT SAFETY INSTRUCTIONS
1. READ these instructions.
2. KEEP these instructions.
3. HEED all warnings.
4. FOLLOW all instructions.
5. DO NOT use this apparatus near water.
6. CLEAN ONLY with dry cloth.
7. DO NOT block any ventilation openings. Install in accordance with the manufacturer's instructions.
8. DO NOT install near any heat sources such as radiators, heat registers, stoves, or other
apparatus (including amplifiers) that produce heat.
9. DO NOT defeat the safety purpose of the polarized or grounding type plug. A polarized plug has two
blades with one wider than the other. A grounding type plug has two blades and a third grounding
prong. The wider blade or the third prong are provided for your safety. If the provided plug does not fit
into your outlet, consult an electrician for replacement of the obsolete outlet.
10. PROTECT the power cord from being walked on or pinched, particularly at plugs, convenience
receptacles, and the point where they exit from the apparatus.
11. ONLY USE attachments/accessories specified by the manufacturer.
12. USE only with a cart, stand, tripod, bracket, or table specified by the manufacturer, or sold with the
apparatus. When a cart is used, use caution when moving the cart/apparatus combination to
avoid injury from tip-over.
13. UNPLUG this apparatus during lightning storms or when unused for long periods of time.
14. REFER all servicing to qualified service personnel. Servicing is required when the apparatus has
been damaged in any way, such as power-supply cord or plug is damaged, liquid has been spilled
or objects have fallen into the apparatus, the apparatus has been exposed to rain or moisture, does
not operate normally, or has been dropped.
This symbol indicates that dangerous voltage constituting a risk of electric shock is present
within this unit.
The Lightning Flash with arrowhead symbol within an equilateral triangle, is intended to alert
the user to the presence of uninsulated “dangerous voltage” within the product enclosure
that may be of sufficient magnitude to constitute a risk of shock to persons.
WARNING: To reduce the risk of fire or electrical shock, do not expose this apparatus
to rain or moisture. The product must not be exposed to dripping and splashing and no object filled with
liquids – such as a vase of flowers – should be placed on the product.
WARNING: Voltages in this equipment are hazardous to life. No user-serviceable parts inside. Refer all
servicing to qualified service personnel.
CAUTION: Changes or modifications not expressly approved by the manufacturer could void the users
authority to operate this device.
No naked flame sources – such as candles – should be placed on the product.
The ventilation should not be impeded by covering the ventilation openings with items, such as
newspapers, table-cloths, curtains, etc.
SERVICE: Equipment for servicing should be returned to the supplying dealer, or to the appointed service
agents in your area. For service within the United States:
Klipsch Customer Service:1-888-554-5665
If purchased outside the U.S., please contact your local dealer.
PACKING LIST
1 control satellite and 1 passive satellite
1 Owner's manual
1 Stereo mini-plug cable
1 22 gauge speaker wire/ RCA terminations
1 Power supply with AC cord and power cable attached
SPEAKER PLACEMENT
1. The two speakers should be positioned on each side of your computer monitor, with the control
satellite on the right.
2. Do not cover up the ventilation slots or rear acoustic port of the enclosure and be sure to
provide enough ventilation. It is normal for the area around the ventilation slots to be warm
to the touch.
3. Avoid running speaker or power cables across an area of foot traffic.
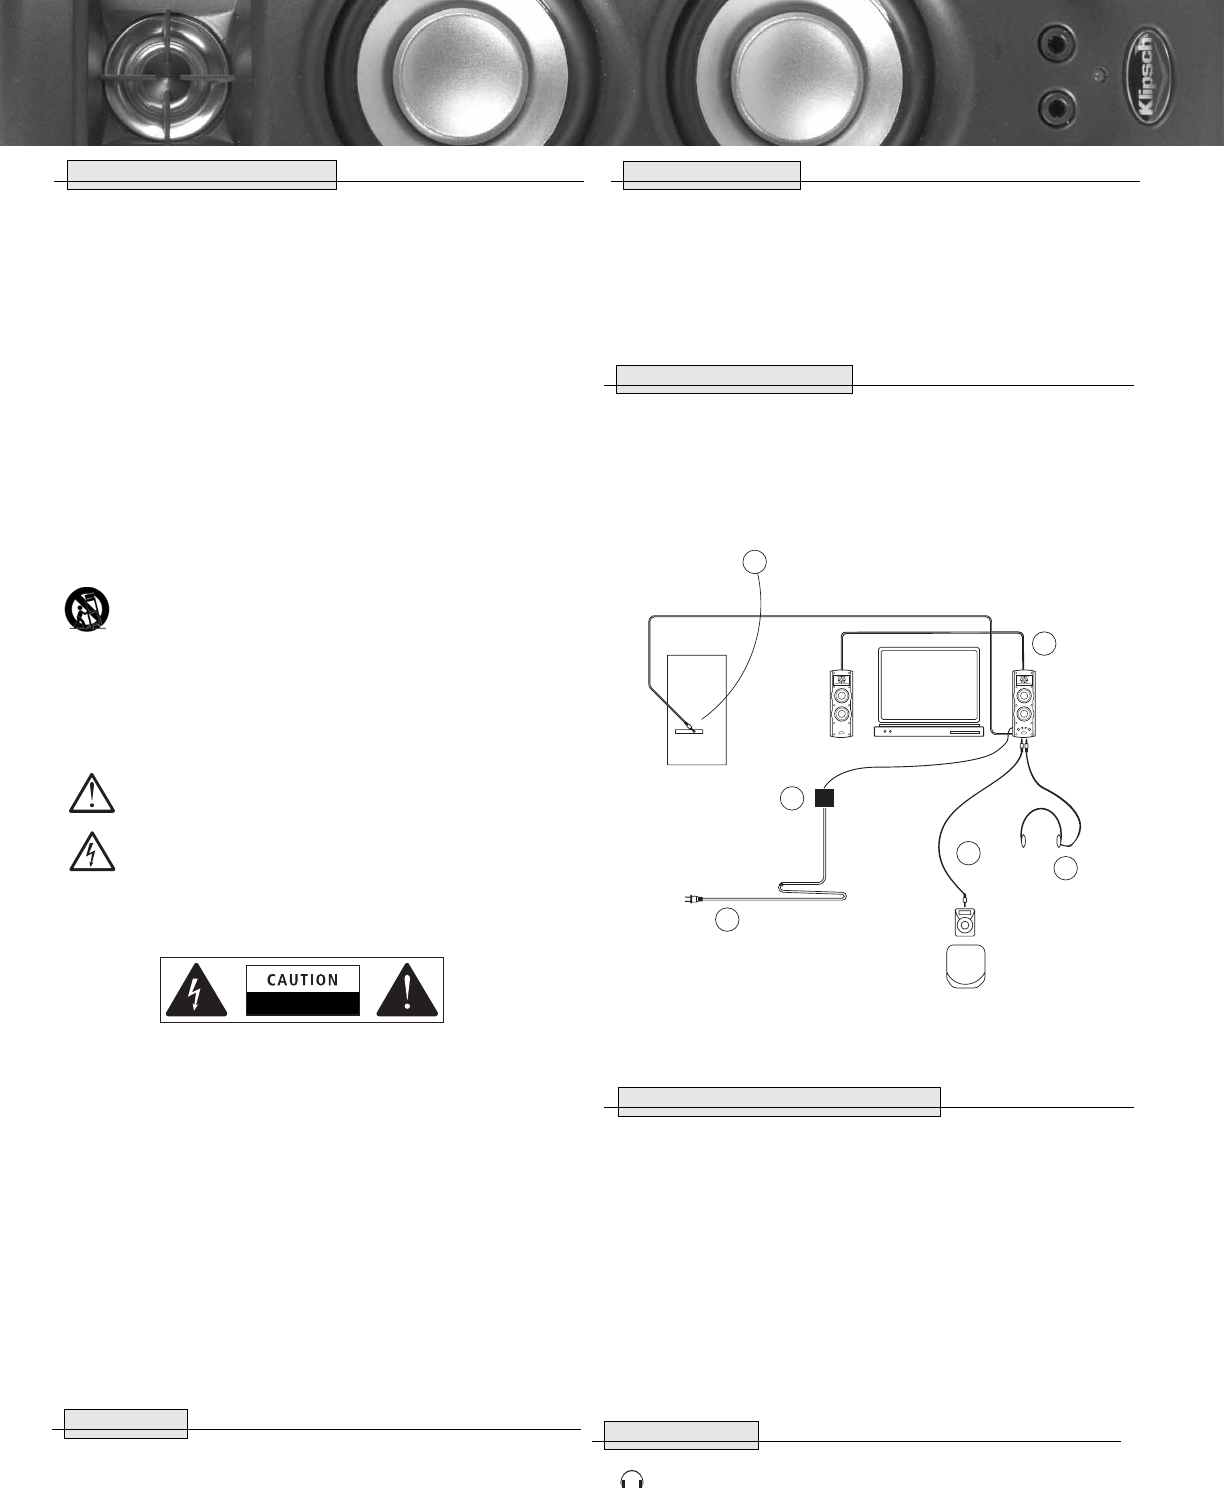
SPEAKER CONNECTION DIAGRAM
1. Do not plug in AC power until system setup is complete.
2. Connect mini plug cable from the control speaker to the primary audio source (computer,
iPod
®
, etc.).
3. Connect RCA speaker cable from control (active) speaker to the passive speaker.
Note: The active speaker plays right channel, and the passive speaker plays the left channel.
4. Connect DC power supply cable to the DC IN of the control speaker.
5. Plug headphone mini stereo plug into headphone jack, if desired.
Note: The speakers will not play while headphones are connected.
6. Plug stereo mini plug into MP3/Aux jack. Plug stereo mini plug into MP3 player (for example).
SOFTWARE AND HARDWARE GAIN CONTROLS
Software Volume Controls in Microsoft Windows
1. Click the Start button on your taskbar
2. Choose Accessories
3. Windows 95: Choose Multimedia
Windows 98/2000: Choose Entertainment
Windows XP: Choose Entertainment
4. Click on the Volume Control
5. Adjust the Wave Volume Elevator Button to halfway
Volume Control Programs
Some soundcard and/or PC manufacturers may have software that must be adjusted separately
from the Windows volume control. Consult applicable manual for specific hardware documentation.
CONTROL FEATURES
Headphones: The 1/8" stereo headphone output jack, located on the front of the master
speaker, turns off the two speakers.The main volume control will adjust the headphone output.
The bass control knob does not function in this mode.