167668
2
Zoom out
Zoom in
Previous page
1/10
Next page
Installation . . . as easy as 1, 2, 3
1. Mounting Choose a structurally sound location to mount your Kicker amplifier. The controls on the
top of the amplifier need to be accessible for adjustment. Make sure there are no items behind the area
where the screws will be driven. Choose a location that allows at least 4” (10cm) of open ventilation for
the amplifier. If possible, mount the amplifier in the climate-controlled passenger compartment. Drill four
holes using a 7/64” (3mm) bit and use the supplied #8 screws to mount the amplifier.
2. Wiring Disconnect the vehicle’s battery to avoid an electrical short. Then connect the ground wire
to the amplifier. Make the ground wire short, 24” (60cm) or less, and connect it to a paint-and
corrosion-free solid-metal area of the vehicle's chassis. Adding an additional ground wire between the
battery's negative post and the vehicle chassis of this same gauge (or larger) is recommended.
Use a twisted pair of RCA (low-level)
interconnect cable to feed the audio signal
to the amplifier. Only use speaker wire
(high-level) inputs if your source unit does
not have RCA type outputs. Either input
method will provide a low-level output
signal at the RCA output, which effectively
passes the audio signal to another
amplifier or component (P.A.S.T.). Keep
the RCA cable away from factory wiring
harnesses and other power wiring. If you
need to cross this wiring, cross it at a 90
degree angle.
Install a fuse within 18” (45cm) of the
battery and in-line with the power cable
connected to your amplifier. If you ever need to remove the amplifier from the vehicle after it has been
installed, the ground wire should be the last wire disconnected from the amplifier--just the opposite as
when you installed it. See the chart below for power and ground wire size, and fusing
recommendations.
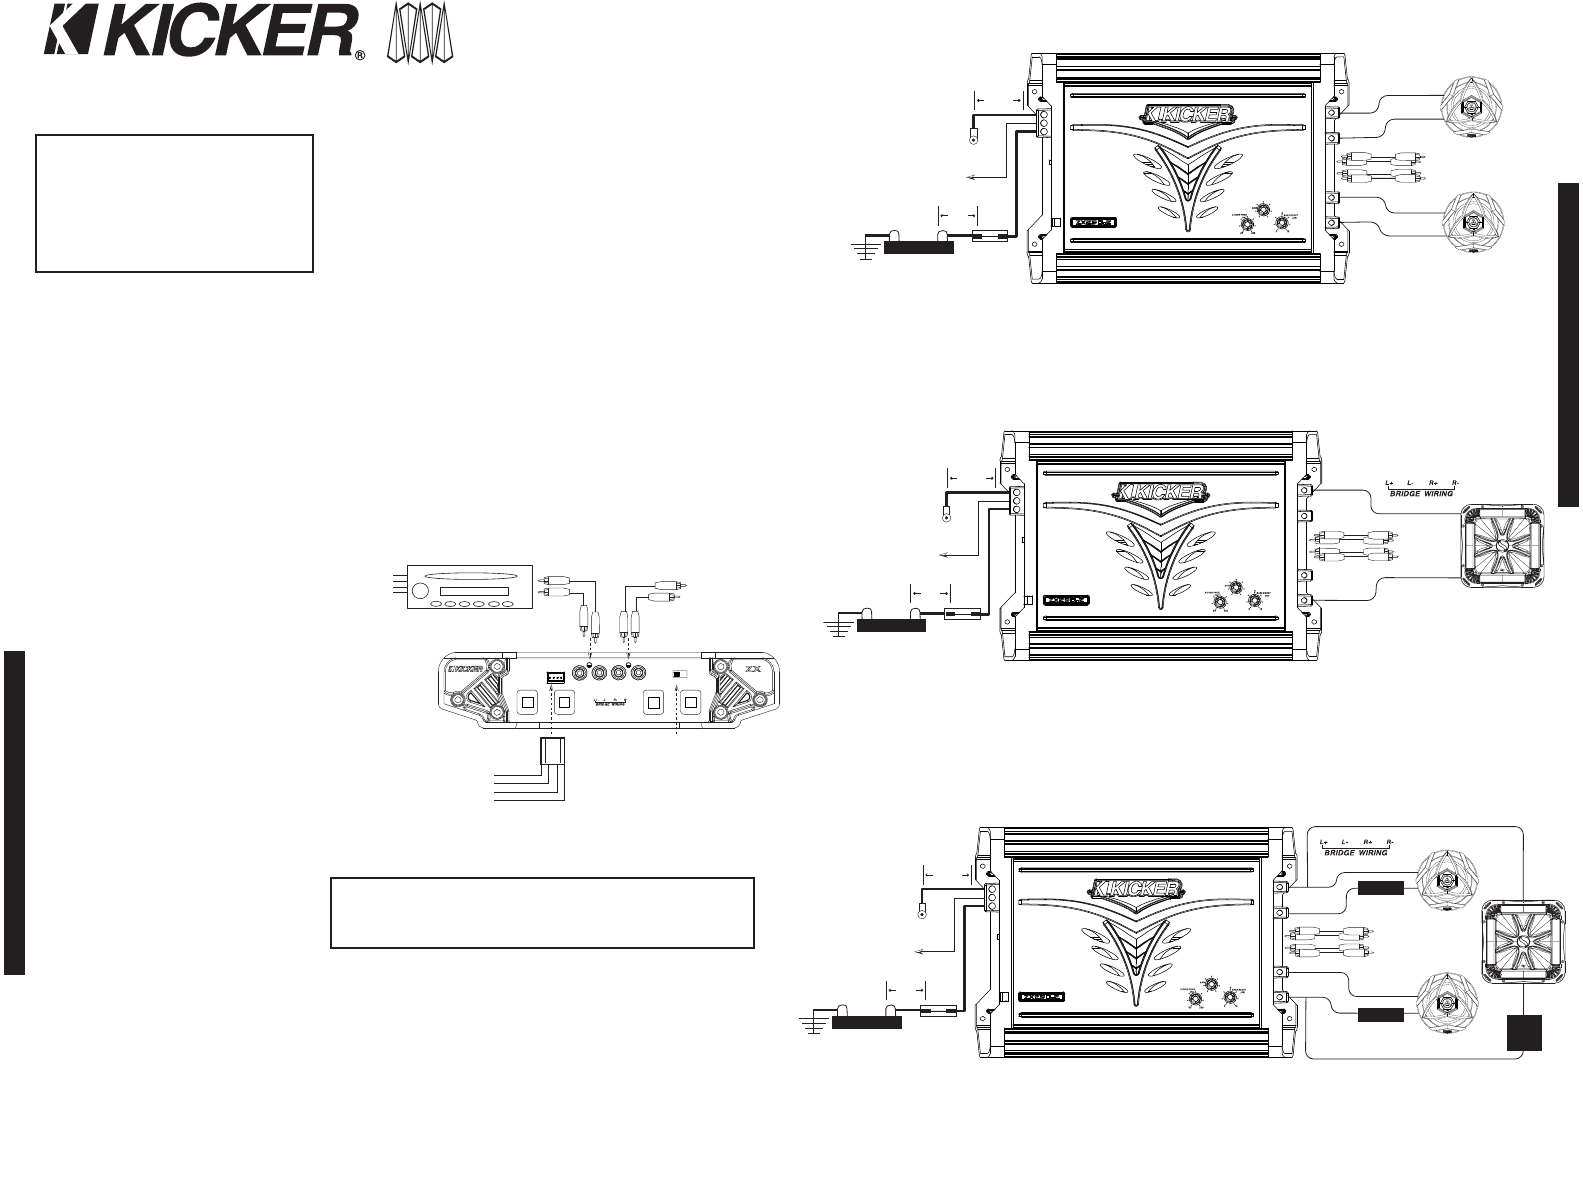
3. Configuration The following
diagrams show the most common
configurations for your Kicker ZX series amplifier.
Two Channel Operation (Stereo) These ZX amplifiers are capable of operating into a minimum
impedance of 2 ohms per channel in stereo operation. See Figure 2.
Bridged Operation (Mono) ZX.2 series amplifiers are capable of operating into a minimum
impedance of 4 ohms when in bridged operation. See Figure 3.
Stereo and Mono Operation Simultaneously (SAMS) The ZX.2 series amplifiers are capable of
operating into a minimum impedance of 4 ohms mono and 2 ohms per channel in stereo
simultaneously with the use of passive crossovers. See Figure 4.
INSTALLATION
ZX.2AMPLIFIER
ZX150.2 / ZX200.2 / ZX250.2
TwoChannelModels:
ZX.2SeriesAmplifier
Owner’sManual
Congratulations on your
KICKER purchase
Please record your purchase
information and keep your sales
receipt for validation of warranty.
Authorized Kicker Dealer:
Purchase Date:
Amplifier Model Number:
Amplifier Serial Number:
__________________________
__________________________
__________________________
__________________________
SOURCE UNIT
killers trk7“on Top”
INPUT
RL
L+ L- R+ R-
OUTPUT
RL
HI-LEVEL
INPUT
+ - - +
OFF HI LO
XOVER
ModelZX150.2 Fuse25A PowerGroundWire 8GA
ModelZX200.2 Fuse30A PowerGroundWire 8GA
ModelZX250.2 Fuse40A PowerGroundWire 8GA
24"
Or Less
(60cm)
Ground
+
_
+
_
R-
R+
L-
L+
Remote
Turn-On
Battery
+12V
Fuse
Right Speaker
Left Speaker
18"
Or Less
Signal Out (P.A.S.T.)
(45cm)
Signal In
Minimum impedance of 2 ohms per channel in stereo operation
Remote
Turn-On
Battery
+12V
Fuse
18"
Or Less
(45cm)
Minimum impedance of 4 ohms when in bridged operation
R-
R+
L-
L+
+
_
Mono
Speaker
Signal Out (P.A.S.T.)
Signal In
24"
Or Less
(60cm)
Ground
24"
Or Less
(60cm)
Ground
+
_
+
_
+
_
HIGH PASS
CROSSOVER
HIGH PASS
CROSSOVER
LOW
PAS S
CROSS-
OVER
Left Speaker
Right Speaker
Mono
Speaker
R-
R+
L-
L+
Remote
Turn-On
Battery
+12V
Fuse
18"
Or Less
(45cm)
Minimum impedance of 4 ohms mono and 2 ohms per channel in
stereo simultaneously with the use of passive crossovers
Signal Out (P.A.S.T.)
Signal In
2 3
Figure 1
Figure 2
Figure 3
Figure 4
Use only one type of signal input to the amplifier,
either RCA Cable or Speaker Wire
RCA Cable
(Low-Level)
Input
Speaker Wire
(High-Level
Output)
Speaker Wire
(High-Level Input)
Left +
Left -
Right -
Right +
CONFIGURATION
RCA Cable
(Low-Level)
Output
Crossover Switch
Signal Out
(P.A.S.T.)
Note: To get the best performance from your new Kicker Amplifier, we recommend using genuine Kicker Accessories and Wiring.
Note: All specifications and performance figures are subject to change. Please visit the www.kicker.com for the most current information.
2


Need help? Post your question in this forum.

Forumrules


Report abuse

Libble takes abuse of its services very seriously. We're committed to dealing with such abuse according to the laws in your country of residence. When you submit a report, we'll investigate it and take the appropriate action. We'll get back to you only if we require additional details or have more information to share.

Product:

For example, Anti-Semitic content, racist content, or material that could result in a violent physical act.

For example, a credit card number, a personal identification number, or an unlisted home address. Note that email addresses and full names are not considered private information.

Forumrules

To achieve meaningful questions, we apply the following rules:

Register

Register getting emails for Kicker zx 150 2 at:


You will receive an email to register for one or both of the options.


Get your user manual by e-mail

Enter your email address to receive the manual of Kicker zx 150 2 in the language / languages: English, German, French, Spanish as an attachment in your email.

The manual is 1,94 mb in size.


You will receive the manual in your email within minutes. If you have not received an email, then probably have entered the wrong email address or your mailbox is too full. In addition, it may be that your ISP may have a maximum size for emails to receive.

The manual is sent by email. Check your email

If you have not received an email with the manual within fifteen minutes, it may be that you have a entered a wrong email address or that your ISP has set a maximum size to receive email that is smaller than the size of the manual.

The email address you have provided is not correct.

Please check the email address and correct it.

Your question is posted on this page

Would you like to receive an email when new answers and questions are posted? Please enter your email address.


Info