UHF TRANSCEIVER
USER GUIDE
This User guide cov
your r
to the follo
https://manual.ken
SUPPLIED A
Carefully unpack the tr
in the follo
or havfi le a claim with the carrier immediately
Item Quantity
Battery charger/ AC adapter (KSC-35S) 1
Li-ion battery pack (KNB-45L) 1
Speaker/ microphone jack cap 1
Speaker/ microphone locking br 1
Belt clip (KBH-10) 1
Screw (M3 x 8 mm) 2
User guide 1
INST
1Align the battery pack with the back of the
transceiver
transceiver fi rmly together until the r
the base of the transceiver lock
2T
the base of the transceiver
latch underneath the safety catch.
3While pressing the release latch, pull the battery
pack aw
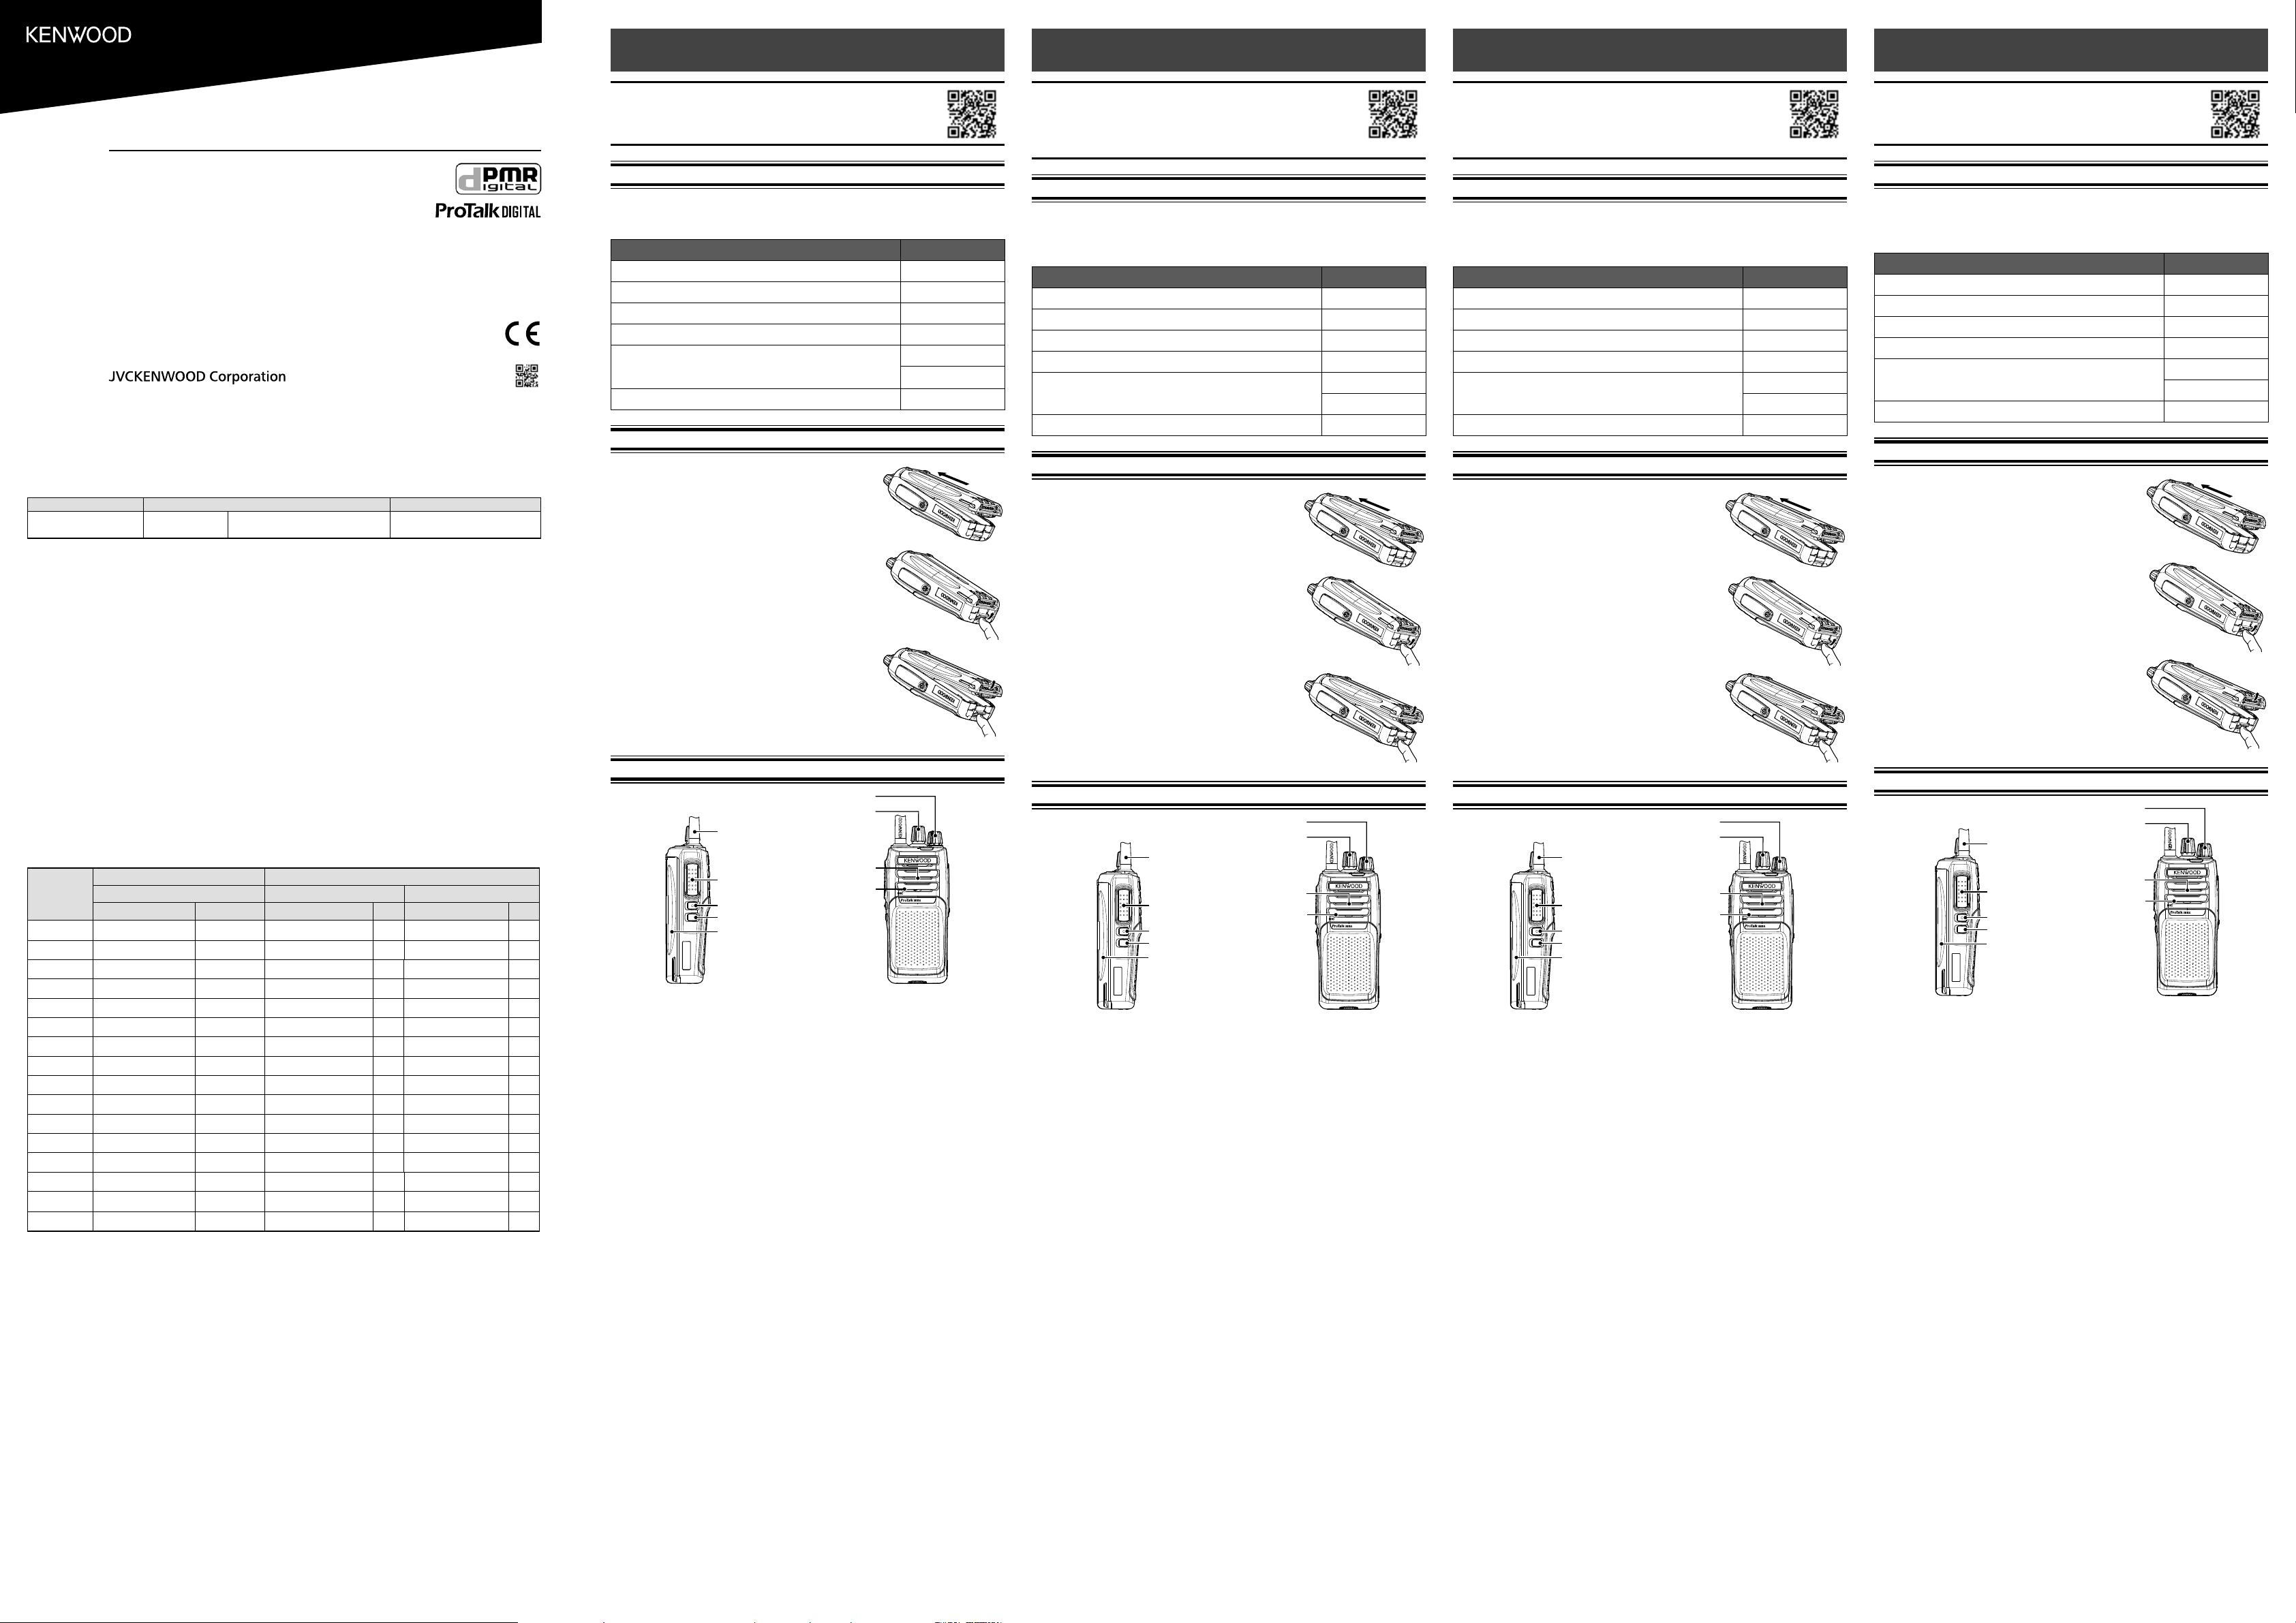
BASIC OPERA
Side 2 button
Antenna
(Not detachable)
Microphone
Speaker
Battery pack
P
Selector
Side 1 button
PTT switch
SWIT
TPo clockwise to switch the transceiv
TPo counterclockwise fully to switch the
transceiver OFF
ADJUSTING THE V
Rotate the P to adjust the volume.
increases the volume and counter
SELEC
Press and hold the Side 1 button for 1 second to change Z
Zone 3.
SELEC
Rotate the Selector to select y
MAKE A CALL
1 Select the desired zone and channel.
2 Press the button programmed as [Monitor] or [Squelch O ff ] (default setting:
Side 2 button) to check whether or not the channel is free.
• If the channel is busy
3 TPTT s and speak to the microphone.
• For best sound quality
inches) from y
4 Release PTT switch to receiv
• If Q
channel, you will hear a call only if the r
transceiver settings
ÉMETTEUR-RÉCEPTEUR UHF
GUIDE DE L
Cette Guide de l’utilisateur couvre uniquement les
opérations de base de votr
manuel d’instruction (User Manual) en détail, reportez-
vous à l’URL suiv
https://manual.ken
A
Déballez soigneusement l’émetteur-récepteurfi er la présence
des articles ci-dessous avant de v
S’il manque un des éléments ou si un élément est endommagé, remplissez
immédiatement un formulaire de plainte a
Article Quantité
Chargeur de batterie/ Adaptateur C 1
Bloc-piles au lithium-ion (KNB-45L) 1
Cache des prises du haut-parleur/ microphone 1
Support de verrouillage du haut-parleur/ microphone 1
Crochet de ceinture (KBH-10) 1
Vis (M3 x 8 mm) 2
Guide de l’utilisateur 1
POSE/ DÉPOSE DU BLOC PILES
1Alignez le bloc-piles av
récepteur
bloc-piles et l’émetteur-récepteur en même temps
jusqu’à ce que le loquet de blocage sur la base de
l’émetteur-récepteur soit verrouillé.
2P
sécurité sur la base de l’émetteur-récepteur
appuyez sur le loquet de blocage sous le cr
sécurité.
3Lorsque v
enlev
FONC
Bouton latérale 2
Antenne
(Non détachable)
Microphone
Haut-parleur
Bloc-piles
Commutateur d’alimentation/ Commande de volume
Sélecteur
Bouton latérale 1
Commutateur PTT
MISE SOUS/ HORS
Tcommutateur d’alimentation/ commande de volume dans le sens
horaire pour mettre l’émetteur-récepteur sous
Tcommutateur d’alimentation/ commande de volume dans le sens
anti-horaire pour mettre l’émetteur-récepteur hors tension.
RÉGLA
Tcommutateur d’alimentation/ commande de volume pour régler le
volume
diminue.
SÉLEC
Appuyez et maintenez enfbouton latéral 1 pendant 1 seconde pour
changer la zone 1, z
SÉLEC
Sélectionnez le canal souhaité à l’aide de Sélecteur .
P
1 Sélectionnez la zone et le canal v
2 Appuyez sur le bouton pr[Moniteur] ou [Silencieux
désactivé] (réglage par défaut:bouton latérale 2 ) pour savoir si le canal est
libre ou non.
• Si le canal est occupé, attendez qu’il se libère.
3 Pcommutateur PTT
et parlez au microphone.
• P
4 cm de votre bouche
4 Relâchez commutateur PTT pour recev
• Si Q
canal sélectionné, vous entendrez un appel uniquement si le signal r
correspond aux réglages de votr
B5A-3228-00 (E,T)
TRANSCEPT
GUÍA DEL USU
Este Guía del Usuario sólo cubre las operaciones
básicas de su radio
instrucciones de detalles de uso , consulte el siguiente
URL código QR.
https://manual.ken
A
Desembale el transceptor con cuidadofi car
los elementos que se indican a continuación antes de deshacerse del material de
embalaje.
inmediatamente una reclamación a la empresa de transporte.
Artículo Cantidad
Cargador de la batería/ Adaptador de C 1
Batería de iones de litio (KNB-45L) 1
T 1
Soporte del bloqueo del altavo 1
Gancho para cinturón (KBH-10) 1
T 2
Guía del usuario 1
INS
1Alinee la batería con la parte posterior del
transceptor
transceptor fuertemente hasta que la pestaña de
liberación situada en la parte inferior del transceptor
chasquee.
2P
situado en la base del transceptor y luego presione
la pestaña de liberación situada debajo de dicho
cierre.
3Mientras presiona la pestaña de liberación, separ
la batería del transceptor
OPERA
Botón lateral 2
Antena
(No desmontable)
Micrófono
Altav
Batería
Interruptor de encendido/ Control de volumen
Selector
Botón lateral 1
Conmutador de PTT
ENCENDIDO Y
Gire el interruptor de encendido/ control de v hacia la derecha para
encender el transceptor
Gire el interruptor de encendido/ control de v hacia la izquierda par
apagar el transceptor
AJUS
Gire el interruptor de encendido/ control de v para ajustar el volumen.
Hacia la derecha aumenta el nivel de v
SELECCIÓN UNA Z
Mantenga pulsado el botón lateral 1 durante 1 segundo para alternar entr
1, Zona 2 y Z
SELECCIONE UN C
Seleccione el canal deseado mediante el Selector .
REALICE UNA LLAMAD
1 Seleccione la zona y el canal deseados
2 Pulse el botón programado con la función [Monitor] o [Desactiv
silenciamiento] (valor prbotón lateral 2) para comprobar si el
canal está libre.
• Si el canal está ocupado
3 Pconmutador PTT y hable al
micrófono
• P
de la boca.
4 Suelte conmutador PTT para recibir
• Si se ha programado la función de Q
el canal seleccionado
coincida con la configuración del transceptor
RICETRASMETTIT
GUID
Questa guida per l'utente spiega soltanto i fondamenti
d’uso del ricetrasmettitore
dettagliato è scaricabile dall’indirizzo o codice QR.
https://manual.ken
A
Disimballare con cura il ricetrasmettitor
d’imballaggiofi care la pr
nell’elenco seguente.
immediatamente reclamo al corriere
Articolo Quantità
Carica batteria/ Adattatore c.a. 1
Pacco batteria al litio (KNB-45L) 1
Cappuccio jack altoparlante/ microf 1
Staff 1
Clip da cintura (KBH-10) 1
Vite (M3 x 8 mm) 2
Guida per l’utente 1
INST
1Allineare il pacco batteria con il retro del
ricetrasmettitore
il ricetrasmettitore insieme fi no a quando il f
sgancio alla base del ricetrasmettitore si blocca.
2P
di sicurezza alla base del ricetr
premere il f
sicurezza.
3Mentre si preme il f
sollev
FUNZIONAMENT
Pulsante laterale 2
Antenna
(non rimovibile)
Microfono
Altoparlante
P
Interruttore di accensione/ regolatore di v
Selettore
Pulsante laterale 1
Interruttore PTT
A
Ruotare l’interruttore di accensione/ r in senso or
accendere il ricetrasmettitore
Ruotare l’interruttore di accensione/ r in senso antior
per spegnere il ricetrasmettitore
REGOLAZIONE DEL
Ruotare l’interruttore di accensione/ r per eseguir
regolazione.
lo si abbassa.
SELEZIONE DI UNA ZONA
Premere e tenere prpulsante laterale 1 per 1 secondo per cambiare tra
Zona 1, Z
SELEZIONE DI UN CANALE
Selezionare il canale desiderato utilizzSelettore .
EFFETTU
1 Selezionare la zona e il canale desider
2 Premere il pulsante progr[Controllo] o [Squelch disattivato]
(impostazione predefi nita:pulsante laterale 2) per controllare se il canale è
libero o meno
• Se il canale è occupato
3 Pff ettuare una chiamata, tenere premuto l’interruttore PTT e parlare nel
microfono
• P
3 ~ 4 cm dalla bocca.
4 Rilasciare interruttore PTT per la ricezione.
• Se sul canale selezionato è stata programmato uno specifico tipo di
(Analogico) o ID (Digitale), la ricezione da parte di un altro corrispondente
potrà avv
formato utilizz
Model Frequency r Max.
TK-3701D-E
TK-3701D- TX/RX 446.003125 - 446.196875 MHz 0.5
This transceiv
(Analogue)/ ID (Digital) settings.
Cet émetteur-récepteur vous permet de reprogrammer chaque canal a
QT/DQT (Analogique)/ ID (Numérique) différents.
canaux par défaut.
Este transceptor le permite reprogramar cada uno de los canales con distintas frecuencias y ajustes de
QT/DQT (Analógico)/ ID (digital).
Il ricetrasmettitore consente di riprogrammare ogni canale confrequenze e impostazioni QT/DQT
(Analogica)/ ID (Digitale) differenti.
Dieser
(Analog)/ ID (Digital)-Einstellungen zu belegen.
Met deze zendontv
(Analoge)/ ID (Digitale) programmeren.
kanaal.
Bu telsiz her bir kanalı farklı frekanslar v
programlamanıza olanak sa lar a ıdaki tablo v
Αυτός ο πομποδέκτης σας επιτ να προγ εκ νέου κάθε έν από τα κανάλια με
διαφορετικές συ και ιαφορετικές ρυθμίσεις Qν)/ ID ( Ψηφιακή).Στ
παρακάτω π ίνακ παρατίθε οι προεπιλεγ ρυθμίσεις κ.
Este transcetor permite-lhe reprogrfi nições Q
(Analógico)/ ID (Digital) diferentesfi gurações padrão de canal.
Channel
Number
Analogue Digital
Zone 1 Zone 2 Zone 3
Frequency Q ID Frequency ID
1 446.006250 MHz 94.8 Hz 446.103125 MHz 1 446.003125 MHz 1
2 446.093750 MHz 88.5 Hz 446.109375 MHz 2 446.009375 MHz 2
3 446.031250 MHz 103.5 Hz 446.115625 MHz 3 446.015625 MHz 3
4 446.068750 MHz 79.7 Hz 446.121875 MHz 4 446.021875 MHz 4
5 446.043750 MHz 118.8 Hz 446.128125 MHz 5 446.028125 MHz 5
6 446.018750 MHz 123.0 Hz 446.134375 MHz 6 446.034375 MHz 6
7 446.081250 MHz 127.3 Hz 446.140625 MHz 7 446.040625 MHz 7
8 446.056250 MHz 85.4 Hz 446.146875 MHz 8 446.046875 MHz 8
9 446.006250 MHz 107.2 Hz 446.153125 MHz 9 446.053125 MHz 9
10 446.093750 MHz 110.9 Hz 446.159375 MHz 10 446.059375 MHz 10
11 446.031250 MHz 114.8 Hz 446.165625 MHz 11 446.065625 MHz 11
12 446.068750 MHz 82.5 Hz 446.171875 MHz 12 446.071875 MHz 12
13 446.043750 MHz D132N 446.178125 MHz 13 446.078125 MHz 13
14 446.018750 MHz D155N 446.184375 MHz 14 446.084375 MHz 14
15 446.056250 MHz D134N 446.190625 MHz 15 446.090625 MHz 15
16 446.081250 MHz D243N 446.196875 MHz 16 446.096875 MHz 16
USER GUIDE
GUIDE DE L'UTILISA
GUÍA DEL USU
GUID
BENUTZERHANDBUCH
GEBRUIKERSHANDLEIDING
KULLANICI REHBERI
Ο ΧΡΗΣ
GUIA DO UTILIZADOR
TK-3701D