UHF FM
USER GUIDE
This User guide cov
your r
to the follo
https://manual.ken
SUPPLIED A
Carefully unpack the tr
in the follo
or havfi le a claim with the carrier immediately
Item Quantity
Battery charger/ AC adapter (KSC-35S) 1
Li-ion battery pack (KNB-63L) 1
Cap1
Belt clip 1
User guide 1
Note:
◆The speaker/ microphone jac
securing the supplied cap.
by connecting an optional speak
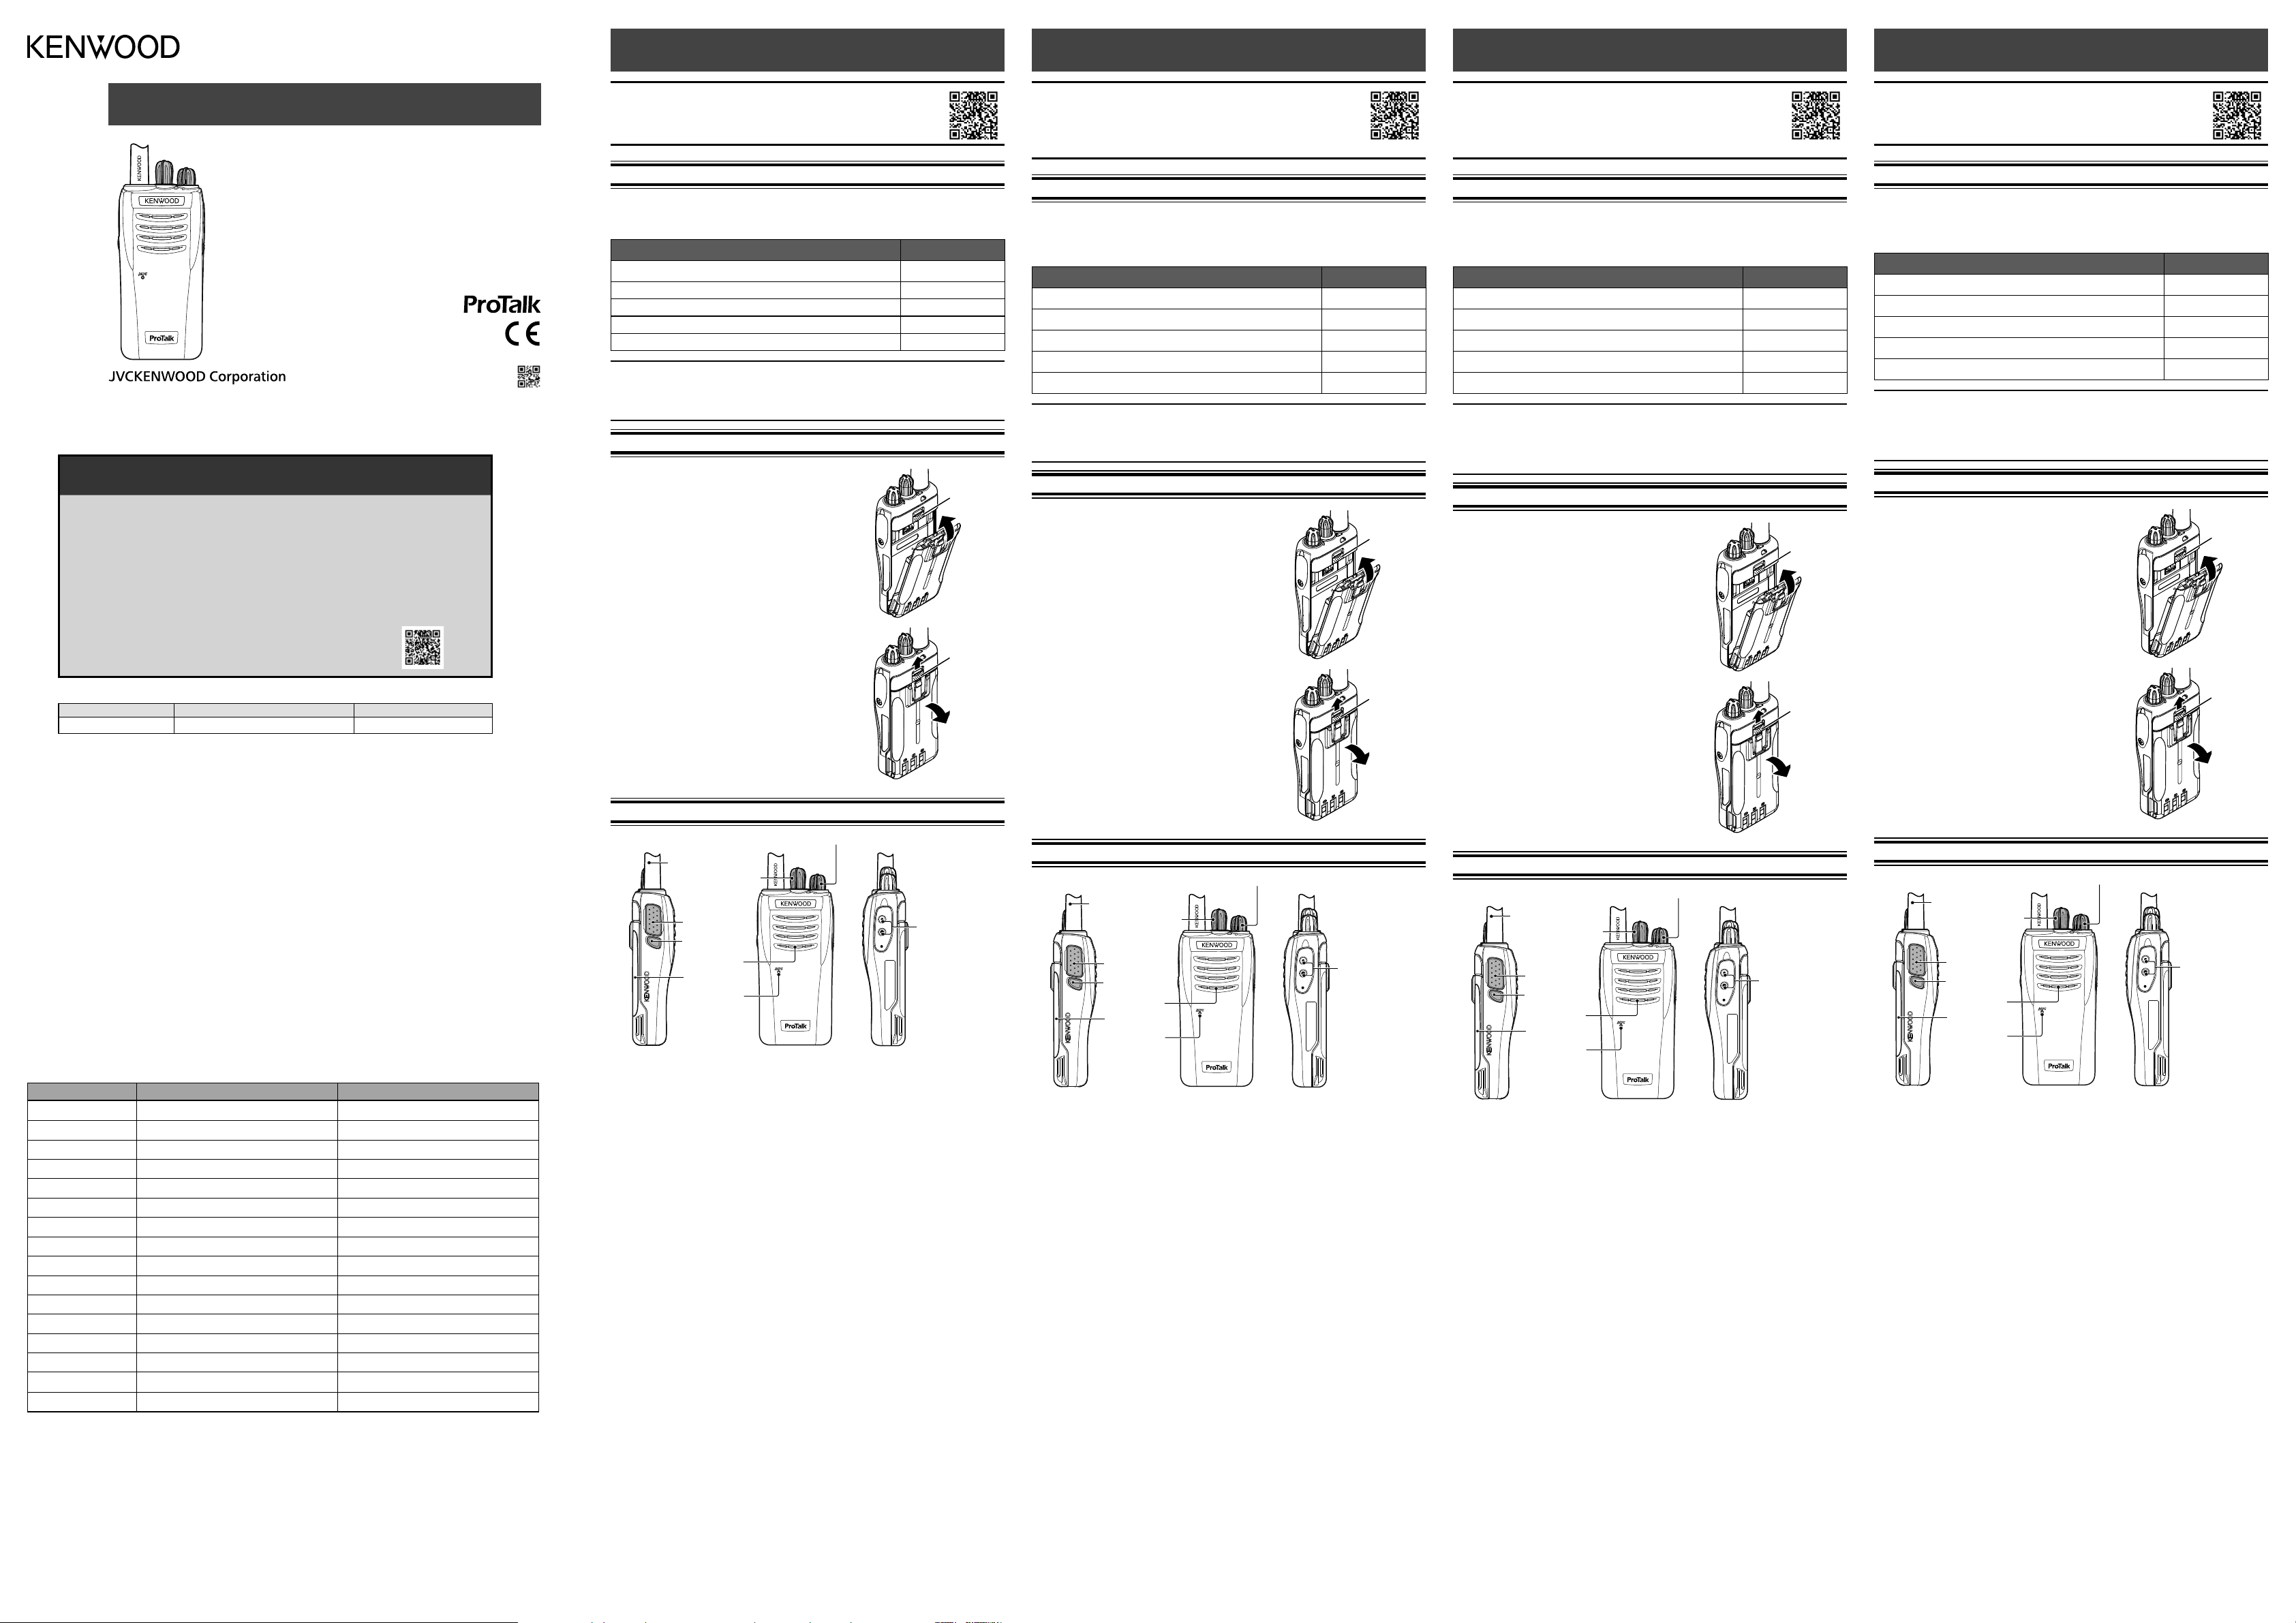
INST
1T
battery pack with the transceiver
the battery pack into place until the lock lever is
secure.
Lock le
2T
up
transceiver Lock lev
BASIC OPERA
Antenna
Microphone
Speaker
Battery pack
P
Channel selector
Side ke
PTT switch Speaker/
Microphone jacks
SWIT
TPoswitch/ Vcontrol clockwise to s
TPower switch/ V control counterclockwise fully to switch the
transceiver OFF
ADJUSTING THE V
Rotate the Pswitch / Vcontrol to adjust the volume.
increases the volume and counter
SELEC
Rotate the Channel selector to select y
MAKE A CALL
1 Select the desired channel.
2 Press the button programmed as [Monitor/ Monitor Momentary] or [Squelch
Off ff (default setting:Side k
not the channel is free.
• If the channel is busy
3 TPTT s
• For best sound quality
inches) from y
4 Release PTT switch to receiv
• If Q
call only if the received signal matches y
ÉMETTEUR-RÉCEPTEUR FM UHF
GUIDE DE L
Cette Guide de l’utilisateur couvre uniquement les
opérations de base de votr
manuel d’instruction (User Manual) en détail, reportez-
vous à l’URL suiv
https://manual.ken
A
Déballez soigneusement l’émetteur-récepteurfi er la présence
des articles ci-dessous avant de v
S’il manque un des éléments ou si un élément est endommagé, remplissez
immédiatement un formulaire de plainte a
Article Quantité
Chargeur de batterie/ Adaptateur C 1
Bloc-piles au lithium-ion (KNB-63L) 1
Cache 1
Clip de ceinture 1
Guide de l’utilisateur 1
Remarque:
◆P
garantit une étanchéité.
pas garantie en connectant un haut-parleur/microphone en option, etc.
POSE/ DÉPOSE DU BLOC PILES
1P
bloc-piles av
sur le bloc-piles pour qu’il s’enclenche sur les
leviers de v
Le
verrouillage
2P
verrouillage v
pour le retirer de l’émetteur-récepteur
Le
verrouillage
FONC
Antenne
Microphone
Haut-parleur
Bloc-piles
Commutateur d’alimentation/ commande de volume
Sélecteur de canal
T
Commutateur
PTT Prises du
Microphone à
haut-parleur
MISE SOUS/ HORS
Talimentation / commande de volume dans le sens
horaire pour mettre l’émetteur-récepteur sous
Talimentation / commande de volume dans le sens anti-
horaire pour mettre l’émetteur-récepteur hors tension.
RÉGLA
Talimentation / commande de volume pour régler le
volume
diminue.
SÉLEC
Sélectionnez le canal souhaité à l’aide de Sélecteur de canal .
P
1 Sélectionnez la zone et le canal v
2 Appuyez sur le bouton pr[Surveillance/
Surveillance momentanée] ou [Silencieux désactivé/ Silencieux
désactivé momentané] (réglage par défaut:
canal est libre ou non.
• Si le canal est occupé, attendez qu’il se libère.
3 PPTT
et parlez au microphone.
• P
4 cm de votre bouche
4 Relâchez le commutateur PTT pour rece
• Si Q
un appel uniquement si le signal reçu correspond aux réglages de v
émetteur-récepteur
B5A-3443-00 (E)
TRANSCEPT
GUÍA DEL USU
Este Guía del Usuario sólo cubre las operaciones
básicas de su radio
de detalles de uso , consulte el siguiente URL código
QR.
https://manual.ken
A
Desembale el transceptor con cuidadofi car
los elementos que se indican a continuación antes de deshacerse del material de
embalaje.
inmediatamente una reclamación a la empresa de transporte.
Artículo Cantidad
Cargador de la batería/ Adaptador de C 1
Batería de iones de litio (KNB-63L) 1
Tapa 1
Gancho para cinturón 1
Guía del usuario 1
Nota:
◆P
está garantizado mediante la fi
de la impermeabilidad no estará garantizado si conecta un altavoz/micróf
opcional, etc.
INST
1P
batería con el transceptor; a continuación,
presione la batería en el transceptor hasta que el
pestillo de bloqueo esté en posición asegurada.
P
bloqueo
2P
bloqueo hacia arriba y
batería del transceptor
P
bloqueo
OPERA
Antena
Micrófono
Altav
Batería
Interruptor de encendido/ control de volumen
Selector de canales
T
Conmutador
de PTT Jac
micrófono
ENCENDIDO Y
Gire el interruptor de encendido/ control de v hacia la derecha
paraencender el transceptor
Gire el interruptor de encendido / control de v hacia la izquierda para
apagar el transceptor
AJUSTE DEL
Gire el interruptor de encendido / control de v para ajustar el volumen.
Hacia la derecha aumenta el nivel de v
SELECCIONE UN CANAL
Seleccione el canal deseado mediante el Selector de canales .
REALICE UNA LLAMAD
1 Seleccione el canal deseados.
2 Pulse el tecla programado con la función [Monitor/Monitor momentáneo] o
[Desactivar silenciamiento/Desactiv (valor
predeterminado:
• Si el canal está ocupado
3 PPTT y hable al
micrófono
• P
de la boca.
4 Suelte el conmutador PTT para recibir
• Si se ha programado la función de Q
oirá las llamadas en las que la señal recibida coincida con la configuración
del transceptor
RICETRASMETTIT
GUID
Questa guida per l’utente spiega soltanto i fondamenti
d’uso del ricetrasmettitore
dettagliato è scaricabile dall’indirizzo o codice QR.
https://manual.ken
A
Disimballare con cura il ricetrasmettitor
d’imballaggiofi care la pr
nell’elenco seguente.
immediatamente reclamo al corriere
Articolo Quantità
Carica batteria/ Adattatore c.a. 1
P 1
Cappuccio 1
Clip da cintura 1
Guida per l’utente 1
Nota:
◆P
garantite fi
all’acqua non saranno garantite collegando un altoparlante/microf
opzionale, ecc.
INST
1Dopo av
con la sede del ricetrasmettitore premerlo in
posizione sino a quando la lev
s’innesta saldamente.
Le
bloccaggio
2P
bloccaggio e allontanarlo dal ricetrasmettitore Le
bloccaggio
FUNZIONAMENT
Antenna
Microfono
Altoparlante
P
Interruttore di accensione/ regolatore di v
Selettore canale
Pulsante Lato
Interruttore PTT Prese microfono e
viva
A
Ruotare l’interruttore di accensione / rvolume in senso orario per
accendere il ricetrasmettitore
Ruotare l’interruttore di accensione / rvolume in senso antiorario per
spegnere il ricetrasmettitore
REGOLAZIONE DEL
Ruotare l’interruttore di accensione/ r di volume per eseguire la
regolazione.
lo si abbassa.
SELEZIONE DI UN CANALE
Selezionare il canale desiderato utilizzcanale .
EFFETTU
1 Selezionare il canale desiderati.
2 Premere il pulsante progr[Controllo/Controllo momentaneo]
o [Squelch disattivato/Squelch disattiv
(impostazione predefi nita:
meno
• Se il canale è occupato
3 Pff ettuare una chiamata, tenere premuto l’interruttore PTT e parlare nel
microfono
• P
3 ~ 4 cm dalla bocca.
4 Rilasciare PTT per la ricezione.
• Se sul canale selezionato è stata programmato uno specifico tipo di Q
DQ
se le segnalazioni risulteranno compatibili ed idonee al formato utilizz
fase di progr
Model Frequency r Max.
TK-3501-E 446.00625 - 446.193750 MHz 500 mW e.r
This transceiver alloff
T
Cet émetteur-récepteur vous permet de reprff
réglages Q
vous donne les réglages par déf
Este transceptor le permite reprogr
(Silenciosa)/DQ
Con questo ricetrasmettitore è possibile riprogr
(Quiet fi nita di tutti i canali.
Dieser
Einstellungen der Fr
Standardkanaleinstellungen auf
Met deze transceiv
(Digital Quiet
Bu telsiz her bir kanalı farklı frş ma)/ DQş ma) aı ile
yeniden prı za olanak sağ larş ağı daki tablo vı lan kanal aı nı listeler
Αυτός ο πομποδέκτης σας επιτ να προγ εκ νέου κάθε ένα από τα κανάλια με
διαφορετικές συ και διαφορετικές ρυθμίσεις QΉσυχη Ομιλία )/ DQ
Quiet TΨηφιακή Ήσυ Ομιλία).Στ παρακάτω π ίνακ παρατίθεντ οι προεπιλεγμέν ρυθμίσεις
κα.
Este transcetor permite-lhe reprogrfi nições Q
Silenciosa)/DQfi gurações padrão de canal.
Channel Number Frequency Q
1 446.00625 MHz 94.8 Hz
2 446.09375 MHz 88.5 Hz
3 446.03125 MHz 103.5 Hz
4 446.06875 MHz 79.7 Hz
5 446.04375 MHz 118.8 Hz
6 446.01875 MHz 123.0 Hz
7 446.08125 MHz 127.3 Hz
8 446.05625 MHz 85.4 Hz
9 446.00625 MHz 107.2 Hz
10 446.09375 MHz 110.9 Hz
11 446.03125 MHz 114.8 Hz
12 446.06875 MHz 82.5 Hz
13 446.04375 MHz D132N
14 446.01875 MHz D155N
15 446.05625 MHz D134N
16 446.08125 MHz D243N
USER GUIDE
GUIDE DE L'UTILISA
GUÍA DEL USU
GUID
BENUTZERHANDBUCH
GEBRUIKERSHANDLEIDING
KULLANICI REHBERI
Ο ΧΡΗΣΤΗ
GUIA DO UTILIZADOR
TK-3501
Access the f
product and f
Refe
SEN
Raı n. Ανα στο “ΑΠΛΟ
ΟΔΗ”. FéacČ ”.
Se “č íČ NÁ PRÍRUČ K
Viz „Ű KÉ
KatОб се къ “ОСНО РЪ
ЗА ЕКСПЛОА”ę z „
UPRħ all- “GWIDĊ I”. SkatĀ RŠ Ā PA ĀCĪ BA”
„ţ i „G
https://manual.ken