Las terminales de alimentación no deben cortocircuitarse.
Para la seguridad de su hijo:
• No cambie ni altere este producto.
• No permita que el bebé juegue con los arcos cuando
no están jados a la cobija.
GYMINI® Mover y jugar
GYMINI® Tiny Princess
TM
Mover y jugar
Guía de instrucciones
MANTENGA ESTA GUÍA DE INSTRUCCIONES PORQUE CONTIENE INFORMACIÓN IMPORTANTEIMPORTANTE. LEER CUIDADOSAMENTE.
(Estas instrucciones se aplican a todos los Gymini®s en la serie Move & Play)
¡Mover y jugar – el único gimnasio que se ajusta a las etapas de desarrollo del bebé!
PRECAUCIÓN
Se requiere que lo arme un adulto.
Retire todos los materiales de empaque antes de usar.
321
54
Para su conveniencia, mire un vídeo corto que
lo explica mejor: http://www.tinylove.com/
moveNplay_battery_change.html
Para sua conveniência, assista um vídeo curto
que explica o prcedimento: http://www.tinylove.
com/moveNplay_battery_change.html
To attach the hang toys, insert their rings into the
sliding rings connected to the arches (Fig. 9). You can
easily slide the toys along the arches to enable baby to
reach them (Fig. 10).
For easy access and to change baby’s diaper, slide
the arch connector to the back and lower the arches
(Fig. 11).
Using Operating the Move & Play electronic
toy
The electronic toy has 2 switches:
• OFF / low / loud (Fig. 12) - turns the toy on by
selecting one of the two volume settings.
• Music / Tap (Fig. 13) - enables the selection of
continuous music or activation by baby which reacts
to baby’s tapping on the toy.
5 modes of use:
Folding the mat for easy storage
Turn over the Move & Play mat. With the printed side of
the mat facing away from you, fold it in half and snap
the two sides closed (Fig. 14).
Cleaning and long-term storage
1. Don’t immerse in water.
2. Remove all toys from the arches. Remove the
batteries from the electronic lights and music toy
for long-term storage.
3. Detach the arches from all four corners of the mat.
4. Only the mat may be machine-washed. Wash in
cold water (no bleach) then line dry in the shade.
Do not tumble dry or dry-clean. Hand wash for
optimum care.
5. To clean the toys, wipe with a damp cloth.
And don’t forget these safety rules:
1. Batteries should be replaced by adults only.
2. Do not mix old and new batteries.
3. Non-rechargeable batteries are not to be recharged.
4. Rechargeable batteries are to be removed from the
toy before being charged.
5. Rechargeable batteries should only be charged
under adult supervision.
6. Do not mix alkaline, standard (carbon-zinc) or
rechargeable (nickel-cadmium) batteries.
7. Exhausted batteries are to be removed from the toy.
8. Do not burn batteries. Dispose of batteries in a safe
and appropriate manner.
9. Use only batteries of the same or equivalent type as
recommended.
10. Batteries are to be inserted with the correct polarity.
11. Please note, batteries may leak uid that can be
harmful to your baby and the product. Use only
high quality alkaline dry batteries.
12. The supply terminals are not to be short circuited.
For your child’s safety:
• Do not modify or alter this product in any way.
• Do not allow baby to play with the arches when
they are not attached to the mat.
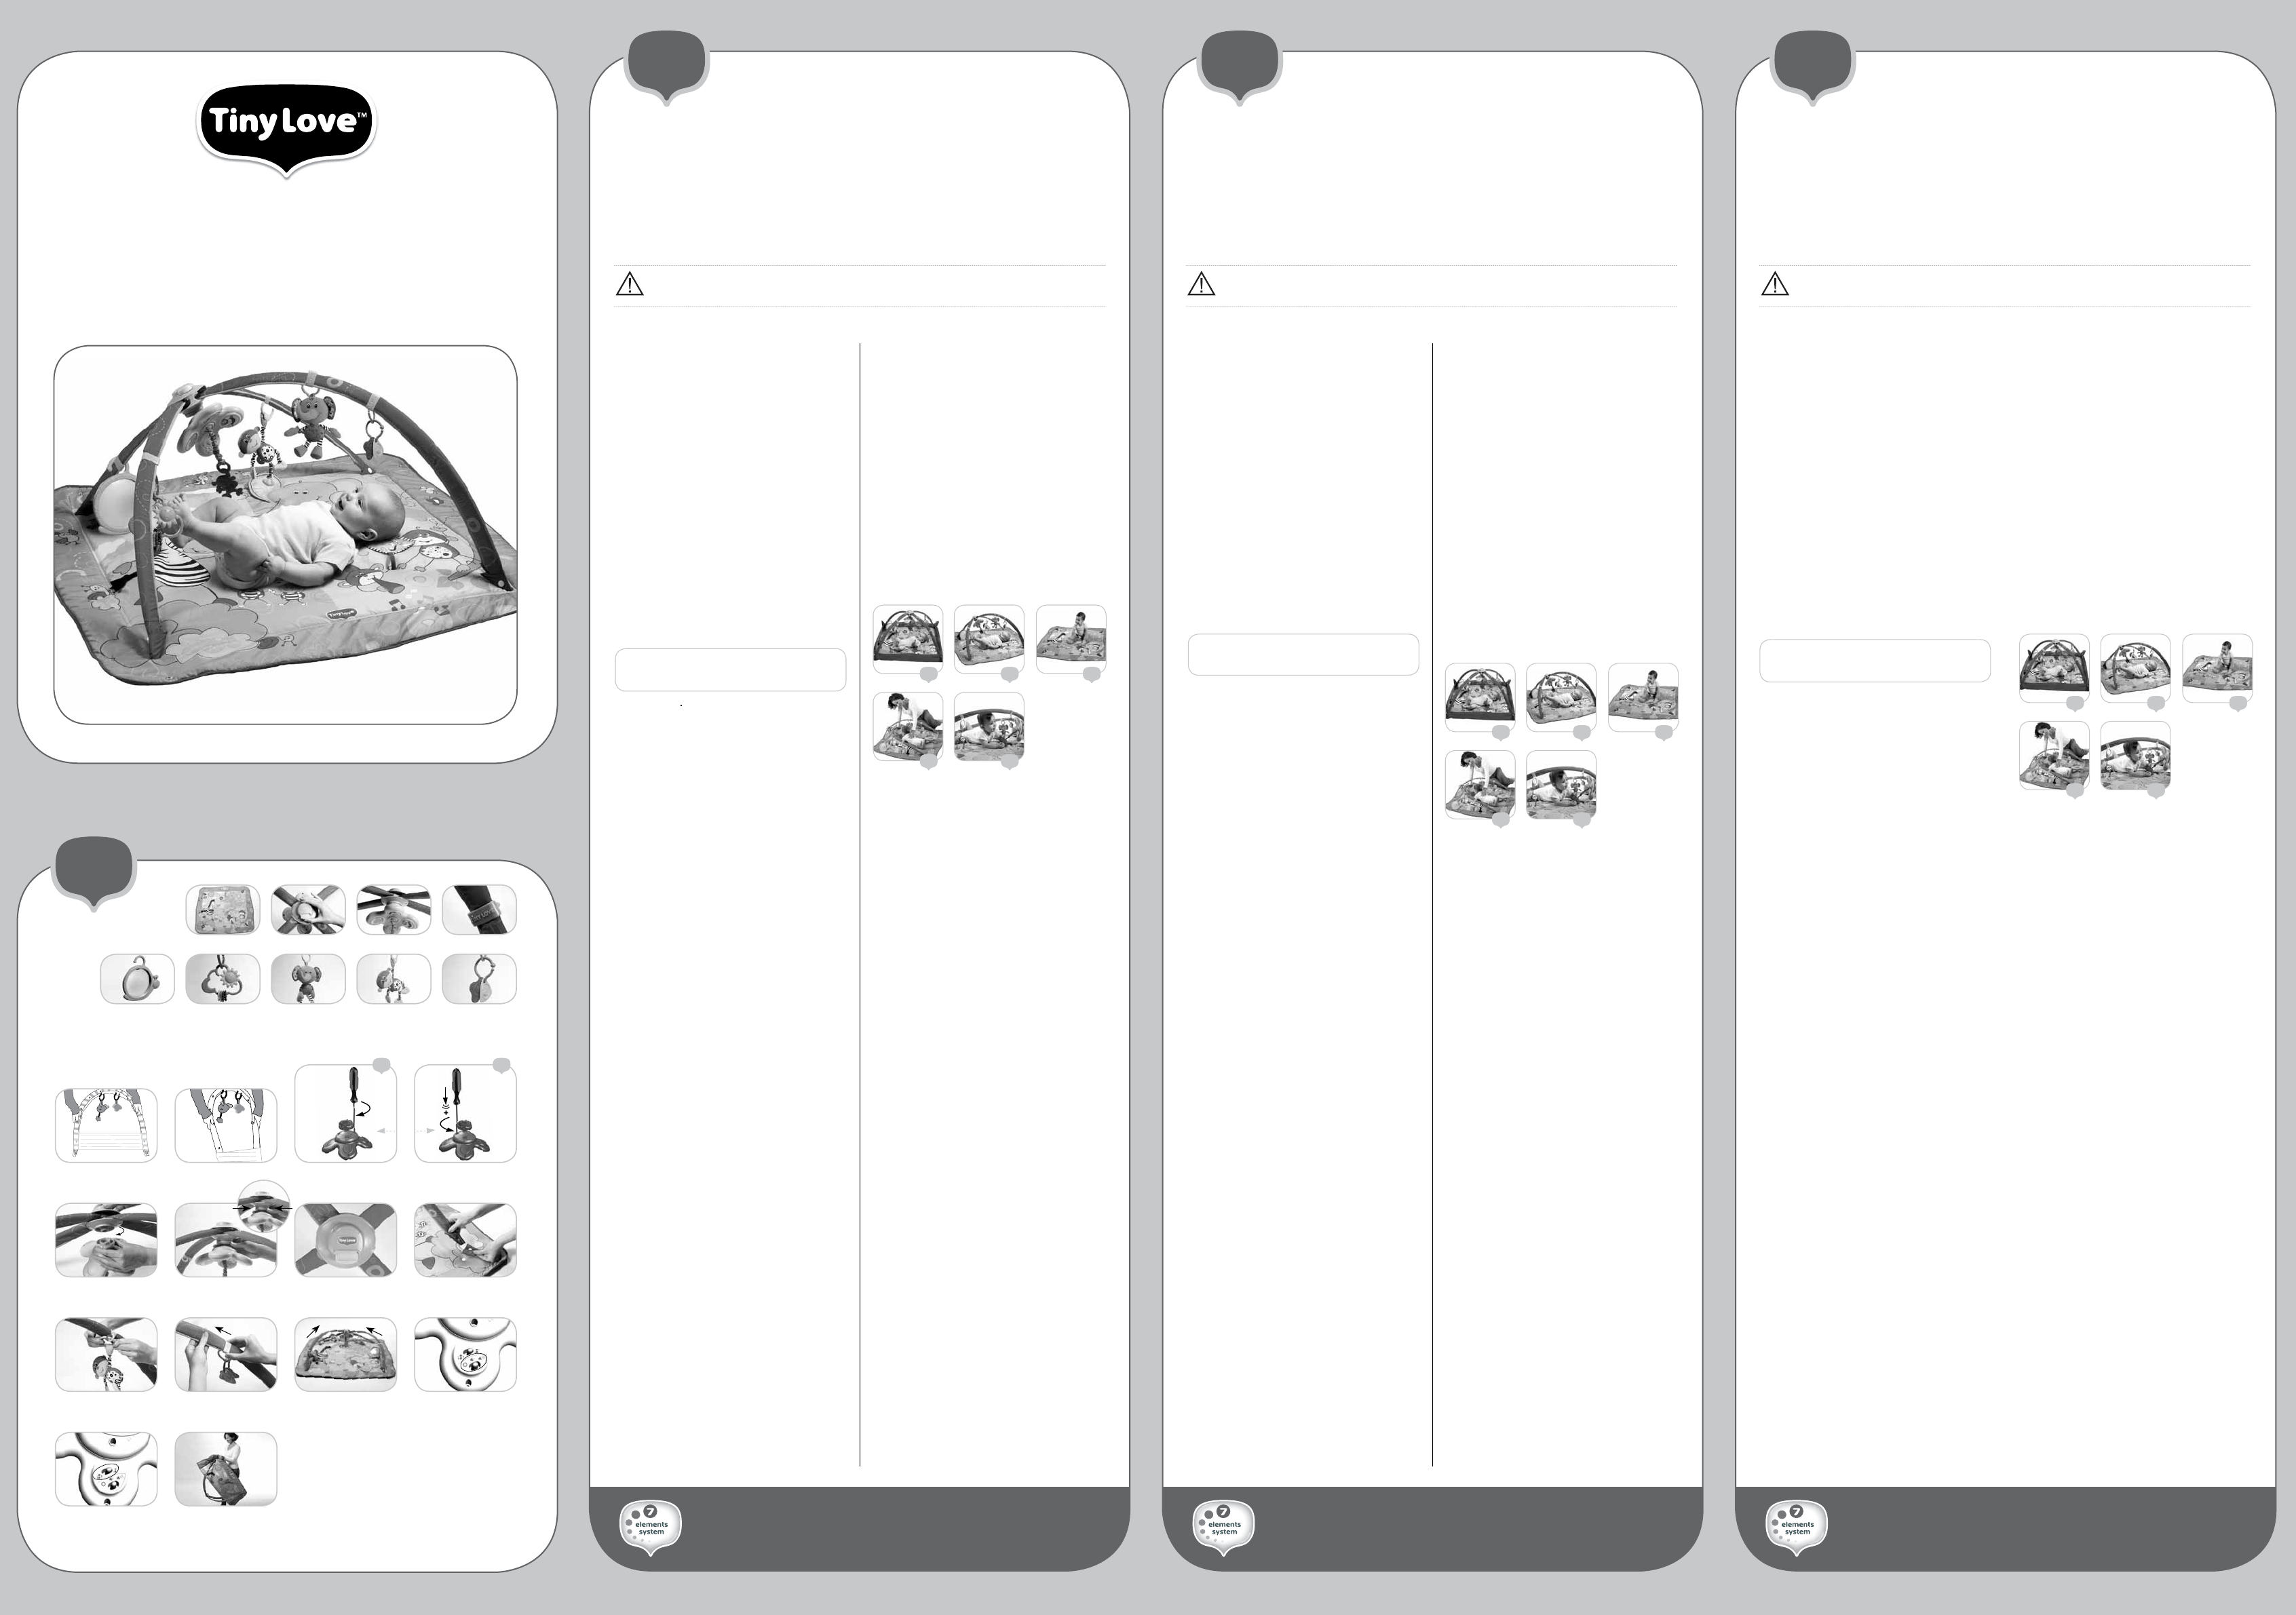
Product Key
A. Move & Play mat
B. Activity arches with arch connector
C. Electronic music and lights toy
D. Arch sliders
E. Mirror
F. Cloud rattle
G. Soft elephant / Soft buttery
H. Soft monkey / Soft porcupine
I. Colorful teethers
* Toy may dier
Product assembly
Remove the activity arches from their packaging. Using
both hands, hold the arches according to the illustration
(Fig. 1) and squeeze them together. The plastic wrap
should slip o (Fig. 2).
Using Assembling the electronic music and
lights toy
Using Inserting\changing the batteries
1. Remove the electronic music and lights toy from
the box.
2. Make sure the unit is in the “OFF” position.
3. Lay the unit on a table so that the back is facing up
(and the monkey teether is facing the table). Using
a cross-head screwdriver, release the screw (Fig. 3).
The screw does not come out completely; once you’ll
feel it’s loose you’ll know you’ve released it enough.
Move the cross-head screwdriver to the other side
and press the spring located inside the cavity of
the battery cover (Fig. 4). Continue pressing and at
the same time turn the cover counter-clockwise to
release it. Once cover is o, insert 3 new AAA (1.5V)
alkaline batteries.
4. Replace the cover and turn it clockwise until you see
the spring pin inside the cavity again. Make sure the
cover is well secured. Tighten the screw back rmly.
Please note: batteries may leak uid that can be harmful
to your baby and the product. Use only high quality
alkaline dry batteries.
Using Connecting the electronic music and
lights toy to the arch connector
Please note: do not perform this over the baby. Connect
the electronic toy to the arch connector rst. Only when
it is well-secured, connect the arches to the mat.
Screw the electronic music and lights toy into the arch
connector clockwise until you hear a series of clicking
sounds (Fig. 5). These clicks mean that the toy is locked
into place. To remove the music and lights toy, press
the buttons on the side of the upper part of the toy and
unscrew counter-clockwise (Fig. 6).
Using Connecting the arches to the mat
Please note: assemble the product away from the baby.
1. Unfold the mat so that it is facing you (position it
so you can read the Tiny Love® logo). Position the
arches so the Tiny Love® logo on the arch connector
is facing you (Fig. 7).
2. Connect the arches to the four corners of the mat by
slipping each end of each arch into the corresponding
sleeve and snap them shut (Fig. 8). Check that the
arches are securely attached.
Using the Gymini® Move & Play
Adjusting the gym according to your baby’s
developmental stages
Slide the arch connector to each side for an endless
array of angles and opportunities! Simply push the
button and slide the arch connector to the desired
position according to your baby’s needs.
For baby’s safety, once you release pressure from the
button on the side of the arch connector, it will not
move any further.
321
54
For your convenience, watch a short video explaining
this: http://www.tinylove.com/moveNplay_battery_
change.html
ABCD
EFHI
9
14
786
21
13
101112
34
5
!!
G
Need help? Post your question in this forum.
Report abuse
Libble takes abuse of its services very seriously. We're committed to dealing with such abuse according to the laws in your country of residence. When you submit a report, we'll investigate it and take the appropriate action. We'll get back to you only if we require additional details or have more information to share.
Product:
Forumrules
To achieve meaningful questions, we apply the following rules:
First, read the manual;
Check if your question has been asked previously;
Try to ask your question as clearly as possible;
Did you already try to solve the problem? Please mention this;
Is your problem solved by a visitor then let him/her know in this forum;
To give a response to a question or answer, do not use this form but click on the button 'reply to this question';
Your question will be posted here and emailed to our subscribers. Therefore, avoid filling in personal details.
Register
Register getting emails for Jumbo Tiny Love - GYMINI Move and Play at:
new questions and answers
new manuals
You will receive an email to register for one or both of the options.
Get your user manual by e-mail
Enter your email address to receive the manual of Jumbo Tiny Love - GYMINI Move and Play in the language / languages: English, French, Spanish as an attachment in your email.
The manual is 0,8 mb in size.
You will receive the manual in your email within minutes. If you have not received an email, then probably have entered the wrong email address or your mailbox is too full. In addition, it may be that your ISP may have a maximum size for emails to receive.
The manual is sent by email. Check your email
If you have not received an email with the manual within fifteen minutes, it may be that you have a entered a wrong email address or that your ISP has set a maximum size to receive email that is smaller than the size of the manual.
The email address you have provided is not correct.
Please check the email address and correct it.
Your question is posted on this page
Would you like to receive an email when new answers and questions are posted? Please enter your email address.