•It is NOT allowed to connect more than one motor to the same single switch. The centralisation controls can be done by an appropriate devices,
which are supplied on request.
•The gear motor is made for intermittent working. However, it is provided by an internal thermal protection, which stops the power supply in case of
overheating, for example after continuous operations (more than 10 non-stop). The motor re-functioning happens after a time not lower than 10
minutes, at the end of which the thermal protection resets itself automatically. But, after this resetting, the motor can function at a reduced rate; the
normal functioning will be possible only after a complete motor cooling (about 60 minutes).
•If the electricity supply cable of this motor is damaged, it must be replaced only by a repair centre, recognised by the manufacturer, as it is necessary
to use special equipment. In cases where such indications are not adhered to, the guarantee will be rendered invalid..
4 Limit switch adjustment
WARNING
:
•In order to avoid injury or damage to the device during the regulation procedure of the
stop, it is essential to be able to stop the coiler tube at any moment.
•It is recommended that you use a normal screwdriver to regulate the route end points.
If you use and electric screwdriver use a very low rotation velocity (inferior to 100
RPM) without exerting pressure on the screws.
•In the case of rolling shutters, do not install stopper or stop carriers on the end blade.
LIMIT SWITCH ADJUSTMENT:
a)Lower the tube, without the roller, until the motor stops automatically.
b)While keeping the down button pressed, turn the lower end run adjustment screw (see
figure) anti-clockwise (+), until the roller tube is in a suitable position for anchoring the
roller shutter.
c)Fix the roller shutter to the tube. Warning: DO NOT USE over-long screws.
d)Raise the roller shutter/awning until the motor stops automatically.
e)While keeping the up button pressed, turn the upper end run adjustment screw (see
figure) anti-clockwise (+), until the roller shutter/awning reaches the topmost position
desired.
LATER ADJUSTMENTS:
If, for example, the upper stopping point has been set too high, move the roller shutter or
awning to a position below the desired stopping point. At this point, turn the upper end run
adjustment screw a few times in a clockwise direction (−), and then start the procedure
again from point d).
NOTE
: for awnings we advise you to:
•Regulate the stop points with a reasonable safety margin that takes into account the size variations of the tent sheet due to various phenomenon such as heat and humidity… .
•One first check is suggested after few days from the installation and eventually a further end run adjustment to recover an eventual cloth “plays”.
•Use automatic closing systems in case of strong wind in order to avoid damage to the motor.
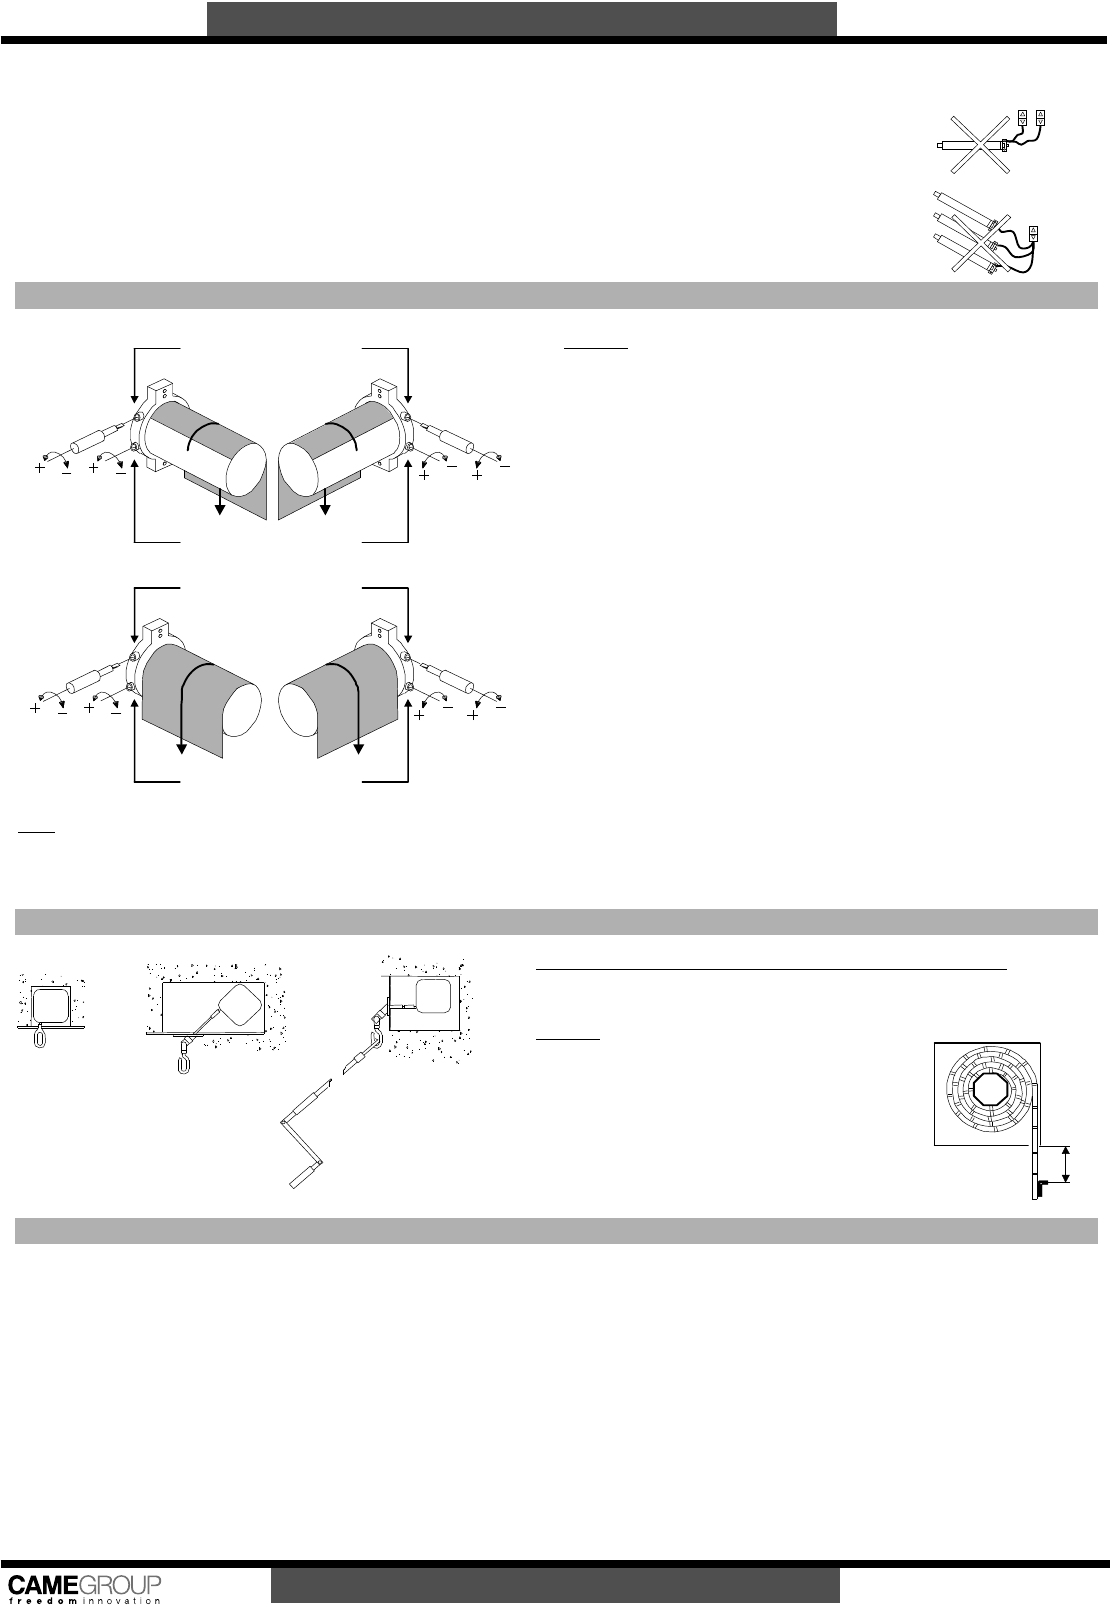
5 Reducer gearboxes with supplementary operation
Before utilizing the manual override switch off electric current of the motor.
The figure shows various installation possibilities of the manual maneuver with respect to the
position of the motor.
WARNING
:
•If the gear motor is provided by a manual override device,
it is necessary to take care to the motor orthogonality as
regards its fixing plan (static part).
•Only for reducer gearboxes with supplementary operation,
fit the stop brackets as to pic. 5, to avoid during manual
operation, the roller blind entering the housing completely.
In this case, adjust the limit switch so that the stop
brackets remain at least 5 cm lower than the stop
threshold.
6 Trouble shooting
1.THE MOTOR DOES NOT WORK:
•Check the electrical supply.
•Verify the correct execution of the electrical connections (see par. 3).
•If the problem occurs after numerous close operations the thermal protection could have intervened. In that case wait for the cooling of the system.
2.THE SHUTTER/SHADE DOES NOT STOP IN CORRESPONDENCE TO THE STOP:
•Check that the stop has been well inserted in the coiler tube (see point d) par. 2).
•Verify that the procedure for the regulation of the stops has been executed correctly (see par. 4).
•Check that the moving pulley is adequate and correctly inserted in the coiler tube.
•Verify the fastening of the pin square support to the roller-shutter box or to the wall.
3.THE MOTOR TURNS BUT THE ROLLER-SHUTTER/SHADE DOES NOT MOVE:
•Check that the roller-shutter/shade is fixed well to the coiler tube.
•Check that the moving pulley is correctly inserted in the shaft of the motor (see point b) par. 2).
Libble takes abuse of its services very seriously. We're committed to dealing with such abuse according to the laws in your country of residence. When you submit a report, we'll investigate it and take the appropriate action. We'll get back to you only if we require additional details or have more information to share.
Product:
Forumrules
To achieve meaningful questions, we apply the following rules:
First, read the manual;
Check if your question has been asked previously;
Try to ask your question as clearly as possible;
Did you already try to solve the problem? Please mention this;
Is your problem solved by a visitor then let him/her know in this forum;
To give a response to a question or answer, do not use this form but click on the button 'reply to this question';
Your question will be posted here and emailed to our subscribers. Therefore, avoid filling in personal details.
Register
Register getting emails for Jolly Motor FMMQ at:
new questions and answers
new manuals
You will receive an email to register for one or both of the options.
Get your user manual by e-mail
Enter your email address to receive the manual of Jolly Motor FMMQ in the language / languages: English as an attachment in your email.
The manual is 0,1 mb in size.
You will receive the manual in your email within minutes. If you have not received an email, then probably have entered the wrong email address or your mailbox is too full. In addition, it may be that your ISP may have a maximum size for emails to receive.
The manual is sent by email. Check your email
If you have not received an email with the manual within fifteen minutes, it may be that you have a entered a wrong email address or that your ISP has set a maximum size to receive email that is smaller than the size of the manual.
The email address you have provided is not correct.
Please check the email address and correct it.
Your question is posted on this page
Would you like to receive an email when new answers and questions are posted? Please enter your email address.