The JA-86P is a component of Jablotron’s Oasis 80 alarm system. It is
designed to detect human body movement inside buildings. Detection in
two zones is more immune to moving pets. The battery-powered detector
communicates via OASIS radio protocol.
Installation
Installation should only be undertaken by technicians holding a certificate
issued by an authorized distributor. The detector can be installed on a flat
wall or in the corner of a room.The expected installation height is 120 cm
above the floor. Objects rapidly changing temperature, (electrical heaters,
gas appliances etc) should not be positioned within the detection field.
Moving objects with a temperature close to that of a human body (such as
curtains moving above a radiator) should also be avoided. The detector
should not face windows or spotlights or be installed in places with obvious
air flow (e.g. near ventilation fans, air holes or badly sealed doors etc.).
There should be no obstacles blocking the detection field and the detector
should be kept away from metal objects (they could interfere with radio
communication).
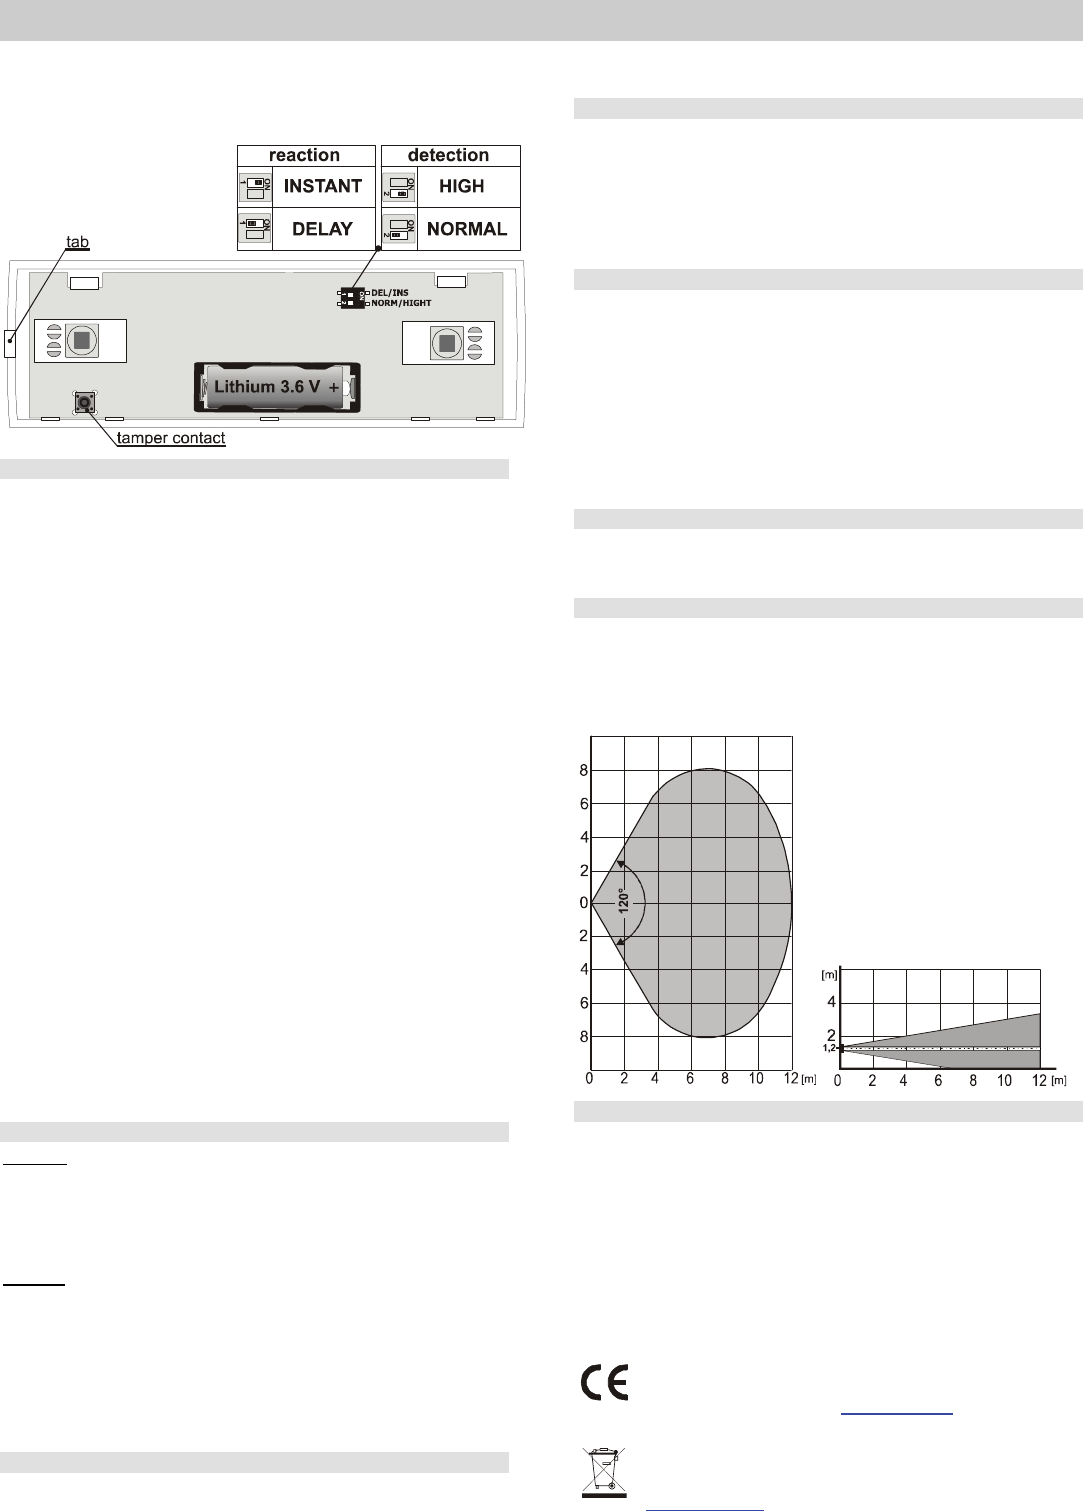
1. Open the detector cover (by pressing the tab) – do not touch the PIR
sensors inside and avoid damaging the semicircular antenna
2. Remove the PCB – it is held by two internal tabs
3. Punch through the pre-formed holesfor cables and screws(at least
one screw should go through the tamper-sensitive section)
4. Screw the rear cover to the wall approximately 120 cm above the
floor (vertically, with the tab down)
5. Return the PCB to its original place(with the antenna to the cover
tab)
6. Leave the battery disconnected and the cover open. Then follow
the control panel (receiver) installation manual.
The basic procedure:
a. Switch the control panel to service mode and press the “1” key
to start enrollment mode
b. Install a battery into the detector to activate enrollment
c. Exit enrollment mode by pressing “#” key
7. To observe EN 50131-2-2the tab must be secured by the supplied
screw.
If you want to enroll the detector when its battery has already been
connected, first disconnect it, press and release the tamper switch (to
dissipate any remaining energy) and then reconnect the battery to perform
enrollment.
When the battery is reconnected, the detector needs approx. 1 minute
to stabilize. Its indicator is lit permanently for the whole period.
DIP switches
Switch 1: DEL / INS defines whether the detector covers a building entrance
and provides entrance & exit delays = DEL position. If the detector is in the INS
position, it triggers an immediate reaction in an armed control panel. Using the
switch only makes sense when the detector is used together with an Oasis
control panel and the NATUR reaction has been set. It is useless if a different
reaction is set in the control panel or if you are using the detector together with a
UC-8x or AC-8x receiver.
Switch 2: NORM / HIGH defines the immunity to false alarms.
The NORM position combines very good immunity with fast sensor reactions.
The detector is activated if it detects movement in one zone and then in the
second zone within 3 seconds.
The HIGH position increases sensor immunity at the expense of speed (it is
used with problematic installations). The detector is activated if there are two
NORM activations in 10 seconds.
Warning: The most frequent cause of false alarms is wrong detector
positioning.
The detector always sends a sabotage signal if the cover is removed
Detector testing
The indicator shows detector activation for 15 minutes after closing the
detector cover. Movement in one zone is signalled by a short flash of the
indicator light. Movement in both zones – an alarm - is indicated by longer
flashing. The strength and quality of detector signals can be measured with
the control panel in Service mode.
5 minutes / 1 minute sleep time
To save battery energy, the detector switches to battery-save mode 15 minutes
after its cover is closed. When the detector detects movement, it informs the
control panel and ignores all movement for the next 5 minutes (sleep
time). When this time expires, the sensor keeps guarding the area
continuously until the next movement etc.
The sleep time can be shortened to 1 minute by holding the tamper switch
on during battery installation (if you install the battery without holding the
tamper switch on, a 5-minute sleep time is set).
Battery replacement
The detector monitors its battery voltage and if it is too low, it informs the user
(or a service technician). The detector continues to function and shows each
detected movement by a short flash of its LED. We recommend replacing the
battery within 2 weeks. The battery should be replaced in service mode by a
technician. After battery replacement, the detector needs approx. 60 seconds to
stabilize – the indicator lights continuously. When it switches off, test the detector
functions.
If a weak battery is inserted in the detector, its indicator flashes for
approx. 60 seconds. Then the detector starts functioning but it will report a
discharged battery.
Expired batteries should not be thrown into the garbage, but disposed of
according to local regulations.
Removing the detector from the system
If a detector is removed, the system announces the removal. The detector
has to be removed (deleted) in the control panel or a bypass must be
performed before intentional removal.
Detection characteristics
The detector has two detection zones each of which covers an angle of
120° and a distance of 12m. The imaginary dividing line between both
zones is determined by the detector installation height. Recommended
installation height is about 120cm.
Top view
Side view
Technical parameters
VoltageLS(T)14500 (3.6V AA / 2 Ah) type lithium battery
Typical battery lifetime approx. 3 years (5 min. sleep mode)
Communication band 868 MHz, Oasis protocol
Communication range approx 300m (open area)
Recommended installation height 1.2 m above the floor
Detection angle/detection range 120° / 12 m (with basic lens)
Operational environment according to EN 50131-1 II.indoor general
Operational temperature range -10 to +40 °C
Dimensions, weight 180 x 60 x 55 mm, 200 g
EN 50131-1, EN 50131-2-2, EN 50131-5-3 classification: grade 2
Complies with ETSI EN 300220, EN 50130-4, EN 55022, EN 60950-1
Can be operated according to ERC REC 70-03
JABLOTRON ALARMS a.s. hereby declares that the JA-86Pis in
compliance with the essential requirements and other relevant
provisions of Directive 99/5/ECThe original of the conformity
assessment can be found at www.jablotron.com
, Technical Support
section.
Note: Although this product does not contain any harmful materials
we suggest you return the product to the dealer or directly to the
producer after use. More detailed information is available at
www.jablotron.com
Need help? Post your question in this forum.
Report abuse
Libble takes abuse of its services very seriously. We're committed to dealing with such abuse according to the laws in your country of residence. When you submit a report, we'll investigate it and take the appropriate action. We'll get back to you only if we require additional details or have more information to share.
Product:
Forumrules
To achieve meaningful questions, we apply the following rules:
First, read the manual;
Check if your question has been asked previously;
Try to ask your question as clearly as possible;
Did you already try to solve the problem? Please mention this;
Is your problem solved by a visitor then let him/her know in this forum;
To give a response to a question or answer, do not use this form but click on the button 'reply to this question';
Your question will be posted here and emailed to our subscribers. Therefore, avoid filling in personal details.
Register
Register getting emails for Jablotron JA-86P at:
new questions and answers
new manuals
You will receive an email to register for one or both of the options.
Get your user manual by e-mail
Enter your email address to receive the manual of Jablotron JA-86P in the language / languages: English as an attachment in your email.
The manual is 0,17 mb in size.
You will receive the manual in your email within minutes. If you have not received an email, then probably have entered the wrong email address or your mailbox is too full. In addition, it may be that your ISP may have a maximum size for emails to receive.
The manual is sent by email. Check your email
If you have not received an email with the manual within fifteen minutes, it may be that you have a entered a wrong email address or that your ISP has set a maximum size to receive email that is smaller than the size of the manual.
The email address you have provided is not correct.
Please check the email address and correct it.
Your question is posted on this page
Would you like to receive an email when new answers and questions are posted? Please enter your email address.