Car alarm CA-320 / CA-321 „Accent“ 4 / 2 MDF59500 Car alarm CA-320 / CA-321 „Accent“ 4 / 3 MDF59500
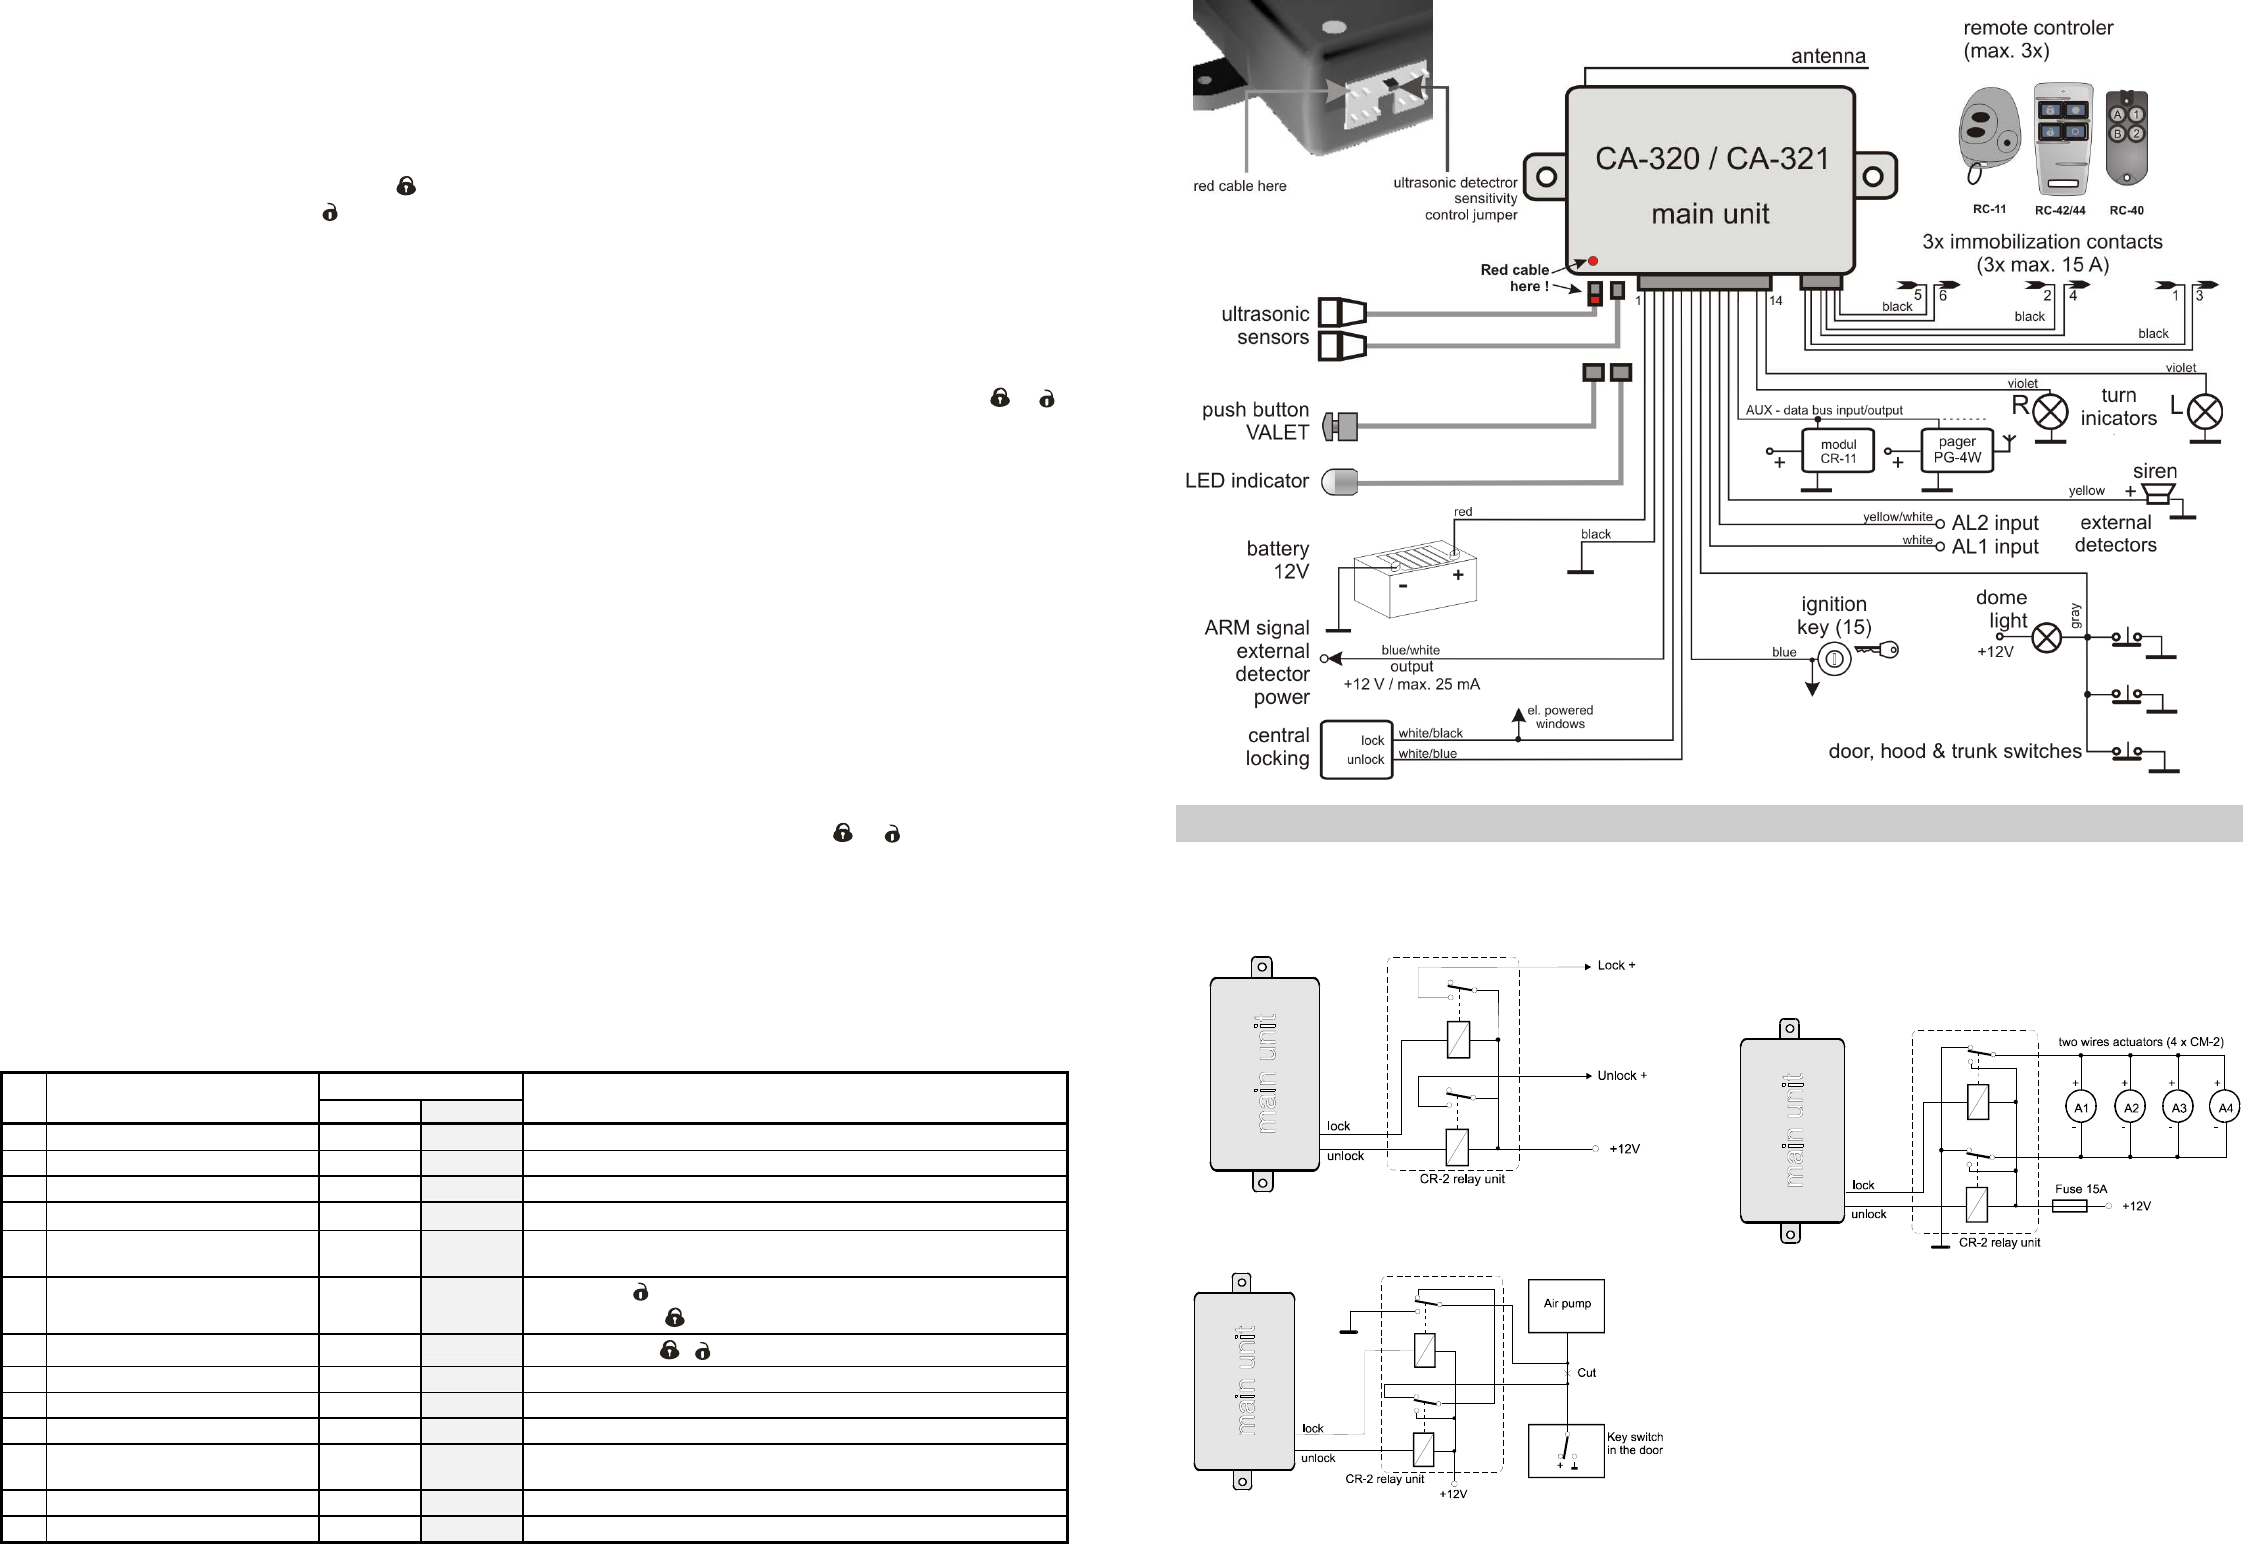
WHITE/BLACK = Lock, WHITE/BLUE - these w
signals to control the central door lock system. The
current for either of these lines is 300mA. NPN transistors switching to the
GND are on the output of these lines. The duration of output pulses is
programmable (0.3sec. factory default). Connect the wires from
„Accent“ to the inputs of the central locking sy
If the car has powered windows w
can use the „Lock“ signal to close all the windows. In this case, select
the longer “Locking Signal“ in the setting mode This way the car alarm
will lock the doors and will close all windows if button
is used for
arming and it will only lock the doors if button
is used.
Do NOT connect the wires from the car alarm directly to the
actuators! See "Examples of Accent use for different central locking
systems" if your locking system uses another type of control signals. If
you are also going to
recommend the CL-20A.
BLUE = Ignition Key Input - connect the blue w
switch (+12V when ignition is ON). This signal w
arming of the alarm while driving
trigger an alarm if someone switches ON the ignition without first
disarming the car alarm. This signal is also used for other functions
(REARM, AUTOIMMO, Alarm Memory reading, etc.).
Note: Be sure, that +12V is also present, when a starter is used.
GRAY = Door Switches input, Dome Light Control output - is
a
control output. Connect this wire to the door switches (we recommend
to have switches installed in all doors). When a door opens, and
central control unit is armed the alarm will be triggered. With the
system is disarmed, opening the door turns on the interior dome light
till the ignition key is switched on (max. 1 minute).
NOTE: The maximum load of the interior light can be 10W.
WHITE = AL1 Ainput w
grounded. It can be used for any additional detector.
YELLOW/WHITE = AL2 input has selectable trigger logic (can
be activated when connected to ground or when disconnected from the
ground). The kind of reaction (Alarm or Warning) can be customized for
this input in setting mode. An additional sensor can be connected to
this wire.
Note: each of the above inputs can only trigger alarms a maximum of
three times during each arming period.
YELLOW = Siren -
siren in the engine compartment, with its negative pole
Connect the positive pole of the siren to this wire.
Notice : No additional siren can be connected to the car alarm siren
output.
VIOLET = Turn Indicators - the two violet wires provide power for
and right turn indicators. Each wire provides 12V, 5A pulses to the lights
as a visual indication of arming, disarming and alarm triggering. Connect
one of the violet wires to the left turn light and the other violet
right turn light. These two wires also work as inputs to disable
current sensor. The car alarm can be armed even if the flashing
emergency lights are ON (flashing of all turn indicators).
Immobilization - the six wires in a separate connector are the
built-in immobilization contacts’ leads. Each wire is marked by
a
following wires are connected by internal relay contacts inside: 1-3,
2-4, 5-6. The starter, fuel pump, ignition or any other system that
electrically disconnected will render y
connected here. Only disarming the alarm and switching ON the key in
the ignition closes the contacts. These contacts will operate correctly
for permanent load up to 15A, max. 20A for 30 seconds (each).
AUX - data bus input/output. It can be used for connection
of CR-11 expansion relay module.
Adding of a new
There are two remote controllers in each „Accent“ car alarm set. The car
alarm can be operated with a maximum of three remote controllers. To add
an additional remote control or to replace an original one (in the case one is
lost) perform the following procedure:
Switch on the ignition key when car alarm is disarmed
VALET button five times (in 1 minute from the moment when y
the ignition). The siren will make two long signals and the LED will light
continuously. The control unit is now in remote control learning mode.
You must activate all remote controls (one by
or )
which you want accepted by the car alarm. The contr
codes in its memory (confirmed by a LED flash and for a brand new
code also by siren chirp).
Keep in mind that only three controllers can be taught to the car alarm.
If you try to teach a fourth controller, the first one will be forgotten and so
on. If you activate only one controller in learning mode, y
control the car alarm only with this one controller.
To close learning mode, switch off the ignition key. Y
many remote controls are available for your car alarm by number of
LED flashes every time when you sw
Setting mode
Optional functions can be modified. To enter the setting mode perform
the following procedure:
•
disarmed and hold it pressed
• after 5 seconds (or more) switch on the ignition key
• the siren will make two long and one short signals and the LED will
light continuously
• release the VALET button; the car alarm is now in setting mode
Now you can make setting; see the following table (you are in row
no. 1). Setting of the parameter is indicated by LED and can be
changed by a remote control button (
or ), each short pressing
will change the parameter (on - off - on - off - etc.). Bold printed
parameters are factory default settings.
To select next parameter (next row in the table), press VALET button
quickly. The siren will confir
of signals. Step by step go through all parameters. When y
parameter number 13, the next VALET button pressing will store all the
programming to the memory and the setting mode
(confirmed by the siren with a long signal). If y
off any time before the setting mode is completed, the setting mode will
be terminated and no changes will be stored.
Note: All data is stored to EEPROM memory, so rem
the car alarm will not change them.
If your locking system needs another kind of control signal
negative pulses, install a couple of over-switching relays to the „Accent“
outputs (or you can use CR-2 relay unit). See following diagrams for
different locking systems.
System with positive
Pneumatic central locking system:
Program duration of output pulses 2 or 4 seconds according to
reaction time of the pneumatic system.
Simplified additional installation o
When manual operation of the whole system from the driver's door is
not requested, you can use the following easy solution. Install
wires actuator (recommended type CM-2) to each door
Connect them as shown in the following diagram. Program duration of
Accent output pulses 0.3 seconds. This way all actuators are operated
with the remote control.
When necessary, the door locks can also be operated manually with a
key (the same way
Caution : In this case do not use longer locking signal !
no. parameter status (LED) description
5 (on)
z (off)
1 REARM enabled
disabled if car is not entered within 1 min. after disarming, it will arm again
2 AUTOIMMO enabled
dis if enabled it will block engine if ignition key is switched off for more than 5 min.
3 duration of locking pulses 0,3 sec.
4 sec. modify „lock“ and „unlock“ output pulse duration
4 longer „lock“ signal
60 sec.
normal
the „lock“ pulse is normal (see step no. 3) or longer (60 seconds)
5
emergency disarm with VALET
enabled
disabled
if emergency disarm is disabled, VALET button can only be used for setting
(emergency disarm is possible only by a professional mechanic)
6
arming / disarming chirps
all arming
limited
if limited, only
button arming and after alarm disarming is indicated with
siren (no sound for
button arming and normal disarming)
7 PANIC enabled
disabled
can be triggered if
& buttons are pressed simultaneously
8 current enabled
disabled possibility to switch the detector completely
9 vibration enabled
disabled completely (no function for CA-321)
10 vibration detector reaction ALA
WARNING alarm or short siren chirp only (no function for CA-321)
11
open door w
enabled
disabled
if disabled, it will not indicate if all the doors are closed when arming
(car alarm tests door switches, AL1 and AL2 inputs when arming)
12 AL2 input reaction ALA
WARNING alarm or short siren chirp only
13 AL2 input logic N.O.
N.C Normally Closed contact logic can be used as a positive trigger input.
Examples of „Accent“ use for different central locking systems