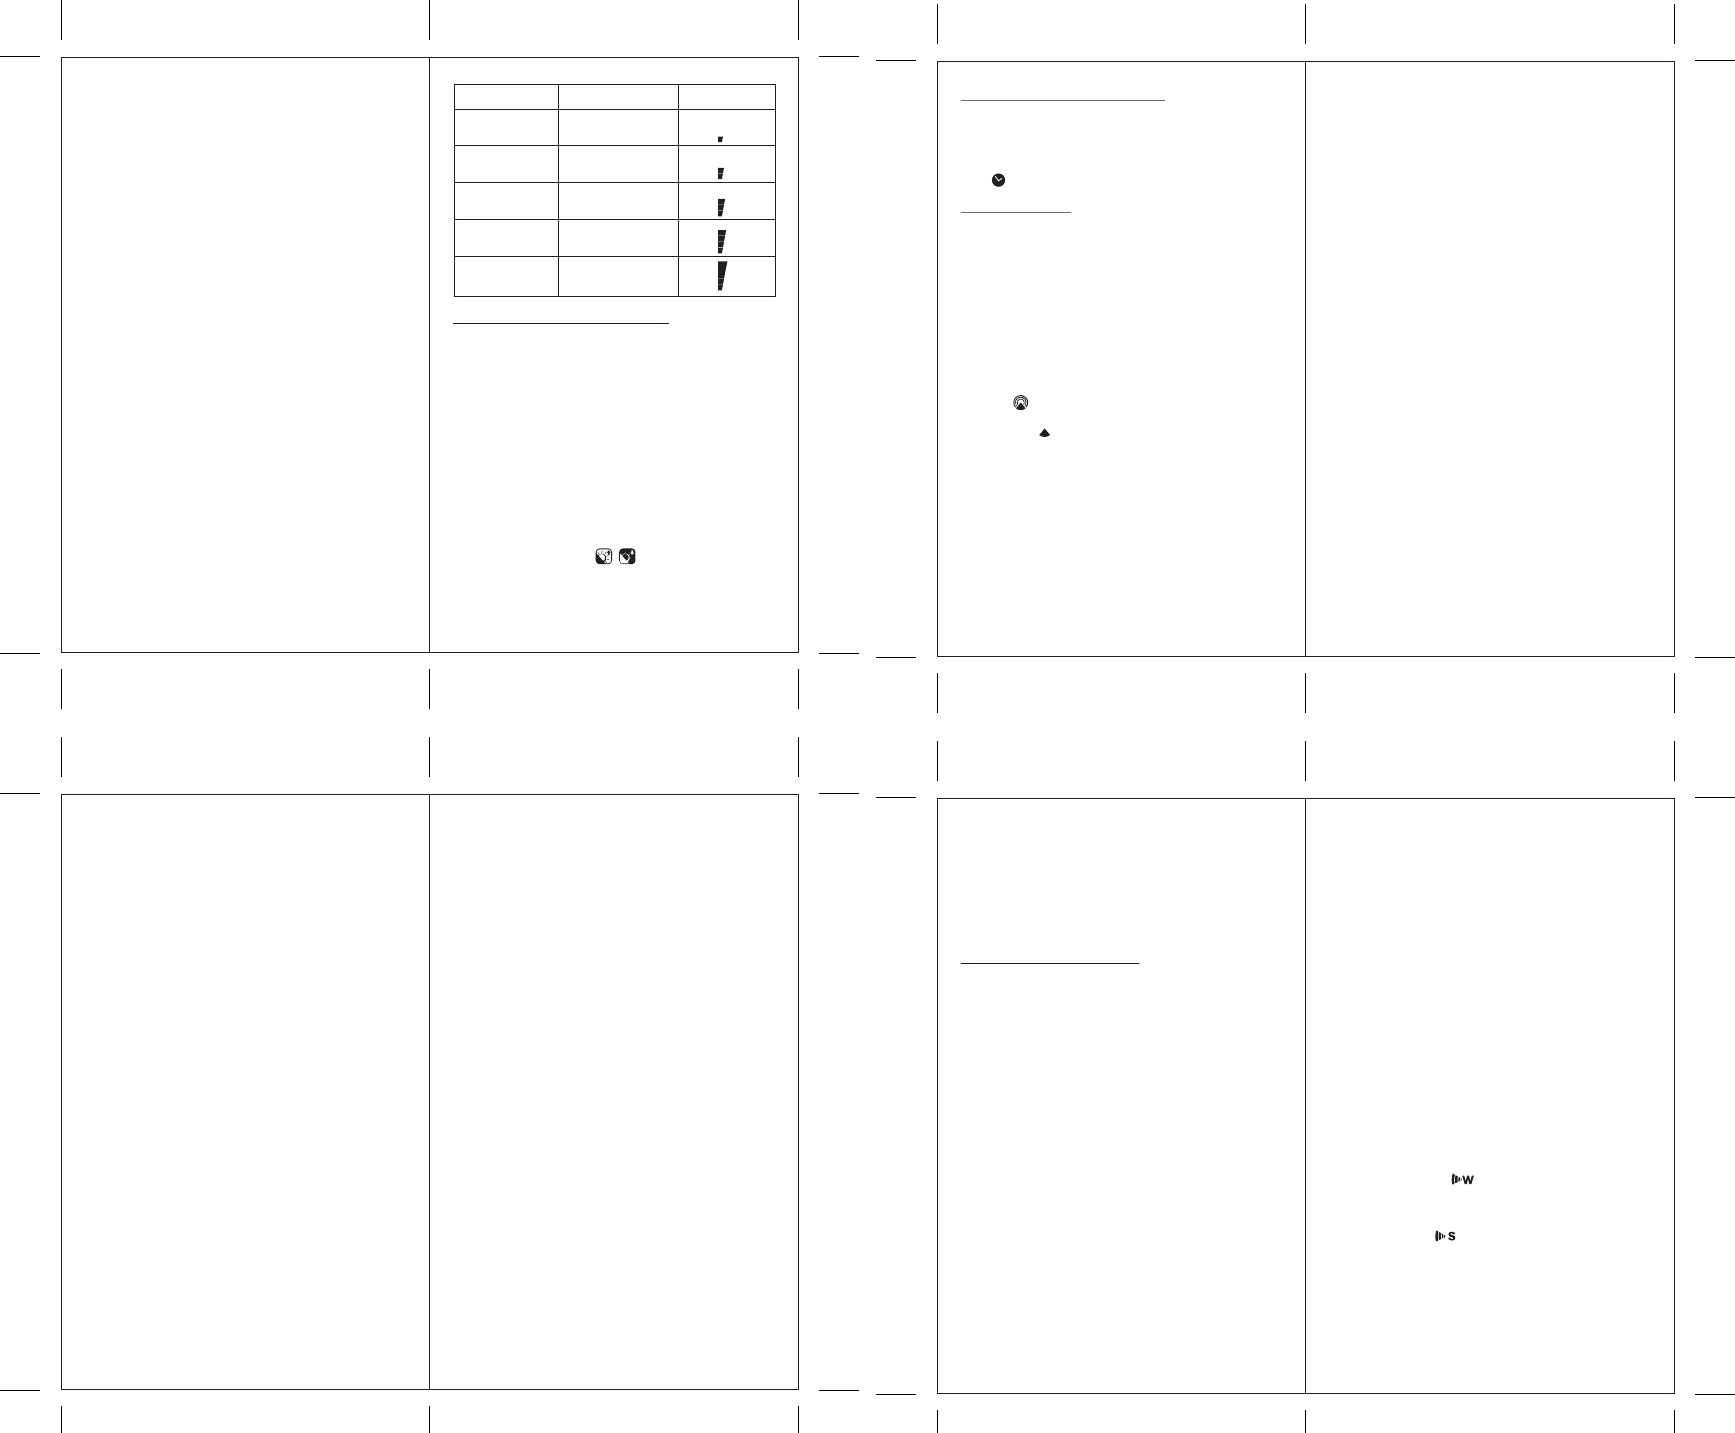
578942
3
Zoom out
Zoom in
Previous page
1/5
Next page
< 27°C
normal
27 – 32°C
caution
32 – 41°C
extreme caution
41 – 54°C
danger
> 54°C
extreme danger
Category Heat Index (°C) Level
3. The transmission is within range and path is clear of
obstacles and interference. Shorten the distance when
necessary.
l) Transmission Collision
Signals from other household devices, such as door
bells, home security systems and entry controls, may
interfere with those of this product and cause
temporarily reception failure. This is normal and does
not affect the general performance of the product.
The transmission and reception of temperature readings
will resume once the interference recedes.
m) Heat Index
The heat index is based on the temperature and
humidity measurements of the channel 1 sensor.
The heat index is an index that combines air
temperature and dew point in an attempt to determine
the human-perceived equivalent temperature how hot
it feels, termed the "felt air temperature". The human
body normally cools itself by perspiration, or sweating,
which evaporates and carries heat away from the body.
However, when the relative humidity is high the
evaporation rate is reduced, so heat is removed from the
body at a lower rate causing it to retain more heat than
it would in dry air. Measurements have been taken
based on subjective descriptions of how hot subjects
feel for a given temperature and humidity, allowing an
index to be made which corresponds a temperature and
humidity combination to a higher temperature in dry air.
The heat index contains average assumptions about the
human body mass and height, clothing, and the wind
speed.
b) Setting up the Location Data
i) In Sunrise/Sunset Mode, press and hold SET to
enter location data setup.
ii) The city code in the Time and Alarm display should
start flashing. Set City Info: Press “+” or “-” to
select a city for your local area. Refer to the
Appendix section for a list of available codes. The
corresponding longitude and latitude will be shown
along with the city. Should you wish to input your
own geographical coordinates, choose “USR”
as the city code. Press SET to confirm your
selection.
iii) If “USR” was chosen, you will be asked to input
your geographical coordinates. Set Degree of
Latitudes: Press “+” or “-” to adjust value. Press
and hold either button for fast advance. Press SET
to confirm your selection. Repeat above procedure
to set minute of latitude, degree of longitude, minute
of longitude, time zone and DST selection.
iv) Upon completion the display will be returned to
Sunrise/Sunset Mode.
Note: Press and hold SET anytime during the setup to
return to normal Clock and Alarm mode. All setting will
be discarded.
c) Viewing the Location
In Sunrise/Sunset Mode, each press of SET rotates
display between:
1. Time and sunrise/sunset times
2. Calendar and sunrise/sunset times
3. Calendar and longitude/latitude
d) Viewing Sunrise/Sunset Times for Different Dates
1. In Sunrise/Sunset Mode, press MEM.
2. The date should be flashing.
Press “+” or “-“ to adjust date. Press and hold either
button for fast advance. The corresponding sunrise
and sunset times will be displayed for the selected
date.
7. CLOCK AND ALARM MODE
Important: All operations described in here are to be
made in the clock mode
Accessing Clock and Alarm Mode
From the main console unit: Press + or - until the clock
icon beside the time/date display starts flashing.
7.1 Time Function
HOW TO SET THE RADIO CONTROLLED
CLOCK
1. After the batteries are installed. The clock will
search the radio signal automatically (DCF77 from
Germany). It takes about 3-10 minutes to finish this
process.
2. If you wish to disable the auto-reception feature,
hold “+” for 2 seconds to disable it.
3. To enable the auto-reception feature again, hold “+”
for 2 seconds again to start the reception and the
regular synchronisations.
4. If the radio signal is received, the date & time will
be set automatically and the radio control signal
icon [ ] turns on.
5. If the clock fails to receive the time signal, it will
show the [ ] icon. If the time is not correct, you
may set the time manually.
HOW TO SET THE CLOCK MANUALLY
To set the clock manually, hold SETfor 2 seconds.
Now it will show the language. You may choose among
English (ENG), German (GER), French (FRE), Italian
(ITA), Spanish (SPA) and Dutch (DUT). Press “+” or
“-” to change it.
Press SETto confirm. Repeat the same procedure to
set your nearest city (default is "Frankfurt", see belwo
for more details), year, month, date, date-month
format,12/24 hour format, hour and minute. During the
setting, press and hold “+” or “-” will increase or
decrease the value rapidly.
Rotating between Different Clock/Calendar Displays
Pressing SET rotates the clock display between:
- Hour: Minute: Weekday
- Hour: Minute: City
- Hour: Minute: Second
- Month: Day: Year (or Day: Month Year depending
on settings)
- Hour: Minute for UTC (Coordinated Universal Time)
7.2 Wake-Up Alarm Function
There are three time alarms available on the console
unit:
Weekday alarm: activated everyday from Monday to
Friday at specified time
Single alarm: activated once at specified time
Pre-alarm: activated at specified time interval
(15- 90 min) ahead of weekday alarm, if channel 1
temperature falling to +2 ºC or below.
The snooze duration for the above alarms can also be
programmed (1-15 min).
Activating/Deactivating the Time Alarms
1. Press ALARM/CHART to rotate between:
- Weekday Alarm Time (displays OFF if weekday
alarm deactivated)
- Single Alarm Time (displays OFF if single alarm
deactivated)
- Pre-Alarm Time (displays OFF if pre-alarm
deactivated)
2. When the above alarms are displayed, pressing “+”
or “-” will activate/deactivate the corresponding
alarm.
Note: Press SET anytime during alarm selection mode
to return to normal clock display.
Setting up the Time Alarms
1. Press ALARM/CHART to select the alarm which
you wish to configure.
2. Press and hold ALARM/CHART until hour starts
flashing in the display
3. Set Alarm Hour:
Press “+” or “-” to adjust value. Press and hold
either button for fast advance.
Press ALARM/CHART to confirm your selection.
4. Set Alarm Minutes:
Press “+” or “-” to adjust value. Press and hold
either button for fast advance.
Press ALARM/CHART to confirm your selection.
5. Set Duration of Snooze Function (all three alarms
share same snooze time duration, default 8 minutes,
1 to 15 minutes can be set):
Press “+” or “-” to adjust value. Press and hold
either button for fast advance.
Press ALARM/CHART to confirm your selection.
6. Upon completion the display will be returned to
the alarm selection screen.
Note: Pre-alarm cannot be activated if weekday alarm
or single alarm is not enabled.
ALARM FEATURE
Weekday Alarm
The alarm sound will be activated and the icon will be
flashed on weekday when it is armed and the alarm
time is reached.
Single Alarm
The alarm sound will be activated and the icon will be
flashed when it is armed and the alarm time is reached.
Once it finished, it will be disabled automatically
Pre-Alarm “Pre-AL”
The pre-alarm sound will be activated and the icon will
be flashed if the temperature of channel 1 is under or
equal two degree C.
It is programmable 15, 30, 45, 60 or 90 minutes earlier
than the weekday alarm or single alarm time.
If there is an item you do not wish to change, simply
press SETto bypass the item. When you finished the
change, press SETto exit. The display will return to
the clock mode.
Details about the time setting mode (in "city code"
section)
1. In the city setting, you may chose any of the preset
locations (see the list in the Appendix).
2. If USR (=USER location) is selected, you may set
your own latitude and longitude and timezone
Set Latitude / Longitude:
You will be asked to enter your latitude in degrees (º).
Press “+” or “-” to adjust value. Press and hold either
button for fast advance.
Press SET to confirm your selection.
Repeat above procedure to set the minutes for the
latitude (‘), the northern or southern hemisphere and
then the degrees for the longitude and the minutes for
longitude and again the eastern or western hemisphere
Set Time Zone (TZ):
Press “+” or “-” to adjust value in steps of 30 min.
Press and hold either button for fast advance.
Press SET to confirm your selection.
Set Daylight Saving Time Option:
Press “+” or “-” to turn DST option on or off. Press and
hold either button for fast advance. The various options
you may find in the Appendix in the "DST definition".
Press SET to confirm your selection.
Note: You may press and hold SET anytime during the
setup to return to the normal Clock and Alarm Mode.
All settings made will then be discarded. The same will
happen, if you do not press any key in the setting mode
for more than 2 minutes,
3. Press MEM or SET to return display to
Sunrise/Sunset Mode.
e) Understanding the Sunrise/Sunset Display
The sunrise time being displayed differs during the
morning and the afternoon/night.
From 12 am to 12 pm:
The sunrise time for the current day will be displayed.
From 12 pm to pm:
The sunrise time for the next day will be displayed.
“NEXT DAY” icon will be displayed above the sunrise
time.
At certain locations (especially those at high latitudes),
sunrise and sunset events may not occur within a 24
hours time frame.
6. SUNRISE AND SUNSET MODE
Important: All operations described in here are to be
made in the Sunrise/Sunse mode
The main console unit computes the sunrise and sunset
times from the user-configured location data. This
includes the longitudes, latitude, time zone and DST
(Daylight Saving Time). Choosing a suitable city code
for your location will automatically generate the correct
values for the location data.
Should you wish to input your own location data or if a
suitable city code could not be found, choose “USR” as
the city code during setup. A searching function is also
available, which allows the sunrise/sunset times for
different dates to be viewed.
a) Accessing Sunrise/Sunset Mode
From the main console unit: Press “+” or “-” until the
sunrise and sunset icons on the lower left of the
display start flashing.
2221
2423
1817
2019
3


Need help? Post your question in this forum.

Forumrules


Report abuse

Libble takes abuse of its services very seriously. We're committed to dealing with such abuse according to the laws in your country of residence. When you submit a report, we'll investigate it and take the appropriate action. We'll get back to you only if we require additional details or have more information to share.

Product:

For example, Anti-Semitic content, racist content, or material that could result in a violent physical act.

For example, a credit card number, a personal identification number, or an unlisted home address. Note that email addresses and full names are not considered private information.

Forumrules

To achieve meaningful questions, we apply the following rules:

Register

Register getting emails for Irox HBR653 at:


You will receive an email to register for one or both of the options.


Get your user manual by e-mail

Enter your email address to receive the manual of Irox HBR653 in the language / languages: English as an attachment in your email.

The manual is 2,92 mb in size.


You will receive the manual in your email within minutes. If you have not received an email, then probably have entered the wrong email address or your mailbox is too full. In addition, it may be that your ISP may have a maximum size for emails to receive.

Others manual(s) of Irox HBR653

Irox HBR653 User Manual - German - 3 pages


The manual is sent by email. Check your email

If you have not received an email with the manual within fifteen minutes, it may be that you have a entered a wrong email address or that your ISP has set a maximum size to receive email that is smaller than the size of the manual.

The email address you have provided is not correct.

Please check the email address and correct it.

Your question is posted on this page

Would you like to receive an email when new answers and questions are posted? Please enter your email address.


Info