3. PUTTING INTO OPERA
The communication between the main unit (receiver) and the remote sensor (transmitter)
is wireless, thus simplifying the installation. The remote temperature sensor transmits data
to the main unit, with an operating range of up to 100 feet (30 meters) in opened area.
The remote temperature sensor can be placed indoors or outdoors, depending on the area
where the temperature is intended to be measured. If you intend to measure outdoor
conditions, place the remote sensor outdoors.
Start-up the transmitter
• It is important to power-up the remote sensor BEFORE powering-up the main unit.
Immediately after batteries are installed, the remote sensor will start transmitting a
temperature and humidity data to the main unit.
• It is strongly recommended to power up and test communication between the remote
sensor and the main unit BEFORE permanently mounting the sensor outside.
• During initial set up, place the remote sensor within a range of 1m to the main unit in the
same room, both receiver and transmitter far from any other electric product.
•
position the remote sensor and the main unit within the maximum transmission range of
up to 30 meters (100 feet).
NOTE:
•
• T
appliances, surrounding building materials and how the main unit and transmitter are
positioned.
Placement of sensor and main unit
• Place the remote sensor so that it faces the main unit (receiver), minimizing obstructions
such as doors, walls and furniture.
• Though the remote sensors are weather
sunlight, rain or snow
the north side of a building with free air circulation.
• The remote sensor can be placed on the flat surface or mounted on the wall in vertical
position by using the included stand. For fixing the stand, use a screw
• Ideally
correct measurement.
•
elements
•
concrete structures, paving, and patios
• The international standard for the valid air temperature measurements is 1.25meters
(4 feet) above the ground
• When mounting the main unit on the wall or vertical surface, fold the table stand back
into the unit.
• Make sure that the main unit is locating within the operating range of all remote sensors.
• Ideally the main unit should be placed within line of sight of remote sensors.
placing the main unit where surfaces emitting and radiating heat (e.g. heating ducts or air
conditioners) and areas with interference from wireless devices (e.g. cordless phones,
radio headsets, baby monitoring devices and other electronics).
Important notice about batteries
• The HBR636 is delivered with batteries to make the start-up easy for you.
batteries may not last as long as fully new batteries may
batteries on the outside sensoralkaline batteries. Advantage
this is a better performance in case the outside temperature falls below 0° (32°F). For
optimum performance, we recommend even lithium batteries.
•
power requirements.)
• AL install batteries in the remote sensor before the main unit.
• Insert batteries before first use, matching the polarity in the battery compartment.
When the
display
shows...
Forecast
is...
Sunny
Partly
Cloudy
Heavy
Rainy
Heavy
Snowy
Cloudy Rainy Snowy
NOTE: The weather
the forecasted (pr
clear weather
4.1.1 OPERA
For all operations described in Chapter 4.2, press UP▲ ) or DOWN (▼ ) until the
pressure icon “PRESSURE” , to the left of the barometric pressure value, begins to
flash.
The pressure window displays the weather forecast and the local barometric or sea level
pressure.
bar-chart for the past 24 hours or a temperature or humidity history bar chart.
Pressure can be displayed in hPa/mBar
There are three viewing options available: barometric pressure SEA or LOCAL
or AL. Local pressure is a measured value (can’t be adjusted) while the
SEA is calculated from the Altitude setting. YSEA
value directlyAltitude and allow the unit to
calculate the SEA value. The direct setting of the SEA is only advised
if you wish to calibrate the SEA pressure based on very accurate pressure
information for your location.
The unit is designed to measure the pressure changes at your specific location and show
this value as the LOCAL barometric pressure.
The SEA pressure value is meant to match your local meteo information (like on
TV
4.1.2 SETTING INITIAL
NOTE: The unit will automatically exit any programming mode if it does not detect a
button press for about 1 minute.
SELECT
Select the PRESSURE window
Press MODE button, to toggle through selections until “SEA or “LOCAL”
barometric pressure is displayed.
Press and hold MEM button to enter the setting of the pressure unit (unit blinking). Press
the UP▲ ) or DOWN (▼ ) button to select the preferred barometric pressure unit:
hPa/mBar
MEM to confirm your selection.
Then press MODE to move to the Altitude unit selection mode. Press and hold MEM
button to enter select the altitude unit (unit blinking). Press the UP▲ ) or DOWN (▼ )
button to select FEET or METER . Press MEM to confirm.
PROGRAMMING ALTITUDE
Select the PRESSURE window
Press MODE to move to the
Altitude setting.
Press and hold MODE to move to the AL value setting (altitude value blinking).
Press UP▲ ) or DOWN (▼ ) to adjust the altitude value to your location. (Press and hold
either button for fast adjustment)
Press MODE to confirm the programming selection.
PROGRAMMING SEA
Select the PRESSURE window
Press MODE , to toggle through selections until “SEA is displayed.
Press and hold MODE , until the barometric pressure digits are flashing.
Enter the desired sea level pressure value by pressing UP▲ ) or DOWN (▼ ) buttons.
(Press and hold either button for fast adjustment).)
Press MODE , to confirm sea level value selection.
VIEWING
Select the PRESSURE window
Press MODE . W
local pressure and the local altitude.
VIEWING SEA
Select the PRESSURE window
Press MEM to enter the sea level pressure display
When the SEA is displayed, press MEM repeatedly viewing the sea level
pressure history for the past 24 hours in 1 hour intervals.
If no buttons are pressed for 5 seconds, the unit will automatically return to the default
Pressure and W
VIEWING PRESSURE, TEMPERA
The bar chart in Pressur can be configured to display a historical data for the
sea level pressure and temperature or humidity for channel 1 (only channel 1!).
After selecting the Pressur, press and hold ALARM button to toggle the bar
chart between the sea level pressure with a word “PRESSURE” displayed at the right
bottom corner of the chart, temperature with a thermometer icon and “CH1” and a
humidity with “RH” icon and “CH1” .
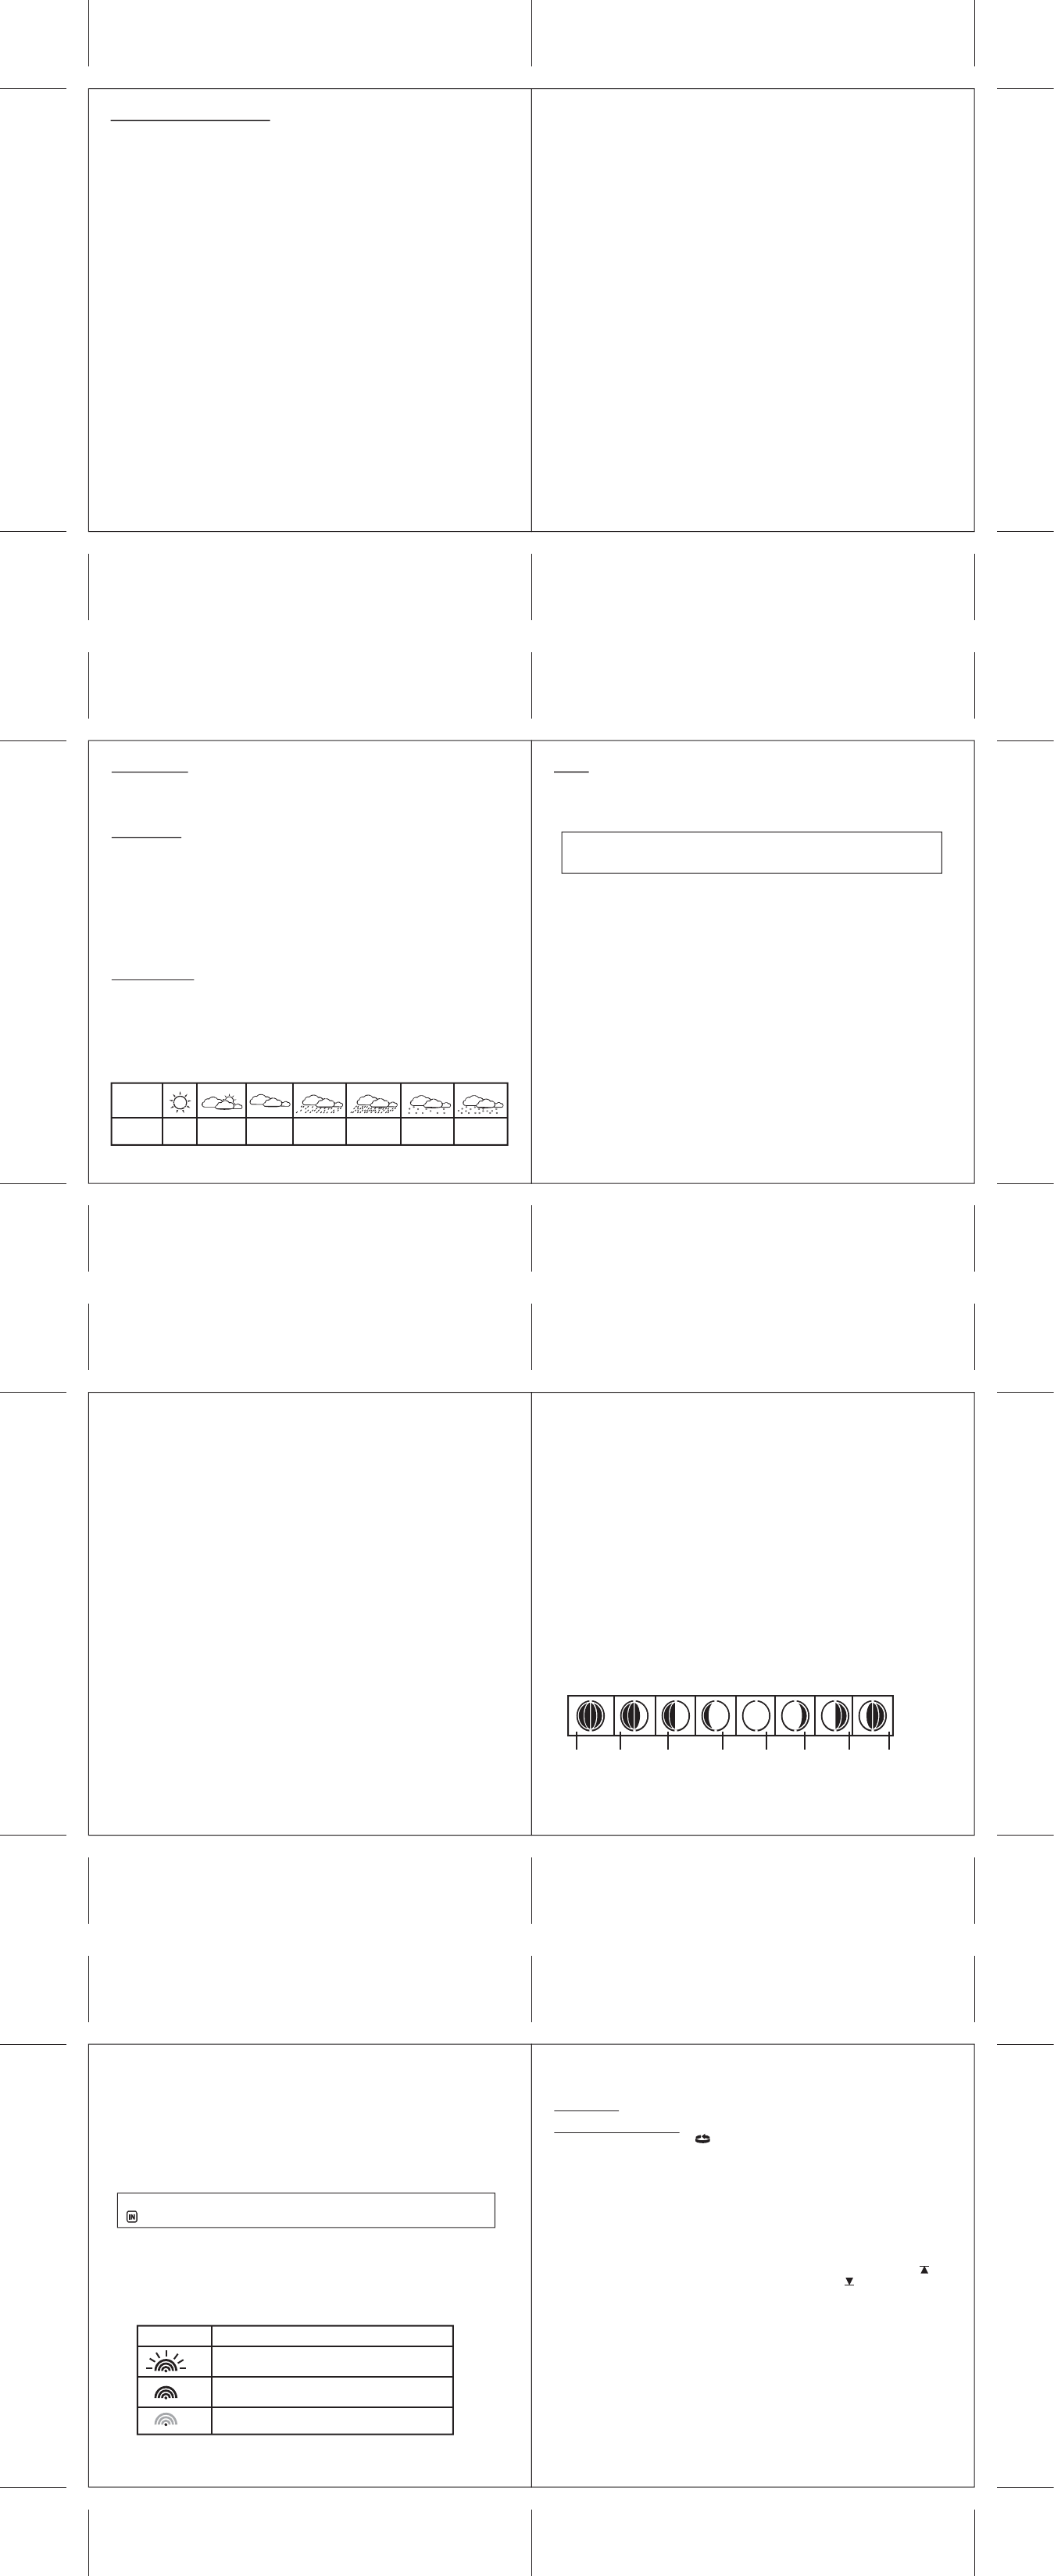
4.1.3 MOON PHASE
In steps of 3 days, the current moon phase is displayed by the following icons (the dark
part is same as with the moon: dark !)
New
Moon
W
Crescent
First
Quarter
W
Gibbous
Full
Moon
W
Gibbous
Last
Quarter
W
Crescent
4.2 TEMPERA
The main unit supports up to 3 remote sensors, each corresponding to a separate channel
of the temperature and relative humidity display
Celsius (ºC) or Fahrenheit (ºF).
The main unit carries the "indoor" temperature and humidity sensor and uses this data to
calculate the indoor comfort level - W or "NO INDICA.
A
once one of the remote temperatures exceeds or falls below the pre-set upper and lower
limits.
OPERA
FORCED SEARCH FOR REMOTE SENSORS
Select the TEMPERA
The main unit can be manually activated to search for the signal from the selected remote
sensor by pressing and holding the DOWN (▼ ) button.
The wave icon above the current channel icon shows the connection status of the
corresponding remote sensor:
For all operations described in Chapter 4.4, press UP▲ ) or DOWN (▼ ) until the
icon, to the left of the indoor temperature value, begins to flash.
Icon
Status
Searching for the signals from the remote sensor
Corresponding remote sensor signal received
successfully
No signals received for over 1 hour
VIEWING REMOTE (CHANNEL) TEMPERA
Select the TEMPERA
Static Display: Press the CHANNEL button to select measurements from different
remote sensors (channel 1, 2 or 3).
Channel
and hold CHANNEL , until the icon is displayed. The measurements from each
remote channel will be alternately displayed with a 5 seconds viewing.
NOTE: the channel auto-scan feature can be active only if there are mor
remote sensors operating and are MODE to different channels.
PROGRAMMING TEMPERA
Select the TEMPERA
Press and hold MODE button for 3 seconds to toggle the temperature unit in Celsius (ºC)
or Fahrenheit (ºF).
TEMPERA
Select the TEMPERA
Press ALARM button selecting the desired alarm, the upper temperature alert with icon
(if disabled, display shows OFF ), or lower temperature alert with icon (if disabled,
display shows OFF ).
Press and hold ALARM button until the temperature digits flashing.
temperature digits using the UP▲ ) or DOWN (▼ ). Press and hold either button for fast
setting. Press the ALARM to confirm selection and return to the temperature alarm
selection screen
ACTIV
Once the above alerts are displayed, press the UP▲ ) to enable or DOWN (▼ ) to disable
the alert.
VIEWING MAX/MIN READINGS
Select the TEMPERA
Press the MEM button to read the minimum temperature and humidity of all sensors
(indoor and remote) with the MIN, next MEM press the maximum values with the MAX
icon and then back to the current values.
4. OPERA
Immediately after batteries are installed, the remote sensor will start transmitting the
temperature and humidity data to the main unit in regular intervals.
Once the main unit is powered-up by activating the batteries, the display will show all
available LCD segments for a moment.
IMPORT
(or as long as you are performing a setting), allowing setting your local altitude and
pressure parameters by pressing the UP▲ ) or DOWN (▼ ) and MODE buttons. The
locked display will show the pressure icon and abbreviation “hP flashing in the
W
If pressure and altitude are not set within this minute, the unit will self-calibrate and show
the default settings for the pressure and altitude (sea level).After this, the unit will scan the
remote sensors (Ch 1 to Ch 3) in the T. There is no
immediate need to press any button during this process.
After this, the unit will start to scan the DCF77 time transmitter in the Clock Window .
Thereby
there is no immediate need to press any button during this process.
Recommendation: without touching
ANY for about 6-8 minutes during the main unit initial set up. This will give the
unit time to synchronize with remotes, stabilize pressure readings and settle with default
settings.
4.1 WEA
This unit is capable of detecting the atmospheric pressure changes. Based on collected
weather data, it forecasts the weather for the next 12 to 24 hours.
39
41
43
45