4. EXTENDED OPERA
All operations on the device are carried out by pr
It is very important that you read chapters 2 and 3!
In these chapters you will find additional information about the functions
4.1 W
This Irox device uses a high quality pressure sensor to measure barometric pressure and the
respective changes. This information is then, using a by meteorologists specially developed
algorithm, used to calculate a weather forecast for the coming 12-24 hrs. Five different
forecasts are possible:
COMMENT
The forecast for
means clear weather
Slightly cloudy
Cloudy
Rain
Sunny
Heavy rain
RADIO CONTROLLED CLOCK RECEIVING LOGIC
1.
automatically received when the batteries are activated. The time signal reception takes
about 3-10 minutes. During receiving the icon will blink, if reception is good with
waves if reception is poor without.
2. If you would like to switch the automatic time reception off and then on again you can do
so with the time-setting (see below "Setting").
3. During normal operation an automatic time reception will be activated daily at 0:00 and
4:00. If the reception at 4:00 failed, another reception will start at 5:00.
4.
icon is active.
5. If reception is poor the icon will be displayed. OFF
and adjust the clock manually (see below "Setting"). If you leave the reception On , a
next reception attempt will then be activated during the night.
SETTING
Y
1- Radio controlled clock with regular time comparisons. In between the active receptions
the time runs on integrated quartz (this is a factory setting which is reactivated after every
battery replacement)
2- Strictly as a quartz clock
Move to set mode with the set button (press and hold for 3 seconds). On will appear in the
time display
W▲ /▼ buttons you can make changes to the setting, with the set button you move to
the next setting.
The setting options vary depending on operating mode On or OFF
4.4 T
Y
corresponding text with up to 15 letters.
CELEBRA
time to the beginning of the event (COUNTDOWN ).
If the event takes place in a different time zone it is very important that you calculate the
time difference. If for example admittance to an event is at 17:00 in London, then it is
already 18:00 in Central Europe! If then for example you live in Germany or Switzerland
you must enter 18:00 as start time!
When programming an event consider following questions:
- In which time zone is the event taking place?
- In which time zone do you live and what time is it on your display?
- Is daylight savings time (summer/winter) of importance?
Y
maximum 3999 days (this means an event that is over ten years from "now"!). If you select
a date beyond these 3999 days the clock will still count the time down but only in the
background. The depicted 3999 days, 23 hours, 59 minutes and 59 seconds remains the
same until the countdown is below this number
Caution: During the setting procedure as described below you will exit the setting mode if
more than 1 minute passes between pressing the buttons. The settings already made up to
this point will be taken over
SETTING
Press and hold the event set button until T appears in window B and the
year (YEAR ) blinks.
Y▲ /▼ buttons, use the set button to move to the next
setting:
Month Day Hour T
The letters for the text line are also selected using the ▲ /▼ button, to move to the next
character use the set button. event set button to move back in the
text. Maximum 15 characters can be entered.
Selection of characters: A-Z, 0-9, Space and special characters / + * '
Setting is complete when the last character in window C has been confirmed by pressing the
set button or if when entering the text the set button is pressed and held for 3 seconds.
WHA
When the countdown reaches zero the time of the event has arrived.
All zeros of the T
activated it will stop). event set
button.
By pressing the event set button you can acknowledge this message and the display that was
active prior to the end of the countdown will appear
In window B End will now appear for COUNTDOWN and T.
This status will remain until midnight.
It is possible though to program a new event before midnight.
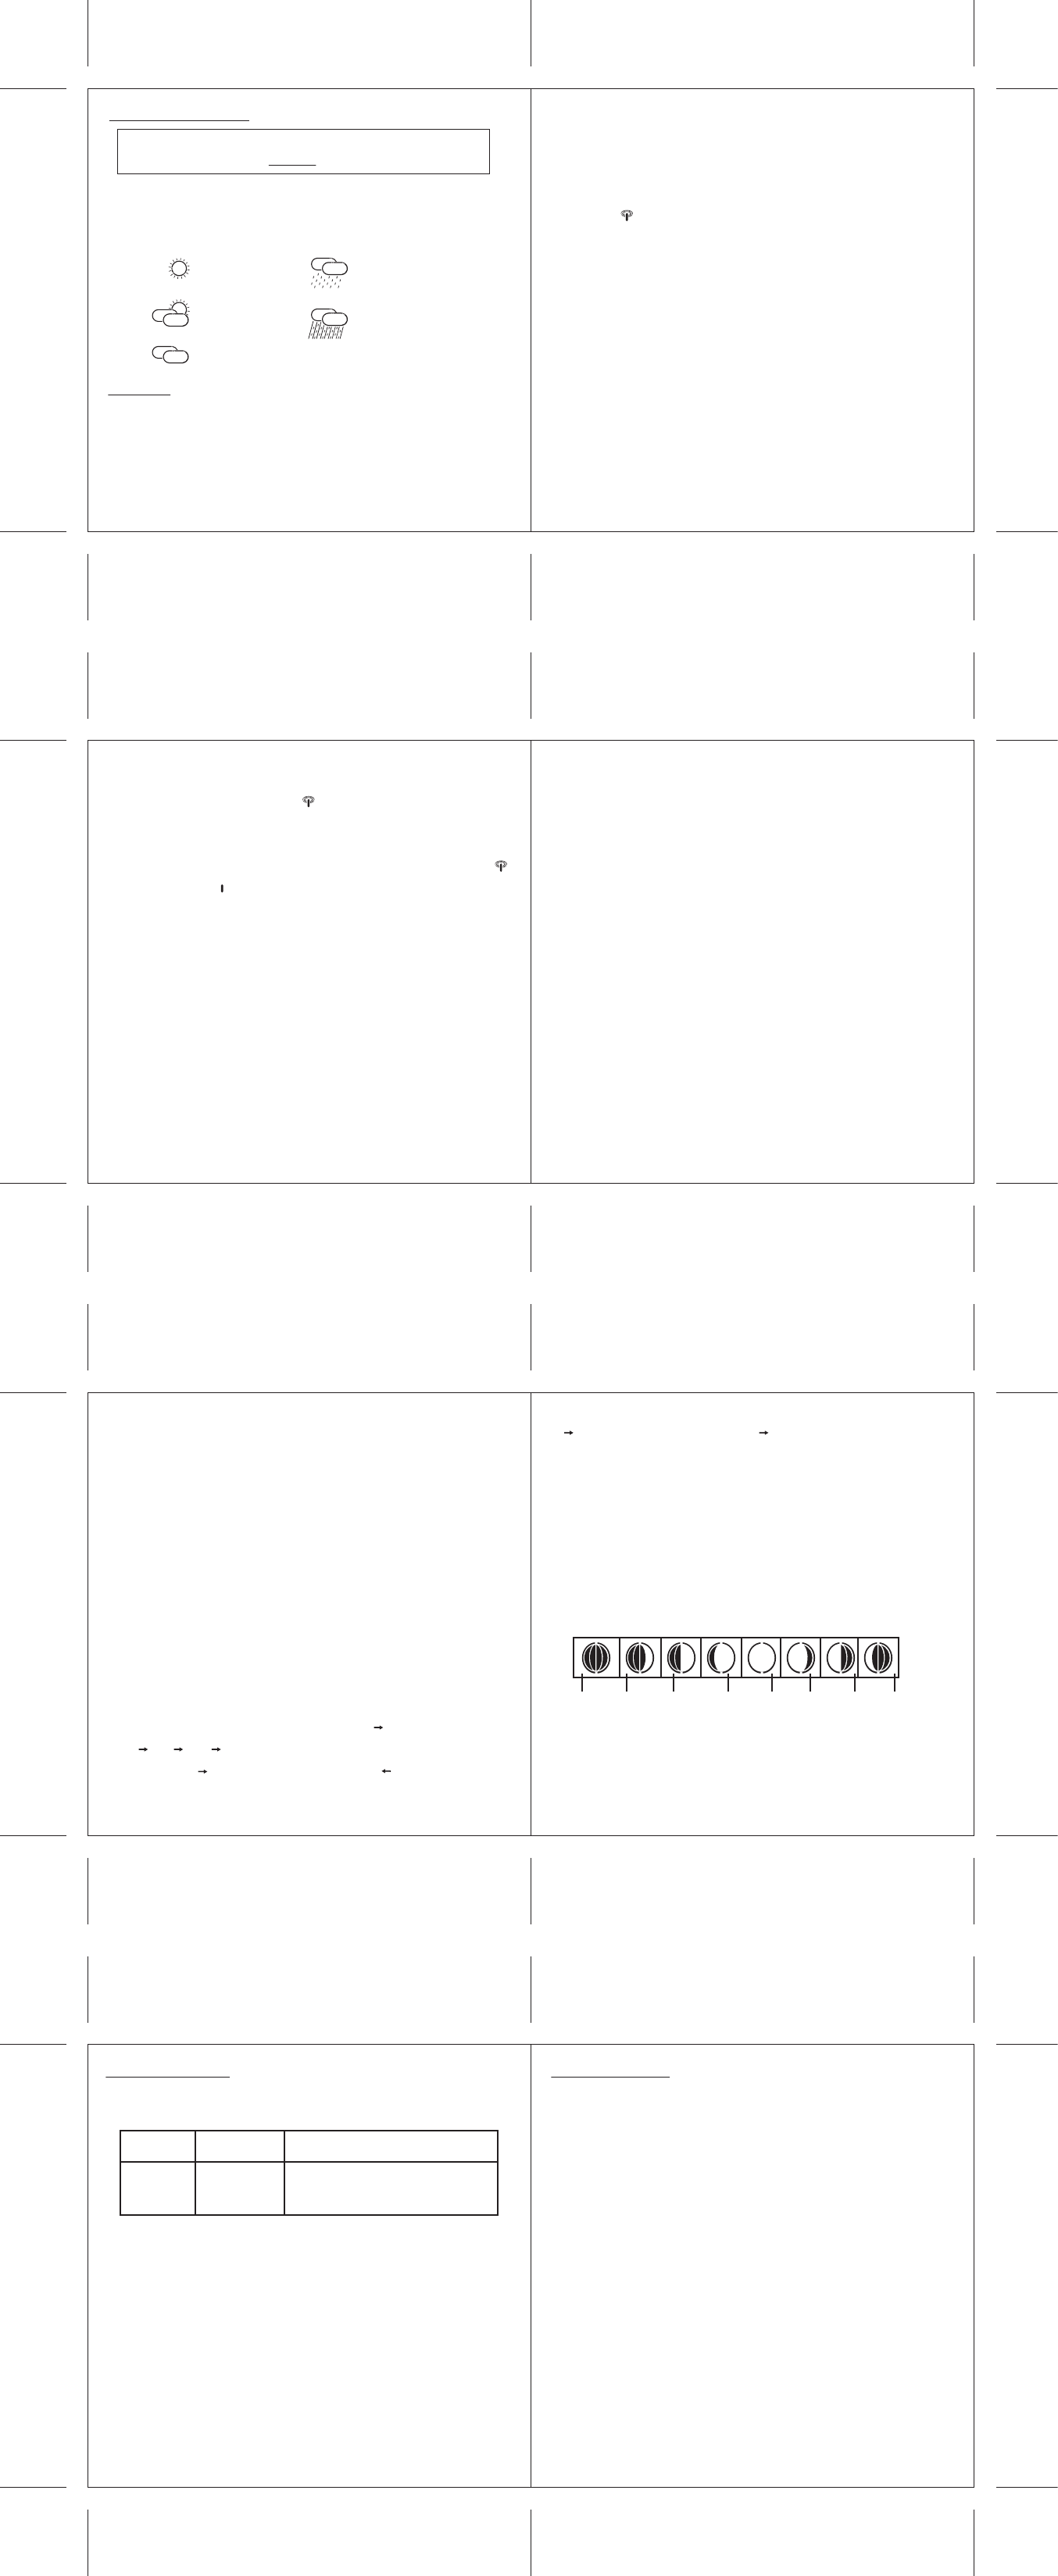
4.5 Moon phase
In steps of 3 days, the current moon phase is displayed by the following icons (the dark part
is same as with the moon: dark !)
Operating mode 1 – Radio controlled clock on = On
- T
- Language selection of the weekday display of the programmed event
- T
T
Central Europe (Germany
“ZONE” and the accordingly corrected time will appear on the time display
for locations where the DCF77 time signal is received but that have a different time such
as Great Britain (-1HR) or Finland (+1HR)
Complete the setting with the set button
If the radio reception was reactivated (switching from OFF to On ), the time signal will
also be newly received after exiting the set mode.
Operating mode 2 – Radio controlled clock off = OFF
- T
- Language selection of the weekday display of the programmed event
- Setting the hours
- Setting the minutes
- Setting the date
W
received. Switching off the receiver spares the batteries.
T
There are a total of 19 languages available. In a predetermined language block of 3
languages the weekday of the programmed event is displayed with a 3 letter abbreviation
of the weekday
The language blocks contain following 3 languages:
Deutsch – Français- Italiano
English – Espanol – Portugues
Danske/Norske – Svenska – Islenska
Nederlands – Suomalainen – Polski
Cesky – Slovencina – Magyar
Ruski – Srpski – Hrvatski (Russian and Serbian are depicted Cyrillic)
4.2 T
The display unit measures the temperature and relative humidity of its location. The
temperature is displayed in °C.
4.3 Time function
The time signal DCF 77 is transmitted by the atomic clock in Mainflingen near
Frankfurt/Main. The long-wave transmitter has a range of up to 1500 km.
If the time icon is displayed without waves you have reception problems. Please
observe following points:
- There are fewer disturbances in the atmosphere during the night which increases the
likeliness of reception. One reception per day is completely sufficient to ensure the
preciseness of the clock by +/- 1 second
- Make sure that the device is at least 2 meters (8 feet) away from possible sources of
disturbance such as TV
- In rooms with concrete or metal walls (e.g. cellar rooms, modern office buildings etc.) the
receipt of the signal may be more difficult due to the shielding. In such cases find a better
location for the device near a window
by 90°, thereby improving the alignment of the receiving antenna.
Caution: During the setting procedure as described below you will exit the setting mode if
more than 1 minute passes between pressing the buttons. The settings already made up to
this point will be taken over
Where?
Display unit
Radio controlled
clock does not
receive signal
Symptom Solution
5. TROUBLESHOOTING
If you notice a malfunction of your device, always first check the battery please. If in doubt,
always replace the batteries !
Also please check the following before contacting the customer service of the store where
you purchased the device:
6. BA
The batteries last for about 8-12 months. Depending on the batteries used this time frame
may be a bit shorter or longer
undesired and unexpected interruption of operation.
- IN LOW BA
This means that the batteries in the display unit are becoming too weak and must be
replaced.
The ticker is automatically activated if a battery status message is activated. It is not possible
to stop the ticker as long as the message is displayed!
Important:
Use only new batteries and never combine old batteries with new batteries. Observe polarity
when inserting batteries!
Please also remember that used batteries do not belong in domestic trash, they should be
disposed of at designated collection points. Our environment will appreciate it!
Important note on batteries
• Never use rechargeable batteries.
sufficient for our devices.
Reposition the device. Preferably near a
window and leave it there overnight. Perhaps
an additional turning of the device by 90°
would help.
New
Moon
W
Crescent
First
Quarter
W
Gibbous
Full
Moon
W
Gibbous
Last
Quarter
W
Crescent
28
30
32
34