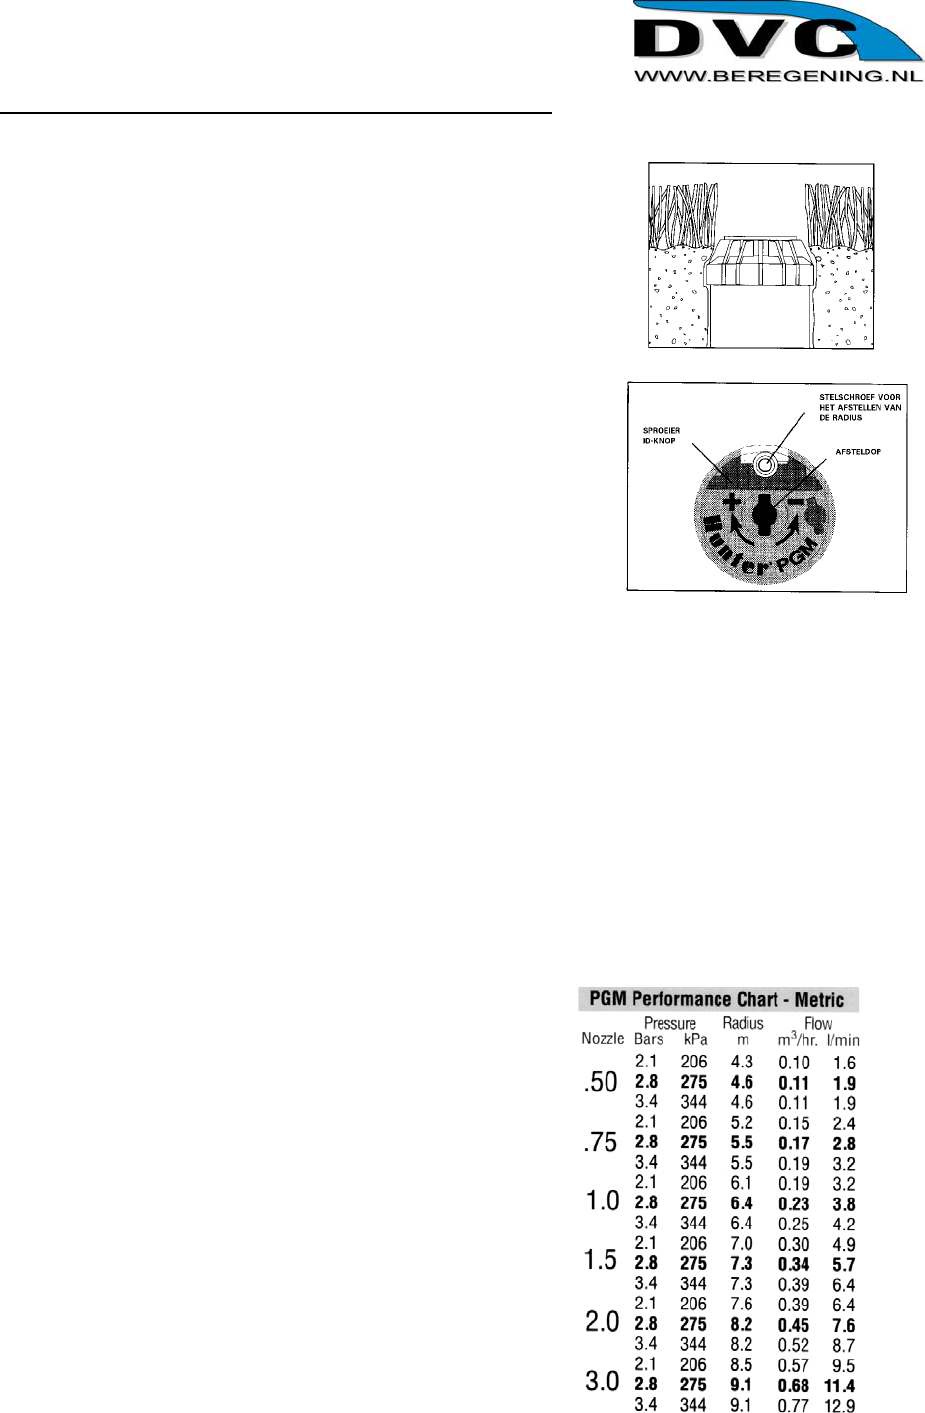
De PGM-sproeier dient geïnstalleerd te worden op de hoogte, zoals in de
afbeelding wordt aangegeven.
AFSTELLING VAN DE SPROEIHOEK
(Alle PGM-sproeikoppen VOORAF INGESTELD op ongeveer 180°)
1. Draai de sproeikop tegen de klok in naar het linkersperpunt.
2. Draai de sproeikop met de klok mee naar het rechter vaste punt. Dit
is het vaste startpunt van de sproeihoek. De sproeikop moet voor
alle afstellingen van de sproeihoek in deze stand worden gehouden.
HET VERGROTEN VAN DE SPROEIHOEK:
1. Steek het einde van de Hunter-sleutel in de afsteldop aan de
bovenzijde van de sproeier.
2. Draai de sleutel met de klok mee, terwijl u de sproeikop op het
rechter vaste punt houdt. (Let op: alle afstellingen zijn mogelijk
zonder dat de afstelsleutel een volledige draaigang heeft gemaakt.)
3. De sleutel zal ophouden te draaien wanneer de maximale
sproeihoek (360°) is bereikt.
Ga niet voorbij dit punt !!!!!!!!
4. Stel iedere sproeihoek af tussen de 40° en 360°.
HET VERKLEINEN VAN DE SPROEIHOEK:
1. Steek het einde van de Hunter-sleutel in de afsteldop.
2. Draai de sleutel tegen de klok in, terwijl u de sproeikop bij het rechter vaste punt houdt.
3. De sleutel zal ophouden te draaien wanneer de minimale cirkelboog (40°) is bereikt.
Ga niet voorbij dit punt !!!!!!!.
4. Stel iedere cirkelboog af tussen de 40° en 360°.
Let op: Niet-beschadigde sproeimonden kunnen opnieuw gebruikt worden.
HET VERKLEINEN VAN DE STRAAL:
1. Draai de stelschroef voor het afstellen van de sproeimond met de klok mee naar beneden.
2. Indien een kleinere straal wordt verlangd, installeer dan een kleinere sproeimond. Dit zal de
neerslaghoeveelheid beïnvloeden.
HET VERGROTEN VAN DE RADIUS:
1. Draai de stelschroef voor het afstellen van de sproeikop tegen de klok in omhoog.
2. Indien een grotere straal wordt verlangd, installeer dan een grotere sproeimond. Dit zal de
neerslaghoeveelheid beïnvloeden.
HET VERHOGEN VAN DE NEERSLAG.
1. Verwijder de bestaande sproeimond.
2. Vervang hem door een grotere maat.
3. Stel de straal af.
HET VERLAGEN VAN DE NEERSLAG:
1. Verwijder de bestaande sproeimond.
2. Vervang hem door een kleinere maat.
3. Stel de radius af.
PRESTATIE VAN HET PRODUCT
De 5 verwisselbare sproeimonden van de PGM voorzien in een brede
en multifunctionele actieradius van 2,4 tot 13 liter/minuut met een
straal van 5,2 tot 9,1 meter.
De weergegeven gegevens betreffen de resultaten bij afwezigheid van
wind. Stel de installatie af op de plaatselijke omstandigheden. De
straal kan met behulp van de stelschroef verkleind worden met 25%
(dit kan de uniformiteit van het sproeipatroon veranderen).
De gemiddelde neerslagsnelheid is ongeveer .11mm per uur voor een
sproeihoek van 180° (de feitelijke neerslag kan variëren en dient
berekend te worden).
Hunter
Need help? Post your question in this forum.
Report abuse
Libble takes abuse of its services very seriously. We're committed to dealing with such abuse according to the laws in your country of residence. When you submit a report, we'll investigate it and take the appropriate action. We'll get back to you only if we require additional details or have more information to share.
Product:
Forumrules
To achieve meaningful questions, we apply the following rules:
First, read the manual;
Check if your question has been asked previously;
Try to ask your question as clearly as possible;
Did you already try to solve the problem? Please mention this;
Is your problem solved by a visitor then let him/her know in this forum;
To give a response to a question or answer, do not use this form but click on the button 'reply to this question';
Your question will be posted here and emailed to our subscribers. Therefore, avoid filling in personal details.
Register
Register getting emails for Hunter PGM at:
new questions and answers
new manuals
You will receive an email to register for one or both of the options.
Get your user manual by e-mail
Enter your email address to receive the manual of Hunter PGM in the language / languages: Dutch as an attachment in your email.
The manual is 0,16 mb in size.
You will receive the manual in your email within minutes. If you have not received an email, then probably have entered the wrong email address or your mailbox is too full. In addition, it may be that your ISP may have a maximum size for emails to receive.
The manual is sent by email. Check your email
If you have not received an email with the manual within fifteen minutes, it may be that you have a entered a wrong email address or that your ISP has set a maximum size to receive email that is smaller than the size of the manual.
The email address you have provided is not correct.
Please check the email address and correct it.
Your question is posted on this page
Would you like to receive an email when new answers and questions are posted? Please enter your email address.