Eco-Logic 4-& 6-Station Indoor Controller
Owners Manual and Programming Instructions
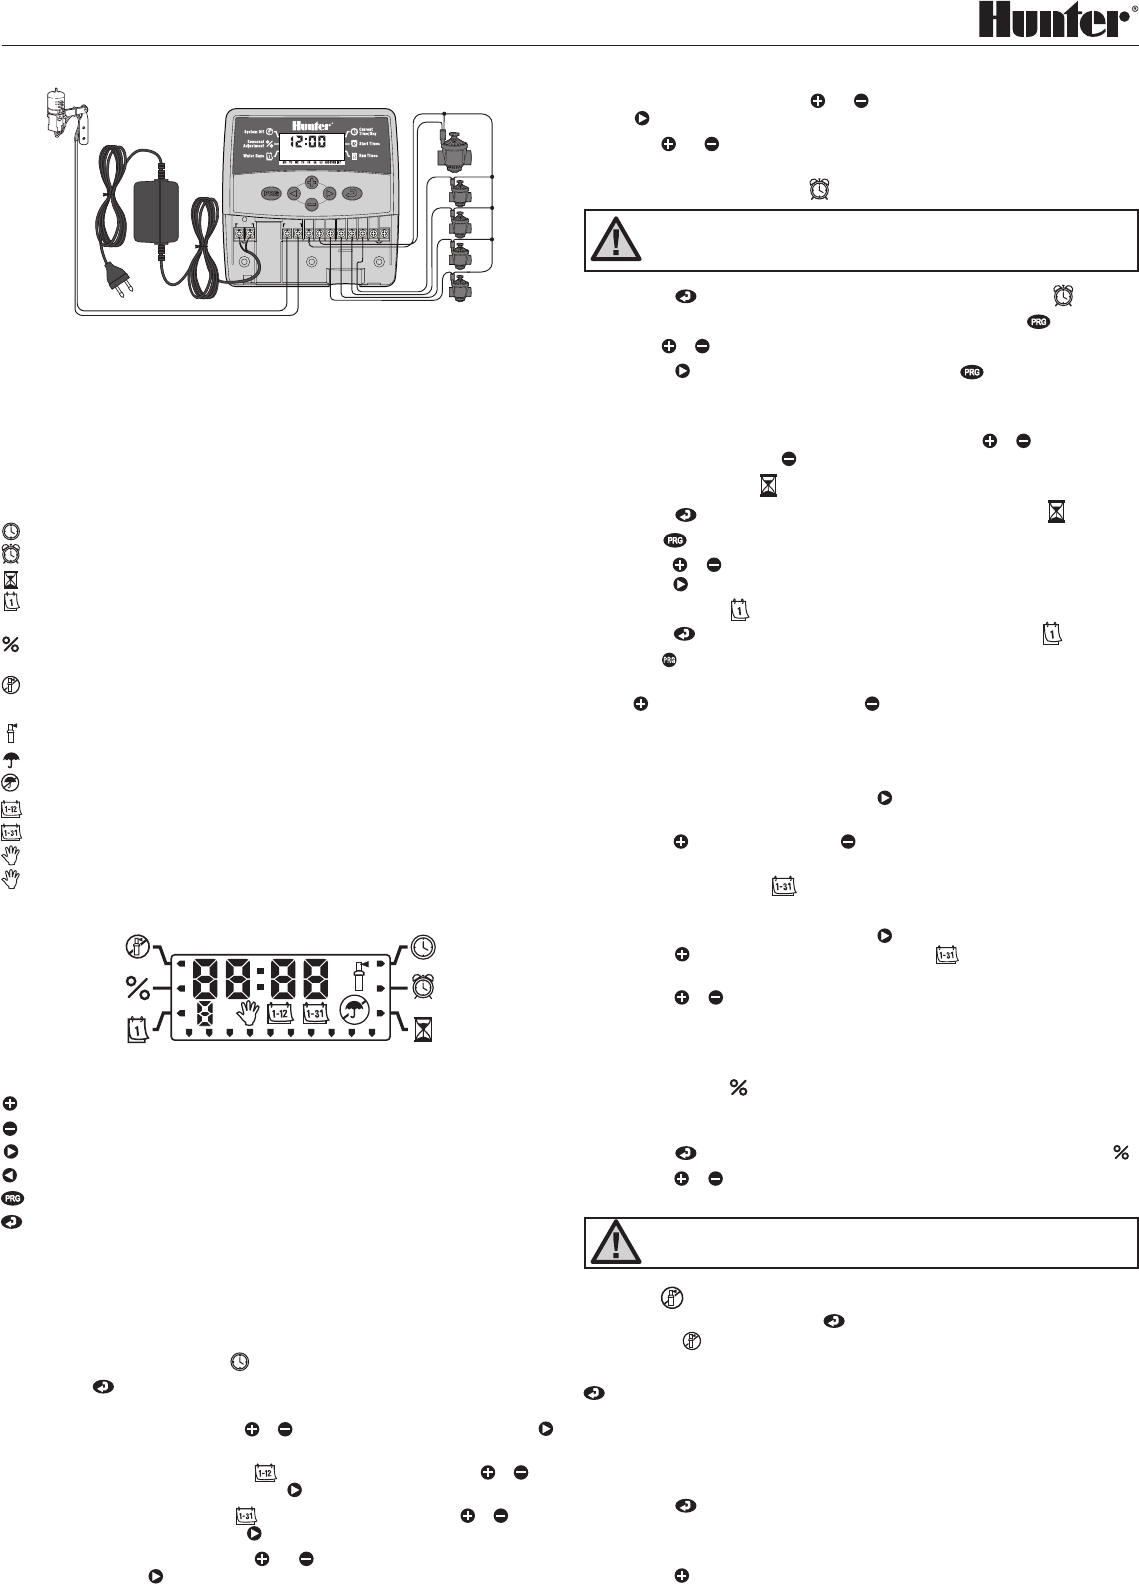
Installation Instructions
Remove lower access cover. Place a screw into the wall and hang the controller from the
keyhole on the back. Secure the controller using one or more screws below the terminal
strip. One wire from each solenoid should be connected to the C terminal (common wire).
The other wire from each solenoid to its respective number on the terminal strip. Connect
the transformer wires to the 24 VAC terminal strip. Attach the two sensor wires (if needed)
to the SEN terminals. Connect a 9-volt alkaline battery (not included) to the battery wire
clip. Plug the transformer into a nearby power outlet.
Main Display
Current Time/Day – Set current day and time.
Start Times – Set 1 to 4 start times for each program.
Run Times – Set each valve station run time from 1 min. to 4 hrs.
Water Days – Select specific days to water, odd/even days, or a selected number
of days between waterings (interval).
Seasonal Adjustment – Make run time changes according to the seasons without
reprogramming the controller.
System Off – Stops all automatic watering.
Program Designator – identifies program in use (A or B).
Flashing Sprinkler – indicates that watering is occurring.
Umbrella – indicates rain sensor is suspending irrigation.
Crossed Umbrella – Indicates rain sensor has been manually bypassed.
– identifies month when programming current date.
– identifies day when programming current date.
Manual Single Station – indicates the one time watering of a single valve station.
Manual All Station – indicates the one time watering of all valve stations or selected
stations.
Control Buttons
Button – increases displayed item.
Button – decreases the displayed item.
Button – advances to the next item.
Button – advances to the previous item.
Button – Select program A or B for different watering requirements.
Mode Button – Advanced through programming functions.
Programming the Controller
An irrigation program consists of three parameters:
1) A program start time, 2) watering duration for each station and 3) days to water. A
program will run all stations assigned to it in sequential order. Programs are independent
and stations can be assigned to both programs.
Setting the Current Date and Time
1. Press the Mode button until the arrow is pointing at the Current Time/Day
position.
2. The year will be flashing. Use the or buttons to change the year. Press the
button to proceed to setting the month.
3. The month will be flashing and the
icon will be displayed. Use the or
buttons to change the month. Press the button to proceed to setting the day.
4. The day will be flashing and the icon will be displayed. Use the or but-
tons to change the day. Press the button to proceed to setting the time.
5. The time will be displayed. Use the and buttons to select AM, PM, or
24 hour. Press the button to set the hour.
6. Hours will be flashing. Use the and buttons to change the hour shown. Press
the button to move to minutes.
7. Use the and buttons to change the minutes shown. The date, day and time
have now been set.
Setting the Program Start Time(s)
NOTE: One start time will activate all stations sequentially in that program. This
eliminates the need to enter each station’s start time. Multiple start times in a
program can be used for separate morning, afternoon, or evening watering cycles.
1. Press the
Mode button until the arrow is pointing at Start Times .
2. Program A will be displayed. (If Program B is desired, press the button).
3. Use the or buttons to change the start time.
4. Press the button to add an additional start time, or button for the next
program.
Eliminating a Program Start Time
With the arrow pointing at the Start Times position, press the or buttons until
you reach 12:00 AM. Push the button once to reach the OFF position.
Setting Station Run Times
1. Press the Mode button until the arrow is pointing at Run Times
.
2. Use the button to select a program (A or B).
3. Press the or buttons to change the station run time from 1 minute to 4 hours.
Press the button to advance to the next station.
Setting Days to Water
1. Press the Mode button until the arrow is pointing at Water Days .
2. Use the button to select the desired program.
3. Arrows point at the specific days of the week in which watering is to occur. Press
the button to activate that day or the button to cancel watering for that day.
Selecting Odd or Even Days to Water
This feature is uses numbered days of the month for watering instead of specific days
of the week (Odd days 1st, 3rd, 5th, etc.; Even days 2nd, 4th, 6th, etc.).
1. When in the Water Days mode, press the button until the cursor is above
either ODD or EVEN on the display.
2. Press the button to select, or the button to cancel either ODD or EVEN days
to water.
Selecting Interval Watering
You can select interval watering from 1 to 31 days.
1. When in the Water Days mode, press the
button until the cursor is over INT.
Press the button and the interval watering icon
will be displayed and
a 1 will be flashing.
2. Press the or button to select the number of days between watering days
(1 to 31 days). This is called the interval.
The controller will water the selected program at the next start time and will then
water at the interval programmed.
Seasonal Adjustment
Seasonal Adjustment is used to make global run time changes without re-program-
ming the entire controller.
1. Press the Mode button until the arrow is pointing at Seasonal Adjustment .
2. Press the or buttons to adjust the percentage of the seasonal adjustment
from 10% to 150%.
NOTE: The controller should always be initially programmed in
the 100% position.
System Off
To turn your controller off, press the Mode button until the arrow is pointing at
the System Off . Wait 2 seconds and the display will read OFF. Valves currently
watering will be shut off. All active programs will be discontinued and watering
stopped. To return the controller to normal automatic operation, simply press the
Mode button once. The current time and day will be displayed.
Programmable Off
This feature will stop all programmed waterings for a designated period of time from
1 to 7 days. After the programmed off period, the controller will automatically resume
programmed watering.
1. Press the Mode button until the arrow is positioned next to the System Off
function.
2. Wait 2 seconds until OFF is displayed.
3. Press the button to set the number of days off (up to 7 days).