EQUIPMENT IDENTIFICATION LABEL
ETIQUETA DE IDENTIFICACION DE LA MAQUINA
ETIQUETA DE IDENTIFICAÇÃO DA MÁQUINA
ETIKETA ¶PO™¢IOPI™MOY TOY MHXANHMATO™
1.
Acoustic power level according to EEC directive
2000/14/CE
Nivel de potencia acústica según la directiva
2000/14/CE
Nível de potência acústica conforme a directriz
2000/14/CE
™Ù¿ıÌË ·ÎÔ˘ÛÙÈ΋˜ ›ÂÛ˘ Û‡Ìʈӷ Ì ÙËÓ
Ô‰ËÁ›· 2000/14/CE
2.
Mark of conformity according to EEC directive 98/37
Marca de conformidad según la directiva 98/37/CEE
Marco de conformidade segundo a directriz
98/37/CEE
™‹Ì· Û˘ÌÌfiÚʈÛ˘ Û‡Ìʈӷ Ì ÙËÓ Ô‰ËÁ›·
98/37/EOK
3.
Year of manufacture
Año de fabricación
Ano de construção
EÙÔ˜ ηٷÛ΢‹˜
4.
Rating
Potencia nominal
Capacidade nominal
OÓÔÌ·ÛÙÈ΋ ÈÛ¯‡˜
5.
Operational motor speed in r.p.m.
Velocidad de funcionamiento del
motor en revoluciones/minuto
Velocidade de funcionamento do
motor em rotações/min
T·¯‡ÙËÙ· ÏÂÈÙÔ˘ÚÁ›·˜ ÙÔ˘
ÎÈÓËÙ‹Ú· Û ÛÙÚÔʤ˜/ÏÂÙfi
6.
Lawnmower type
Tipo de cortacésped
Tipo de relvadeira
T‡Ô˜ ¯ÏÔÔÎÔÙÈÎÔ‡
11.
Chassis
Chasis
Chassis
™·Û›
12.
Motor
Motor
Motor
KÈÓËÙ‹Ú·˜
13.
Blade
Cuchilla (hoja)
Folha cortante (lâmina)
§Â›‰·
14.
Stone-deflector
Pantalla de protección
Pára-pedras
¶ÚÔÛÙ·Û›· ÁÈ· ¤ÙÚ˜
15.
Grass-catcher
Saco
Saco recolhedor
™¿ÎÔ˜ ÂÚÈÛ˘ÏÏÔÁ‹˜
16.
Handle
Mango
Braço
TÈÌfiÓÈ
17.
Motor switch
Mando interruptor
Comando interruptor
¢È·ÎfiÙ˘ ÏÂÈÙÔ˘ÚÁ›·˜
18.
Electric cable hook
Enganche cable eléctrico
Acoplamento cabo eléctrico
°¿ÓÙ˙Ô˜ ËÏÂÎÙÚÈÎÔ‡ ηψ‰›Ô˘
7.
Serial number
Número de matrícula
Número de matrícula
AÚÈıÌfi˜ ηٷÛ΢‹˜
8.
Name and address of
Manufacturer
Nombre y dirección del
Constructor
Nome e direcção do
Construtor
OÓÔÌ· Î·È ‰È‡ı˘ÓÛË ÙÔ˘
K·Ù·Û΢·ÛÙ‹
9.
Supply voltage and
frequency
Tensión y frequencia de
alimentación
Tensão e frequência de ali-
mentação
Δ·ÛË Î·È Û˘¯ÓÔÙËÙ·
ÙÚÔıÔ‰ÔÛÈ·Û
POSITIONING OF SAFETY LABELS
Your lawnmower should be used with due care and attention. Therefore, figured labels have been placed on various parts of
the machine to remind you of the main precautions to be taken. Their full meaning is explained later on. These labels are an
integral part of the lawnmower and so, if any of them should become detached or illegible, contact your Supplier for their repla-
cement. You are also asked to carefully read the safety regulations in the applicable chapter of this handbook.
UBICACION DE LAS ETIQUETAS DE SEGURIDAD
Su cortacésped debe ser utilizado con prudencia. Con este fin se han colocado en la máquina una serie de etiquetas semejan-
tes a pictogramas destinadas a recordarle las principales precauciones de uso. Su significado se explica a continuación. Estas
etiquetas se consideran parte integrante del cortacésped. Si una de ellas se desprendiera o se volviera ilegible, contacte a su
Concesionario para su sustitución. Le recomendamos además que lea atentamente las normas de seguridad que hallará en el
capítulo correspondiente del presente libro.
COLOCAÇÃO DAS ETIQUETAS DE SEGURANÇA
E' preciso utilizar com cuidado a sua relvadeira. Para este fim, foram colocadas na máquina algumas etiquetas representantes
pictogramas destinados para lhe lembrar as principais precauções para o uso. O seu significado é explicado aqui em segui-
da. Estas etiquetas são consideradas parte integrante da relvadeira. Se uma delas se despegar ou se tornar ilegível, contacte
o seu Concessionário para a substituir. Recomendamos-lhe, aliás, ler atenciosamente as normas de segurança trazidas no pró-
prio capítulo deste livrete.
ETIKETE™ A™ºA§EIA™
TÔ ¯ÏÔÔÎÔÙÈÎfi Ú¤ÂÈ Ó· ¯ÚËÛÈÌÔÔÈÂ›Ù·È Ì ÚÔÛÔ¯‹. °È' ·˘Ùfi ÙÔ ÛÎÔfi, ¿Óˆ ÛÙÔ Ì˯¿ÓËÌ· ˘¿Ú¯Ô˘Ó ·˘ÙÔÎfiÏÏËÙ˜
ÂÙÈΤÙ˜ Ô˘ Û·˜ ˘ÂÓı˘Ì›˙Ô˘Ó Ù· ΢ÚÈfiÙÂÚ· ÚÔÊ˘Ï·ÎÙÈο ̤ÙÚ· ηٿ ÙË ¯Ú‹ÛË. H ÛËÌ·Û›· ÙÔ˘˜ ÂÍËÁÂ›Ù·È ·Ú·Î¿Ùˆ.
A˘Ù¤˜ ÔÈ ÂÙÈΤÙ˜ ıˆÚÔ‡ÓÙ·È ·Ó·fiÛ·ÛÙÔ Ì¤ÚÔ˜ ÙÔ˘ ¯ÏÔÔÎÔÙÈÎÔ‡. ™Â ÂÚ›ÙˆÛË Ô˘ ÌÈ· ·fi ·˘Ù¤˜ ÍÂÎÔÏÏ‹ÛÂÈ ‹
Á›ÓÂÈ ‰˘Û·Ó¿ÁÓˆÛÙË, ·Â˘ı˘Óı›Ù ÛÙÔ Î·Ù¿ÛÙËÌ· ÒÏËÛ˘ ÁÈ· ÙËÓ ·ÓÙÈηٿÛÙ·Û‹ Ù˘. ™˘ÓÈÛÙ¿Ù·È Â›Û˘ Ó·
‰È·‚¿ÛÂÙ Ì ÚÔÛÔ¯‹ ÙÔ˘˜ ηÓÔÓÈÛÌÔ‡˜ ·ÛÊ·Ï›·˜ Ô˘ ·Ó·Ê¤ÚÔÓÙ·È ÛÙÔ ÂȉÈÎfi ÎÂÊ¿Ï·ÈÔ ÙÔ˘ ·ÚfiÓÙÔ˜ ÂÁ¯ÂÈÚ›‰ÈÔ˘.
Instruction label Etiqueta de prescripciones Etiqueta das normas EÙÈΤٷ Ô‰ËÁÈÒÓ
1
FINISH ASSEMBL
COMPLET
CONCLUIR A MONT
TE§EIø™TE TH ™YNAPMO§O°H™H
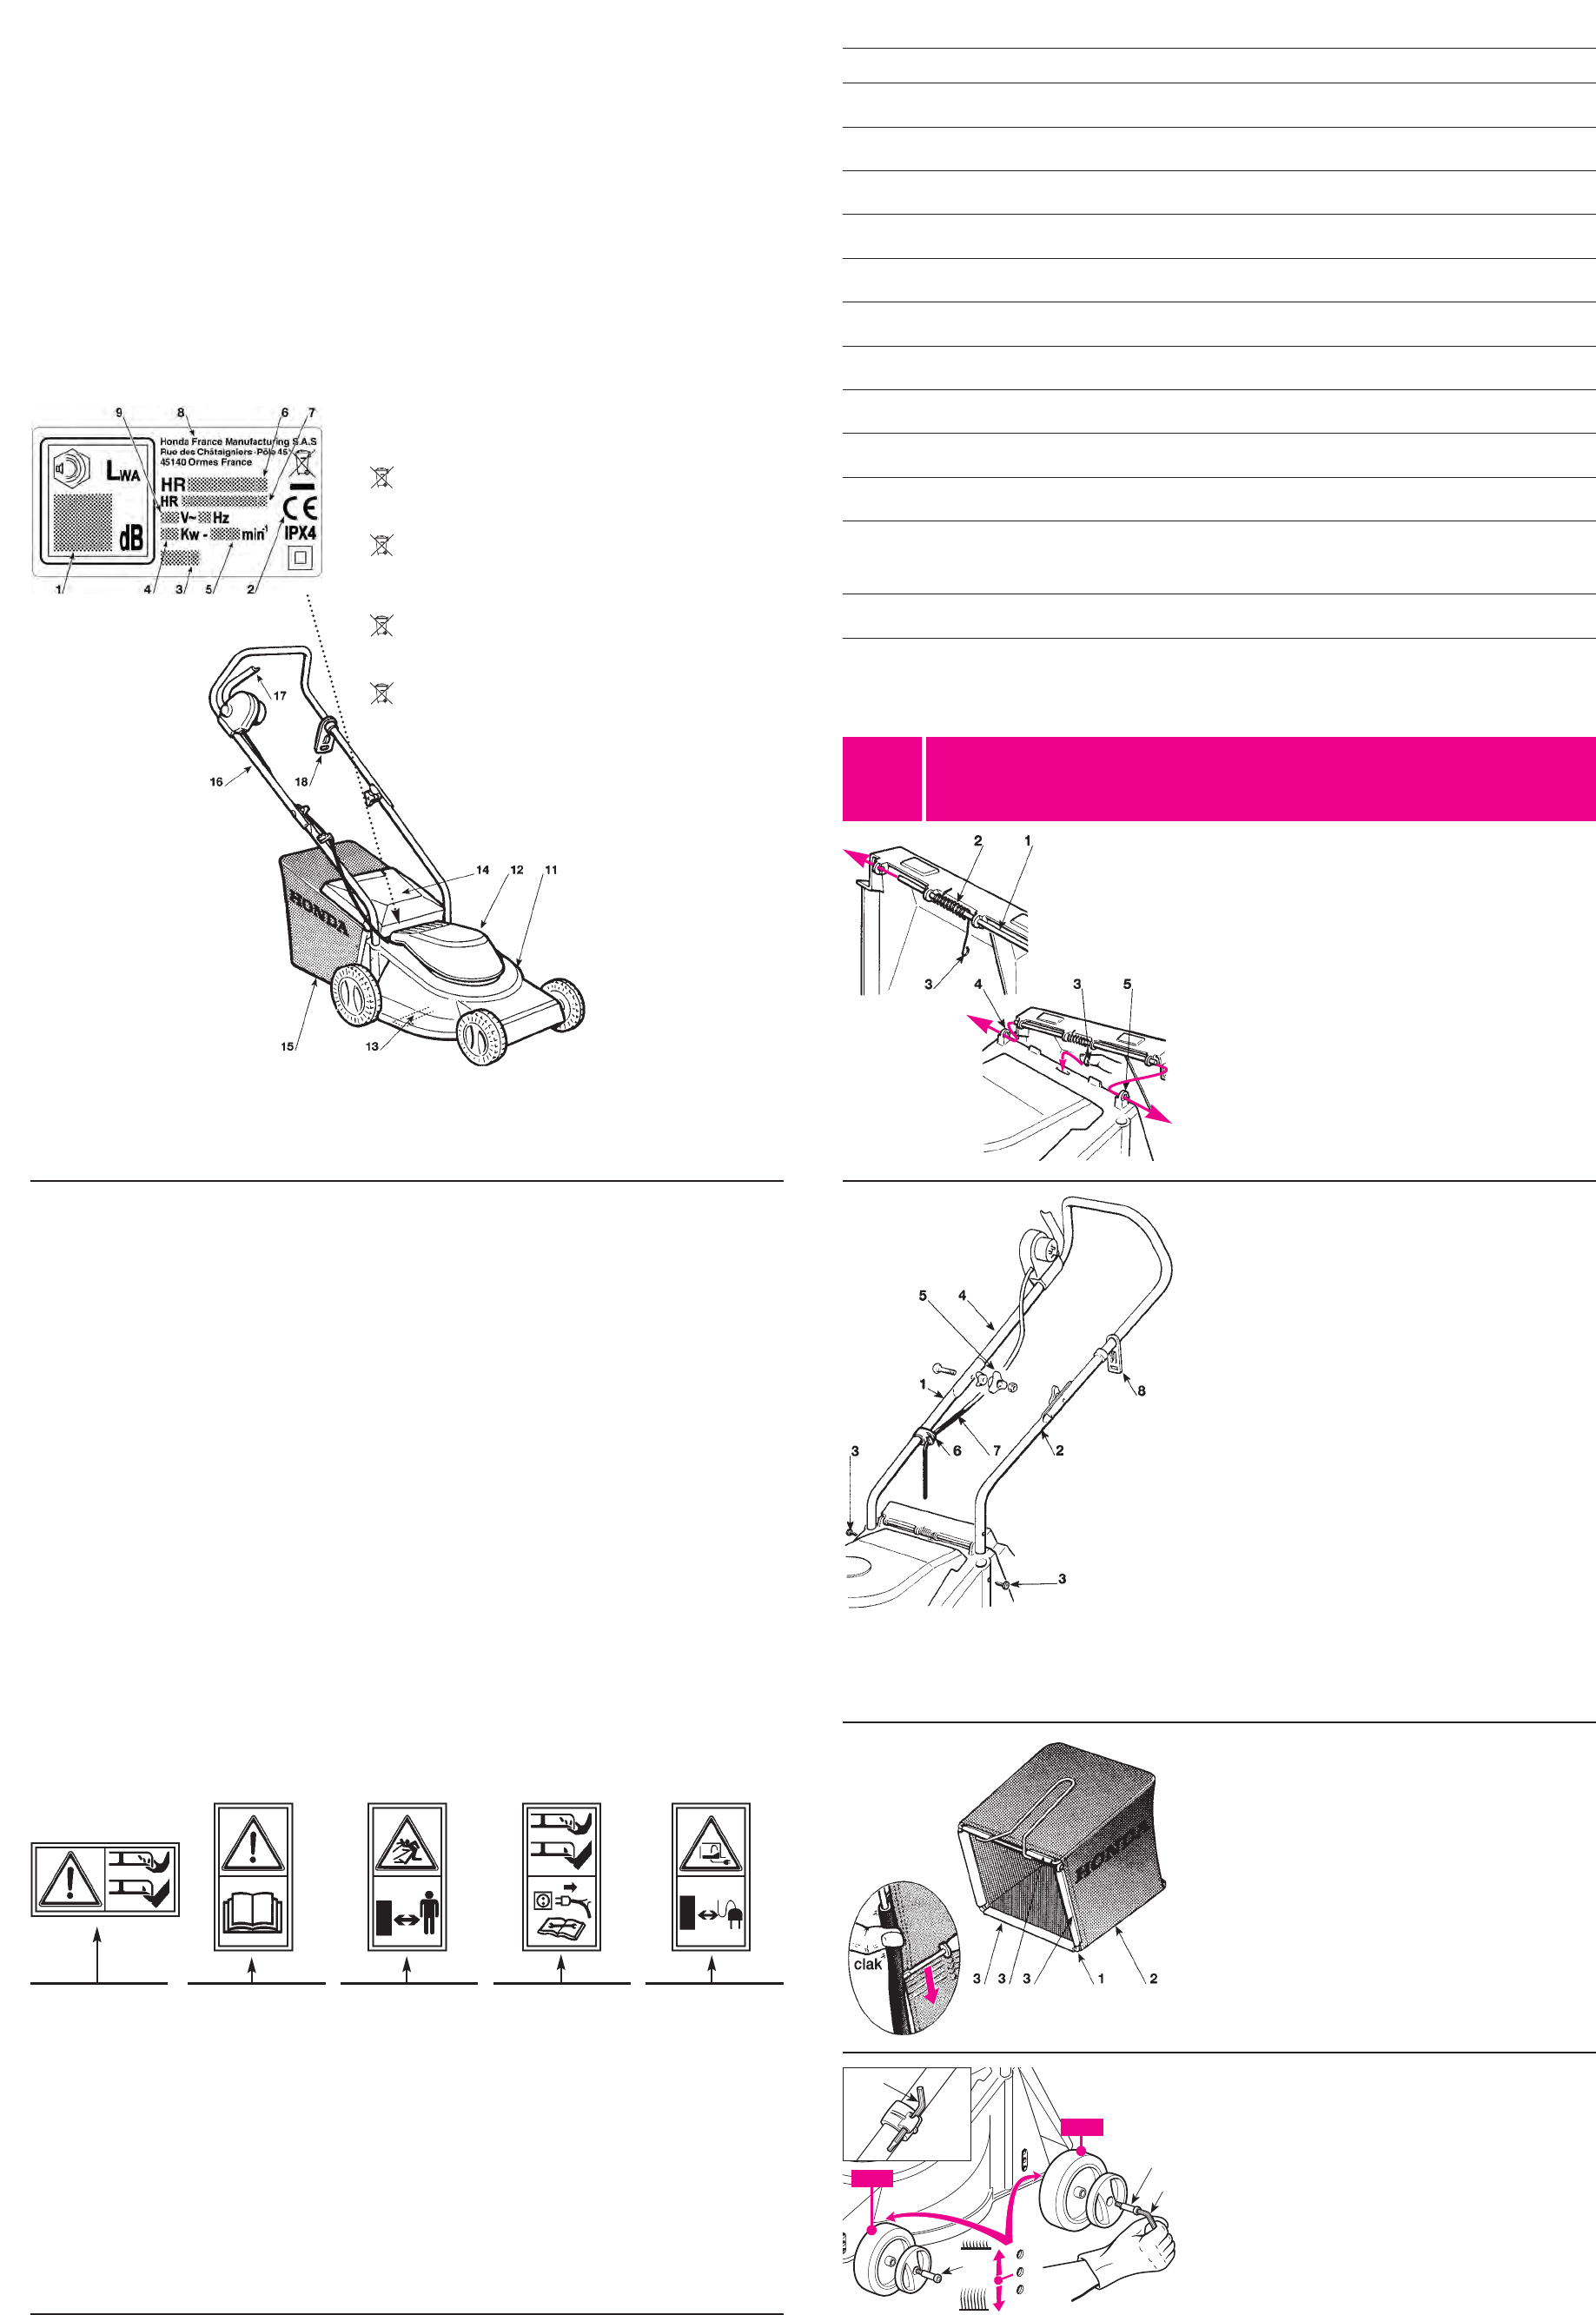
Attach the stone-deflector by inserting the pin (1) and the spring (2)
as shown. First, insert the pin into the right hand housing (4). Next
insert the eyelet end (3) of the spring into the central slot, and lastly
insert the other end into the position (5).
Montar la pantalla de protección introduciendo el perno (1) y el muel-
le (2) como se indica. Introducir el perno antes en su ubicación dere-
cha (4), introducir el terminal de argolla (3) del muelle en la ranura
central, y por último introducir el otro extremo en su alojamiento (5).
Montar o pára-pedras introduzindo o perno (1) e a mola (2) segundo
indicado. Introduzir o perno antes no assento de direita (4), inserir o
terminal de ilhó (3) da mola na fenda central, e afinal introduzir a
outra extremidade no assento (5).
TÔÔıÂÙ›Ù ÙËÓ ÚÔÛÙ·Û›· ÁÈ· ¤ÙÚ˜ ·ÓÙÈÛÙÚ¤ÊÔÓÙ·˜ ÙÔÓ
›ÚÔ (1) Î·È ÙÔ ÂÏ·Ù‹ÚÈÔ (2) fiˆ˜ Ê·›ÓÂÙ·È. B¿˙ÂÙ ÙÔÓ Â›ÚÔ
ÚÒÙ· ÛÙË ‰ÂÍÈ¿ ¤‰Ú· (4), ÂÈÛ¿ÁÂÙ ÙËÓ ¿ÎÚË Ì ̿ÙÈ (3) ÙÔ˘
ÂÏ·ÙËÚ›Ô˘ ÛÙËÓ ÎÂÓÙÚÈ΋ Û¯ÈÛÌ‹, Î·È Ù¤ÏÔ˜ ÂÈÛ¿ÁÂÙ ÙËÓ ¿ÏÏË
¿ÎÚË ÛÙË ı¤ÛË (5).
Insert the lower part right (1) and left (2) of the handle into the
respective holes and lock into position with the supplied screws (3).
Attach the upper part of the handle (5) to the lower part using the
knobs (6) and the supplied nuts and bolts as shown. Attach the
cable-clamp (7) to the position shown and then attach the cable (8).
The correct position of the electric cable hook (4) is as shown.
Introducir en sus respectivos agujeros las partes inferior derecha (1)
e izquierda (2) del mango y fijarlas con los tornillos (3) que se
incluyen.
Fijar la parte superior del mango (5) a las partes inferiores mediante
los pequeños pomos (6) que encontrará en la confección, como se
indica. Colocar el sujetacables (7) en la posición indicada y engan-
char el cable eléctrico (8).
La posición correcta del enganche del cable (4) es la indicada.
Introduzir nos respectivos furos as partes inferiores de direita (1) e de
esquerda (2) do braço e fixá-las pelos parafusos (3) entregues.
Fixar a parte superior do braço (5) nas partes inferiores através dos
botãozinhos e do conjunto de parafusos entregue segundo indicado.
Pôr o grampo do cabo (7) na posição indicada e engatar o cabo (8).
A correcta posição do acoplamento do cabo (4) é a indicada.
EÈÛ¿ÁÂÙ ÛÙȘ ·ÓÙ›ÛÙÔȯ˜ Ô¤˜ ÙÔ Î¿Ùˆ ‰ÂÍ› (1) Î·È Î¿Ùˆ
·ÚÈÛÙÂÚfi ÙÌ‹Ì· (2) ÙÔ˘ ÙÈÌÔÓÈÔ‡ Î·È Ù· ÛÙÂÚÂÒÓÂÙ Ì ÙȘ ‚›‰Â˜
(3) Ô˘ ·Ú¤¯ÔÓÙ·È.
™ÙÂÚÂÒÛÙ ÙÔ ¿Óˆ ÙÌ‹Ì· ÙÔ˘ ÙÈÌÔÓÈÔ‡ (5) ÛÙÔ Î¿Ùˆ ÙÌ‹Ì· Ì ٷ
fiÌÔÏ· (6) Î·È ÙȘ ‚›‰Â˜ Ô˘ ·Ú¤¯ÔÓÙ·È. EÊ·ÚÌfiÛÙ ÙÔ Á¿ÓÙ˙Ô
(7) ÛÙËÓ Î·Ù¿ÏÏËÏË ı¤ÛË Î·È Á·ÓÙ˙ÒÛÙ ÙÔ Î·ÏÒ‰ÈÔ (8).
H ÛˆÛÙ‹ ı¤ÛË ÙÔ˘ Á¿ÓÙ˙Ô˘ (4) Â›Ó·È ÂΛÓË Ô˘ Ê·›ÓÂÙ·È
Insert the frame (1) into the sack (2) and attach all the plastic profiles
(3) with the help of a screwdriver, as shown in the drawing.
Introducir el armazón (1) en el saco (2) y enganchar todas las fijacio-
nes de plástico (3) con la ayuda de un destornillador, como muestra
la figura.
Introduzir a armação (1) no saco (2) e engatar todos os perfis de plá-
stico (3), ajudando-se com uma chave de parafusos conforme indi-
cado na ilustração.
B¿ÏÙ ÙÔ Ï·›ÛÈÔ (1) ÛÙÔ Û¿ÎÔ (2) Î·È Á·ÓÙ˙ÒÛÙ fiÏ· Ù·
Ï·ÛÙÈο ÚÔÊ›Ï (3), ¯ÚËÛÈÌÔÔÈÒÓÙ·˜ ¤Ó· ηÙÛ·‚›‰È, fiˆ˜
‰Â›¯ÓÂÈ Ë ÂÈÎfiÓ·.
To attach the wheels, follow the steps shown. Attach the wheels
selecting one of the holes for the preferred cutting heights, fully tight-
ening the pin (1) using the wrench (2) provided.
Para fijar las ruedas, seguir la secuencia indicada. Fijar las ruedas en
uno de los orificios predispuestos para las distintas alturas de corte,
apretando correctamente el perno (1) con la llave (2) en dotación.
Para a fixação das rodas, seguir a sequência indicada. Fixar as
rodas num dos furos predispostos para as várias alturas de corte,
apertando a fundo o pino (1) com a chave (2) fornecida.
°È· ÙË ÛÙÂÚ¤ˆÛË ÙˆÓ ÙÚÔ¯ÒÓ ÂÊ·ÚÌfiÛÙ ÙËÓ ·ÎfiÏÔ˘ıË ‰È·‰Èηۛ·˜.
™ÙÂÚÂÒÛÙ ÙÔ˘˜ ÙÚÔ¯Ô‡˜ Û ̛· ·fi ÙȘ ÂȉÈΤ˜ Ô¤˜ ÁÈ· Ù·
‰È·ÊÔÚÂÙÈο ‡„Ë ÎÔ‹˜, ÛÊ›ÁÁÔÓÙ·˜ ̤¯ÚÈ Ù¤ÚÌ· ÙÔÓ Â›ÚÔ (1) Ì ÙÔ
ÎÏÂȉ› (2) ÙÔ˘ ÂÍÔÏÈÛÌÔ‡.
Important: Read the
instruction handbook
before using the
machine.
Atención: Leer el libro
de instrucciones antes
de usar la máquina.
Cuidado: Antes de
utilizar a máquina ler o
livrete de instruções.
¶ÚÔÛÔ¯‹: ¢È·‚¿ÛÙÂ
ÙȘ Ô‰ËÁ›Â˜ ¯Ú‹Ûˆ˜
ÚÈÓ
¯ÚËÛÈÌÔÔÈ‹ÛÂÙÂ ÙÔ
Ì˯¿ÓËÌ·.
Danger of thrown
objects. Keep other
people at a safe
distance whilst work-
ing.
Riesgo de expulsión.
Mientras se usa, man-
tener a terceras perso-
nas lejos del área de
trabajo.
Risco de expulsão.
Durante a utilização,
afastar as pessoas da
zona de trabalho.
K›Ó‰˘ÓÔ˜
ÂÎÙfiÍ¢Û˘. K·Ù¿ ÙË
¯Ú‹ÛË, ÎÚ·Ù¿ÙÂ Ù·
¿ÙÔÌ· Ì·ÎÚÈ¿ ·fi
ÙËÓ ÂÚÈÔ¯‹
ÂÚÁ·Û›·˜.
Beware of sharp blades:
Remove plug from mains
before maintenance or if
cord is damaged.
Atención con las cuchillas
cortadoras: Desconectar el
cable de la alimentación
antes de efectuar cualquier
operación de manutención o
si el cable estuviera dañado.
Atenção às lâminas afia-
das: Remover a ficha da ali-
mentação antes de efectuar
a manutenção ou se o cabo
estiver estragado.
¶ÚÔÛÔ¯‹ ÛÙ· ÎÔÊÙÂÚ¿
Ì·¯·›ÚÈ·: ∞ÔÛ˘Ó‰¤ÛÙ ÙÔ
ËÏÂÎÙÚÈÎfi ηÏÒ‰ÈÔ ÚÈÓ
ÚÔ¯ˆÚ‹ÛÂÙ ÛÙË
Û˘ÓÙ‹ÚËÛË ‹ ·Ó ÙÔ Î·ÏÒ‰ÈÔ
¤¯ÂÈ Êı·Ú›.
Keep the power
supply cable away
from the blade.
Tener el cable eléctri-
co de alimentacion
lejos de la cucilla.
Manter o cabo eléctri-
co de alimentaçao
longe de lâmina.
∫Ú·Ù¿ÙÂ ÙÔ
ËÏÂÎÙÚÈÎfi ηÏÒ‰ÈÔ
ÙÚÔÊÔ‰ÔÛÈ·˜ Ì·ÎÚÈ·
·fi ÙÔ Ì·¯·›ÚÈ.
Danger of cutting
yourself. Blades in
movement. Do not put
hands or feet near or
under the opening of the
cutting plate.
Riesgo de corte.
Cuchillas en movimiento.
No introducir las manos
o los pies en el aloja-
miento de la cuchilla.
Perigos de cortes.
Lâminas em movimento.
Nunca introduzir mãos
ou pés no interior do
alojamento da lâmina.
K›Ó‰˘ÓÔ˜ ÎÔ‹˜.
M·¯·›ÚÈ Û ΛÓËÛË. MË
‚¿˙ÂÙ ¯¤ÚÈ· ‹ fi‰È·
ÂÓÙfi˜ ÙÔ˘ ¯ÒÚÔ˘ fiÔ˘
‚Ú›ÛÎÂÙ·È ÙÔ Ì·¯·›ÚÈ
ÎÔ‹˜.
TECHNICAL DATA CARACTERISTICAS TÉCNICAS
CARACTERISTICAS TÉCNICAS TEXNIKA XAPAKTHPI™TIKA HRE330 HRE370
Size Dimensões 1080 x 390 1110 x 430
Dimensiones ¢È·ÛÙ¿ÛÂȘ x 1000 mm x 1030 mm
Unladen weight Peso a vácuo
Peso en vacío μ¿ÚÔ˜ ¯ˆÚ›˜ ÊÔÚÙ›Ô 12 kg 13 kg
Cutting width Largura de corte
Longitud del corte ¶Ï¿ÙÔ˜ ÎÔ‹˜ 33 cm 37 cm
Cutting height adjustment Ajuste da altura de corte
Registro altura del corte ƒ‡ıÌÈÛË ‡„Ô˘˜ ÎÔ‹˜ 25 – 55 mm
Front wheel diameter Diâmetro rodas anteriores
Diámetro ruedas anteriores ¢È¿ÌÂÙÚÔ˜ ÌÚÔÛÙÈÓÒÓ ÙÚÔ¯ÒÓ 130 mm
Rear wheel diameter Diâmetro rodas posteriores
Diámetro ruedas posteriores ¢È¿ÌÂÙÚÔ˜ ›Ûˆ ÙÚÔ¯ÒÓ 160 mm
Grass-catcher capacity Capacidade saco recolhedor
Capacidad del saco ÈÚËÙÈÎfiÙËÙ· Û¿ÎÔ˘ ÂÚÈÛ˘ÏÏÔÁ‹˜ 27 lt 35 lt
MOTOR (Single-phase electric) MOTOR (Eléctrico monofásico)
MOTOR (Eléctrico monofase) Kπ¡∏Δ∏ƒ∞™ ( ∏ÏÂÎÙÚÈÎfi˜ ÌÔÓÔÊ·ÛÈÎfi˜) 1100 W 1300 W
Operational motor speed (r.p.m.) Velocidade de funcionamento (Rotações/min.)
Velocidad de funcionamiento (Revol./min.) Δ·¯‡ÙËÙ· ÏÂÈÙÔ˘ÚÁ›·˜ (ÛÙÚÔʤ˜/ÏÂÙfi) 2850 2850
Acoustic power level (2000/14/CE) Nível de potência acústica (2000/14/CE)
Nivel de potencia acústica (2000/14/CE) ™Ù¿ıÌË ·ÎÔ˘ÛÙÈ΋˜ ›ÂÛ˘ (2000/14/CE) 90 dB(A) 93 dB(A)
Acoustic radiation pressure to user's Nível de pressão acústica ao ouvido
ear (EEC 81/1051) do operador (81/1051/CEE)
Nivel de presión acústica en el oido del ™Ù¿ıÌË ·ÎÔ˘ÛÙÈ΋˜ ›ÂÛ˘ ÛÙÔ ·˘Ù›
operador (81/1051/CEE) ÙÔ˘ ¯ÂÈÚÈÛÙ‹ (81/1051/EOK) 75 dB(A) 80 dB(A)
Vibration level (prEN 1033) Valor das vibrações (prEN 1033)
Valor de las vibraciones (prEN 1033) TÈÌ‹ ÙˆÓ ‰ÔÓ‹ÛÂˆÓ (prEN 1033) 4 m/sec
2
4 m/sec
2
Only for EU countries. Do not dispose of electric equipment together with
household waste material! In observance of European Directive 2002/96/EC
on waste electrical and electronic equipment and its implementation in accordance
with national law, electric equipment that have reached the end of their life must be
collected separately and returned to an environmentally compatible recycling facility.
Sólo para países de la Unión Europea. ¡No deseche los aparatos eléctricos
junto con los residuos domésticos! De conformidad con la Directiva Europea
2002/96/CE sobre residuos de aparatos eléctricos y electrónicos y su aplicación de
acuerdo con la legislación nacional, las herramientas eléctricas cuya vida útil haya lle-
gado a su fin se deberán recoger por separado y trasladar a una planta de reciclaje
que cumpla con las exigencias ecológicas.
Apenas para países da UE. Não deite ferramentas eléctricas no lixo domé-
stico! De acordo com a directiva europeia 2002/96/CE sobre ferramentas
eléctricas e electrónicas usadas e a transposição para as leis nacionais, as ferramen-
tas eléctricas usadas deven ser recolhidas em separado e encaminhadas a uma
instalação de reciclagem dos materiais ecológica.
MfiÓÔ ÁÈ· ÙȘ ¯ÒÚ˜ Ù˘ ∂∂. ªËÓ ·ÔÚÚ›ÙÂÙ ËÏÂÎÙÚÈΤ˜ Û˘Û΢¤˜ ÛÙÔÓ
ο‰Ô ÔÈÎÈ·ÎÒÓ ·ÔÚÚÈÌÌ¿ÙˆÓ! ™‡Ìʈӷ Ì ÙËÓ Â˘Úˆ·˚΋ Ô‰ËÁ›·
2002/96/∂∫ ÂÚ› ËÏÂÎÙÚÈÎÒÓ Î·È ËÏÂÎÙÚÔÓÈÎÒÓ Û˘Û΢ÒÓ Î·È ÙËÓ ÂÓۈ̿وۋ
Ù˘ ÛÙÔ ÂıÓÈÎfi ‰›Î·ÈÔ, Ù· ËÏÂÎÙÚÈΤ˜ Û˘Û΢¤˜ Ú¤Ú¤È Ó· Û˘ÏϤÁÔÓÙ·È
ͯˆÚÈÛÙ¿ Î·È Ó· ÂÈÛÙÚ¤ÊÔÓÙ·È ÁÈ· ·Ó·Î‡ÎψÛË Ì ÙÚfiÔ ÊÈÏÈÎfi ÚÔ˜ ÙÔ
ÂÚÈ‚¿ÏÏÔÓ.
Ø 130
Ø 160
1
1
2
2