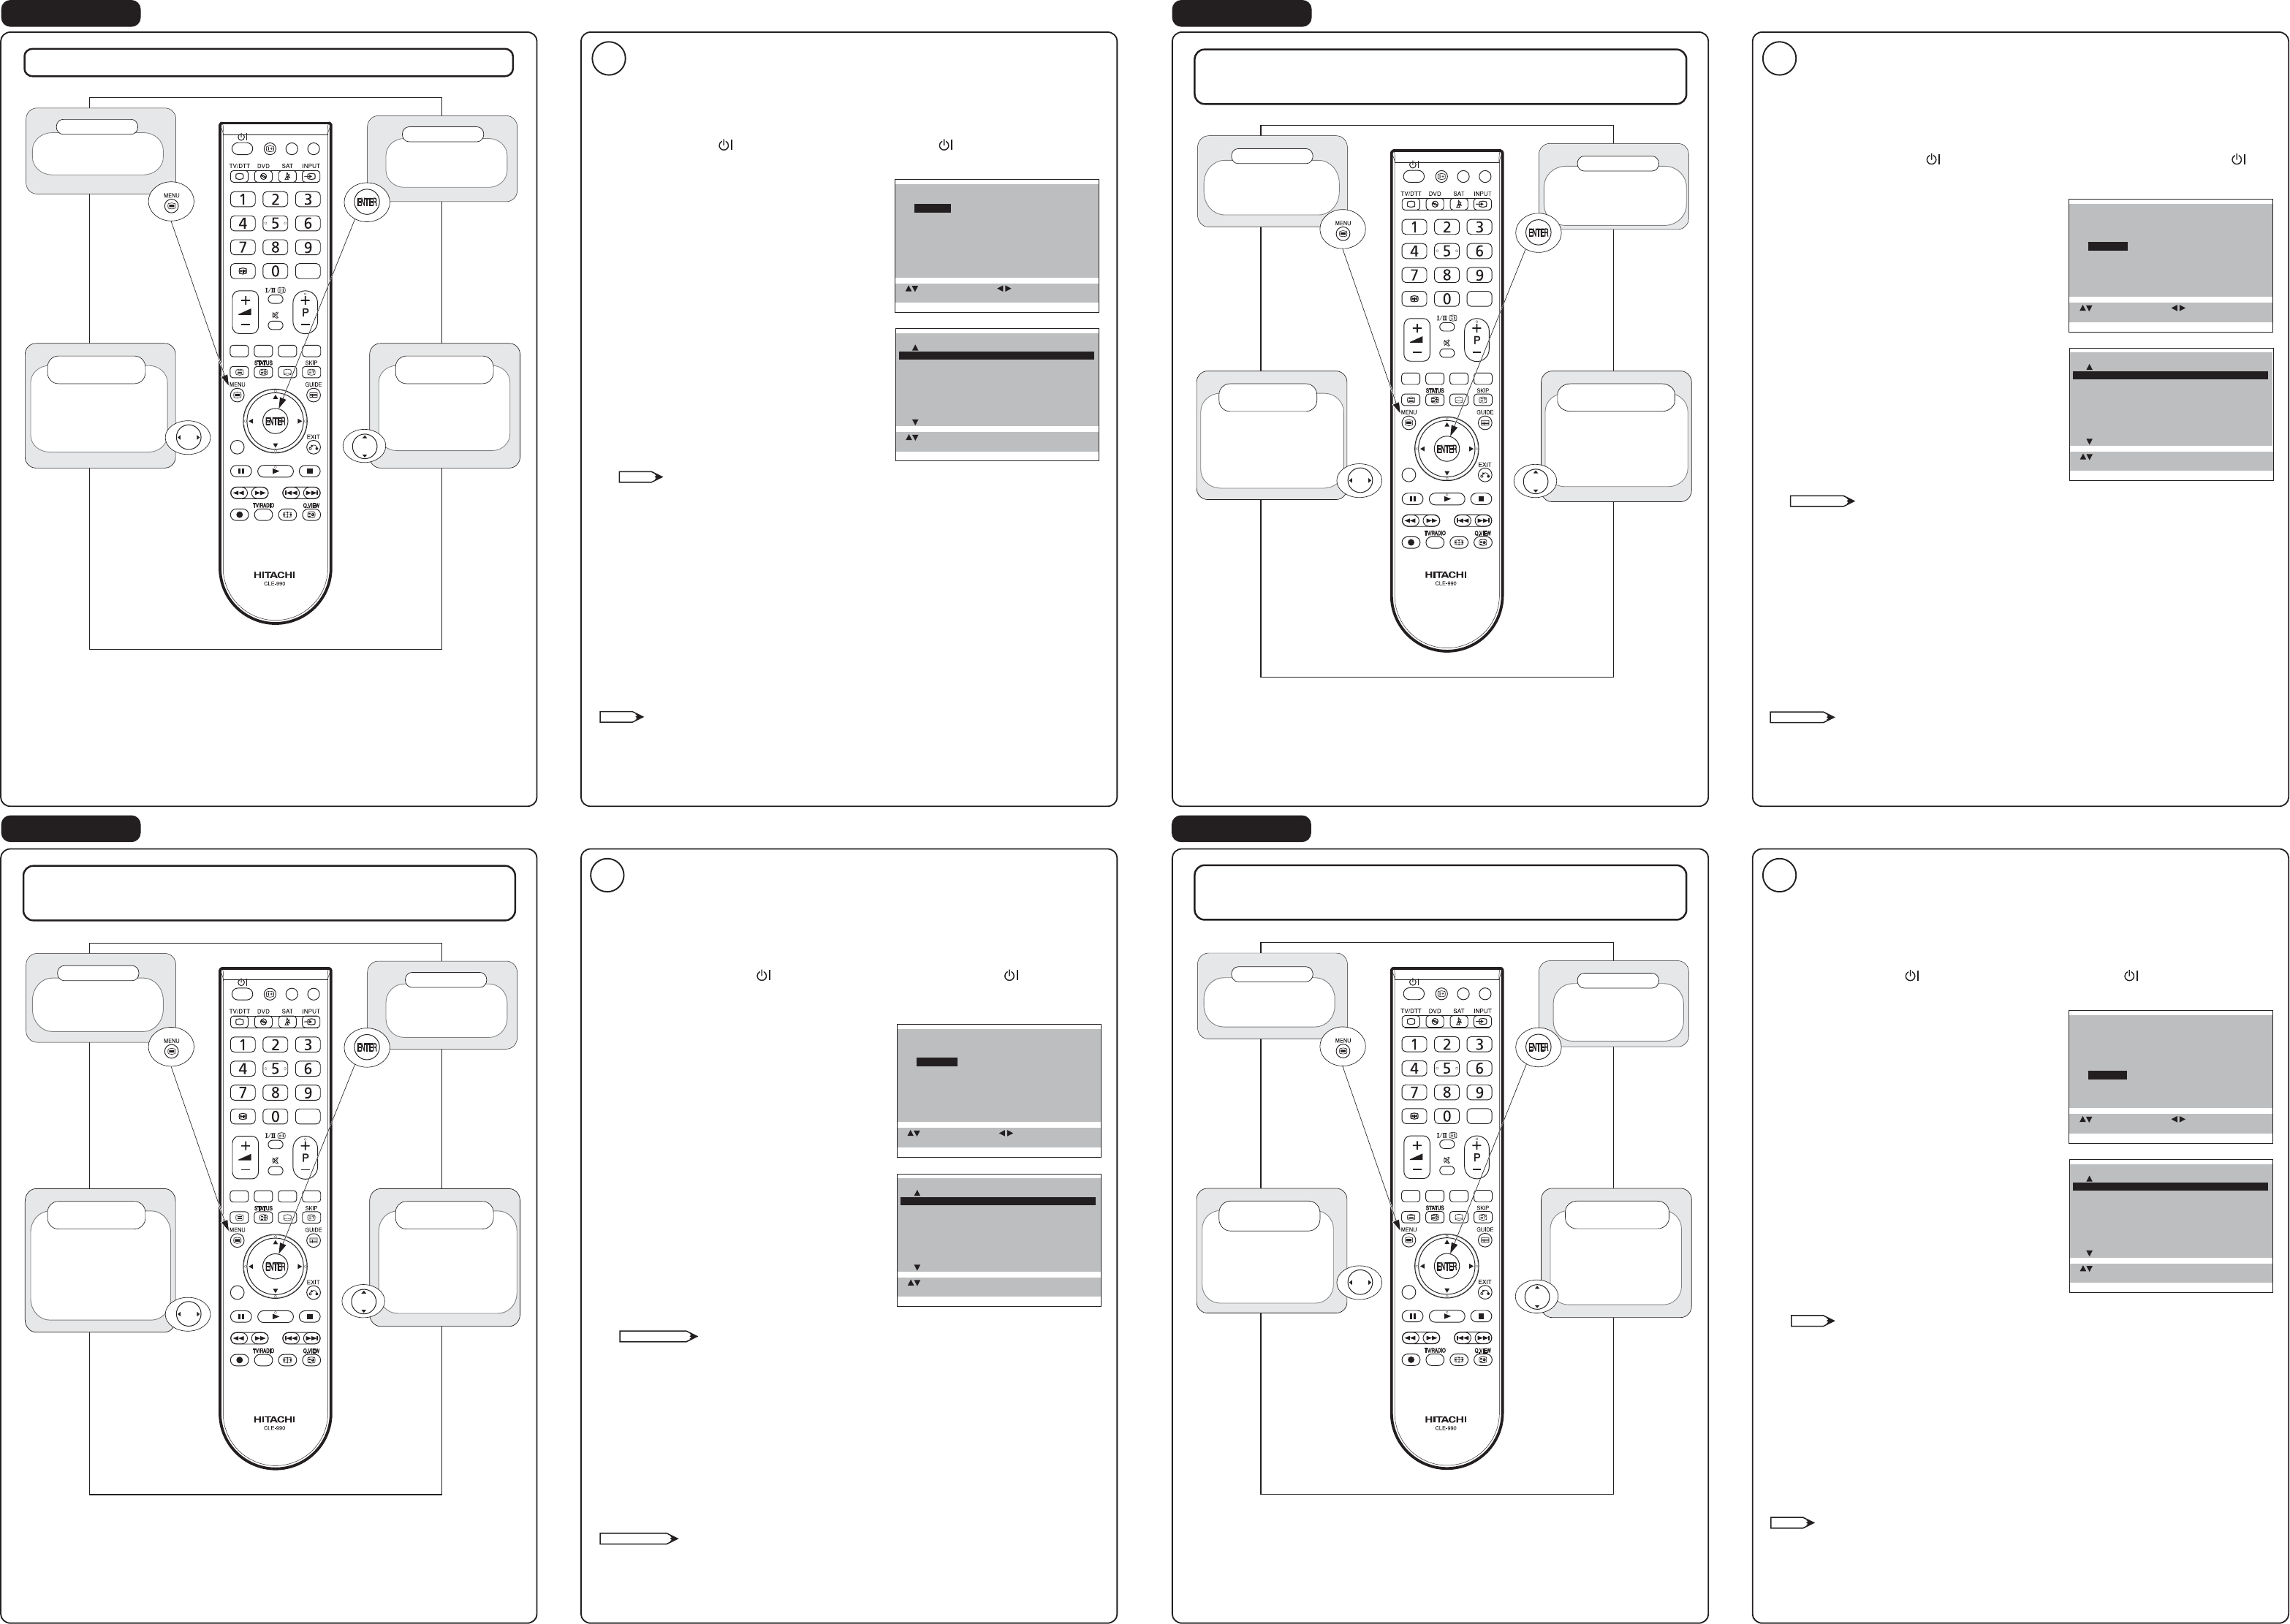
Handset Controls used for Television Auto setup
This button is used to
move the menu selection
boxleft/right or change
ahighlighted selection.
cursor
left/right
Use this button to
set a highlighted
selection
Use this button to
display the main menu.
This button is used to
move the menu selection
boxup/down or change
ahighlighted selection.
cursor
up/down
Boutons de la télécommande utilisés pour
l’auto-installation du téléviseur
curseur
haut/bas
Comandi Telecomando utilizzati per la
configurazione automatica
Durch Drücken dieser
Taste wird das
Hauptmenü angezeigt.
Cursor
links/rechts
Mit dieser Taste können
Sie die Menü-Wahlbox
nach links/rechts verschieben
oder den hervorgehobenen
Auswahlposten ändern.
Mit dieser Taste können
Sie den hervorgehobenen
Auswahlposten einstellen.
Cursor
aufwärts/abwärts
Mit dieser Taste können
Sie die Menü-Wahlbox nach
aufwärts/abwärts verschieben
oder den hervorgehobenen
Auswahlposten ändern.
Utilisez cette touche
pour afficher
le menu principal.
curseur
gauche/droit
Cette touche est utilisée
pour déplace le cadre de
sélection du menu vers la
gauche/droite ou pour
changer un article mis en
valeur.
Usare questo tasto
per accedere al menu
principale.
Questo tasto si usa per
spostare sinistra/destra la
scatola del menu di
selezione o cambiare una
selezione evidenziata.
Cursore
Sinistra/Destra
Usare questo tasto per
confermare una
selezione evidenziata.
Cursore Su/Giù
Questo tasto viene usato
per spostare su/giù la
casella di selezione del
menu o modificare una
selezione evidenziata.
MENU
ENTER
ENTER
MENU
MENU
ENTER
MENU
ENTER
Fernbedienungstasten für das automatische
Setup des Fernsehgerätes
Start Auto setup procedure
5
When the TV powers on for the first time after purchase, the initial auto installation menu will
appear. You can automatically set language, country and channels in successive operations.
1 Press STANDBY on the right side of the unit or press (STANDBY) on the
remote. The Language select menu will appear first.
2 Press ▲/▼ or ◀/▶ to select desired language.
Then press ENTER.
3 Press ▲ or ▼ to select desired Country.
Then press ENTER.
4 Check the aerial then press ENTER.
5 Press ▲ or ▼ to select the colour system.
Most of Western Europe uses the PAL system but France uses SECAM.
6 Press ENTER to start automatic tuning.
Your TV will now automatically tune in all available channels.
Please be patient - the Auto Tuning process can take several minutes to complete.
When the tuning screen disappears and then normal TV screen appears, the Auto
tuning process is complete.
NOTE
NOTE
NOTA
NOTA
Automatisches Setup beginnen
5
Wenn der TV nach dem Kauf zum ersten Mal eingeschaltet wird, beginnt die anfängliche
Autoinstallation. Sie können automatisch der Reihe nach Sprache, Land und die Kanäle
einstellen.
1 Drücken Sie STANDBY auf der rechten Seite des Geräts oder drücken Sie
(STANDBY) auf der Fernbedienung. Das Sprachenauswahlmenü erscheint zuerst.
2 Mit oder ▲/▼ oder ◀/▶ Sprache wКhlen.
Dann ENTER drücken.
3 Drücken Sie ▲ oder ▼ um Ihr Land auszuwählen.
Drücken Sie anschließend ENTER.
4 Überprüfen Sie den Kabelanschluss oder die
Antenne und drücken Sie anschließend ENTER.
5 Drücken Sie ▲ oder ▼ um das Farbsystem
auszuwählen.
Die meisten westeuropäischen Länder verwenden ein PAL-System, in Frankreich
hingegen ist SECAM im Einsatz.
6 Drücken Sie ENTER, um den automatischen Tuning-Vorgang zu starten.
Ihr Fernsehgerät sucht nun automatisch alle verfügbaren Programme.
Die automatische Speicherung kann einige Minuten dauern.
Sobald der Tuning-Bildschirm ausgeblendet wird und das normale Fernsehbild
erscheint, ist das automatische Tuning abgeschlossen.
HINWEIS
Démarrage de la procédure d’auto-installation
5
L’auto installation initiale a lieu lousque le téléviseur est mis sous tension pour la première
fois après l’achat. Vous pouvez régler automatiquement la langue, le pays et les canaux
par opérations successives.
1 Appuyez sur STANDBY sur le coté droit de l’appareil ou pressez (STANDBY)
sur la télécommande.
Le menu selection de langue apparaît en premier.
2 Presser ▲/▼ ou ◀/▶ pour choisir la langue
désirée. Puis presser ENTER.
3 Appuyez sur ▲ ou ▼ pour sélectioner le pays
souhaité. Appuyez ensuite sur ENTER.
4 Vérifiez l’antenne puis pressez ENTER.
5 Appuyez sur ▲ ou ▼ pour sélectionner le
système de couleur.
La plupart des pays d’Europe de l’ouest utilisent le système PAL, mais la France
utilise le système SECAM.
6 Appuyez sur ENTER pour démarrer la recherche automatique.
Votre téléviseur va maintenant rechercher automatiquement toutes les chaînes
disponibles.
Il faut être patient – le processus de recherche automatique peut prendre
quelques minutes.
Lorsque l’écran de recherche disparaît, et qu’alors l’écran neutre des chaînes
apparaît, le processus de recherche automatique est achevé.
REMARQUE
REMARQUE
Avviamento della procedura di configurazione automatica
5
Quando si accende il televisore per la prima volta dopo l’acquisto avviene
l’autoinstallazione iniziale. È possibile impostare automaticamente la lingua, il paese ed i
canali in operazioni successive.
1 Premere STANDBY sul lato destro dell’unità o premere (STANDBY) sul
telecomando. Comparirà per primo il menu di selezione della Lingua.
2 Premere ▲/▼ o ◀/▶ per selezionare la lingua
desiderate. Quindi premere ENTER.
3 Premere ▲ o ▼ per selezionare il paese
desiderato. Quindi premere ENTER.
4 Controllare l’antenna, quindi premere ENTER.
5 Premere ▲ o ▼ per selezionare il sistema
cromatico.
La maggior parte dei paesi dell’Europa occidentale usano il sistema PAL, ma la
Francia usa il SECAM.
6 Premere ENTER per avviare la sintonia automatica.
Ora il vostro televisore si sintonizzerà su tutti i canali disponibili.
Si prega di attendere – il processo di SINTONIA AUTOMAT. può richiedere diversi
minuti per essere completato.
Quando scompare la schermata di sintonizzazione e compare la schermata
normale del televisore, il processo di Sintonia Automat. è completo.
Utilisez cette touche
pour régler un article
mis en valeur.
Cette touche est utilisée
pour déplace le cadre de
sélection du menu vers le
haut/bas ou pour changer
un article mis en valeur.
HINWEIS
: SELECT
: END
EXIT
: SET
ENTER
COUNTRY
UK
IRELAND
FRANCE
BELGIUM
LUXEMBOURG
GERMANY
AUSTRIA
SWITZERLAND
GREECE
: SELECT
: SELECT
EXIT
: SET
ENTER
LANGUAGE
English Dansk
Français Norsk
Deutsch Nederlands
Español Ελληνικά
Italiano Türkçe
Русский Português
Svenska Polski
Suomi
: WAEHLEN
: ENDE
EXIT
: SET
ENTER
LAND
ENGLAND
IRLAND
FRANKREICH
BELGIEN
LUXEMBURG
DEUTSCHLAND
ÖSTERREICH
SCHWEIZ
GRIECHENLAND
: WAEHLEN
: WAEHLEN
: ENDE
EXIT
: SET
ENTER
SPRACHE
English Dansk
Français Norsk
Deutsch Nederlands
Español Ελληνικά
Italiano Türkçe
Русский Português
Svenska Polski
Suomi
: SELECT
: FIN
EXIT
: MARCHE
ENTER
PAYS
UK
IRLANDE
FRANCE
BELGIQUE
LUXEMBOURG
ALLEMAGNE
AUTRICHE
SUISSE
GRÈCE
: SELECT
: SELECT
: FIN
EXIT
: MARCHE
ENTER
LANGUE
English Dansk
Français Norsk
Deutsch Nederlands
Español Ελληνικά
Italiano Türkçe
Русский Português
Svenska Polski
Suomi
: SELEZ.
: FINE
EXIT
: ON
ENTER
PAESE
INGHILTERRA
IRLANDA
FRANCIA
BELGIO
LUSSEMBURGO
GERMANIA
AUSTRIA
SVIZZERA
GRECIA
: SELEZ.
: SELEZ.
: FINE
EXIT
: ON
ENTER
LINGUA
English Dansk
Français Norsk
Deutsch Nederlands
Español Ελληνικά
Italiano Türkçe
Русский Português
Svenska Polski
Suomi
English Deutsch
Français Italiano