3mm
SLO
HR
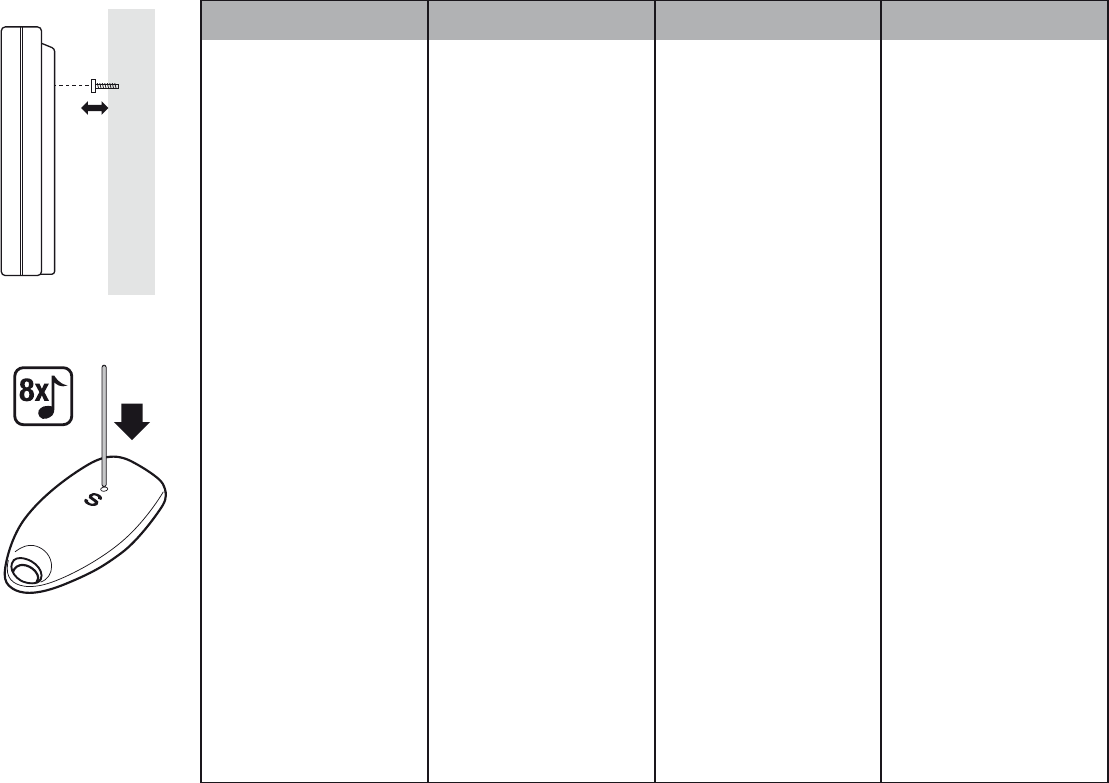
Empfänger Befestigung
Der Empfänger hat auf der Rückseite
ein Befestigungsloch. Dadurch kann
das Gerät an einer Schraube
aufgehangen oder jederzeit beliebig in
einen anderen Raum mitgenommen
werden. Das Befestigungsmaterial
(Dübel und Schraube) ist im Liefer-
umfang enthalten. Achten Sie bei der
Montage darauf, daß zwischen Wand
und Empfänger ein Abstand von ca.
3mm gelassen wird, damit das Gerät
locker eingehangen werden kann.
Melodienauswahl
Der Melodieregler befindet sich im
Sender auf der Rückseite. Um eine
Melodie einzustellen, müssen Sie den
Sender nicht öffnen. Führen Sie einen
schmalen Stift durch die kleine Öffnung
auf der Rückseite des Senders und
drücken Sie kurz. Mit jedem drücken
ertönt eine neue der 8 Melodien im
Empfänger. Die zuletzt gespielte
Melodie bleibt gespeichert.
Einstellmöglichkeiten:
1. Westminster
2. Ding-Dong
3. 3-Klang
4. Mehrklang
5. Trommeln/Tusch
6. Xylophon
7. Jagdhorn
8. Hundebellen
Durch Betätigen des Senders wird ein
Signal an den Empfänger gesendet.
Um den Rufton zu wiederholen,
drücken Sie den Klingeltaster erneut.
Der Rufton wird nur 1x erfolgen, auch
wenn Sie den Klingeltaster gedrückt
halten.
Pritrditev
Sprejemnik
pritrditev.
na
seboj
pritrditev
obsegu
to,
pusti
možno
Izbiranje
Regulator
oddajniku
nastavljanje
odpreti.
strani
kratko
sprejemniku
nova.
shranjena.
Možnosti
1.
2.
3.
4.
5.
6.
7.
8.
S
sprejemniku.
ponovno
Zvonjenje
gumb
Pričvršćivanje
Prijemnik
pričvršćivanje.
možete
uzeti
Materijal
vijak)
pazite
ostavite
uređaj
Odabir
Regulator
na
melodiju,
Provedite
stražnjoj
pritisnite.
od
reproducirana
spremljena.
Mogućnosti
1.
2.
3.
4.
5.
6.
7.
8.
Aktiviranjem
šalje
ton,
Pozivni
jedanput
pritisnutu
Sender Batterieinstallation
Der Sender wird durch eine 3 Volt
Lithium CR2032 Batterie betrieben,
welche im Lieferumfang enthalten und
bereits eingelegt ist. Entfernen Sie
lediglich die Schutzfolie, welche seitlich
aus dem Sender herausschaut, so dass
ein elektrischer Kontakt hergestellt
wird. Um die Batterie zu wechseln,
entfernen Sie zunächst die Rückseite
des Senders durch vorsichtiges Öffnen
des Gehäuses mithilfe einer Münze.
Tauschen Sie die alte Batterie aus.
Überprüfen Sie, ob die Batterie gemäß
der angegebenen Polarität (+ = oben)
richtig eingelegt ist. Setzen Sie die
Rück- und Vorderseite des Senders
wieder zusammen. Der Sender ist nun
betriebsbereit.
Empfänger Batterieinstallation
Schieben Sie die Batteriefach-
abdeckung auf der Rückseite nach
unten und legen Sie die Batterien
ein (nicht im Lieferumfang enthalten)
2 x 1,5 Volt LR14 / Baby. Beim
Einlegen bitte auf Polarität achten!
Schieben Sie die Batteriefach-
abdeckung des Empfängers wieder
ein. Der Empfänger ist nun
betriebsbereit.
Halteband
Der Notfall-Sender ist mit einem
Halteband zum aufhängen oder fixieren
des Senders an einer Gehhilfe, einem
Nachttisch usw. ausgestattet und
gedacht. ACHTUNG: Sollten Sie den
Sender einer Person um den Hals
hängen, so vergewissern Sie sich,
dass diese Person auch in der Lage
ist, den Sender und das Halteband
bestimmungsgemäß zu gebrauchen.
Es besteht sonst Strangulierungsgefahr!
Instalacija
Oddajnik
baterija
obsegu
Odstranite
strani
se
menjavanje
hrbtno
s
Staro
Prekontrolirajte,
z
pravilno
stran
Oddajnik
uporabo.
Instalacija
Pokrov
strani
bateriji
dobave)
Pri
Pokrov
sprejemnika
Sprejemnik
uporabo.
Držalni
Oddajnik
držalnim
fiksiranje
hojo,
namenjen. POZOR:
neki
je
držalni
namembnostjo.
zadušitve!
Ugradnja
Odašiljač
CR2032
isporukom
uklonite
odašiljača
električni
bateriju,
kućišta
stražnju
staru
Provjerite
u
gore).
prednju
sada
Ugradnja
Potisnite
stražnjoj
baterije
x
pazite
Ponovno
baterije
spreman
Traka
Odašiljač
konstruiran
kojom
pomagalo
POZOR:
osobi
odašiljač
upotrebljava
postoji !
Receiver Mounting
The eceiver has an p re-cut mounting
hole on its r ear side.
Thereby the device can be mounted on
a scr ew or be taken to another room at
any time. The fastening materials (screw
and wall-plug) ar e included in delivery
When
mounting the device, please maintain
the distance of 3mm between wall and
receiver so the device can be hung-up
easily
Selection of Melody
The melody control is located on the
back of the transmitter
to open the transmitter to set a melody
Simply guide a thin pencil or rod
through the small opening on the
transmitter's back and press briefly
Each time you press, another of the 8
melodies plays on the receiver
melody played last remains saved.
Adjustment Options
1.
2. Ding-Dong
3. 3-tone
4. multiple sound
5. drumming/flourish
6. xylophone
7. hunting horn
8. barking dog
By pr essing the transmitter a signal is
sent to the receiverepeat the call
signal pr ess the bell push-button again.
The call signal sounds only once, even if
bell push-button is pr essed constantly
Transmitter Batter y Installation
The transmitter is operated by a
3 olt Lithium CR2032 batteries,
which is included in delivery and is
preinstalled inside the transmitte r
Just emove the p rotective foil
sticking out fr om the side of
transmitter, which will establish the
electrical contact. T
battery
back by carefully opening the casing
using a coin. Replace the old battery
Please check if the battery is inserted
correctly acco rding to the polarity
(+ = up). Reassemble the back
and fr ont of the transmitter
The transmitter is now r eady for
operation.
Receiver Batter y Installation
Push down the battery cover on back
and insert batteries (not included in
delivery) 2 x 1,5 Volt LR14 / Baby
Please mind the polarity! Push the
battery cover of the r eceiver back into
position. The r eceiver is now ready for
operation.
Strap
The emergency transmitter is equipped
with a strap for hanging or affixing the
transmitter to a walker or a bedside
table, etc., and is intended for that
purpose. WARNING: If you ar
hanging the transmitter around a
person's neck, ensure that the person
is capable of using the transmitter and
strap properly
risk of strangulation!