DISCONNECT THE UNIT FROM THE POWER OUTLET DURING CLEANING AND MAINTENANCE.
DO NOT IMMERSE THE H2O SteamFX™ HANDHELD STEAMER IN WATER.
Cleaning procedure to remove lime scale
If your H2O SteamFX™ begins to produce steam slower than usual or stops producing steam you may need to remove lime scale. It is necessary to
remove lime scale on a regular basis, every 25 times you use a full tank of water or once a month, especially in areas with hard water.
To remove lime scale from your H2O SteamFX™, please follow these procedures:
Using the Cleaning Pin
Swirl and push the pin up and down the small hole of the steam outlet. Ensure that all scale debris have been removed from the steam outlet
before reassembling any attachment.
Using a cleaning solution
1. Prepare a solution of 1/3 white vinegar and 2/3 water and add to the Water Tank.
2. Ensure that steam released is aimed away from or any surrounding objects. Plug the appliance into a properly grounded electrical outlet, turn it
ON and allow the unit to produce steam until the vinegar/water solution is used up.
3. Repeat the above procedure as many times as necessary until a normal steam flow is achieved.
4. Fill the Water Tank with fresh water and rinse out.
5. Fill the Water Tank with fresh water again, and release steam through the system until the Water Tank is empty.
6. Perform a test cleaning on a suitable isolated area after each lime scale removal to ensure that there is no debris left in the system.
CLEANING AND MAINTENANCE
7
To clean calcium deposits building up inside the Water Tank:
Add 1-2 tablespoons of white vinegar to a full Water Tank, close the Water Tank cap and shake the contents. DO NOT TURN THE APPLIANCE ON. Let the
unit sit for a few hours. Empty the Water Tank and rinse with clean water until it rinses clear.
Cleaning blocked steamer accessories:
Due to the high mineral content of water in some areas, some calcium buildup might develop inside the tip of the Straight Nozzle. To clean it, we recommend
using a spray lubricant. Spray a small burst or two of the lubricant inside the tip of the Straight Nozzle. After spraying the lubricant, fill the steamer with
water and run a continuous jet of steam through the affected accessory for several minutes to remove the deposit.
WE RECOMMEND PERFORMING THIS PROCEDURE IN A PROTECTED AND WELL-VENTILATED AREA.
ProblemSolutionPossible Cause
The unit does not power on
Reduced steam or no steam
Steam escapes from
connections
The unit is not plugged in or turned ONMake sure the unit is plugged into a properly grounded outlet and the
steam switch is pressed
Attachment is improperly connected
Unplug the unit, allow it to cool down, detach the accessories and
reattach them properly
Debris or obstructions at the connection pointsRemove the accessory and check and clean connection points
Blocked Steam Nozzle
Clean the Nozzle
Water Tank is empty
Fill Water Tank
Lime scale deposit
Follow cleaning procedure to remove lime scale
TROUBLESHOOTING GUIDE
Remember to remove lime-scale at least once a month, especially in areas with hard water.
Please follow instructions provided in this User’s Guide.
Use filtered or distillated water for better performance.
IMPORTANT
!
WARING
!
TIPS
6
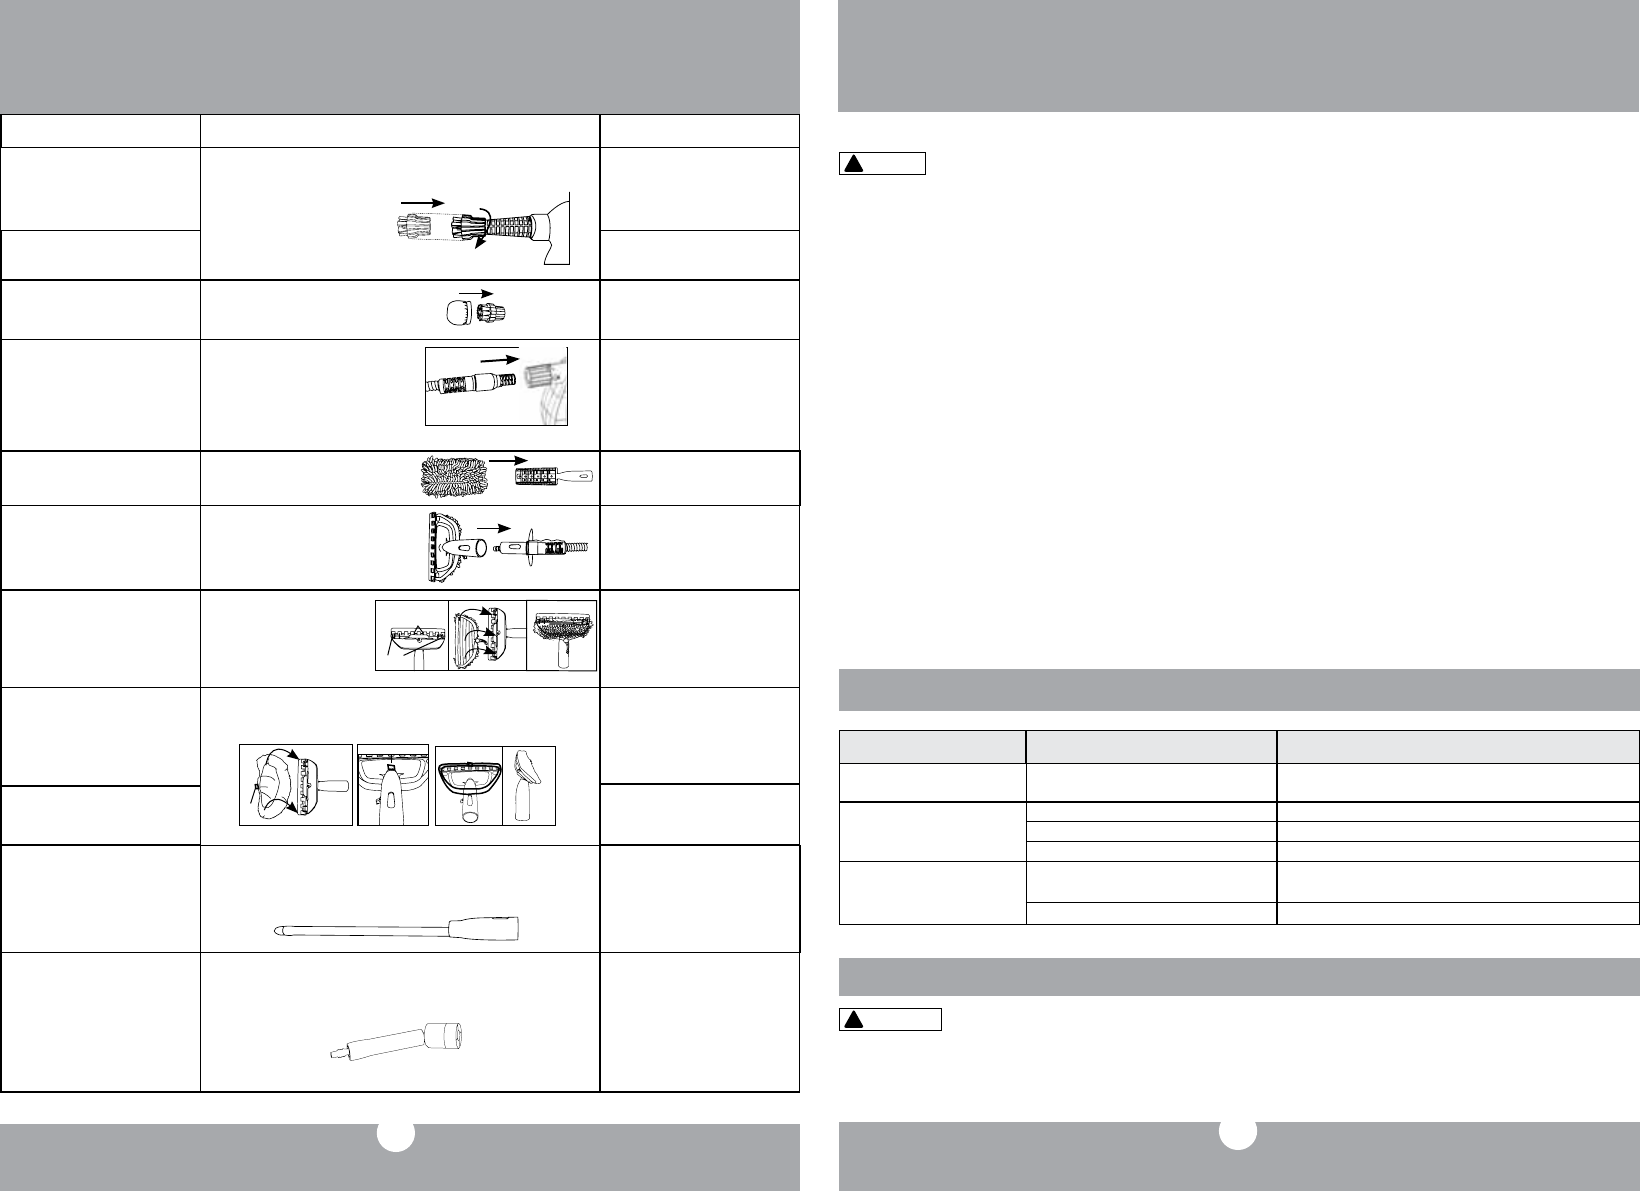
OPTIONAL ACCESSORY USAGE
GARMENT STEAMING CLOTH
To steam a garment, place item of
clothing on a hanger and steam the
garment directly. Slowly slide the
Garment Steamer Head vertically over
the garment to smooth the fabric and
remove wrinkles and odors.
Install the Garment Steaming Cloth or microfiber scrubbing cloth over the Window
Cleaning tool.
Some fabrics like leather, suede, and velvet
may not be suitable for steaming. Please
refer to the manufacturer’s care label.
Curtains and draperies can be steamed
while hanging.
Black Tag
Tag
side
back
Part and UsageAssemblyTips/Caution
EXTENSION HOSE
This 75cm/30” Extension Hose is designed
for use with the following attachments:
- Window Cleaning Tool
- Duster
- Long
Steam Lazer™
Insert the designated end of the
Extension Hose into the designated
hole in the Main Unit and then turn
the locking system.
Make sure the Extension Hose is securely
locked into place before use. When in use,
keep the Extension Hose away from your
body and avoid touching the hose as it
can get hot.
Do not pull the Extension Hose with
excessive force, as it might cause damage
and result in a steam leak.
WINDOW CLEANING TOOL
Attached to the Extension Hose and in
combination with one of the available
cleaning cloths or scraper, use this tool
for window cleaning, garment steaming,
wallpaper removal, etc.
Align the lock button on the Extension Hose
with the designated hole on the Window
Cleaning Tool Frame and push in the
Extension Hose until it locks in place.
Install cleaning cloth of your choice onto the
Window Cleaning Tool.
WINDOW CLEANING CORAL CLOTH
Use it to clean windows, mirrors and glass.
Install the Coral Cloth over the
Window Cleaning Tool. Do not
cover the squeegee blade or scraper
when installing the cleaning cloth.
Make sure to attach the cloth to all
hooks
on the
Clean
ing Tool
Frame
to avoid slipping from the frame
during use.
Do not use steam on frozen windows.
Be careful when using the steamer on
glass, as the glass may break.
Hooks
front
NYLON BRUSH
The round nylon brush is great for
cleaning smooth hard surfaces, such as
toilets, sinks, and kitchen counters, etc.
It can be used with soap or detergent to
clean dirty areas.
Metal/nylon brush can be attached to any of the steam nozzles.
Attach the round metal/nylon brush by screwing onto the threaded end of the Jet
Nozzle or Long
Steam Lazer™
.
Use different color brushes for particular
cleaning areas (kitchen, bathroom, etc.)
MICROFIBER CLOTH FOR NYLON
BRUSH
Use when you want to pick up the dirt
loosened by the steam.
METAL BRUSH
Can be used on hard surfaces that are not
pron to scratches, i.e. car rims, BBQ, etc.
Place the Microfiber cloth onto the nylon brush.
LONG STEAM
LAZER™
Easier to clean hard to reach areas (behind
the cabinets, behind the toilet, hard to
reach coners, etc.).
Attach the Long Steam
Lazer™
to the Extension Hose by aligning the lock button on
the Extension Hose with the designated hole on the Long Steam
Lazer™
tool and push
until it locks in place.
Attached to the Extension Hose, the Long Steam
Lazer™
can be used by itself or
with the Round Brush (Nylon). Remove the end cap before installing the Round Brush
(Nylon).
DUSTER WITH CORAL CLOTH
Slowly pass over surface to be cleaned.
The absorbent Coral Cloth picks up the
dirt loosened by the steam.
Install the Coral Cloth into the Duster frame
and attach the Duster to the Extension Hose.
MICROFIBER SCRUBBING CLOTH
Removes more dust and dirt with less
effort. Effective in cleaning stubborn
smudges or spills.
Hooks
BENDABLE JET NOZZLE
Cleans tight corners and hidden places.
Screw the Bendable Jet Nozzle onto the Long Steam Lazer
Libble takes abuse of its services very seriously. We're committed to dealing with such abuse according to the laws in your country of residence. When you submit a report, we'll investigate it and take the appropriate action. We'll get back to you only if we require additional details or have more information to share.
Product:
Forumrules
To achieve meaningful questions, we apply the following rules:
First, read the manual;
Check if your question has been asked previously;
Try to ask your question as clearly as possible;
Did you already try to solve the problem? Please mention this;
Is your problem solved by a visitor then let him/her know in this forum;
To give a response to a question or answer, do not use this form but click on the button 'reply to this question';
Your question will be posted here and emailed to our subscribers. Therefore, avoid filling in personal details.
Register
Register getting emails for H2o Steam FX at:
new questions and answers
new manuals
You will receive an email to register for one or both of the options.
Get your user manual by e-mail
Enter your email address to receive the manual of H2o Steam FX in the language / languages: English as an attachment in your email.
The manual is 1,17 mb in size.
You will receive the manual in your email within minutes. If you have not received an email, then probably have entered the wrong email address or your mailbox is too full. In addition, it may be that your ISP may have a maximum size for emails to receive.
The manual is sent by email. Check your email
If you have not received an email with the manual within fifteen minutes, it may be that you have a entered a wrong email address or that your ISP has set a maximum size to receive email that is smaller than the size of the manual.
The email address you have provided is not correct.
Please check the email address and correct it.
Your question is posted on this page
Would you like to receive an email when new answers and questions are posted? Please enter your email address.