18/39
Grundig Intermedia GmbH
Thomas-Edison-Platz 3
D-63263 Neu-Isenburg
CLOCK RADIO
Sonoclock 3000
www.grundig.com
DE
These
device suppor resi-
dues on the furniture sur
which -
sible to remo
▪
ate climate.
▪
Do
as
Clean
moist leather clot
▪
Do
ter
e
ers or fire.
▪
Nev
No warr claims are ac-
cepted
incorrect handling.
Compliance wit
The
RoHS not
harmful and pr in the
Directiv
Package information
Pack the product are
manufactured
accordance with our National
Envir
of
tic
rial collection points designated
ties.
This device is noise-suppressed according to the
applicable EU directiv This product fulf the
European directiv 20 2009/1
and
of
on the Grundig Homepage
www
Po
A
~
,
Output 1
Max. P
<1
<1W (standby)
Output
USB host 1A charge out
Back up micro
Back up DC Batt
Frequency bands:
FM 8
Circuit features:
Loudspeaker: 3 inch
Output P
Dimensions:
W x H x L 200 x 1
W
T
POWER SUPPL
Mains operation
Check
the
mains supply
cialist dealer
1 the power adaptor into the sock
(1
~
, 50/60 Hz).
Caution:
▪
The device connected to the mains with the
pow
the mains, pull out the plug.
▪
The mains
shall
obstructed during intended use.
Inserting t
The back-up
are not lost in the case of a pow
1 the batter compartment by pressing
area mark
2
batter
(micro batteries, 2 x 1
3 Close the batter
Note:
▪
Remo
you
long period of time.
Environmental note:
▪
Batteries, not
heavy metal, should not be disposed of with
household
ies
lations.
RADIO MODE
Antenna
For
the wire antenna accordingly
Switching on and off
1 the device fr standby with
»ON/OFF « button.
2 t device to standby with »ON/OFF «
button.
Searching for and saving radio sta-
tions - automatically
Y
1 Activate the station search by pressing
»TUNING+/HR « TUNING-/MIN «
until
through.
The search stops when a station is found.
Note:
▪
T
press » TUNING+/HR « or TUNING-/MIN «
sev
2 Press PRESET«
the memor
3 Press » TUNING+/HR« or » TUNING-/MIN«
buttons to select the preset.
4 Press the » PRESET« button to save the station.
Note:
▪
they
5 T
Selecting stor
1 Select the prPRESET « button
to select the preset stations one af
Adjusting t
1 the volume »VOLUME -/AL 1 « or
»VOLUME +/AL 2 « buttons.
Setting the brightness of t
1 Press the »SLEEP/SNOOZE/DIMMER « button
to adjust
lev
TIMER MODE
Setting the time
1 Switc the device to standby with
»ON/OFF « button.
2 Press and hold the » TIME/MODE« button for
two seconds to activate the setting. The current
day d1 «
is Mondayd7 « is Sunday
3 Then TIME/MODE«
setting the current time.
4 Press » TUNING-/MIN« to set the minutes;
5 Press » TUNING+/HR« to set the hours;
6 Press the » TIME/MODE« button again to con-
firm the settings.
Setting the alarm time
1 SwitcON/OFF « but-
ton;
2 Press hold the » VOLUME -/AL 1« button
for alarm 1 or »VOLUME +/AL 2 « for alarm 2;
3 For ex press and hold
»VOLUME -/AL 1 « button to Then the alarm
days will be flashing on the L
Activating and deactiv
1 In standby mode, »VOLUME -/AL 1 « or
»VOLUME +/AL «
with last used alarm settings.
2 For example, if pressed » VOLUME «
ton, the last used alarm time would be displayed;
3 By VOLUME «
button,
the » « and the » « icons.
Sleep timer
1 Press and hold the
»SLEEP/SNOOZE/DIMMER « button for
2 seconds to activate the sleep timer
2 Then repeatedly pr the
»SLEEP/SNOOZE/DIMMER « select
the auto timer fr 90 to 1
minutes.
3
press and hold »SLEEP/SNOOZE/DIMMER «
button
the button again until »OFF « is displayed.
4 Press t TUNING-/MIN« or » TUNING+/
HR« buttons to adjust the alarm days.
5 Press the » VOLUME -/AL 1« button to confirm;
6 Press the » TUNING-/MIN« button to set the
alarm minutes;
7 Press the » TUNING+/HR« button to set the
alarm hours;
8 Press the VOLUME -/AL 1«
alarm 1 settings.
Note:
▪
The
alarm duration is 60 minutes.
Interrupting t
▪
Press » SLEEP/SNOOZE/DIMMER «
the alarm is sounding.
Note:
▪
The
will be sounded again af
Cancelling the alarm
1 Press »ON/OFF « while the alar
Note:
▪
The
alarm time.
SETUP AND SAFET EN
▪
playback
other
▪
(water dr or splashes). Do
not place an vessels such as
vases
be
on t electr components,
thus presenting a safet
▪
Do
such as candles on the device.
▪
all
device
damaged
the mains cable.
Charging a mobile phone
The USB socket the back side pro DC
pow
the
priate
operating modes
to the user manual or the manufacturer of the mobile
phone
pow
only
from a USB stick.
▪
The
bottom of the device.
▪
Do
treme
b
Compliance wit t WEEE Directive
and Disposing of t
This product complies with EU WEEE Directive
(20 This product bears a classif
symbol for
(WEEE).
This
high qualit
can
cling.
with normal domestic and other wastes at
the end of its ser life. T it to the collection
center the electrical electronic
equipment. Please consult your local authorities to
learn about these collection centers.
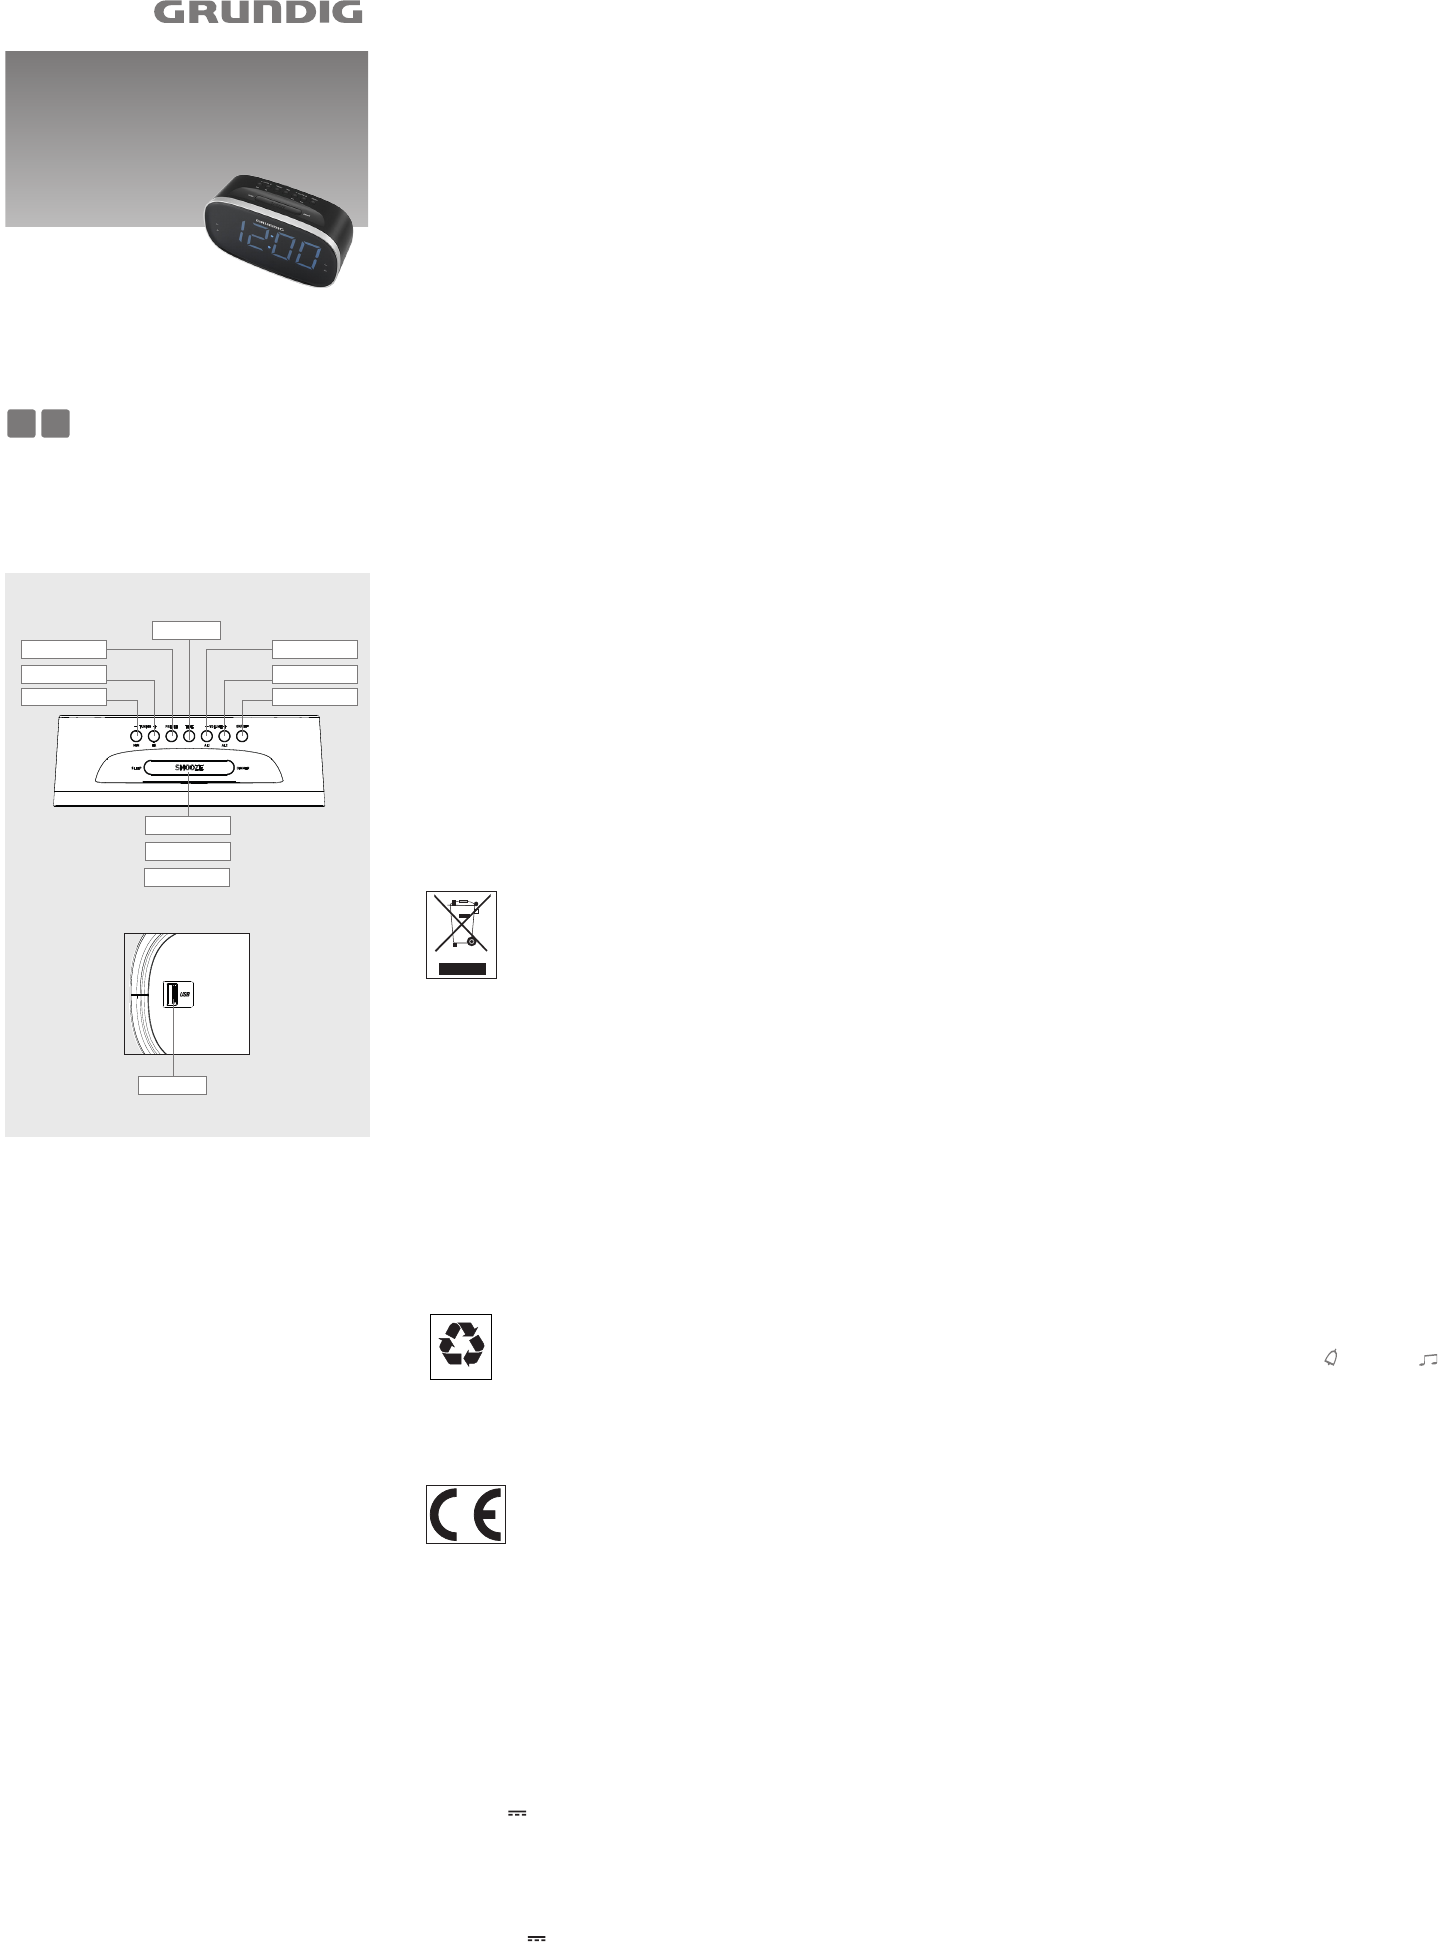
TIME
TUNING+/HR VOL+/AL 2
VOL-/AL 1
TUNING-/MIN
ON/OFF
PRESET
USB
Alway disconnect the mains
cable during a stor
▪
malfunctions occur due to
static
mains
device.
mains adapter and connect it
again af
▪
Mak sure the device is ade-
quately
the
pers, table cloths, cur
▪
When
the -
ture -
ious
most
additives.
SLEEP
SNOOZE
DIMMER